
Messaging in Slate
Slate Training Guide
2023
Table of Contents
Introduction .................................................................................................................................................. 1
Slate Access ................................................................................................................................................... 1
Slate Training ................................................................................................................................................ 1
Slate Campus Support Form ......................................................................................................................... 1
Logging Into Slate .......................................................................................................................................... 2
Slate Tools Overview ..................................................................................................................................... 2
Using Deliver ................................................................................................................................................. 3
Deliver Basics 1: Creating a New Mailing .................................................................................................. 3
Deliver Basics 2: Copying an Existing Mailing ........................................................................................... 8
Deliver Basics 3: Adding a Recipient List ................................................................................................... 9
Import Query......................................................................................................................................... 9
New Query .......................................................................................................................................... 10
Upload Spreadsheet: ........................................................................................................................... 14
Deliver Basics 4: Editing the Mailing ....................................................................................................... 14
Deliver Basics 5: Adding or Replacing Images ......................................................................................... 19
Deliver Basics 6: Adding Links ................................................................................................................. 22
Deliver Basics 7: Editing the Source Code ............................................................................................... 25
Deliver Basics 8: Testing Messages & Displaying a Sample Message ..................................................... 26
Deliver Basics 9: Link and Image Checkers.............................................................................................. 28
Deliver Basics 10: Send Mailing .............................................................................................................. 29
Deliver Basics 11: Delivery and Tracking Reports ................................................................................... 33
Deliver Basics 12: Stopping a Mailing ..................................................................................................... 36
Deliver Basics 13: Mailing Groups (Subscribe/Unsubscribe) .................................................................. 37
Deliver Basics 14: Deliver Troubleshooting ............................................................................................ 39
Best Email Practices .................................................................................................................................... 40
Accessibility ................................................................................................................................................. 41

1
Introduction
Emails play an essential role in student recruitment, retention and engagement. With Slate,
communications can be sent in bulk, individually, scheduled or ad hoc. They can also be sent
sequentially, as part of a drip marketing campaign, with triggers. This guide will help you
navigate the Slate Deliver system and introduce you to the various features the system offers.
Slate Access
If you do not currently have Slate Campus access, please complete the access form request
below:
Slate Campus Access Request Form
There are two types of deliver access levels (permissions) in Slate:
• Campus/Department Communicator role: The UNC central Marketing and
Communications team will work with colleges, departments and units to identify
Campus/Department Communicators, who are trained and designated by central
marketing at UNC to disseminate communications on behalf of their
college/unit/department to UNC students, faculty, staff and more via Slate.
• Communications Assistant role: This refers to staff assisting in the creation but not
dissemination of communications to UNC students, faculty, staff and others via Slate.
Once the communication is created, the department communicator will review, approve
and send the communication.
Slate Training
Note: Before Slate training can occur, please complete the Slate Campus Access Request Form.
Schedule a training session. Training can be provided at the University Advancement office in
Carter Hall or through Teams. Just let us know; we are always happy to accommodate!
Schedule a Slate Campus Deliver Training.
Have a quick question? Contact Marketing and Communications @ [email protected].
Slate Campus Support Form
If you need help with an existing email, creating your email recipient list or need a report,
please complete the Slate Campus Support Form. If you want to create a new one-time mailing,
marketing campaign or need email graphics for Slate mailings, please complete the Project
Request Form.
2
Logging Into Slate
Once your access has been granted, you can log in by going to:
https://enrolled.unco.edu/manage/. Once you log in, you should see the Slate homepage
pictured below.
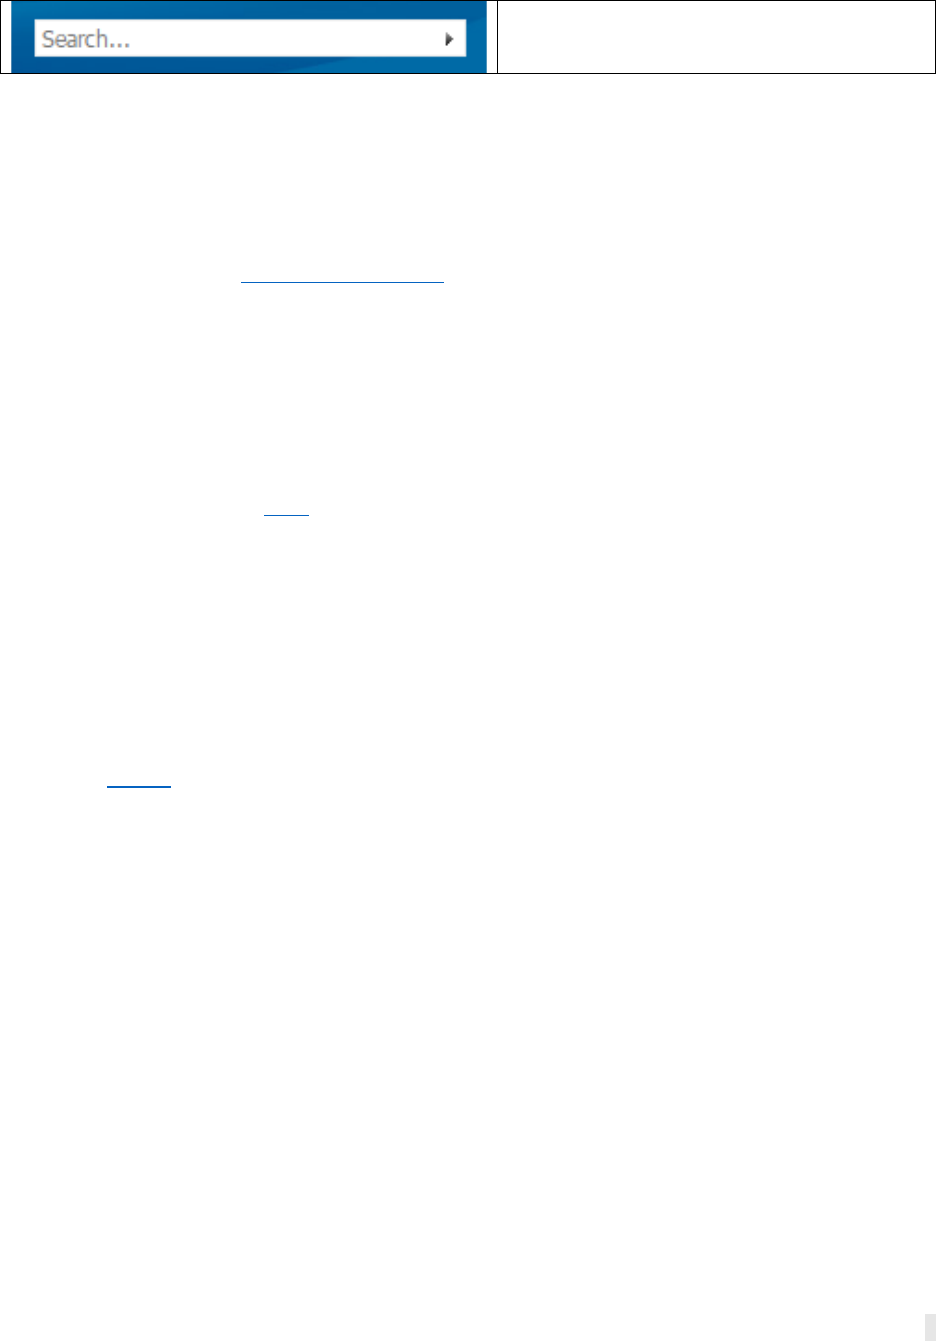
Slate Tools Overview
When you first log in to Slate (https://enrolled.unco.edu/manage/), you will see the dashboard
header, pictured below.
The dashboard houses many useful tools, which are outlined in the table below:
Records: Used to search the database and
access the student and employee records.
Queries/Reports: Used to pull information
from the database using specific search
criteria and filters.
Reader: Organize application materials
within the Reader. When a tab is selected,
the associated materials will appear in the
Reader.
*Deliver: used to send customized
mailings to students/employees.
Inbox: Houses messages routed into Slate.
Forms: Allows users to create forms to
gather information about students,
applicants or staff members within Slate.
Events: Used for scheduling events,
enabling registration and more.
Interviews: Used for scheduling
interviews.
Database: Where data is stored within
Slate.
This is also where users can access the
educational and support resources located
in Discover Slate.
3
Search: Used to search for
students/employees.
*Note. This training guide will focus on the Deliver Tool only.
Using Deliver
The Campus/Department Communicator, as defined above, must submit their request for email
distribution through the project request form with the message send date, time and audience
at least 24 hours before the desired distribution.
The central Marketing and Communications team will review the UNC’s global communications
calendar that they manage and maintain and select a date and time as close to the original
request as possible, ensuring that overlapping communications do not occur to the same
student populations. Failure to put in an email request with the central Marketing and
Communications team for scheduling can result in restricted or removed access from
Slate. Submit your request here. Under “What do you need support with?” select “Approval to
send an email at a certain date(s) and time(s)”. For “What are the date(s) and time(s) you prefer
to send your email(s)?” list the date(s) and time(s) you would like your email(s) sent.
This section explains how to access and build your emails into the ideal messages for your
intended audience.
Deliver Basics 1: Creating a New Mailing
Watch the VIDEO for an overview of Slate Deliver. Now let’s get started!

4
Step 1: Click on the Deliver Icon (megaphone) and select Mailings.
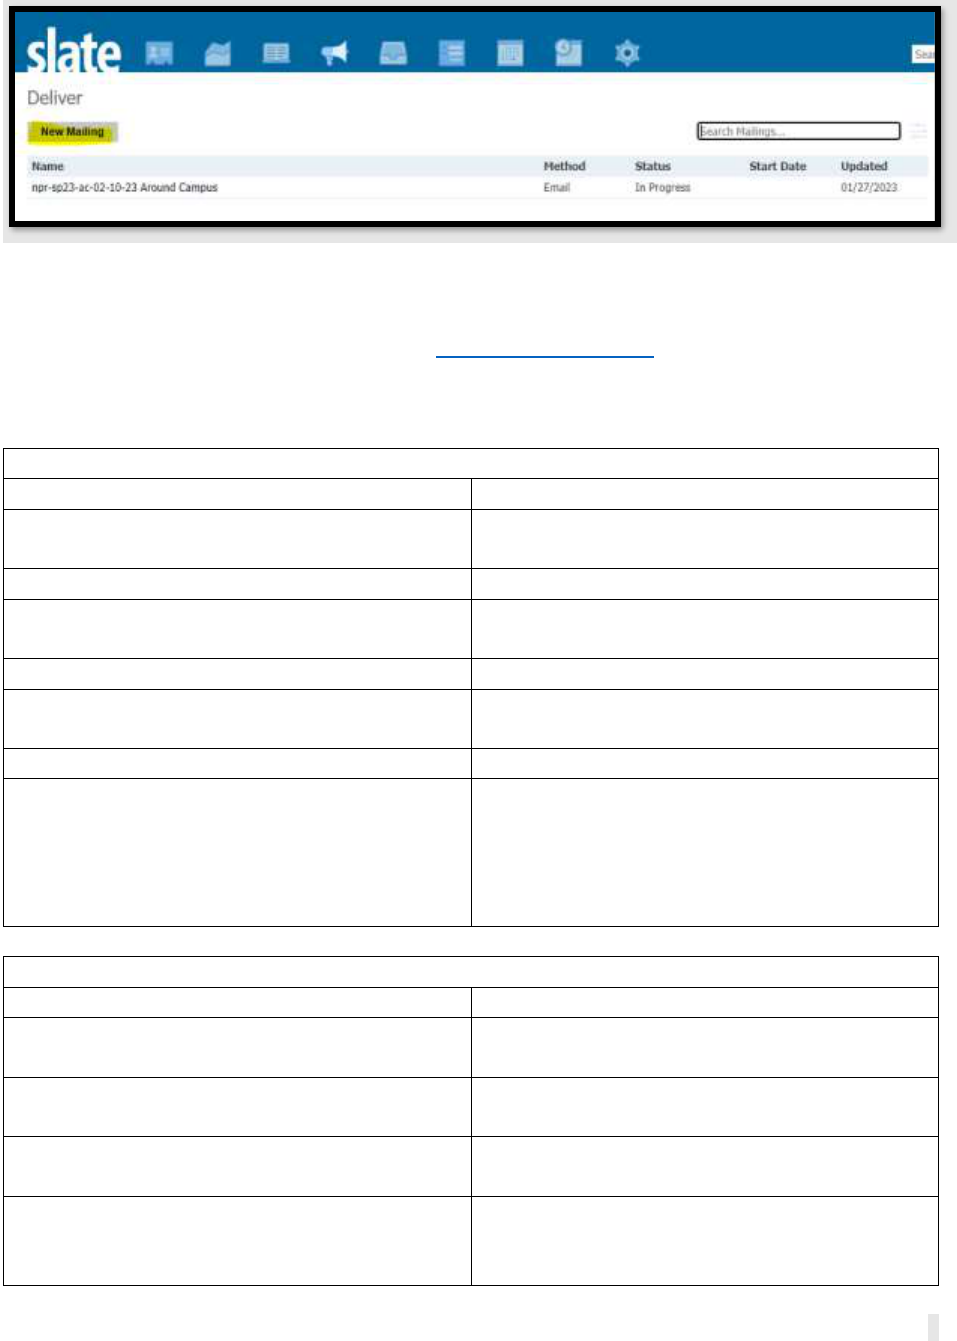
Step 2: Here you will find a complete list of all current mailings. Use the Folders and Subfolders
in the right-hand column to locate messages. From here, select your department/college/unit’s
name from the right-hand side under Folders.
Step 3: After selecting your Folder and Subfolder, you’ll find all your emails. From here you can
copy an existing mailing, edit the mailing or create a new mailing. Click on “New Mailing” to
create a new email.
5
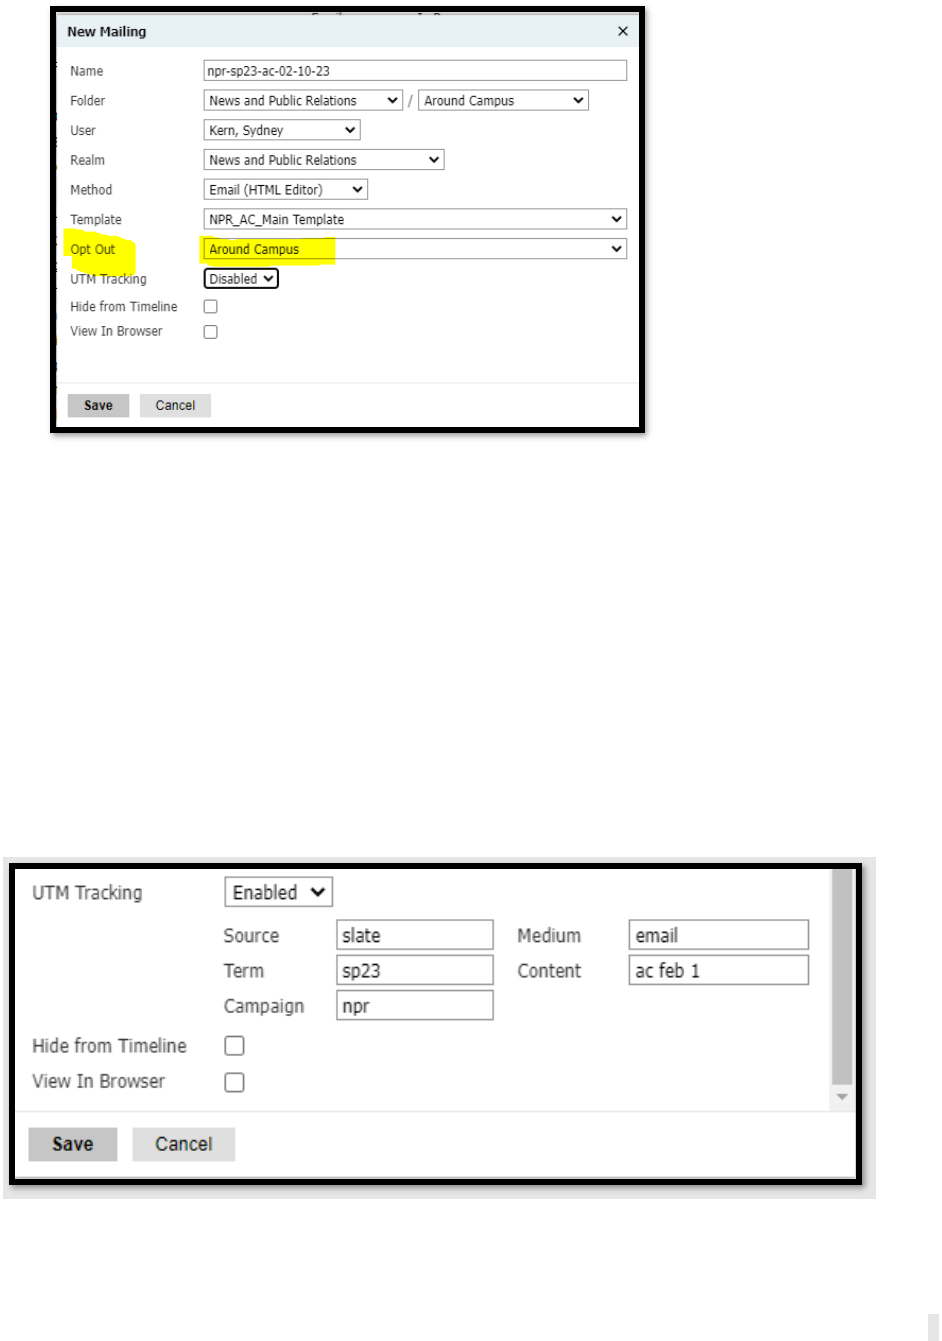
Step 4: Create a new mailing using a standard naming convention for the name and folder. For
guidance on naming conventions for mailings, folders and subfolders, see the table below. If
you still have questions, please reach out to mark[email protected].
Name: Give the new mailing a descriptive name so it can be found quickly using UNC’s standard
naming convention. Follow the following naming conventions outlined in the chart below:
Naming Convention Mailings
Drip Campaign (Multiple Mailings)
One-Time (AKA Ad Hoc) Mailing
Department abbreviation (e.g., ofa, reg, bur,
npr)
Department abbreviation (e.g., ofa, reg, bur,
npr)
Term and year (e.g., sp23, su23, fa23)
Term and year (e.g., sp23, su23, fa23)
Campaign (e.g., FAFSA, REGISTRATION,
BURSAR, HOUSING)
Email number (e.g., EMAIL 1, EMAIL 2)
Email description (e.g., important-dates,
open-soon, sign-up-bear-pay, etc.)
Email description (e.g., important-dates,
open-soon, sign-up-bear-pay, etc.)
Date Sent (e.g., 02-10-23)
Date Sent (e.g., 02-10-23)
Examples:
ofa-fa21-FAFSA-EMAIL 1-important-dates-09-
01-23
reg-sp22-REGISTRATION-EMAIL 1-open-soon-
10-1-23
Examples:
npr-sp23-ac-02-10-23
bur-fa21-sign-up-bear-pay-09-13-22
Naming Convention Folders
Folder Name
Subfolder Name
Office of Financial Aid
2021-2022
2022-2023
Office of the Registrar
2021-2022
2022-2023
Office of The Bursar
2021-2022
2022-2023
News and Public Relations
Around Campus
UNC Today
UNC Today BOT
6
University Announcement
Weekly Media
o Folder: Keep your communications organized by putting them in a folder. ALWAYS place
the mailing in your folder and subfolders (see table above for guidance).
o User: This value defaults to the user who is currently logged in.
o Realm: Select your department’s name for the realm – this will allow only users who
have this realm to access this mailing.
o Method: The only method that is configured for use is:
▪ Email (HTML Editor): This is the only method approved for use – there is no
charge for using this method.
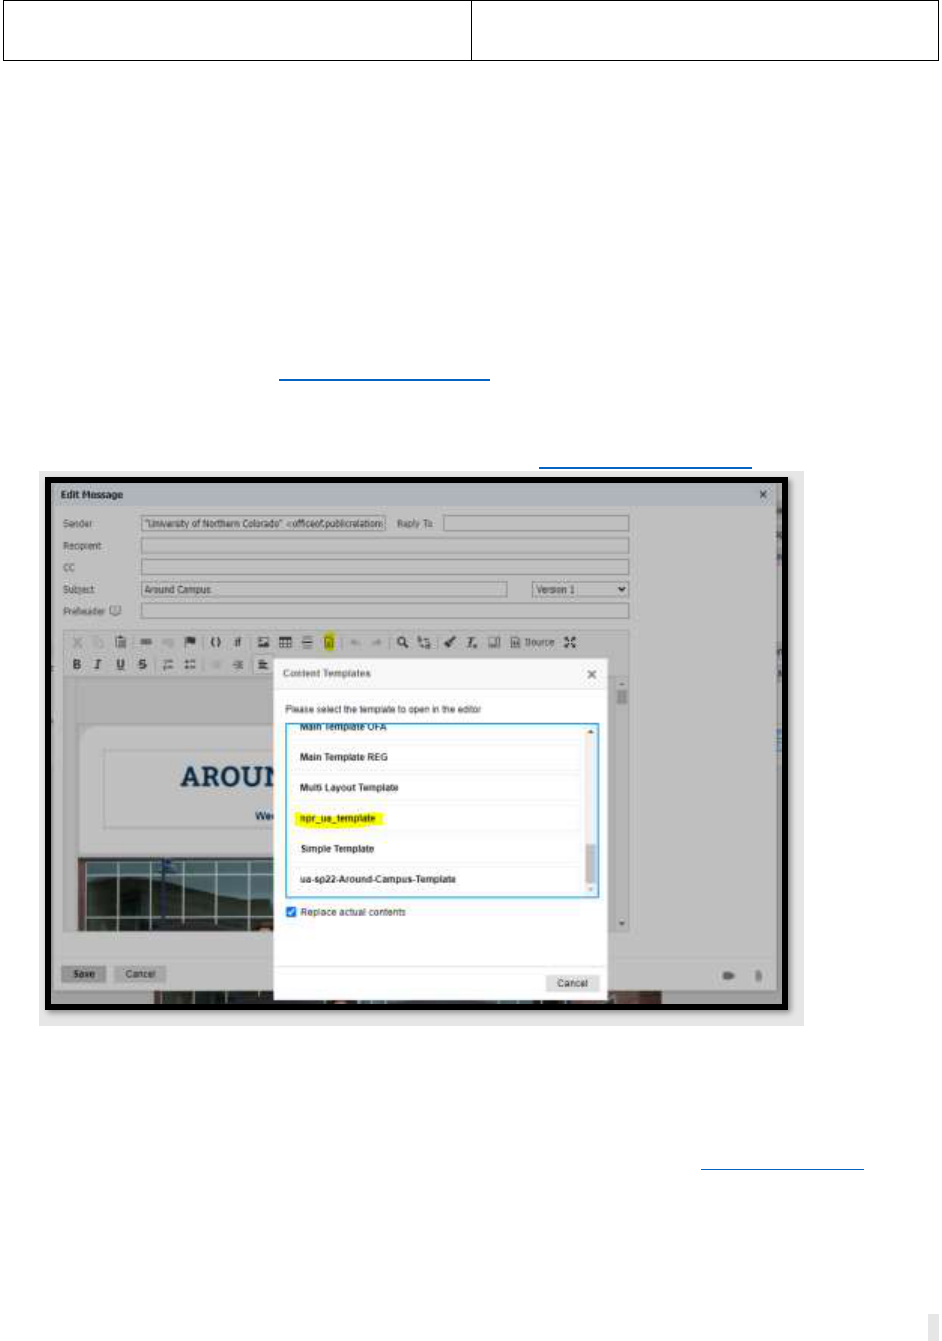
o Templates: Select the template you like to use – if you need a new template created,
please complete the Project Request Form. UNC-branded templates have been created
for your use and are housed in the templates folder. We highly encourage you to use
Templates to make the branding consistent across all your messages and to limit source
coding frustrations. For questions, reach out to [email protected].
o Opt-Out: Select your opt-out group from the drop-down. This will allow the recipient to
opt-out from specific messages from your college/department without opting out of all
UNC messages (see below). Some messages are transactional and, therefore, cannot be
opted out of. For more information about opt-out groups, go to Deliver Basics 13.
7
o UTM Tracking: Set message-level UTM parameters from this view that are inherited by
all URLs in your message. If your message has one Call to Action (CTA), the central
Marketing and Communications Department recommends using this feature. If UTM
tracking is enabled, codes are appended at the end of any URL to track clicks and
performance of these communications.
▪ Source: (Slate)
▪ Term: (Current semester + year)
▪ Campaign: (Specific campaign the email belongs to, or, if not part of a campaign,
use your department name/abbreviation)
▪ Medium: (Email)
▪ Content: (Description of the email)
See the screenshot below:
o Hide from Timeline: Leave this box unchecked. If selected, the communication will not
appear on the timeline of the receiving record.

8
o View in Browser: Leave this box unchecked. This enables a merge field for embedding a
“View in Browser” link in the communication. The link allows the recipient to open the
message independently in a browser. If this option is selected, an Expiration Days field
appears to define the number of days the link will function before expiring.
Deliver Basics 2: Copying an Existing Mailing
To copy a message, go to the mailing you would like to copy, open the mailing and click on Edit.
Then, click on “Copy Mailing”.
Give the message a name following the naming convention outlined above and click Save.
9
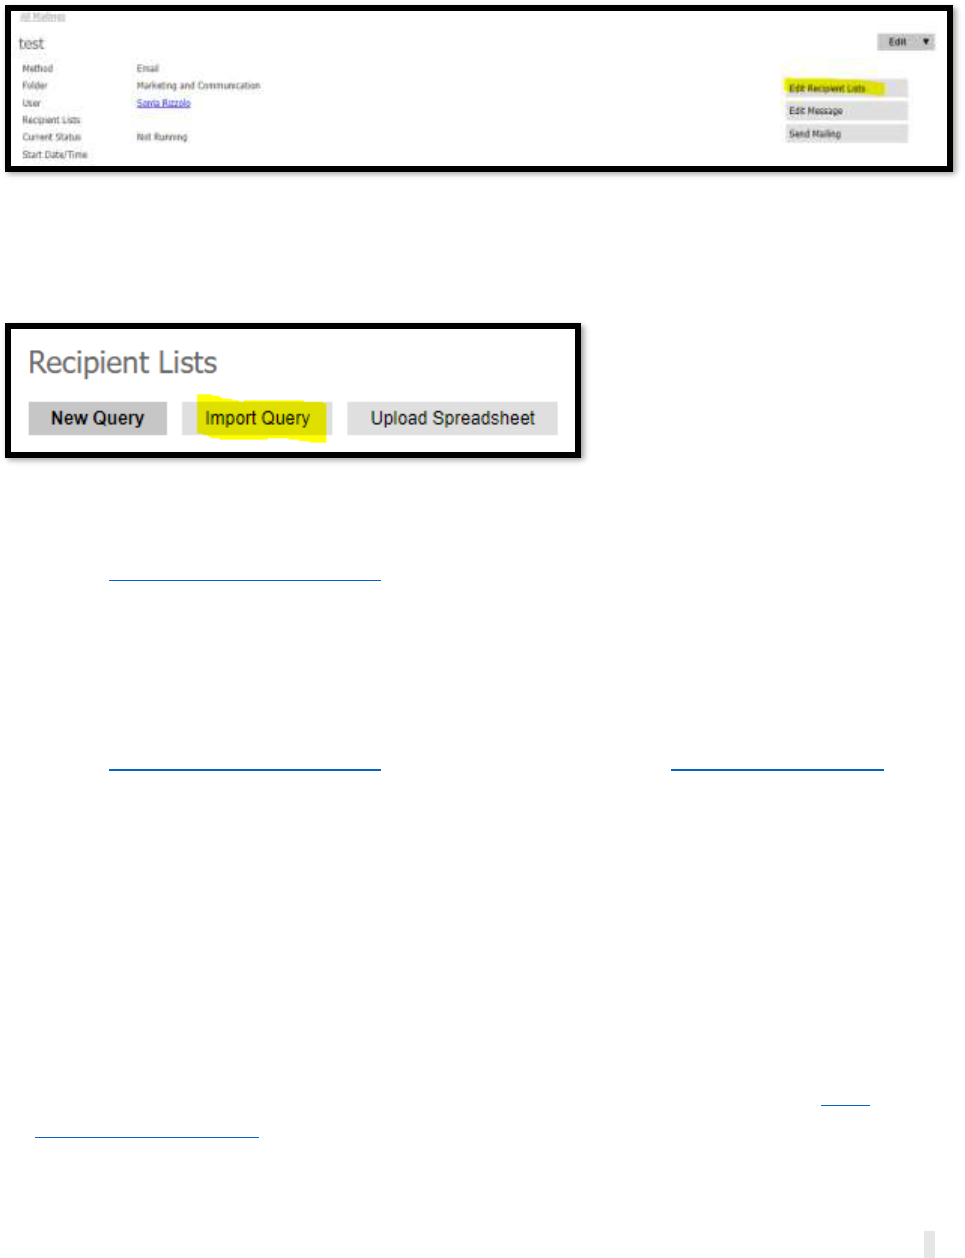
Deliver Basics 3: Adding a Recipient List
Click on the “Edit Recipient Lists” to add a mailing list or lists to the deliver message.
The recipient list(s) is recipients who will receive the message. It will also let you add your
exports/merge fields. The recipient list is referred to as a Query. Central Marketing and
Communications recommends using number 2, Import Query listed below:
1. New Query – Use the New Query option to generate a list of recipients by constructing a
Live Query. This option will let you create your own query. This can be complex – fill out
the Slate Campus Support Form if you need assistance. We highly recommend you
import a template query (see 2 below). These template queries already have the correct
filters and exports created.
2. Import Query – Use the Import Query option to select a query previously created and
saved using the Query tool. Here you can find templates specifically created for your
unit/department. If you need to communicate to a different audience, please submit
3. Upload Spreadsheet – Use this option as the LAST RESORT. Use the upload spreadsheet
option to add an Excel spreadsheet with recipient information. Slate strongly
discourages this option unless necessary and there is no other way to access these
recipients. Always try to do a live query when possible.
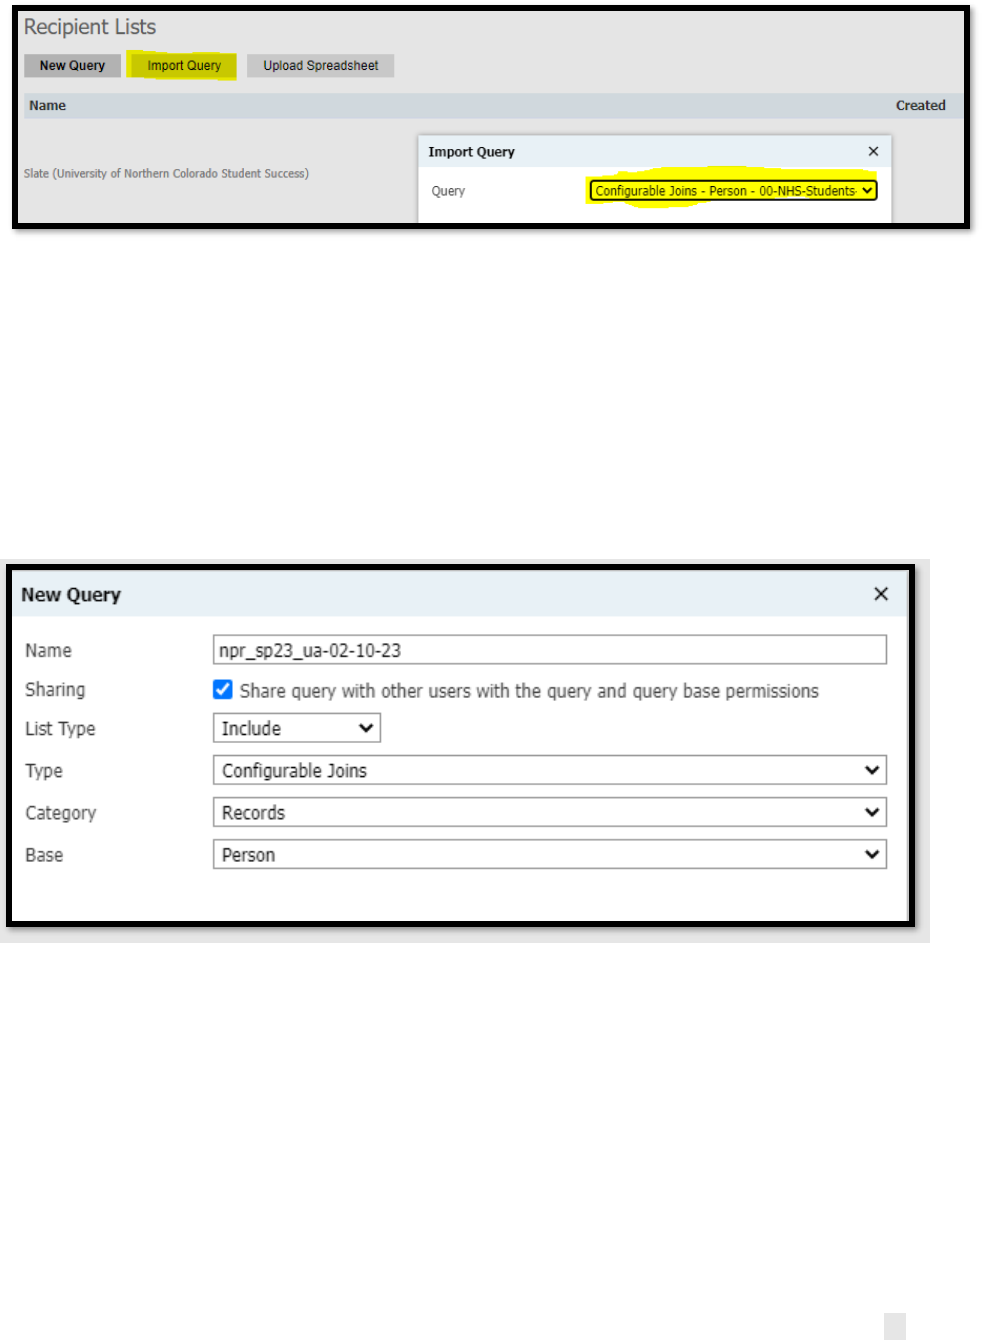
Import Query: this will allow you to import a previously created query. We strongly
encourage you to import a template query specifically developed for your office since
they already have the correct filters and exports created. All template queries will start with
“unit name”- “audience”- “details audience” e.g., NHS-Students. This query will provide a
list of registered NHS students. The query “NHS-Employees" will provide a list of current
NHS employees. If you need additional template queries, please submit the Slate
Campus Support Form.
10
New Query:
o Name: copy the name of the mailing and use that for the name of the recipient list
o Sharing: check the checkbox so the query is shared with other users
o Type: Select Configurable Joins
o Category: Records
o Base: Typically Deliver messages should use one of two bases:
▪ Person: If the mailing should go to current students.
▪ Employee: If the mailing should go to employees.
o If you need to send a mailing to Students and Employees, create two recipient lists –
one for each base listed above.
How to Narrow Down the Recipient List
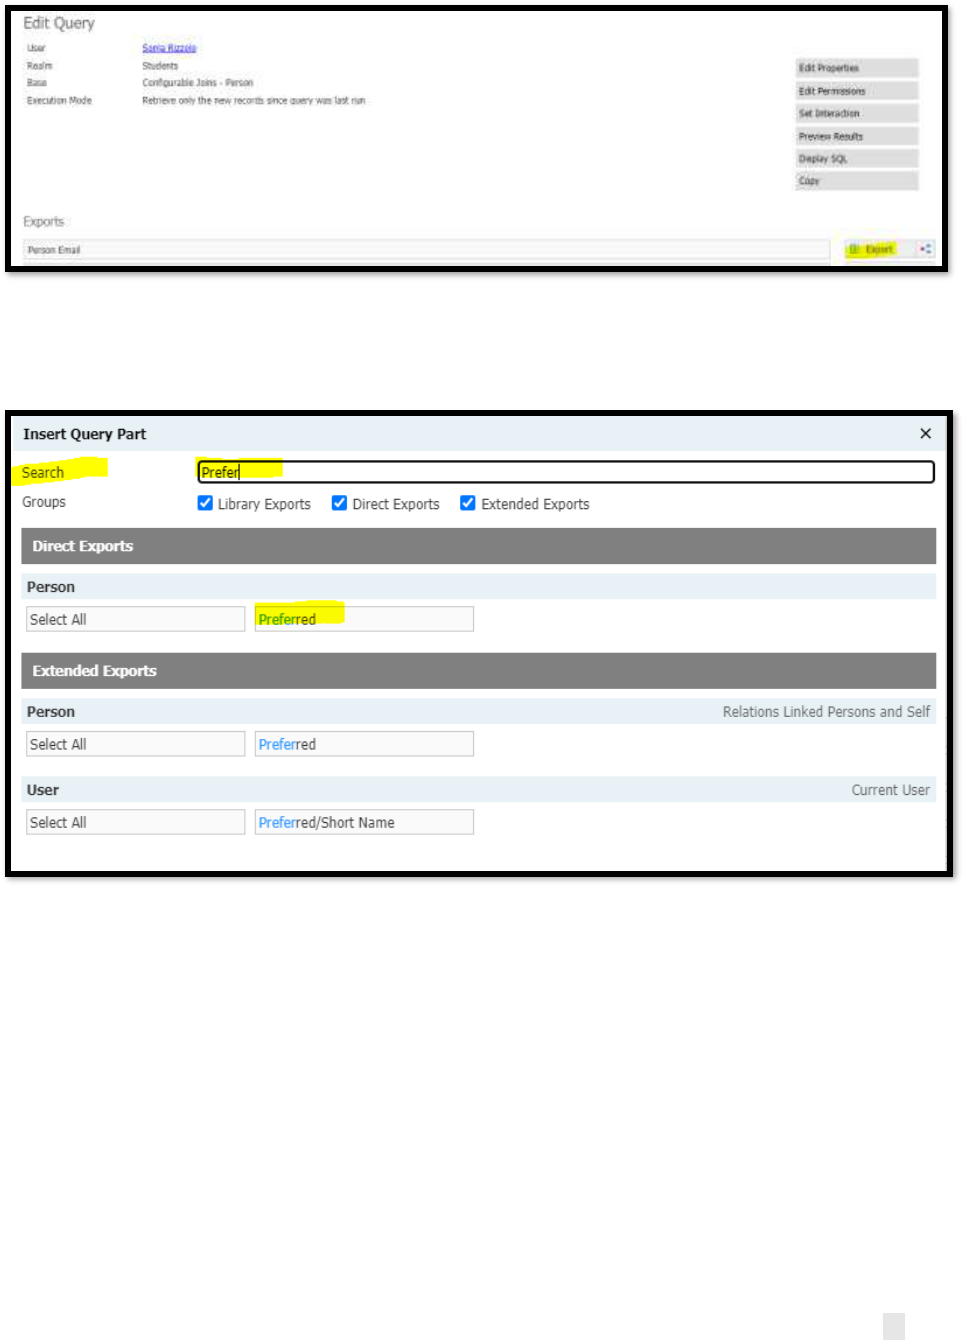
Adding your Exports/Merge Fields
Think of your query as an Excel spreadsheet. You can add your exports by clicking on the
Export button on the right-hand side.
11
Use the search bar to search for specific filters such as the ones listed below (e.g., Person
Email, Person Preferred, etc.) and select the export listed under direct exports.
Exports you add from top to bottom will appear like column headings in your Excel
spreadsheet from left to right. You must include anything you want to merge into your
mailing as an Export (e.g., Email, Preferred first name, Last name).
o Here is a list of common exports from the Configurable Joins - Person base.
▪ Person Email
▪ Person Preferred* (this is their preferred first name and should be used
instead of their first name)
▪ Person Last (name)
▪ Class Level
o Here is a list of common exports from the Configurable Joins - Employee base:
▪ Employee Preferred First (name)*
▪ Employee Last (Family) (name)
▪ For email you will have to join with “Device by type, Rank.”
12
*Note. If a student or employee does not have a preferred name, Slate will pull in their first
name automatically.
Drag and drop to arrange the exports in whatever order makes the most sense to you. The
order does not matter for your message to be able to merge in these fields. Note: when in “Edit
Message,” the order of your exports will appear in alphabetical order on the right-hand side.
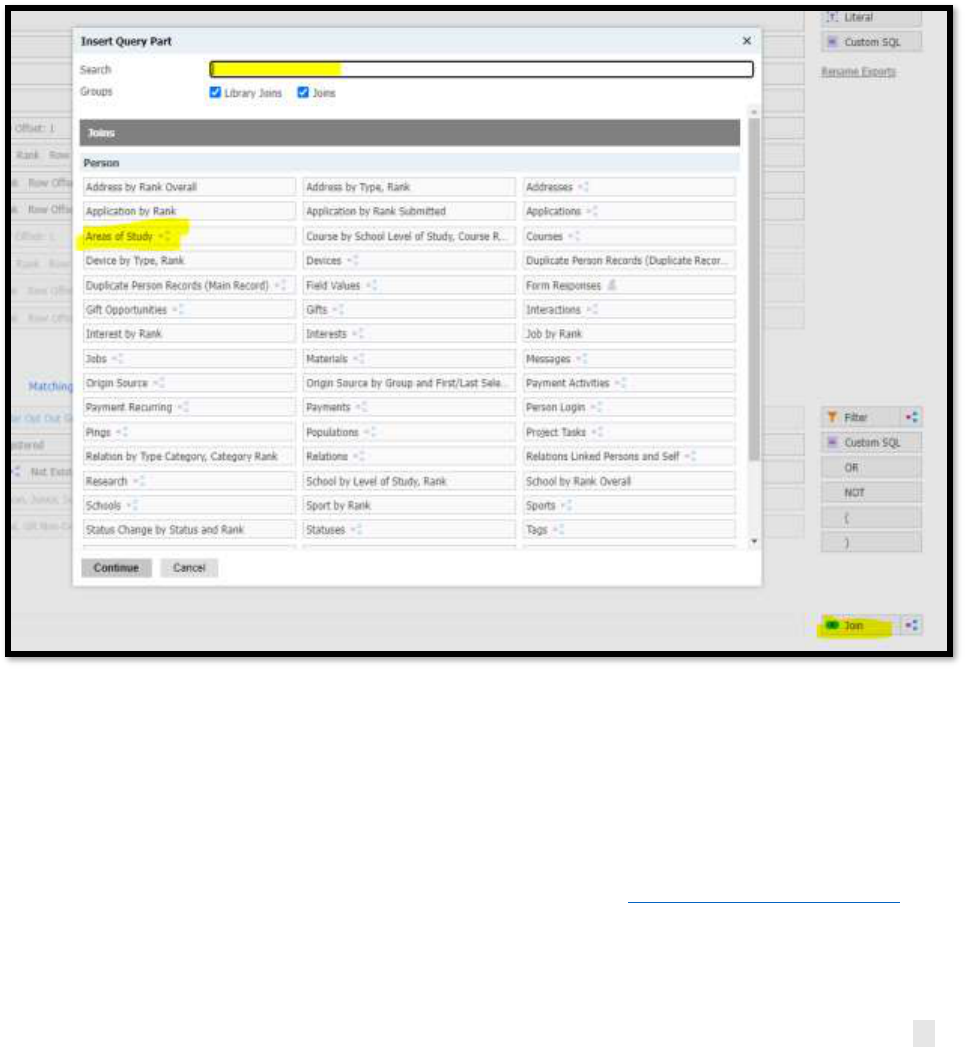
If you want additional information about, for example, their college or program, you will have
to join with an additional table e.g., Area of Study. Click on the Join field button at the bottom
right corner and search for the join you would like to make or select it from the joins listed.
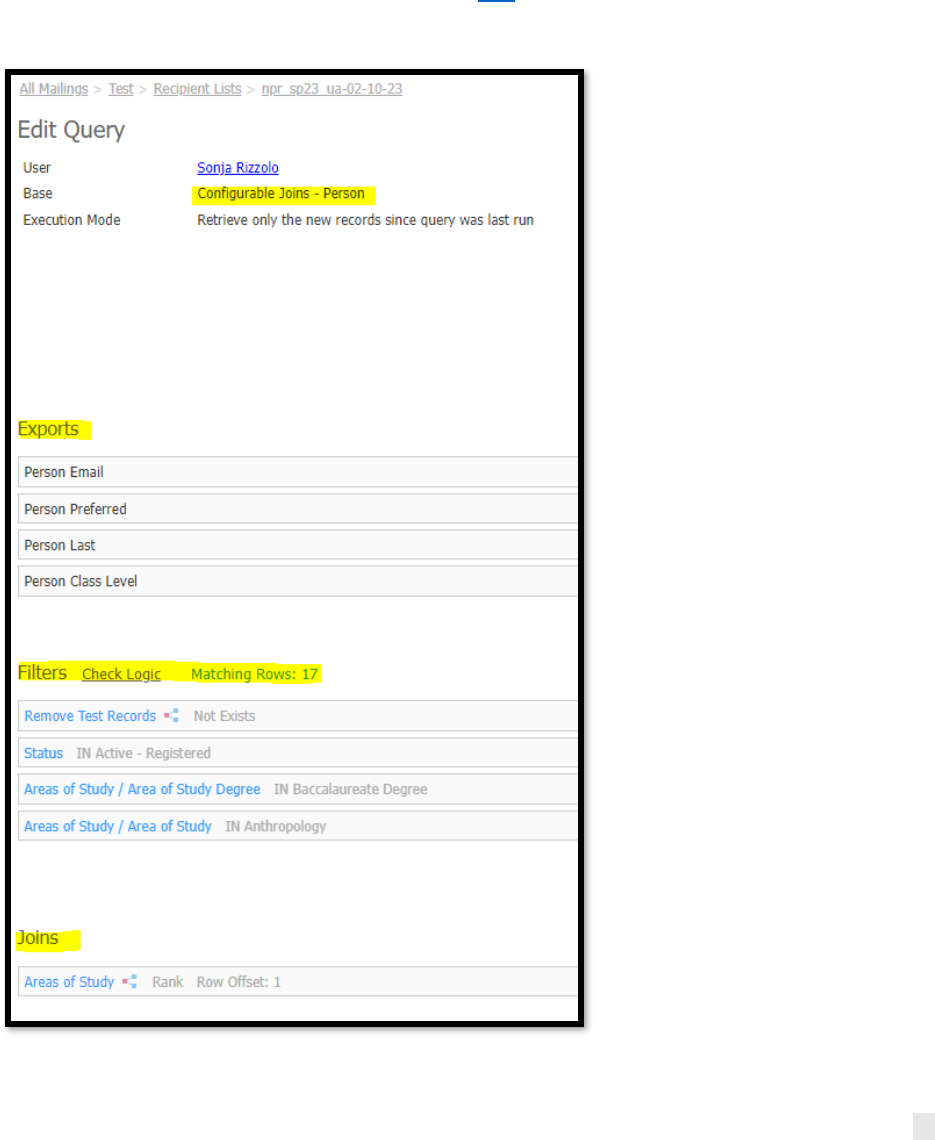
Filters = Who should receive the message
Add additional filters to narrow down your results. Just like Exports, you’ll need to search here
and figure out which ones work best for you.
Matching Rows = Amount of results that the query will return. Add more filters to increase or
decrease this number.
If you are stuck or need help with your query, please submit the Slate Campus Support Form
including the link to your query and a description of exactly what you’re trying to filter down to
and we’re happy to help. We can also check a recipient list query for you if you provide details
about who the intended audience is.
13
If you need to exclude a large group of recipients from a non-recurring mailing (e.g., if you
create a new version of a mailing that has already been going out, and you need to exclude
everyone who got the previous version of the mailing), you can simply Run Query and DO NOT
delete the query run. This will exclude that group of people from this mailing.
Joins = What other fields do you need to pull in:
If you cannot find the filter you are looking for, a join will allow you to connect with a different
data table that does have that information.
14
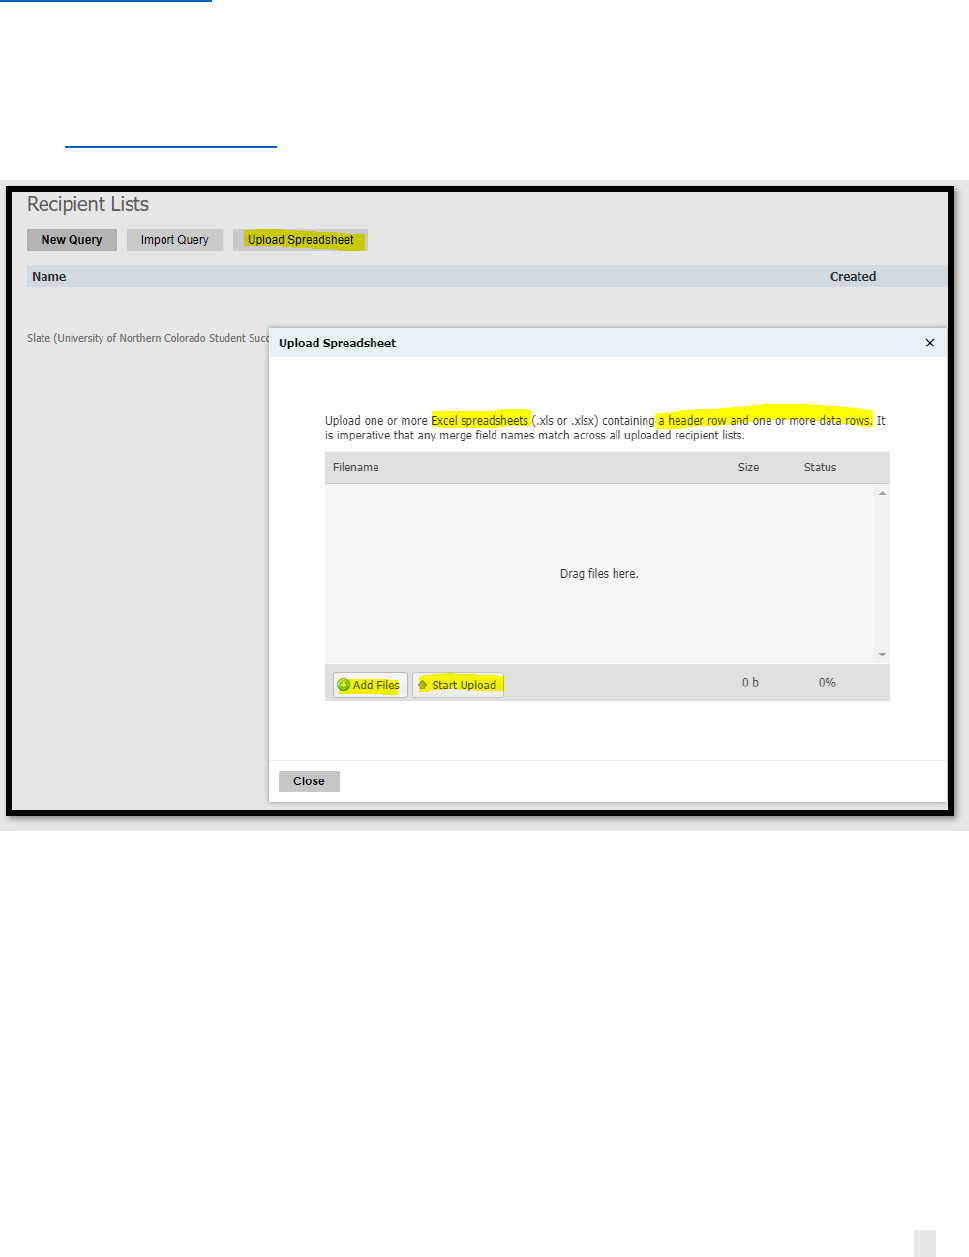
Upload Spreadsheet:
Use this as a LAST resort only. Before loading any data into Slate, please reach out to
[email protected]. The column headers become your merge field. This is the LAST Resort
and is only to be used when a live query cannot be used to find the recipients. For example, if
you are pulling in a contact list of those who have purchased tickets to a UNC event from a
third-party platform, you will need to upload that Excel document of contacts into Slate to
communicate to that audience through Slate. Before loading any data into Slate, please reach
out to [email protected].
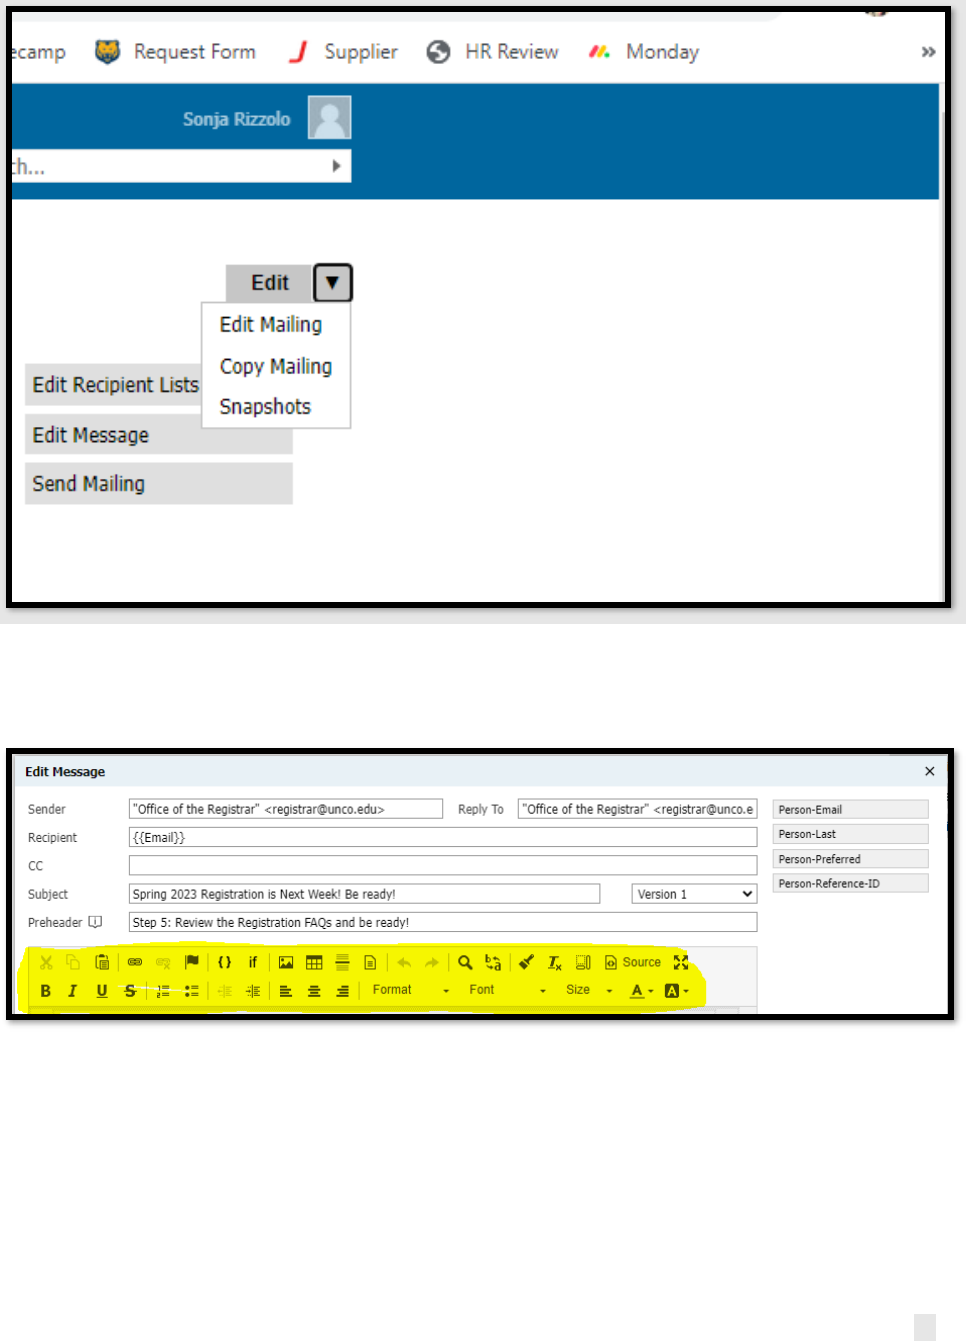
Deliver Basics 4: Editing the Mailing
o Click your mailing and the Edit Message button in the right-hand column to edit your
email copy.
15
• You are now in the Message Editor. As you can see, Slate offers lots of tools to help you
build messages.
o Sender:
o From Name: Do not send emails from your name, rather, use the official name of
your office/department/business unit. For example, “Office of Financial Aid”,
“Bursar’s Office.” “College of Performing and Visual Arts”. Do not use
abbreviations such as SAES, OSO, except for commonly known acronyms such as
College of Natural Health and Sciences (NHS). Those who are members of the
Cabinet, Deans of Colleges and at the Vice President level can send emails with

16
their personal name identifier and title such as: “NHS Dean Kamel Haddad,” or
“Cristina Giletti, PVA Dean.”
o From Address: Use the official email address of your department, office or unit.
For example, [email protected] or [email protected].
Examples
“Division of Diversity, Equity and Inclusion” <[email protected]>
“Athletics” <[email protected]>
“Instructional Design” <[email protected]>
“Libraries” <[email protected]>
o Reply To: Use quotation marks around the text you want the student to see (your
department name). Place greater than and less than signs around your email address,
o Recipient: Double-click on the email field listed under the exports. For the email field to
show up and work, it needs to be chosen in the recipient list as an export.
o Subject Line: When titling your message, we recommend limiting it to under 50
characters. Subject lines longer than this are too large for cell phone screens and will be
cut off. You MUST fill out the subject line to Save your message.
o Preheader: Add a preheader. The preheader is what shows up in your inbox under the
subject line, such as a preview line. Keep this text to under 100 characters and ensure
the message relates to the subject line.
Here is an example of how a subject line and preheader will display:

17
Now that you have the mailing information set up, it’s time to begin building your message. Use
the text editor to begin writing it, and make sure to utilize the exports/merge fields in the right-
hand column to personalize the message by adding things such as preferred name.
Slate offers many excellent tools to help you build and/or edit your messages. You do not need
to be an expert in every single one, but knowing how to use each can help you develop your
email messages. The next few pages will delve into these tools.
o Exports (merge fields) is Slate’s term for dynamic data. You can find all your exports
listed in the right-hand column of the editor. These are the exports you have chosen
when building the recipient list. The exports in the example above are Person-Email,
Person-Last, Person-Preferred and Person-Reference-ID (Bear ID). These are especially
18
easy to use. Simply click on an export and it will appear wherever you placed your
cursor. They are indicated by double curly braces around them, e.g. {{Preferred}} merges
in the recipient’s Preferred Name (if no preferred name exists, then it merges in the
First Name). You determine your merge fields when you create or upload your recipient
list. To see how they will look in the email, save your message and it will populate the
merge fields. If you want to look at a particular student or employee, click on Display
Sample Message and either type the name or Bear ID in the record field, then click on
display to preview the message with the populated merge fields.
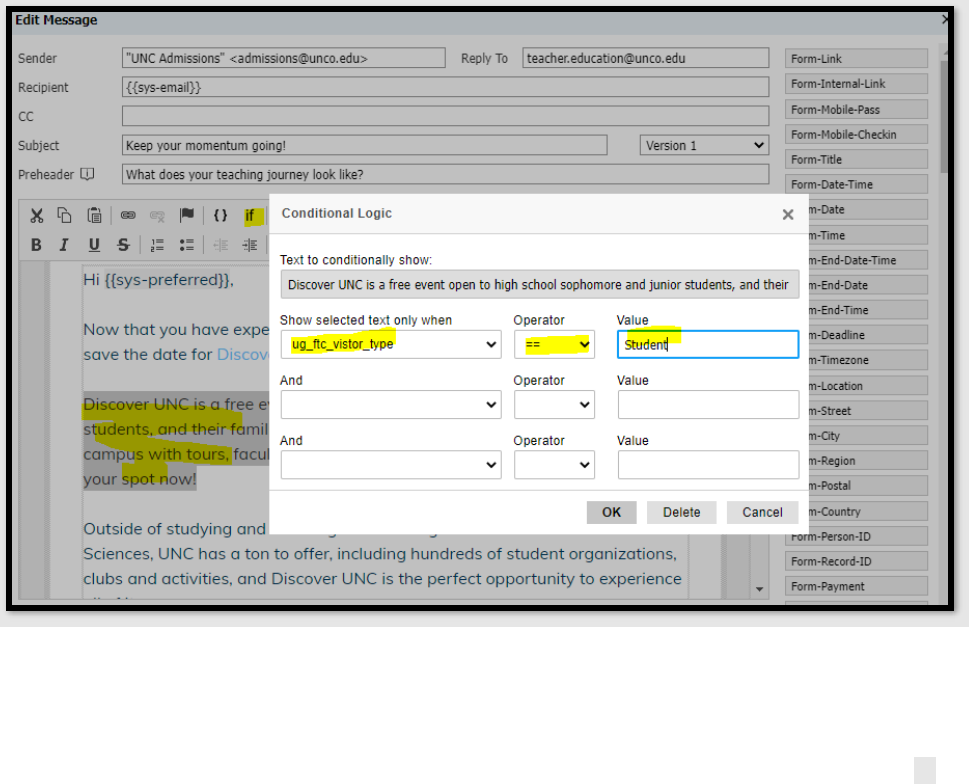
o Liquid Markup and Conditional Logic: Utilize these if you want to display different
content for different segments of your population e.g., students will need to see the
first sentence and everyone else will need to skip the first sentence and only see the
second sentence (see example below). There are two ways to add conditional logic:
o Highlight the text you want to conditionally display and click on the “if” (see
below), then select the “merge field”, “operator ==” and “value” as whatever
population the selection will be visible to, for example, “student”. See the
example below.
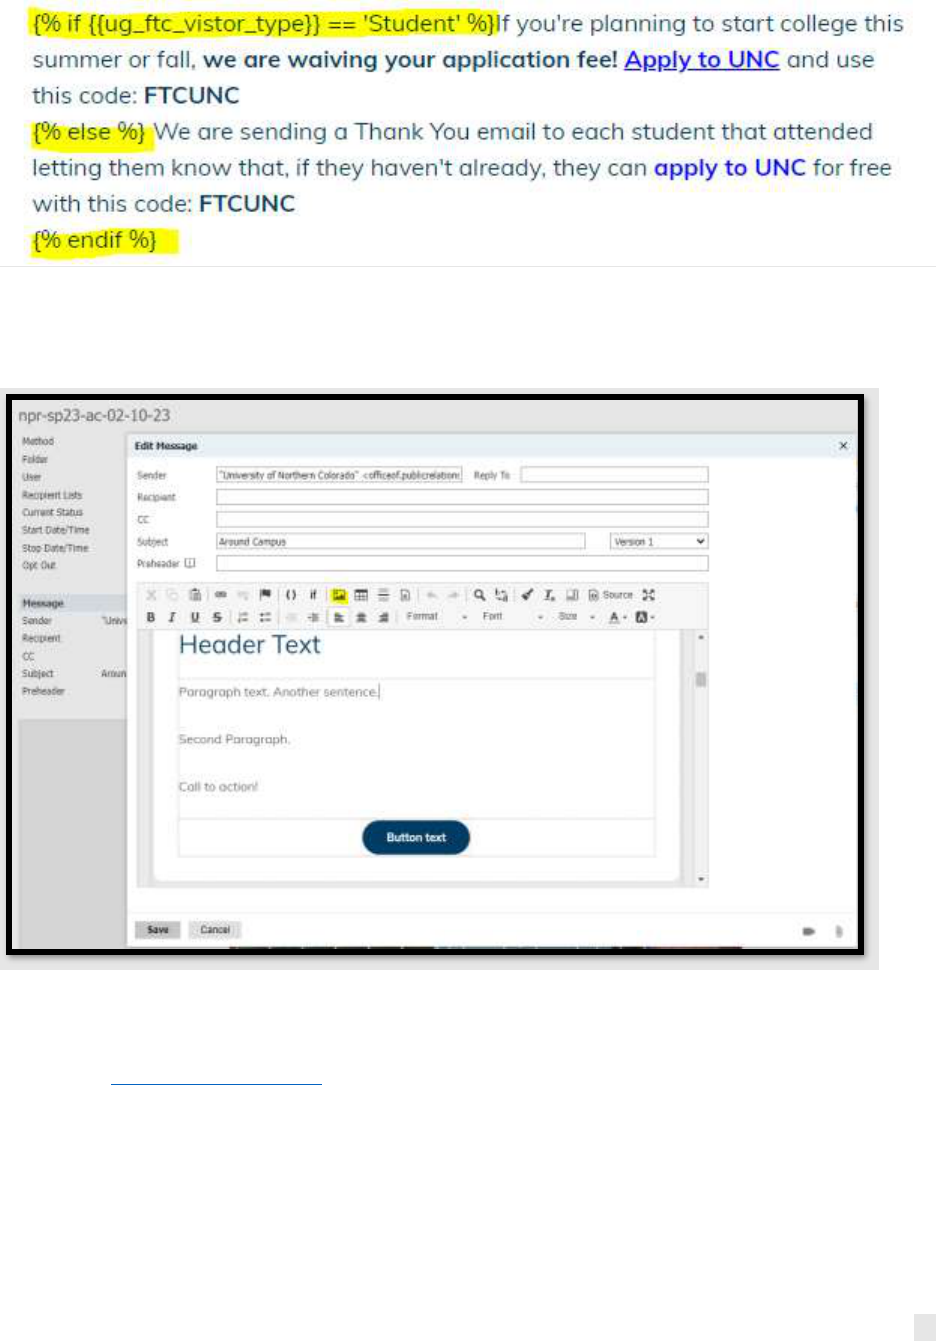
o The more advanced option is to click on “Source” and add the coding to the
source code.
19
Deliver Basics 5: Adding or Replacing Images
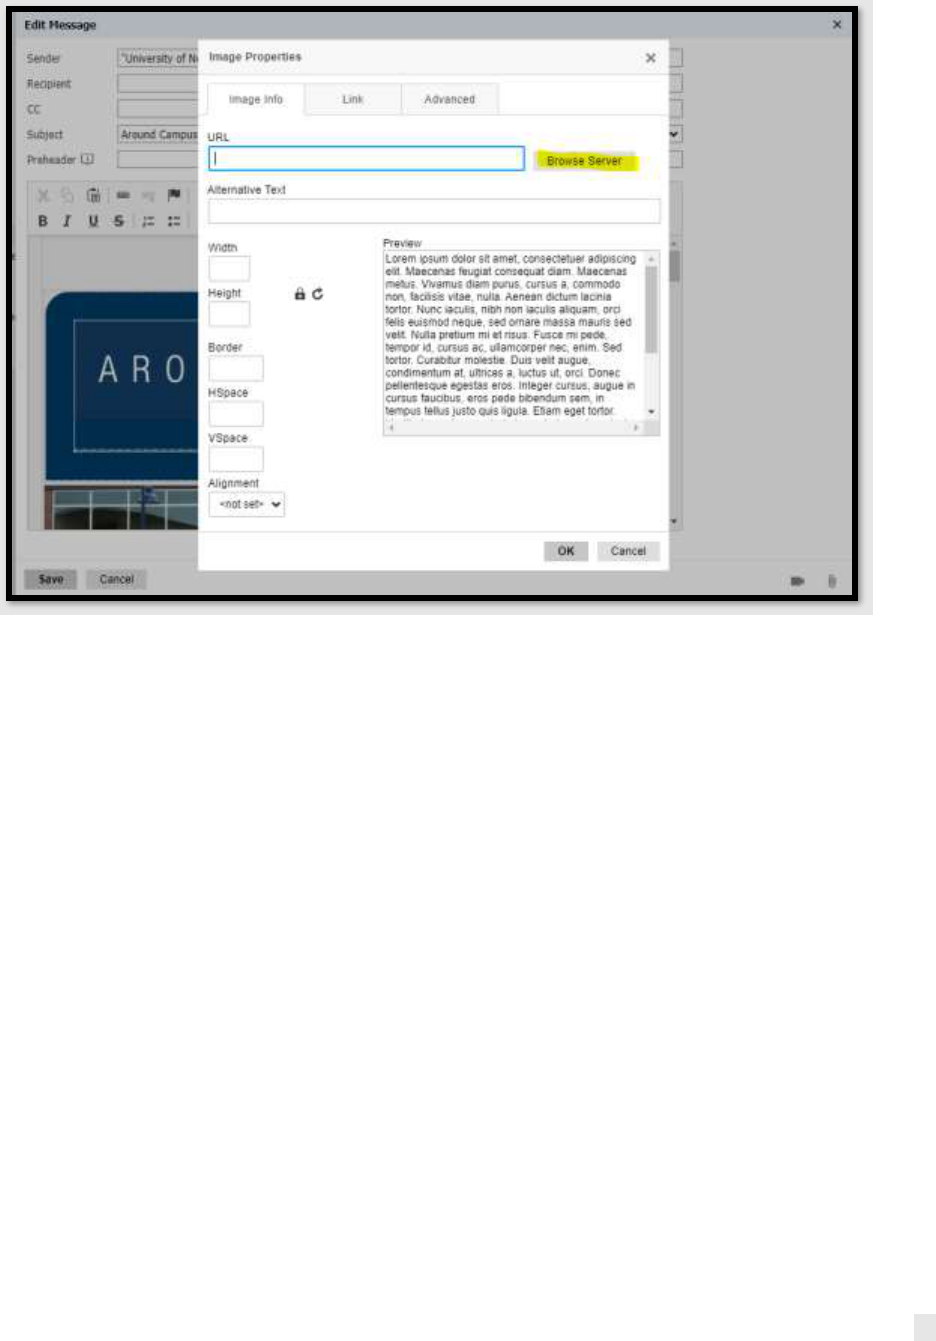
To add an image in Slate, go to your mailing and select the image icon located near the center of the
toolbar. To replace an image in Slate, double-click on the image.
From the Image screen, select “Browse Server”. Click on “00-DEPARTMENTS” then your
subfolder to find your images for use. If you can’t find the image you are looking for. Please
submit the Project Request Form.
20
Here you can choose from the images available on the server. Simply double-click the image
you wish to use.
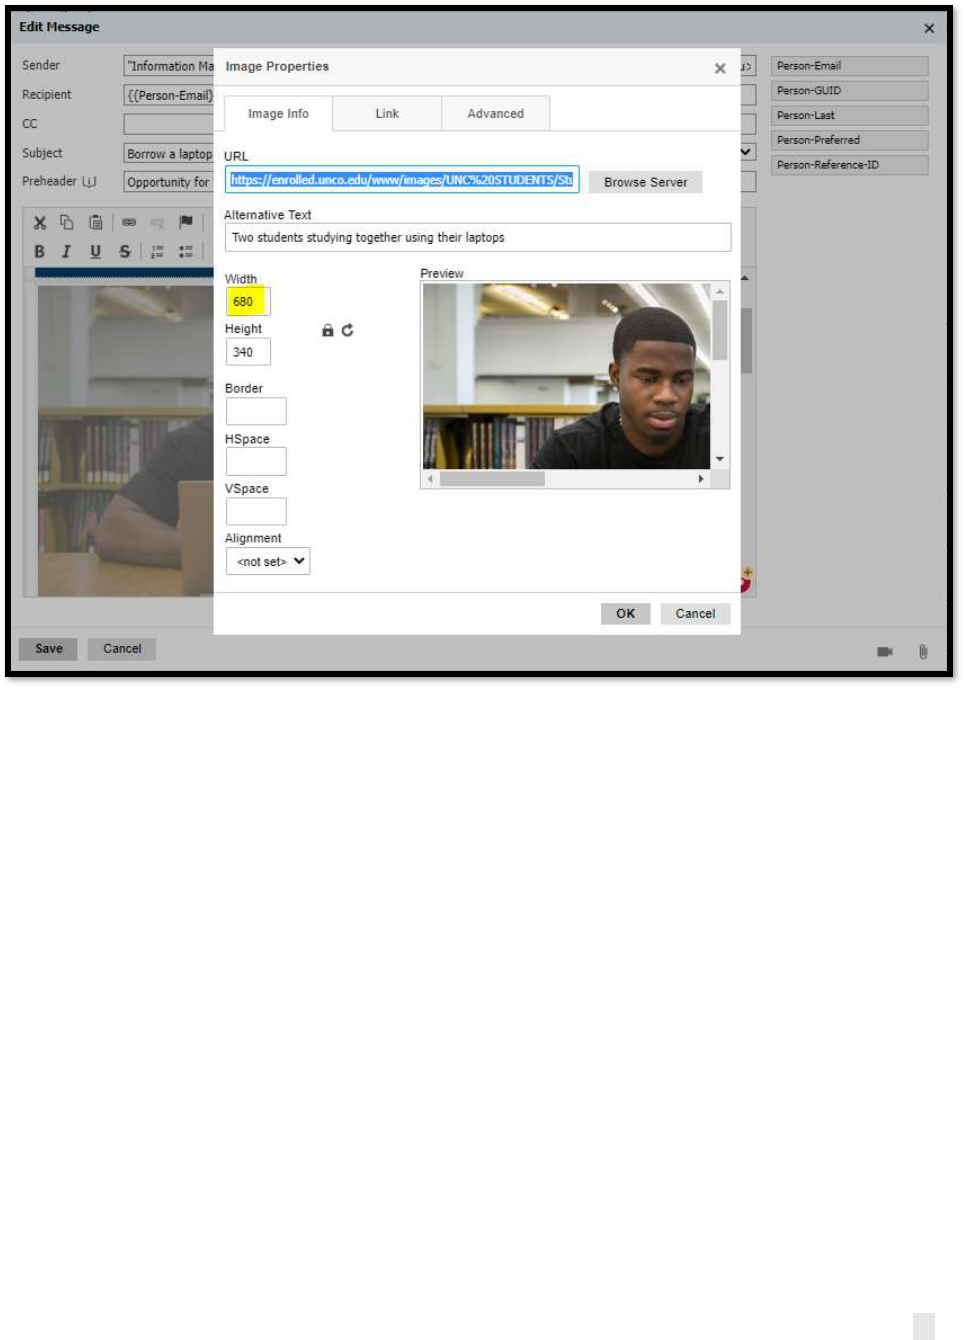
Once you have your image selected, you can adjust the size of it:
• For the header/hero/banner images, we recommend setting the width to 680px, as this
fits well on both desktop and mobile devices.
• For the two-column images, we recommend setting the width to 280px.
• For the three-column images, we recommend setting the width to 167px.
21
Make sure to select the Lock icon to keep the image dimensions proportional when you adjust
them. Before you finish this screen, fill out the Alternative Text box. Alt text (short for
alternative text) is text included in HTML code to describe an image on a webpage, providing
context for search engine crawlers as well as for those viewing a page with a screen reader.
Assistance technology reads this text if unable to display the image, so make sure it describes
everything about the image as concisely as possible.
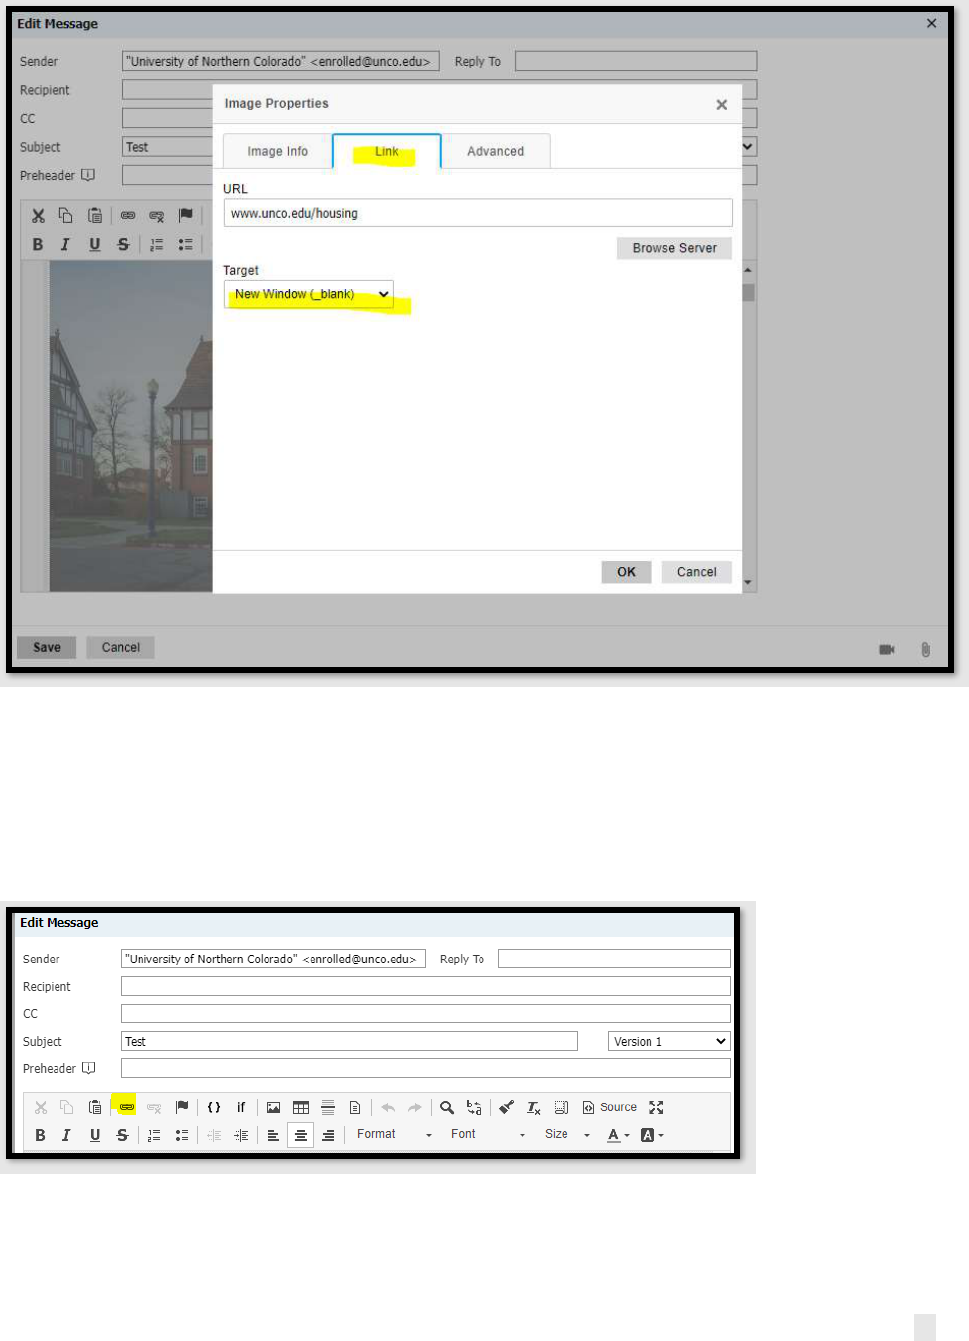
You can also link a webpage to your image. Simply select the link icon at the top of the Image
Editor and paste the link you wish to use in the URL box. From the Target drop-down menu, we
recommend you select the “New Window” option. This way, clicking the image opens a new
tab on the student’s browser.
22
Finally, click OK to insert the image in the message as configured.
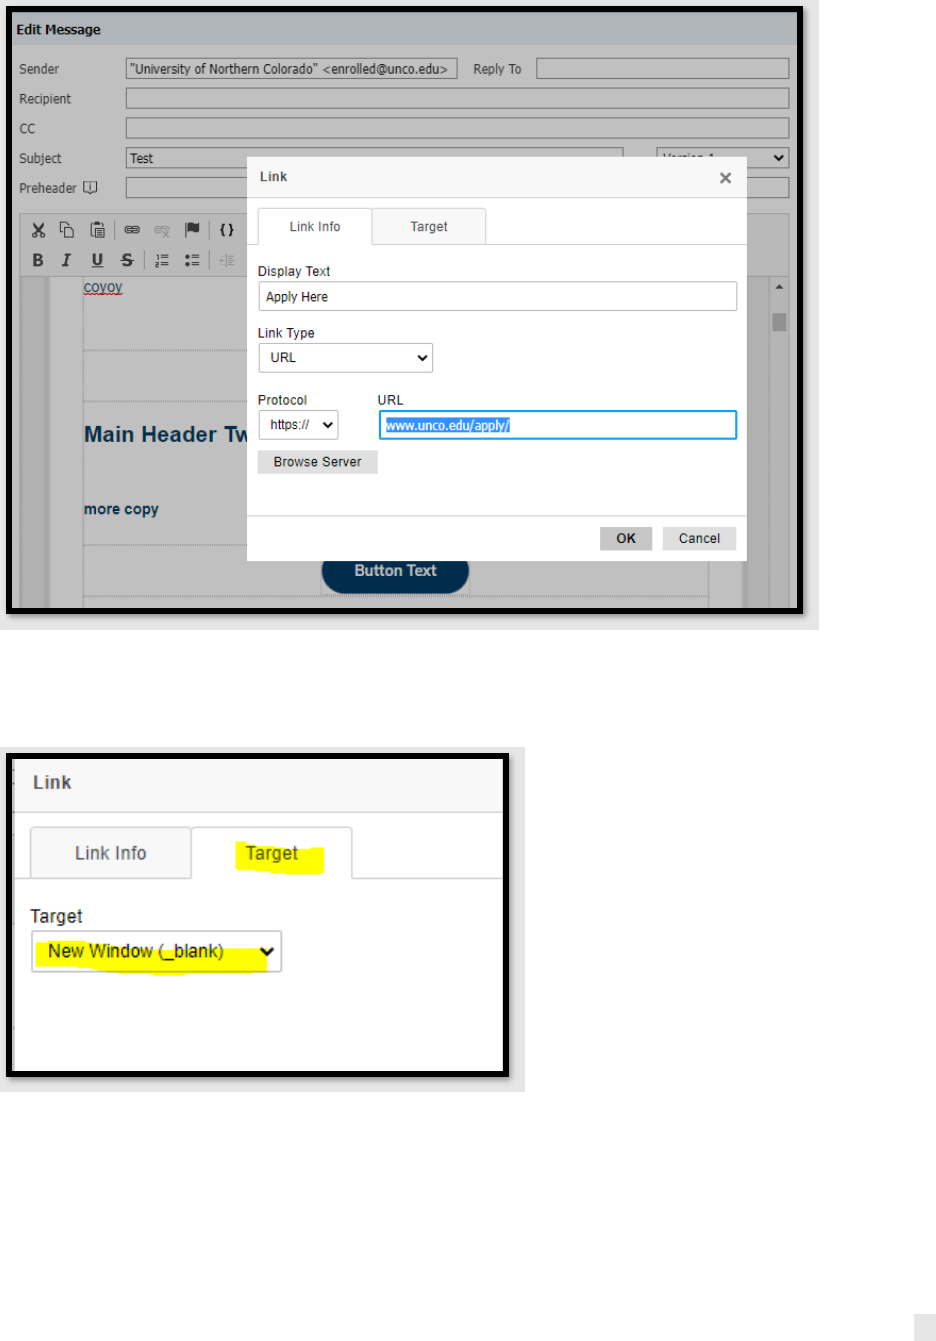
Deliver Basics 6: Adding Links
In the Message Editor, highlight the text you wish to turn into a link. Then, select the Link tool
from the toolbar.
In the Link tool, paste the URL you wish to link the text to.
23
Before you close the link tool, we recommend you go to the Target tab and set it to “New
Window”. That way, students who click the link will open the page in a new tab.
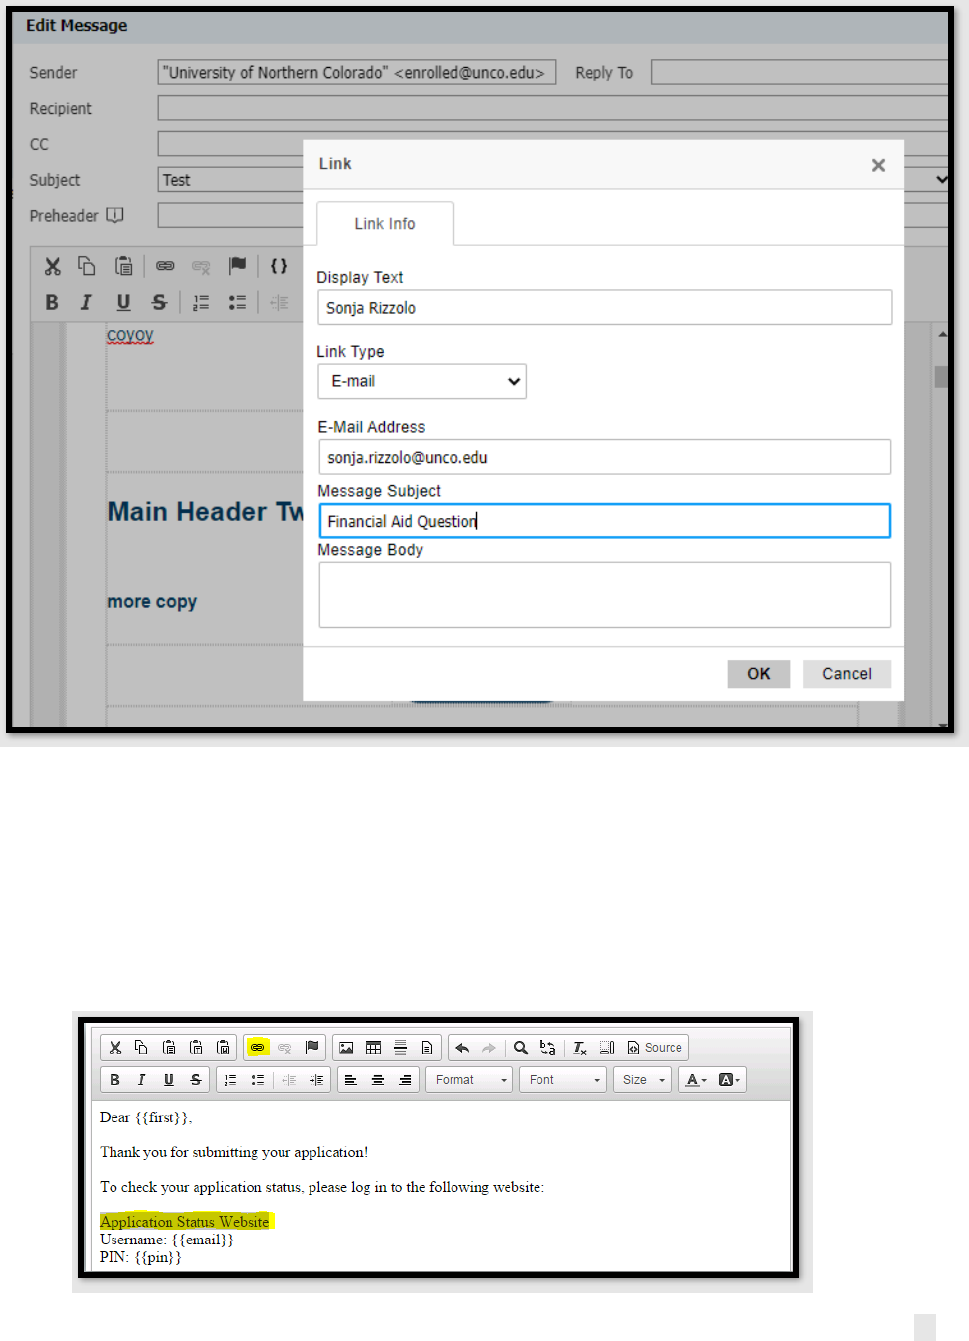
To create a link to an e-mail address, go to the Link Type drop-down menu and select “E-mail”.
24
Select OK to save your link and settings.
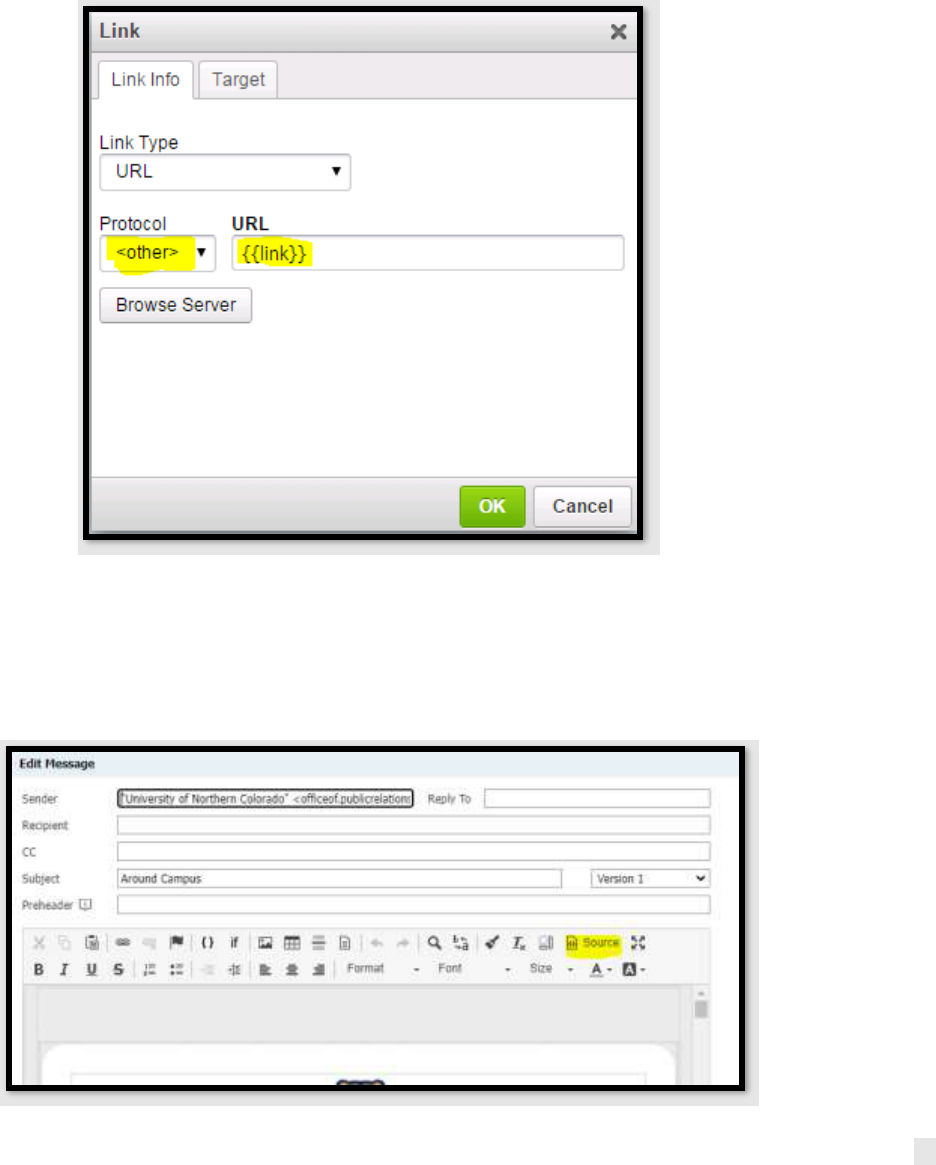
You may want to link to a merge field like {{link}}, which contains a personalized login URL.
Instead of simply placing the merge field as text in the message, which would result in a non-
clickable link, you will want to hyperlink normal text (such as ”Application Status Website”) and
link to the merge field.
1. Highlight the text (e.g., Application Status Website) that you want to hyperlink and click
the link button in the toolbar (see below).
25
2. Select <other> as the “Protocol” and enter the merge field e.g., {{link}} as the URL. You
must select <other> as the protocol if the merge field already contains the URL protocol,
such as http://. If the protocol is left as http://, it will duplicate the protocol segment
and will result in an unclickable URL.
Deliver Basics 7: Editing the Source Code
You also have the option to edit the source code. The source code is the HTML and CSS code, so
basic HTML knowledge is required. To open the Code Editor, click on the Source Button.
26
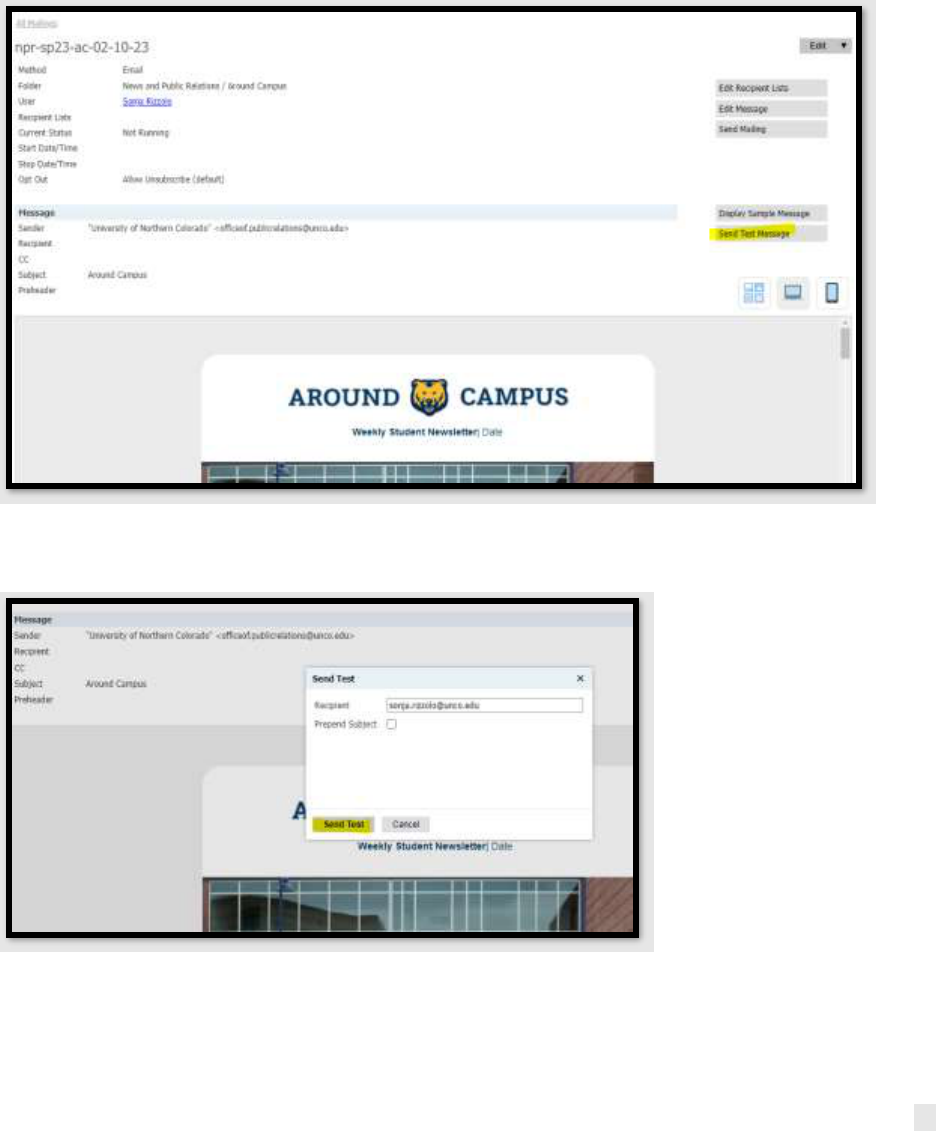
Deliver Basics 8: Testing Messages & Displaying a Sample Message
Once you finish building your message, you’ll want to test it before mailing it to all recipients. It
is extremely important to test. Sometimes there are things in the Source Code that don't show
on the preview screen that WILL show up when the email is sent.
Click the “Send Test Message” button.
In the text box, enter your email address, and then click Send Test.
We recommend you send tests to at least two different email programs (Outlook, Gmail,
Yahoo, etc.) to see how they may display your formatting. Also, open the email on your phone
in addition to reviewing the “mobile preview” option in Slate.
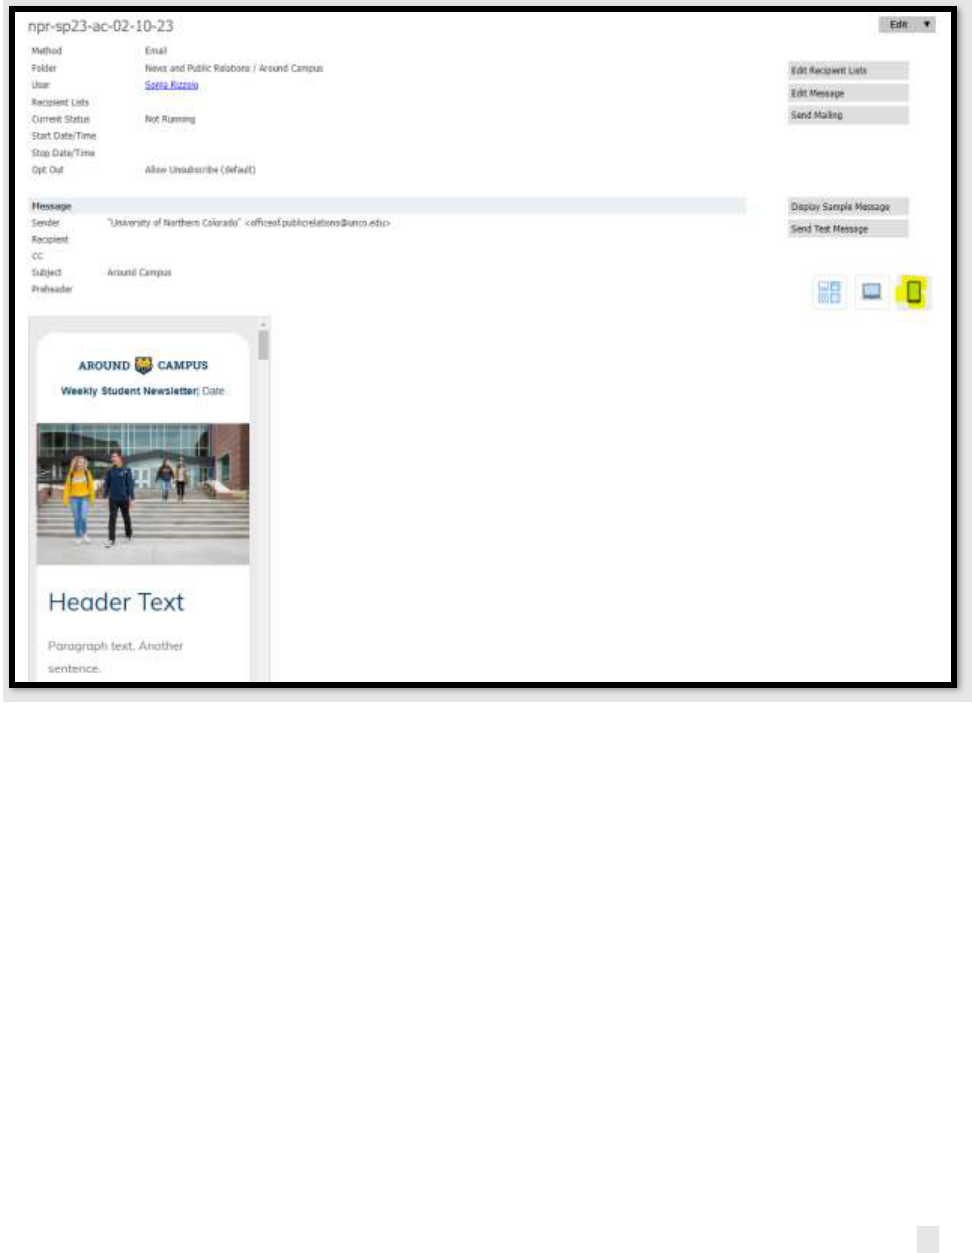
27
Since most students check their email on their phones, Slate has a mobile preview button.
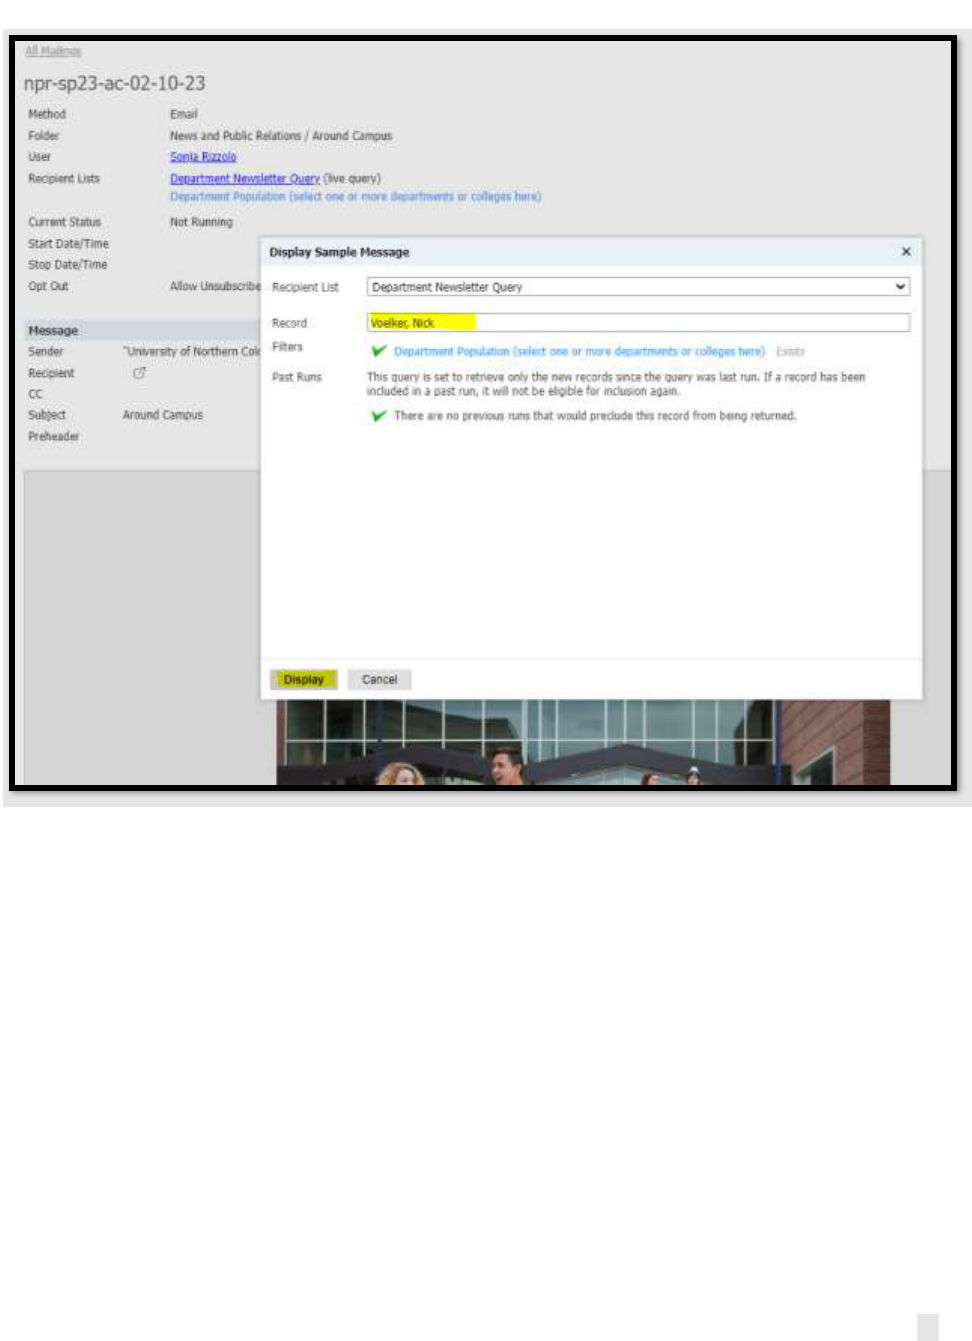
Once you are satisfied with your recipient list, you can Display Sample Message to see how the
message will render for a particular record.
1. Click Display Sample Message.
2. Search for a record of who you think should get this mailing based on your recipient
list. Slate will show you if they meet the filter criteria:
28
3. Click Display to see how the message will show up for that person. This is a great way to
test any merge fields, liquid markup (LM) or conditional logic you have in the email. For
the LM, test all the LM for every possible scenario. In many cases, the spacing needs to
be adjusted in the code itself. If this is the case, refer to Step 7.
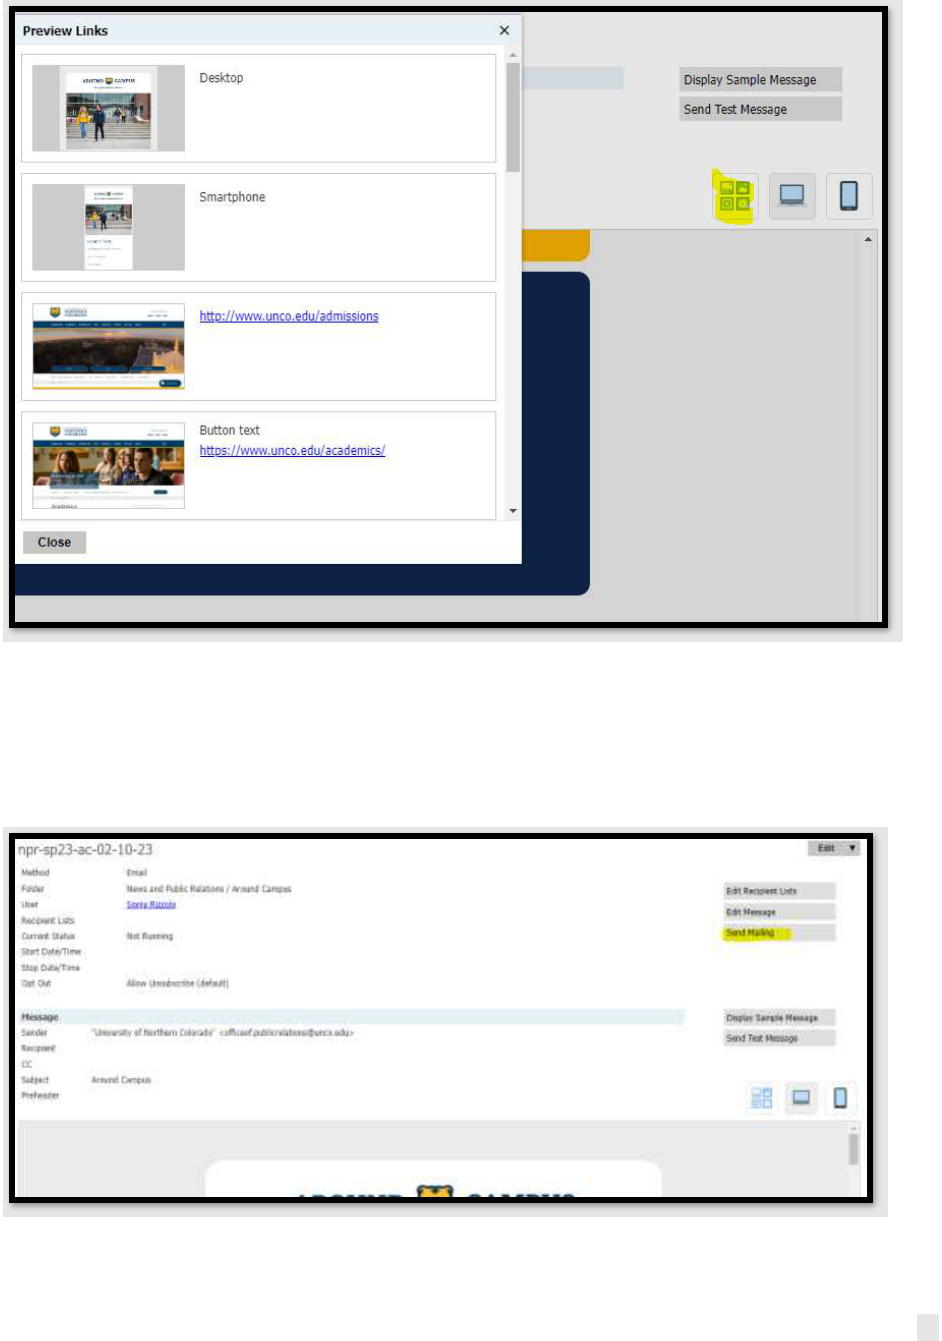
Deliver Basics 9: Link and Image Checkers
Before you send, you will want to check to make sure that your links are not broken. Click the
link check icon above the message, and Slate will check your links for you.
29
Deliver Basics 10: Send Mailing
Once you have your recipient list and message set up as you want them and have tested your
links, you need to configure the Send Settings. To start, click the “Send Mailing” button in the
right-hand column, this will open the Send Settings pop-up.
30
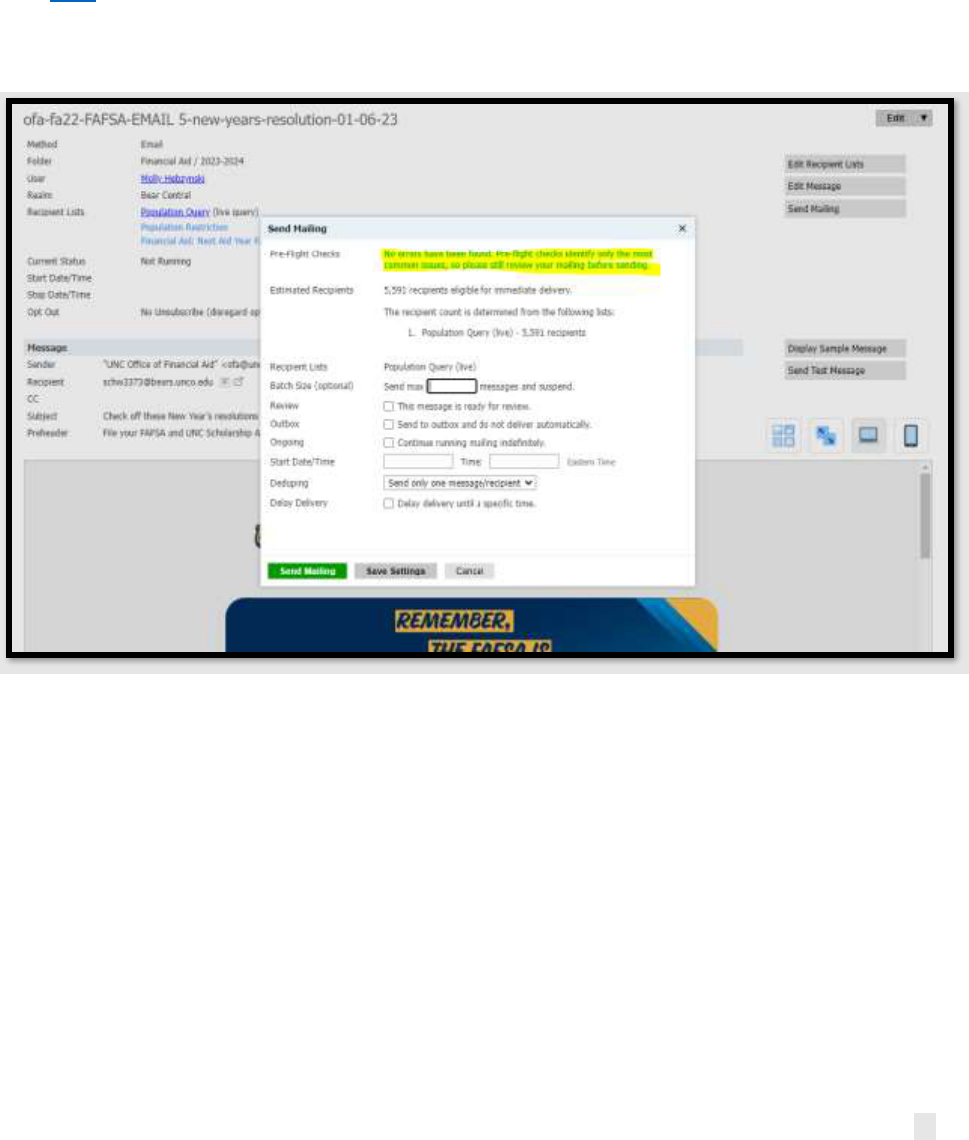
The Send Mailing prompt controls all aspects of how your Mailing will be distributed. At the
top, it runs a Pre-Flight Check to ensure there are no errors in your message. Make sure the text
beside it is green. Pre-flight checks in orange do not prevent you from sending the mailing, but
you should review the areas indicated in the pre-flight check to ensure that they do not cause
your mailing to malfunction (e.g., blank merge fields, conditional logic or liquid markup failure,
etc.) Pre-flight checks in red text need to be corrected before Slate will let you send the mailing.
Click here for some of the most common pre-flight errors and their corrective action(s). After
you have reviewed and addressed the Pre-Flight Checks, you can configure the rest of the Send
Settings.
31
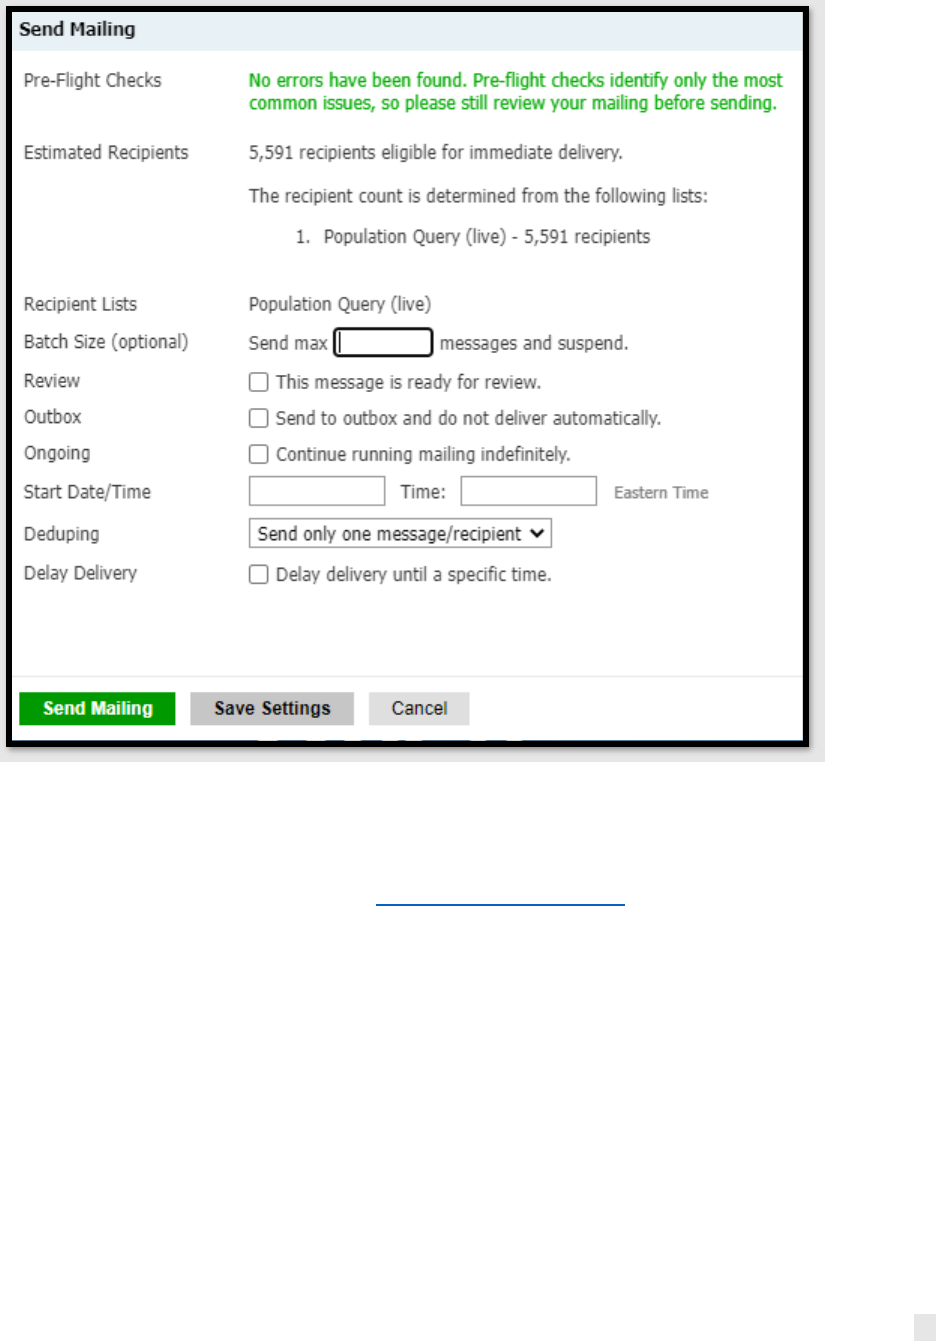
1. Estimated Recipients: Review the number of estimated recipients and make sure that it
matches your expectations. If the numbers do not match your expectations, then go
back into your recipient list(s) and review them. If you have any questions after
reviewing your list(s), submit a Slate Campus Support Form for assistance.
2. Ongoing: Check this box if the message should be sent regularly in an ongoing
manner. Otherwise, just leave it unchecked.
3. Start Date/Time and Stop Date/Time: Enter the date and time you want the message to
start sending in the Start Date/Time area. Remember that the Start Date/Time is in
Eastern Time, not Mountain Time. If you check Continue running mailing indefinitely,
Slate will give you the option to enter a Stop Date/Time as well. The best practice is to
review and edit your communications at least annually, so we recommend always
setting a Stop Date/Time.
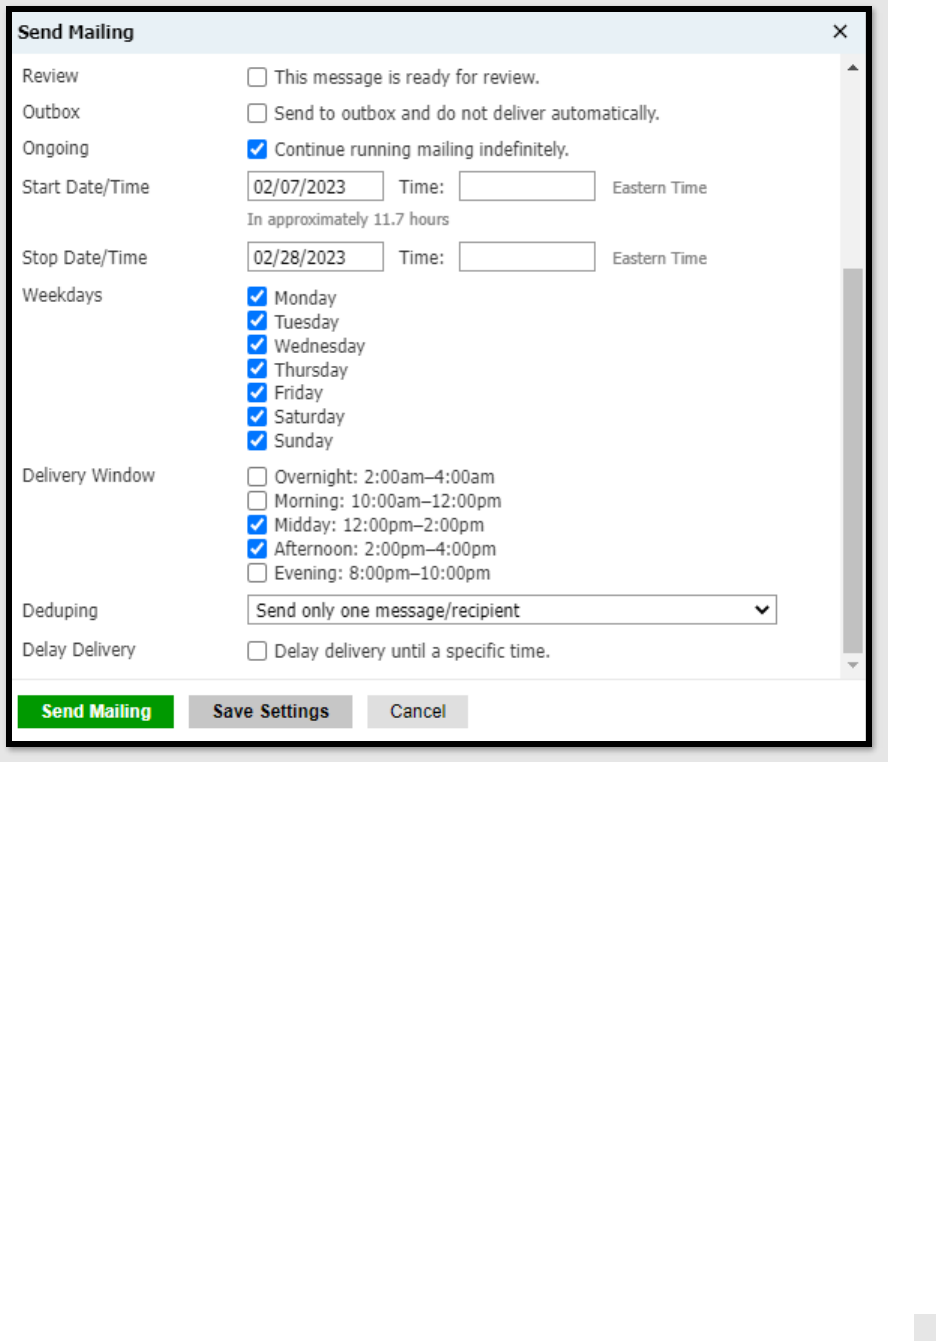
4. Weekdays, Delivery Window and Deduping (see below): This is where you set up the
schedule. This area only shows up if you check Continue running mailing indefinitely.
a. Weekdays: We recommend sending every day of the week, Monday through
Sunday if you want Slate to send the message to new people in your Recipient
List(s) every day.

32
b. Delivery Window: Check the general timeframe you would like Slate to try
sending the message. Remember that these are listed in Eastern Time. We
recommend sending from midday to late afternoon, which is when students
most frequently check their emails. DO NOT send a message overnight: 2:00am –
4:00am, because that’s when data is being imported from Banner.
c. Deduping: Generally, you should choose “Send only one message/recipient.” If
you have a use case for not deduping, please submit a Slate Campus Support
Form with an explanation of what you are trying to do for assistance in setting
that up.
Make sure the Ongoing box is checked if you are running an ongoing campaign. The
message will keep sending indefinitely until an end date is selected.
33
Note: Adding a Stop Date/Time is optional. Leaving it blank will keep your campaign running
until you manually stop it. The best practice is to review and edit your communications at least
annually, so we recommend always setting a Stop Date/Time. You'll need to click the Green
SEND MAILING button and then type the word SEND to activate the mailing. Only Slate users
with the Department Communicator Role can SEND Slate communications. If you are unable to
send a communication, please contact your department communicator.
Deliver Basics 11: Delivery and Tracking Reports
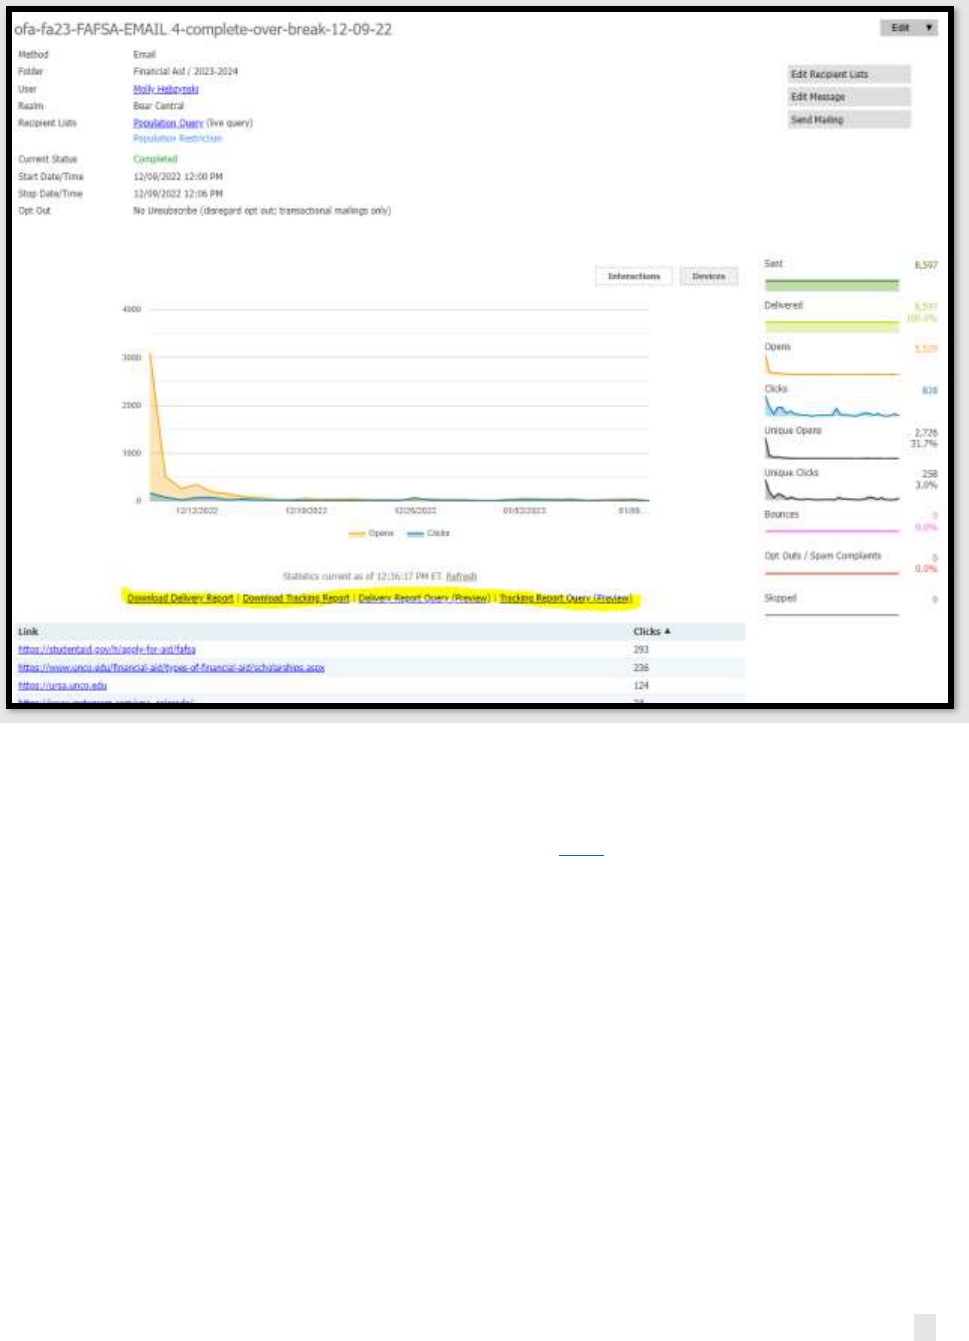
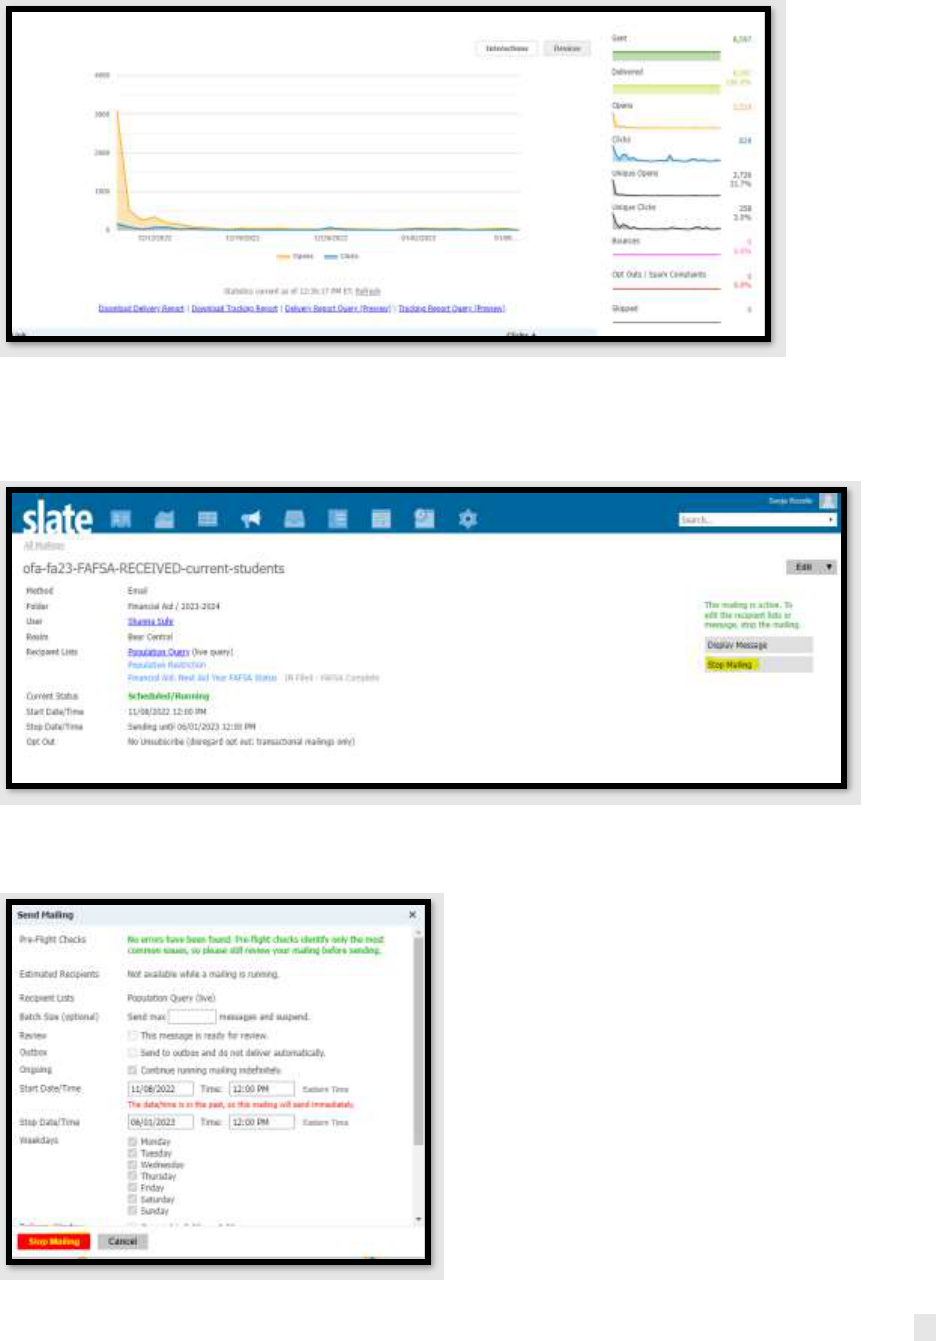
Once your email is sent, Slate will provide some important data.
34
The graph displays the number of Opens and Clicks over the period the message has been live.
Slate automatically generates reports, which you can download using the links underneath the
graph. The download comes as a Spreadsheet that displays the names, emails and statuses of
the recipients. For more info on open/click tracking, click here.
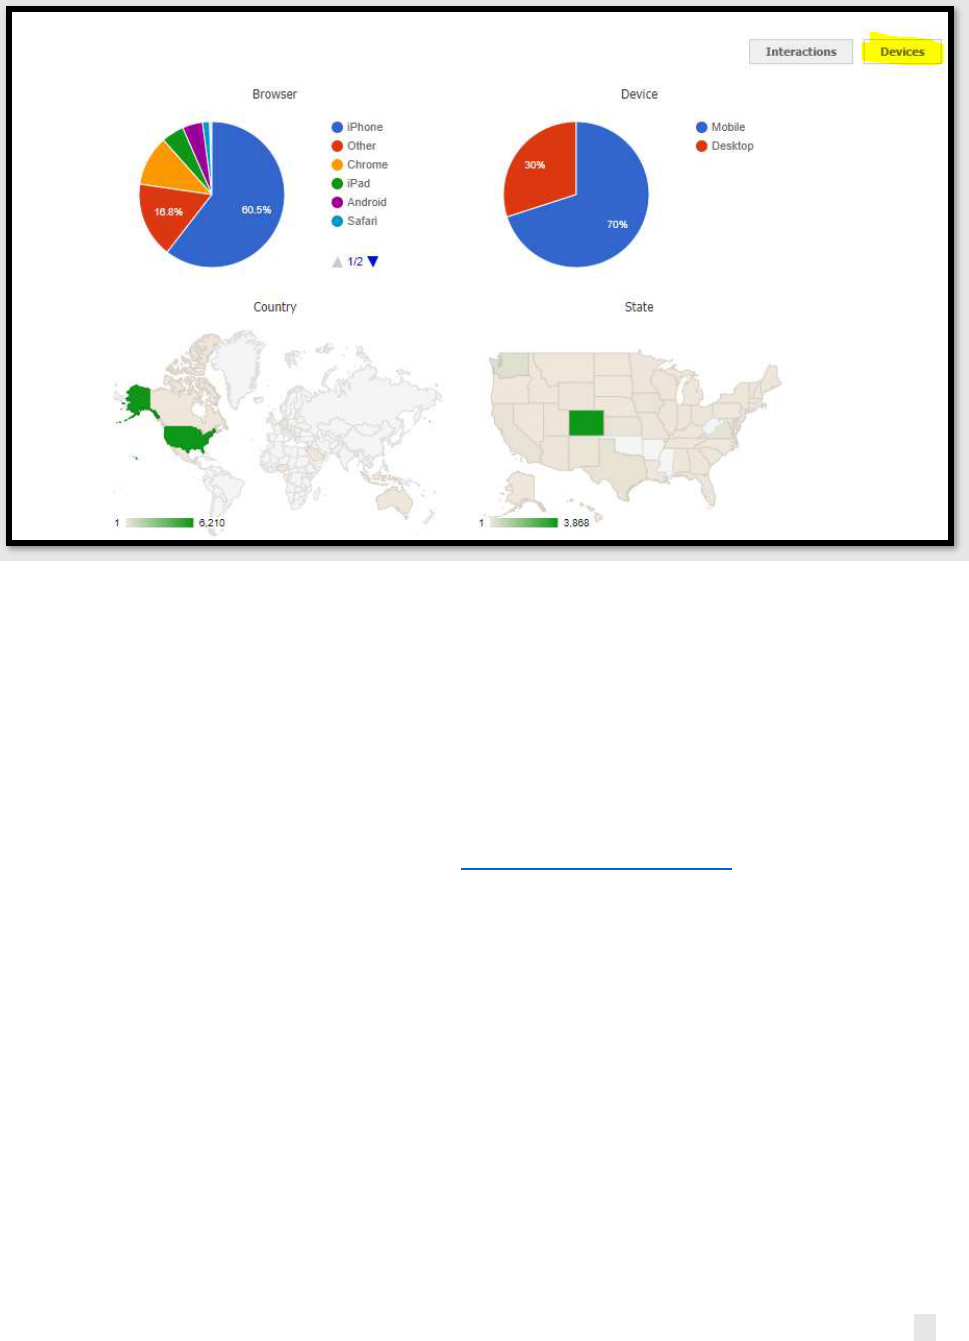
You can also access the Devices chart by selecting the Devices button. Here, you can view which
browser the recipient uses and what device recipients open them on (computer, phone, etc.).
This section also contains a map displaying which regions have received the most messages.
35
The links below the graph will download an Excel list of everyone who meets your recipient list
requirements. The Delivery Report will show everyone Slate tried to send the mailing to and
whether it was successful, bounced or failed for some reason. The Tracking Report will show
opens and clicks.
Important note: These reports may not be immediately available upon sending your mailing.
Please wait up to 24 hours to view the reports.
To set up additional reports, please submit the Slate Campus Support Form.
The right-hand column displays how many messages have been sent, delivered, opened and
clicked on.
36
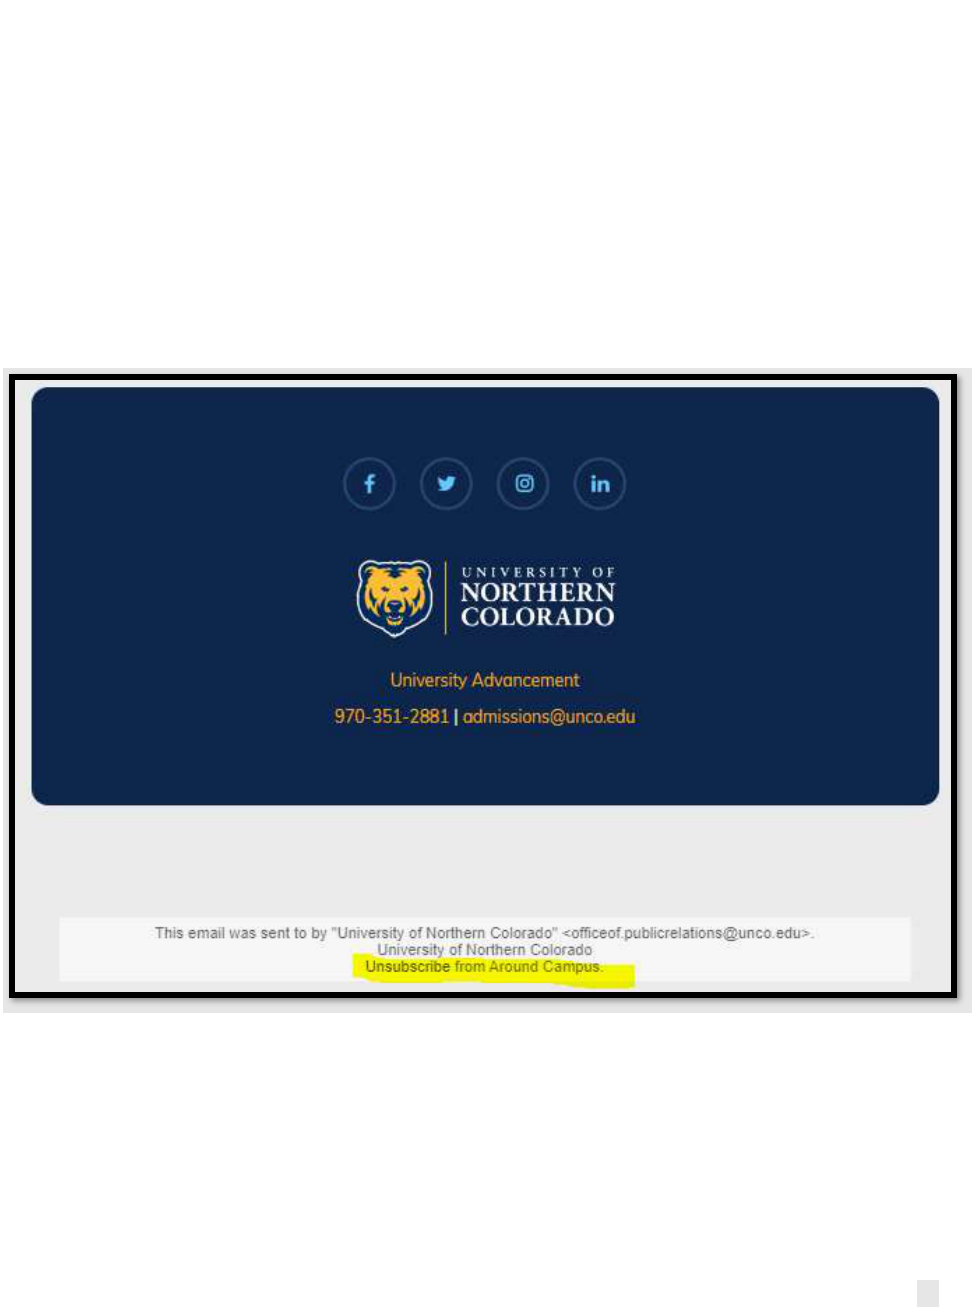
Deliver Basics 12: Stopping a Mailing
To manually stop an ongoing message, select the Stop Mailing button at the top right.
Click on the red “Stop Mailing” button to stop the mailing and type the word STOP.
37
Deliver Basics 13: Mailing Groups (Subscribe/Unsubscribe)
Slate Mailing Groups have been configured for each unit. Mailing Groups provide a way for
students/employees to opt out of receiving mailings from a particular department/unit. Mailing
Groups function like the “Opt Out” tag, but only for messages to which the user has assigned a
Mailing Group.
For example, if someone unsubscribes from “Around Campus” group messages, then any
message where the Opt Out setting is “Around Campus” will honor that person’s opt-out
request and skip sending to that person.
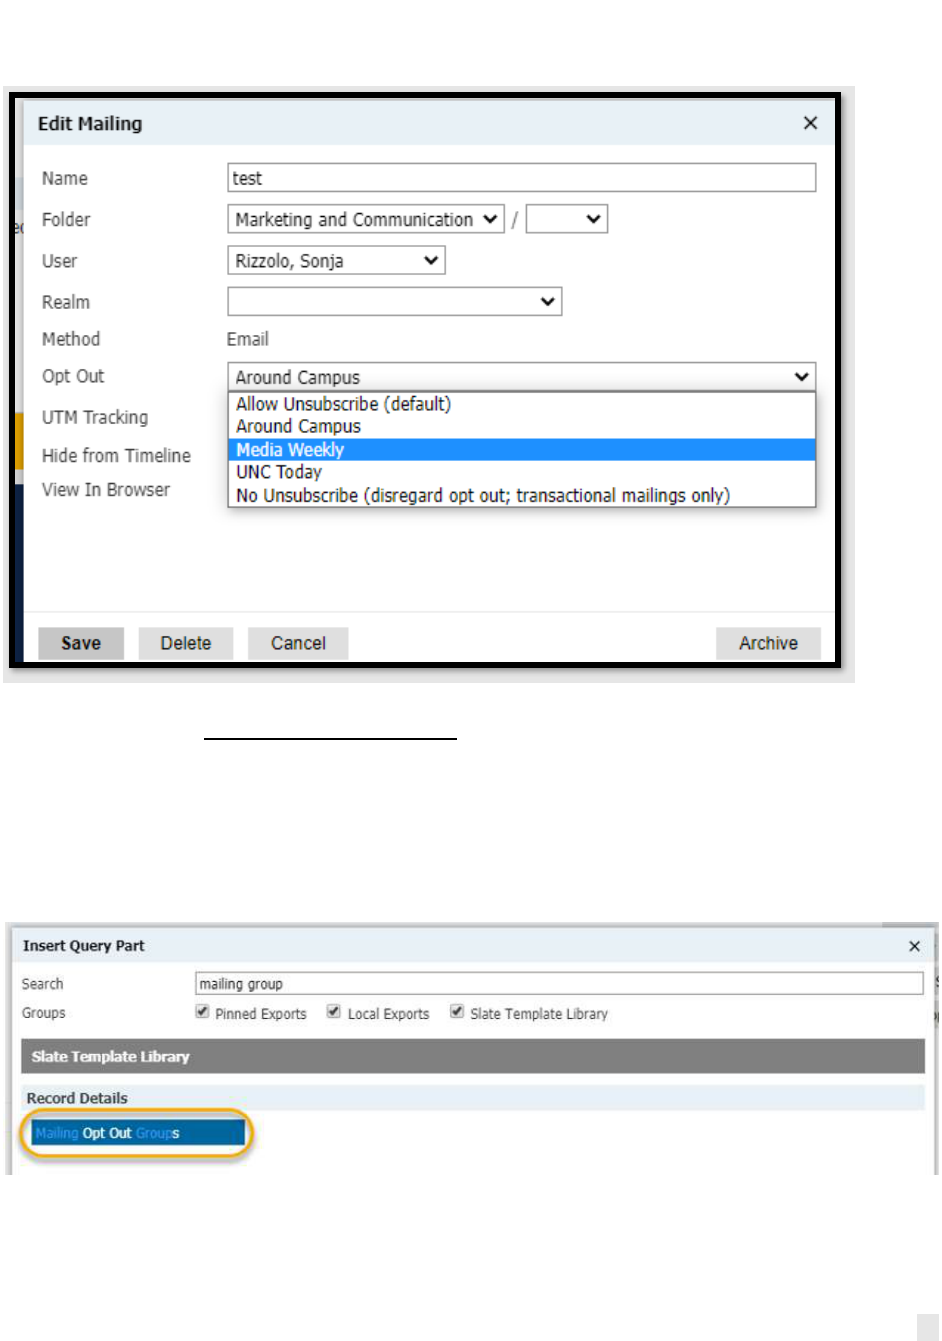
The recipient sees the Unsubscribe link at the bottom of the message with the mailing group
spelled out next to it:
Clicking Unsubscribe will give recipients the option to unsubscribe from just that group or to
opt-out overall.
38
All unit-level marketing messages should be set up with the corresponding unit Mailing Group
in the Opt-Out setting:
This should apply to every marketing message, regardless of the person's status (Student or
Employee). Transactional messages such as “Register for classes” are coded as “No
Unsubscribe.” These messages will be sent regardless of the person’s opt-out status.
Mailing Groups are queryable.
Export:
39
Filter:
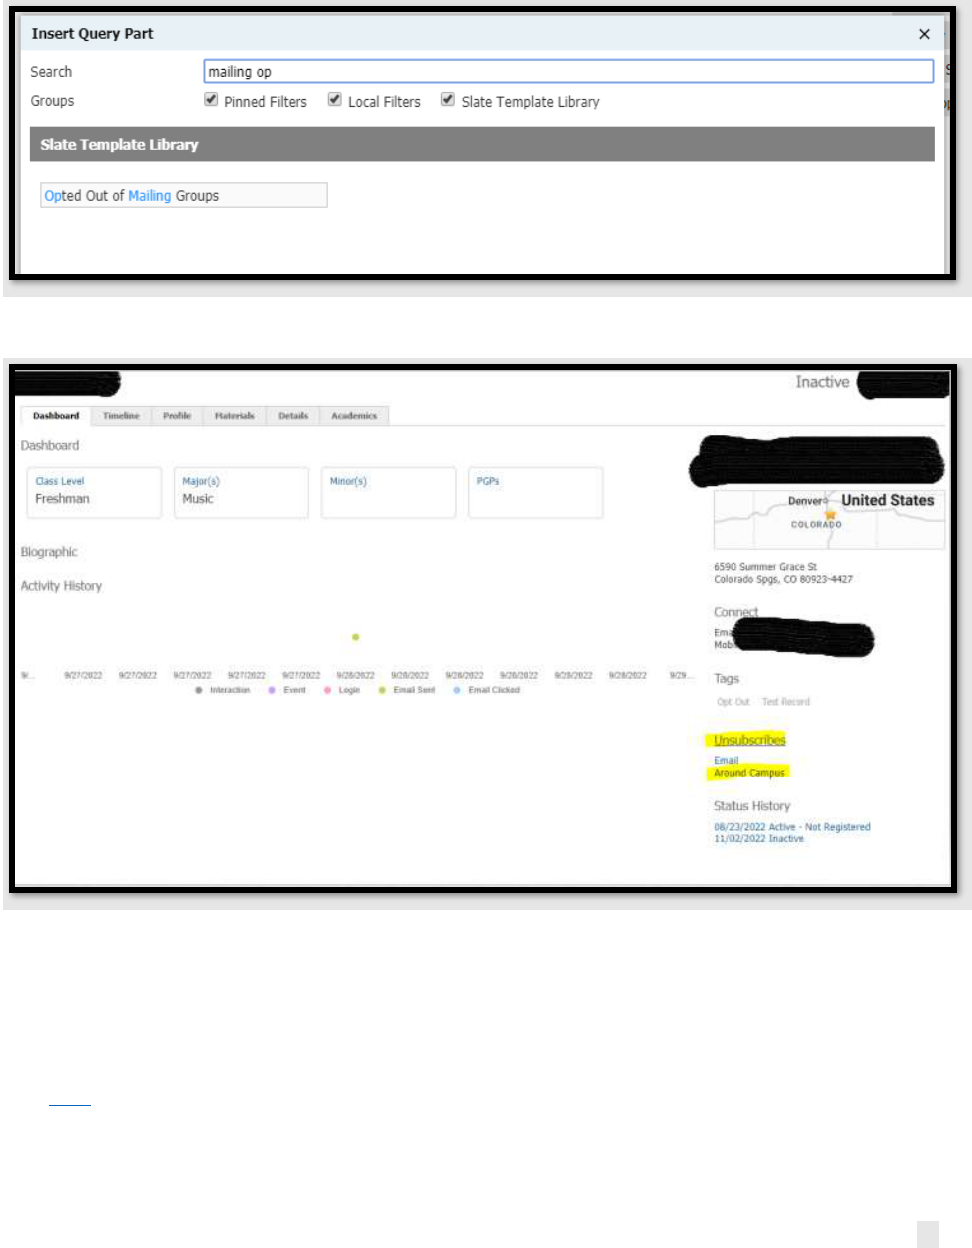
How to Tell Whether a Record Has Opted Out of a Mailing Group:
The “Unsubscribes” will only surface on the record if they have opted out of one or more
mailing groups. If they have not opted out of any mailing groups, you won’t see any
“Unsubscribes.”
Deliver Basics 14: Deliver Troubleshooting
Click here for some frequent questions related to email.

40
Best Email Practices
Message Triggers: messages can be sent based on certain triggers e.g., the student applied for
graduation, the student registered for courses, etc. Having multiple emails running to different
groups of students can greatly increase your student interactions.
Reports: analyze your reports to learn which of your emails are generating the most student
interaction. This can serve as a guide for future campaigns and inform you on how to adjust
your current ones. If you need help creating a report, please submit the Slate Campus Support
Form.
From Name and Address: Do not send emails from your name, rather, use the official name of
your office/department/business unit. For example, “Office of Financial Aid”, “Bursar’s Office.”
“College of Performing and Visual Arts”. Do not use abbreviations such as SAES, OSO, etc. Those
who are members of the Cabinet, Deans of Colleges and at the Vice President level can send
emails with their personal name identifier and title such as: “NHS Dean Kamel Haddad.” From
Address: Use the official email address of your department, office or unit. For example,
Inclusion” [email protected].
Subject Lines: try to make these less than 50 characters. Anything greater than that length is
less likely to be opened.
Banner Sizing: the ideal image width is 680px for responsive emails from Slate. Check the
Adding Images section to learn how to adjust sizing.
Links: make sure to set each of your links to open in a new window. This prevents the student
from being directed away from your message. For information on how to set this up, refer to
the Adding Links section of the guide.
Call to Action: we recommend using a direct call to action in every email. Instruct or ask the
student to do something “now” or “today”. This keeps the reader engaged in the process and
allows the email to provide a valuable function.
Message Length: 125 words is the ideal message length. Cell phone screens can only fit so
many words before the student has to start scrolling, and more scrolling means students are
less likely to read the entire message.
Signatures: keep them simple – name, position and department name. Long signatures require
students to scroll more, making them less likely to finish reading it. Also, avoid using
handwritten signatures -- it makes the messages appear more formal and outdated.

41
Accessibility
Creating accessible emails means that the content and functionality of an email can be easily
accessed by everyone, regardless of ability. Small changes can have an impact on making your
emails more inclusive and increase readability and performance. We highly recommend you
use templates specifically created for your unit/department. These templates are accessible
and adhere to UNC’s branding guidelines. Here are 11 easy tips for improving accessibility with
your Slate emails:
1. Left-justify your copy, especially for longer sections. The start of a new line acts as a
visual anchor. Keeping the anchor in the same place makes it easier to track copy and
keep it readable.
2. Use a minimum font size of 14 points. Making it 14 points or larger makes it easier to
read, regardless of the screen size. For font, use Tahoma or Arial.
3. Keep the contrast between elements high. Contrast is usually the color of the copy and
its background. For example, the color of the text on a button. If the contrast is too low,
it can be challenging to read for people with low vision. You can use color, font weight
and font size to control contrast. When in doubt, check your contrast with this free
contrast-checking tool by WebAIM. For example, DO NOT use a combination of yellow
and white. Do use a combination of blue and white.
4. Make text links distinct from surrounding text. There is a reason that the default for a
link is underlined blue text. Take care with overriding this styling, especially with the
underline. Removing it makes it difficult for people who are color blind.
5. Make buttons and calls to action large enough with sufficient white space around
them. Doing this makes it easier for people to access your links. And, putting links too
close together can cause accidental link taps and frustrate users.
6. Keep your email layout simple. A clean, simple layout also aids in accessibility. Single-
column layouts are the most effective – they streamline content, reinforce the design
hierarchy and make it easier to adjust across screen sizes and to scan. Use a branded
template provided in Slate by central marcom to ensure a clean layout.
7. Add alternate text to non-text content. Adding alternate or alt text to non-text content,
such as photos and graphics allows the content and function to be read by screen
readers and is displayed in place of the image if the image file is not loaded or users
have chosen not to view images (this often occurs with emails sent to unco.edu). A few
tips when writing alt text: Be accurate in describing the content and function of the
image. Keep it short. Usually, a few words or a short sentence is sufficient. Don’t be
redundant with the text within the context of the image. Don’t add that it is an image or
photograph in the description unless it’s relevant. For UNC logos, the alt tag is:
University of Northern Colorado logo. If you’re interested in learning more about how
and when to use alt text appropriately, WebAim provides a more comprehensive
explanation.
8. Keep language simple. Keep sentences short and easy to understand, so readers can
focus on the content. Also, avoid the use of jargon, abbreviations or insider language.
Readers may not know the meaning of words or phrases we use frequently in our work,

42
so review your copy for jargon and rephrase it so it’s easily understood by a wide
audience. Also, keep your emails short to improve readability.
9. Use appropriate headings. Use appropriate heading tags to organize your content into a
logical hierarchy. This helps users with screen readers to understand the structure of
your content.
10. Use descriptive link text. Use descriptive link text that explains the content of the link,
rather than generic phrases like “click here.” This helps users with screen readers to
understand the purpose of the link.
11. Provide captions for videos. Provide captions or transcripts for all videos. This helps
users with hearing impairments to understand the audio content.
Interested in learning more about accessibility? Visit this blog by Email on Acid.
