Qlik Compose Setup and User Guide
Qlik Compose
TM
May 2022
Last updated: December 21, 2023
Copyright © 1993-2021 QlikTech International AB. All rights reserved.
HELP.QLIK.COM
© 2023 QlikTech International AB. All rights reserved. All company and/or product names may be trade names,
trademarks and/or registered trademarks of the respective owners with which they are associated.

Setup and User Guide - Qlik Compose, May 2022 3
1 What's new? 9
1.1 What's new in Data Warehouse projects? 9
Keeping changes in the Change Tables 9
Referenced dimensions 9
Data mart enhancements 10
Microsoft Azure Synapse Analytics Enhancements 10
Uniform source consolidation 11
Environment variables 11
Support for data profiling and data quality rules when using Google Cloud BigQuery 12
Attributes case sensitivity support 12
Associating a Replicate task that writes to a Hadoop target 12
Performance improvements 12
Support for Redshift Spectrum external tables 13
Data mart UX improvement 13
Support for updating custom ETLs using the CLI 13
Support for defining a custom data mart schema in Microsoft Azure Synapse Analytics 13
1.2 What's new in Data Lake projects? 13
Support for excluding deleted records from ODS views 13
Improved Historical Data Store resolution 14
Associating a Replicate task that writes to a Hortonworks Data Platform target 14
Databricks projects 14
1.3 New features common to both Data Warehouse projects and Data Lake projects 15
New Project title setting 15
Support for Microsoft Edge Browser 15
Windows Server 2022 (64-bit) support 15
Security Hardening 15
Managing user and group roles using the Compose CLI 16
2 Introduction 17
2.1 Data warehouse projects 17
Data warehouse projects architecture 17
Key features 18
2.2 Data lake projects 18
Easy data structuring and transformation 18
Continuous updates 18
Historical data store 18
Data lake project architecture 19
3 Qlik Compose installation and setup 20
3.1 Preparing your system for Compose 20
Hardware prerequisites 20
Software and network prerequisites 21
Required permissions for the Compose service 21
Reserved system names 21
3.2 Installing or upgrading Compose 21
Installation Instructions 21
Upgrade Instructions 22
3.3 Installing and upgrading Compose silently 22
Silently installing Compose 23
Contents

Setup and User Guide - Qlik Compose, May 2022 4
Silently upgrading Compose 24
Silently uninstalling Compose 24
3.4 Determining the required number of database connections 24
3.5 Accessing Qlik Compose 25
4 Security considerations 26
4.1 Setting up HTTPS for the Compose console 26
Checking if an SSL certificate is installed 26
Using the self-signed certificate 27
Replacing the self-signed certificate on Windows 29
4.2 Setting the hostname and changing the HTTPS port 30
To set the hostname: 30
To change the HTTPS port: 30
4.3 Setting up HSTS on Compose 31
Enabling HSTS 31
Disabling HSTS 31
4.4 Setting Single Sign-On Authentication with Kerberos 32
4.5 Changing the master user password 32
5 Data Warehouse projects 35
5.1 Defining a Qlik Replicate task 36
Prerequisites 36
Limitations and considerations 36
Setting up the task 37
5.2 Adding and managing data warehouse projects 37
Adding data warehouse projects 38
Managing and monitoring projects 39
Project settings 40
Resetting projects 46
Project deployment 47
Migrating objects as CSV files 49
Exporting and importing projects using the CLI 78
Working with environment variables 88
Generating projects using the CLI 98
Exporting project documentation 99
Viewing and downloading DDL scripts 100
Project versioning 101
Creating a diagnostics package 103
5.3 Getting started with Data Warehouse projects 104
High-level flow 104
Console elements 104
Data warehouse project tutorial 107
5.4 Setting up a data warehouse connection 111
Using Microsoft SQL Server as a data warehouse 112
Using Oracle as a data warehouse 115
Using Snowflake as a data warehouse 118
Using Amazon Redshift as a data warehouse 121
Using Microsoft Azure Synapse Analytics as a data warehouse 124
Using Google Cloud BigQuery as a Data Warehouse 128
Contents

Setup and User Guide - Qlik Compose, May 2022 5
Managing databases 131
5.5 Setting up Landing Zone and Data Source connections 131
Reserved column names and suffixes 131
Permissions 132
Data type mappings 133
Defining landing zones 140
Defining Replicate data source connections 147
Managing databases 154
5.6 Creating and managing the model 154
Reserved column names 155
Generating the model 155
Model limitations 162
Validating the model 163
Displaying the model 163
Managing the model 166
Creating expressions 181
Opening the expression builder 182
Defining reusable transformations 188
5.7 Creating and managing the data warehouse 190
Data warehouse tasks 191
Managing tasks 201
Viewing and exporting task statements 216
Modifying task settings 217
Validating the data warehouse 222
Clearing the data warehouse metadata cache 224
5.8 Creating and managing data marts 225
Adding data marts and star schemas 225
Displaying data in a pivot table 231
Managing data marts 234
Example of a Valid Table Creation Modifier 241
Example of a Valid Table Creation Modifier 246
Creating and managing custom ETLs 250
Viewing and exporting task statements 252
Validating and adjusting the data mart 252
Reloading the data mart 254
Modifying data mart settings 255
The "Obsolete" indicator 257
5.9 Creating and managing command tasks 258
Defining command tasks 258
Managing command tasks 259
Controlling and monitoring command tasks 259
5.10 Controlling and monitoring tasks and workflows 260
Viewing information in the monitor 260
Viewing missing references 262
Controlling tasks 264
Notifications 266
Workflows 268
Monitoring and controlling Qlik Replicate tasks 272
Contents

Setup and User Guide - Qlik Compose, May 2022 6
6 Data Lake projects 275
6.1 Defining a Qlik Replicate task 275
Prerequisites 275
Limitations and Considerations 276
Setting up the task 276
6.2 Adding and managing Data Lake projects 277
Prerequisites 277
Data Lake project guidelines 279
Adding data lake projects 280
Managing and monitoring projects 282
Project settings 283
Resetting projects 288
Project deployment 289
Exporting and importing projects using the CLI 290
Generating projects using the CLI 298
Viewing and downloading DDL scripts 299
Project versioning 300
Creating a diagnostics package 301
6.3 Getting started with Data Lake projects 302
High-level flow 302
Console elements 302
6.4 Setting up landing and storage connections 305
Defining a Storage Zone 305
Defining Landing Zones 314
Managing Landing and Storage connections 316
6.5 Selecting source tables and managing metadata 316
Reserved column names 316
Selecting and adding the source tables 317
Validating the metadata and storage 320
Managing the metadata 322
Schema evolution 327
Creating transformations 329
Reusable transformations 335
6.6 Creating and Managing Storage Zone Tasks 337
Defining and running data storage tasks 338
Managing task definitions 341
Clearing the metadata cache 350
Viewing and exporting task statements 351
Modifying task settings 352
6.7 Creating and managing command tasks 352
Defining Command tasks 353
Managing Command tasks 354
Controlling and monitoring Command tasks 354
6.8 Controlling and monitoring tasks and workflows 354
Viewing information in the monitor 355
Running and controlling tasks 356
Notifications 358
Contents

Setup and User Guide - Qlik Compose, May 2022 7
Workflows 360
Monitoring and controlling Replicate tasks 364
7 Managing Compose 366
7.1 License settings 366
License enforcement 366
Registering a license 366
7.2 Viewing a license 367
7.3 Logging settings 367
Setting the logging level 367
Setting automatic roll over and cleanup 368
Viewing and downloading Compose log files 369
7.4 Mail server settings 369
7.5 Running tasks on a remote Compose server 370
7.6 Replicate Server settings 370
7.7 User permissions 371
Default user permissions according to role 372
Granular access control 373
Managing user and group roles using the Compose CLI 375
Managing user permissions 377
7.8 Audit trails 380
Audit trail information 380
Exporting Audit Trail files 381
Configuring Audit Trail size and retention 382
Decoding an encoded payload 382
8 Setting up Compose on a Windows HA cluster 383
8.1 Step 1: Installing Compose in the cluster 383
Preparation 383
Primary node setup 383
Secondary node setup 384
8.2 Step 2: Adding the Compose service 385
8.3 Step 3: Defining the service dependencies 385
8.4 Step 4: Defining the URLfor the cluster 386
8.5 Upgrading Compose on the cluster 386
A Impact of DST change on Qlik Compose 388
B Support matrix 389
B.1 Supported Windows platforms 389
B.2 Supported browsers 389
B.3 Supported Qlik Replicate and Enterprise Manager versions 389
B.4 Supported Databases for Data Warehouse Projects 390
Supported data sources 390
Supported data warehouses 390
B.5 Supported hive distributions for Data Lake projects 392
C Cron format and examples 393
C.1 Cron format 393
C.2 Special characters 393
Contents

1 What's new?
1 What's new?
The following section describes the enhancements and new features introduced in Qlik Compose May 2022.
The "What's new?" is cumulative, meaning that it also describes features that were already released
as part of Compose August 2021 service/patch releases. This is because customers upgrading from
initial release versions might not be aware of features that were released in interim service releases.
1.1 What's new in Data Warehouse projects?
The following section describes the enhancements and new features introduced in Qlik Compose Data
Warehouse projects.
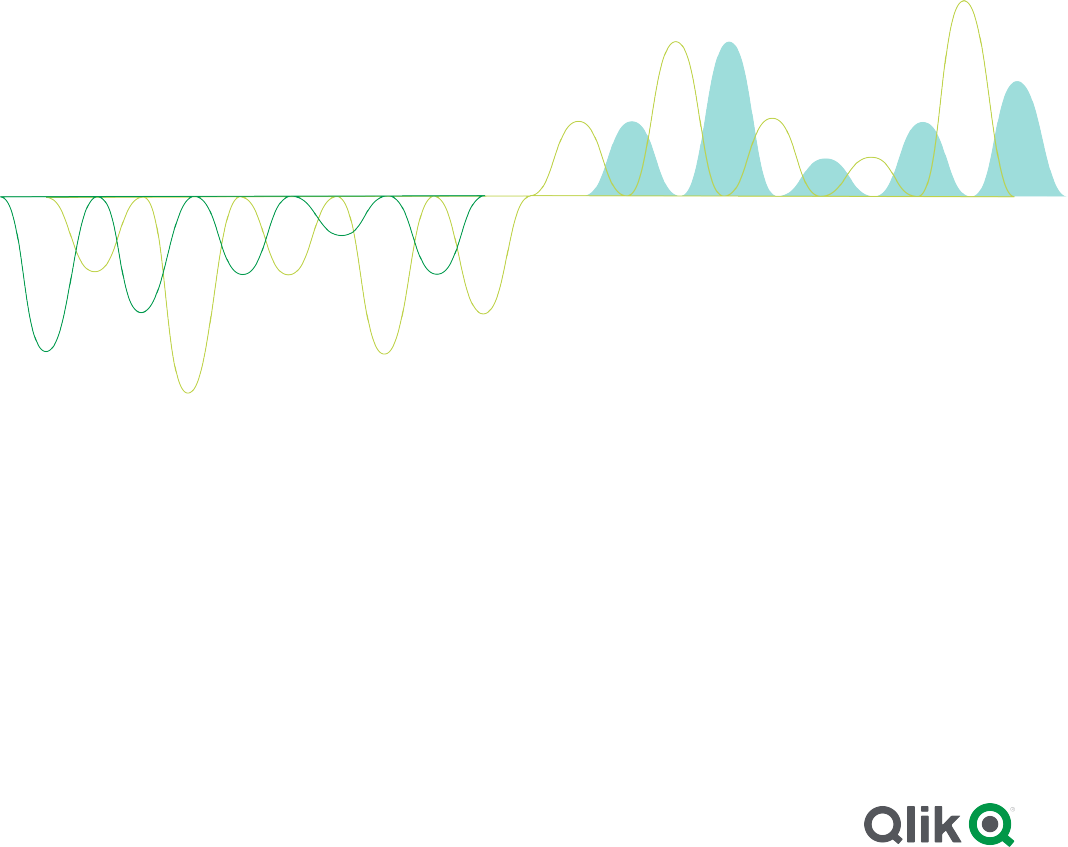
Keeping changes in the Change Tables
This version introduces a new Keep in Change Tables option in the landing zone connection settings:
When you select the Keep in Change Tables option, the changes are kept in the Change Tables after they are
applied (instead of being deleted or archived). This is useful as it allows you to:
l
Use the changes in multiple Compose projects that share the same landing
l
Leverage Change Table data across multiple mappings and/or tasks in the same project
l
Preserve the Replicate data for auditing purposes or reprocessing in case of error
l
Reduce cloud data warehouse costs by eliminating the need to delete changes after every ETL
execution
Referenced dimensions
This version introduces support for referencing dimensions. To facilitate this new functionality, a new
Reference selected dimensions option has been added to the Import Dimensions dialog which, together
with the toolbar button, has been renamed to Import and Reference Dimensions.
Setup and User Guide - Qlik Compose, May 2022 9

1 What's new?
The ability to reference dimensions improves data mart design efficiency and execution flexibility by
facilitating the reuse of data sets. Reuse of dimension tables across data marts allows you to break up fact
tables into smaller units of work for both design and data loading, while ensuring consistency of data for
analytics.
Data mart enhancements
Data mart adjust
This version introduces the following enhancements:
l
The automatic data mart adjust feature has been extended to include DROP COLUMN and
ADDCOLUMN support.
l
In previous versions, adding a dimension which did not relate to any fact would require the data mart
to b e dropped and recreated. From this version, such dimensions can be adding using auto-adjust,
including Date and Time dimensions.
l
The generate_project CLI now supports automatic data mart adjust for specific objects. In
previous versions, Compose would adjust the data marts by dropping and recreating the tables,
regardless of the required change. This would sometimes take a lot of time to complete. From this
version, only the changes will be adjusted. For example, if a new column was added to a dimension,
only that specific column will be added to the data mart tables. To support this new functionality the --
stopIfDatamartsNeedRecreation parameter must be included in the command. I this parameter is
omitted and the data mart needs to be adjusted, Compose will drop and recreate the data mart tables
like it did in previous versions.
Data mart reloading
This version introduces the ability to reload the data mart or parts of the data mart without dropping and
recreating it, thereby eliminating costly and lengthy reloading of the data mart while maximizing data
availability. Such operations should usually be performed after a column with history has been added by the
automatic adjust operation.
To facilitate this, a new mark_reload_datamart_on_next_run CLI has been developed. The new CLI
allows users to mark dimensions and facts to be reloaded on the next data mart run. These can either be
specific dimensions and facts or multiple dimensions and facts (either from the same data mart or different
data marts) using a CSV file.
Microsoft Azure Synapse Analytics Enhancements
A number of changes related to statistics have been implemented. In addition, several statements are now
tagged with an identifier label for troubleshooting 'problem queries' and identifying possible ways to optimize
database settings. Moreover, the addition of labels to ELT queries enables fine-grained workload management
and workload isolation via Synapse WORKLOAD GROUPS and CLASSIFIERS.
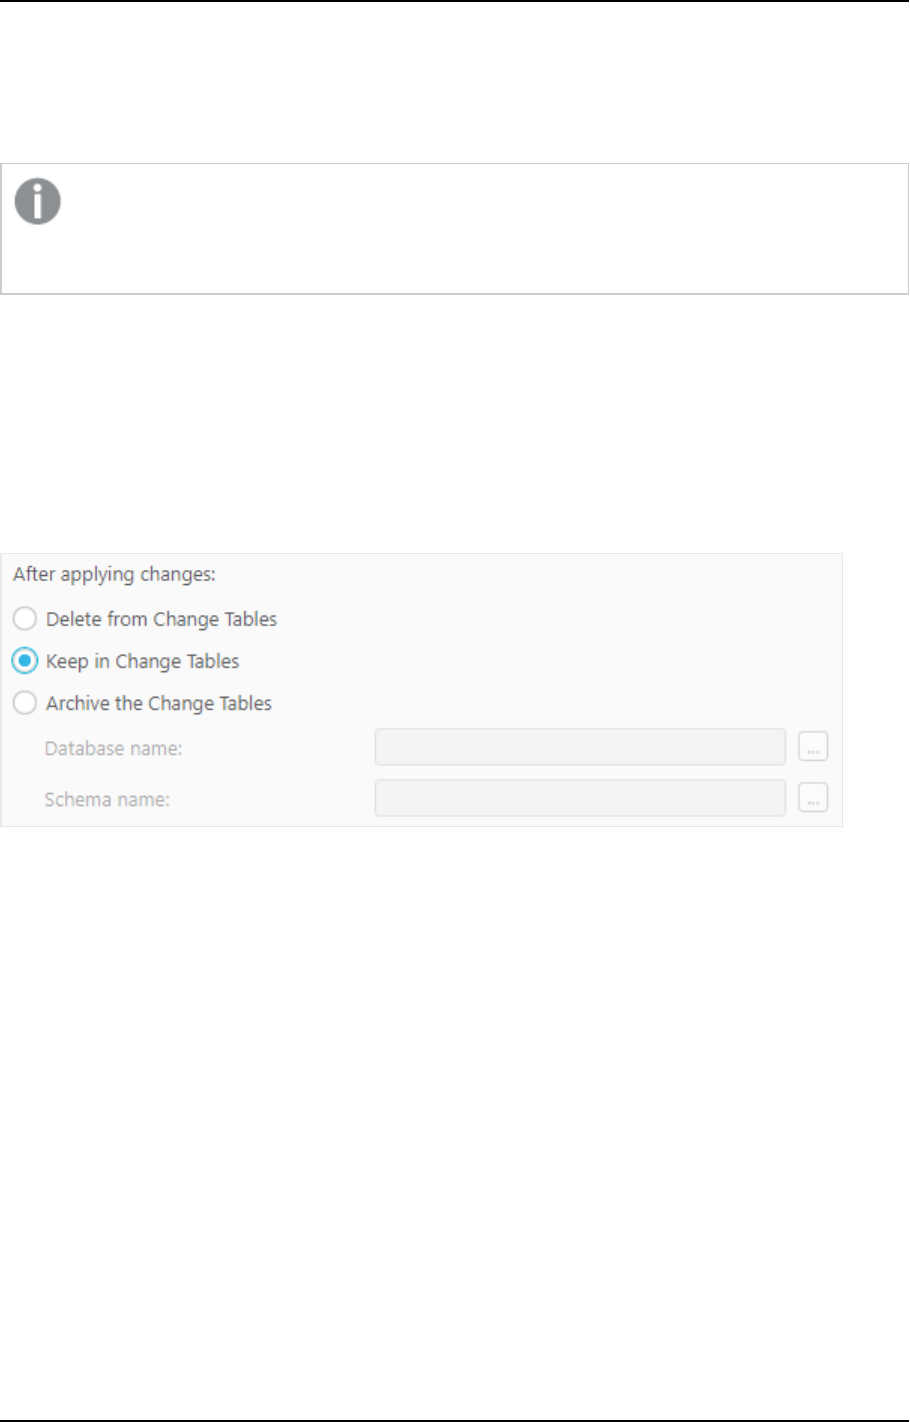
The identifier labels are as follows:
Table type Tag
Hubs CMPS_HubIns
Setup and User Guide - Qlik Compose, May 2022 10
1 What's new?
Table type Tag
Satellites CMPS_SatIns
Type1 dimensions CMPS_<data mart name>_DimT1_Init/CMPS_<data mart
name>_DimT1_Incr
Type2 dimensions CMPS_<data mart name>_DimT2_Init/CMPS_<data mart
name>_DimT2_Incr
Transactional facts CMPS_<data mart name>_FctTra_Init/CMPS_<data mart
name>_FctTra_Incr
State-oriented facts CMPS_<data mart name>_FctStO_Init
Aggregated facts: CMPS_<data mart name>_FctAgg_Init
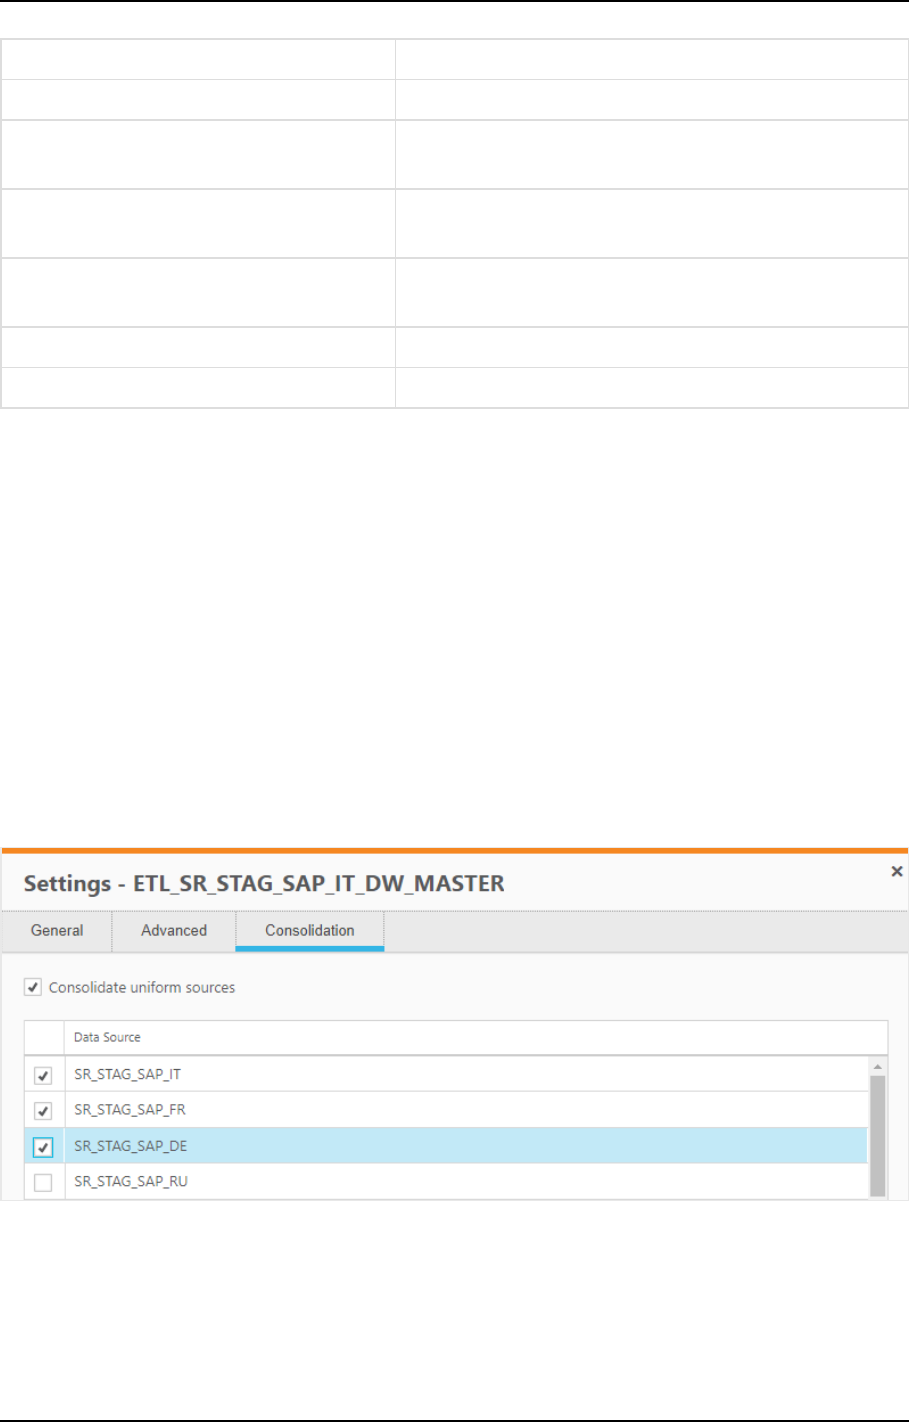
Uniform source consolidation
Uniform source consolidation as its name suggests allows you to ingest data from multiple sources into a
single, consolidated, entity.
To enable uniform source consolidation configuration, a new Consolidation tab has been added to the data
warehouse task settings.
When the Consolidate uniform sources option is enabled, Compose will read from the selected data sources
and write the data to one consolidated entity. This is especially useful if your source data is managed across
several databases with the same structure, as instead of having to define multiple data warehouse tasks (one
for each source), you only need to define a single task that consolidates the data from the selected data
sources.
Consolidation tab showing selected data sources
Environment variables
Environment variables allow developers to build more portable expressions, custom ETLs, and Compose
configurations, which is especially useful when working with several environments such as DTAP
(Development, Testing, Acceptance and Production). Different environments (for example, development and
Setup and User Guide - Qlik Compose, May 2022 11

1 What's new?
production) often have environment-specific settings such as database names, schema names, and Replicate
task names. Variables allow you to easily move projects between different environments without needing to
manually configure the settings for each environment. This is especially useful if many settings are different
between environments. For each project, you can use the predefined environment variables or create your
own environment variables.
Excluding environment variables from export operations
An option has been added to replace environment-specific settings with the defaults when exporting projects
(CLI) or creating deployment packages.
To facilitate this functionality, the --without_environment_specifics parameter was added to the
export_project_repository CLI and a Exclude environment variable values option was added to the
Create Deployment Package dialog.
Support for data profiling and data quality rules when using Google
Cloud BigQuery
You can now configure data profiling and data quality rules when using Google Cloud BigQuery as a data
warehouse.
Attributes case sensitivity support
In previous versions, attempting to create several Attributes with the same name but a different case would
result in a duplication error. Now, such attributes will now be created with an integer suffix that increases
incrementally for each attribute added with the same name. For example: Sales, SALES_01, and Sales_02.
Associating a Replicate task that writes to a Hadoop target
You can now associate a Replicate task that writes to a Hadoop target with the Compose landing.
Performance improvements
This version provides the following performance improvements:
l
Validating a model with self-referencing entities is now significantly faster than in previous versions.
For instance, it now takes less than a minute (instead of up to two hours) to validate a model with 5500
entities.
l
The time it takes to "Adjust" the data warehouse has been significantly reduced. For instance, it now
takes less than three minutes (instead of up to two hours) to adjust a data warehouse with 5500
entities.
l
Optimized queries, resulting in significantly improved data warehouse loading and CDC performance.
l
Significantly improved the loading speed of data mart Type 2 dimensions with more than two entities.
In order to benefit from this improvement, customers upgrading with existing data marts needs to
regenerate their data mart ETLs.
l
Improved performance of data warehouse loading, by reducing statements executed when there is no
data to process. This change impacts cloud data warehouses such as Snowflake, Amazon Redshift,
Setup and User Guide - Qlik Compose, May 2022 12
1 What's new?
Google BigQuery, and so on.
Relevant from Compose May 2022 SR1 only.
Support for Redshift Spectrum external tables
Supported from Compose May 2022 SR1 only.
Customers who want to leverage this support need to create Redshift Spectrum external tables and discover
them. Additionally, when running a CDC task, the new Keep in Change Tables option described above needs
to be turned on.
Data mart UX improvement
The Data Mart Dimensions tree and the Star Schema Fact tab were redesigned to provide a better user
experience.
Support for updating custom ETLs using the CLI
This version introduces support for updating custom ETLs using the Compose CLI. This functionality can be
incorporated into a script to easily update Custom ETLs.
Supported from Compose May 2022 SR2 only.
Support for defining a custom data mart schema in Microsoft Azure
Synapse Analytics
Customers working with Microsoft Azure Synapse Analytics can now utilize the Create tables in schema
option (in the data mart settings) to define a custom schema for the data mart tables.
Supported from Compose May 2022 SR2 only.
1.2 What's new in Data Lake projects?
The following section describes the enhancements and new features introduced in Qlik Compose Data Lake
projects.
Support for excluding deleted records from ODS views
A Deleted records in ODS views section has been added to the General tab of the project settings, with the
following options:
l
Exclude the corresponding record from the ODS views - This is the default option as records
marked as deleted should not usually be included in ODS views.
Setup and User Guide - Qlik Compose, May 2022 13
1 What's new?
l
Include the corresponding record in the ODS views - Although not common, in some cases, you
might want include records marked as deleted in the ODS views in order to analyze the number of
deleted records and investigate the reason for their deletion. Also, regulatory compliance might
require you to be able to retrieve the past record status (which requires change history as well).
As this was the default behavior in previous versions, you might need to select this option to
maintain backward compatibility.
Improved Historical Data Store resolution
Supported from Compose May 2022 SR1 only.
In previous versions, HDS resolution was one second. This was problematic at times as multiple changes to a
Primary Key within a second resulted in only the last change appearing in the HDS. To view all the history,
customers were forced to review the landing.
From this version, all changes (history) will shown in the HDS, facilitating better support for auditing.
Associating a Replicate task that writes to a Hortonworks Data Platform
target
You can now associate a Replicate task that writes to a Hortwonworks Data Platform target with the Compose
landing connection (in a Cloudera Data Platform (CDP) Compose project).
Databricks projects
New Databricks versions
l
Databricks 9.1 LTS is now supported on all cloud providers (AWS, Azure, and Google Cloud Platform).
l
Databricks 10.4 LTS is now supported on all cloud providers (AWS, Azure, and Google Cloud Platform).
Databricks 10.4 LTS is supported from Compose May 2022 SR1 only.
SQL Warehouse compute and Parquet support
Supported from Compose May 2022 SR1 only.
Compose May 2022 SR1 introduces support for SQL Warehouse compute. To benefit from this support,
customers need to use the new Replicate Databricks (Cloud Storage) target endpoint, which is available from
Replicate November 2022. SQL Warehouse compute offers a lower cost alternative to clusters while also
allowing Parquet file format to be used in the Landing Zone.
Setup and User Guide - Qlik Compose, May 2022 14
1 What's new?
Support for Unity Catalog
This version introduces support for Databricks Unity Catalog. Customers working with Unity Catalog can now
specify a catalog name both in the Landing connection settings and in the Storage connection settings.
1.3 New features common to both Data Warehouse projects
and Data Lake projects
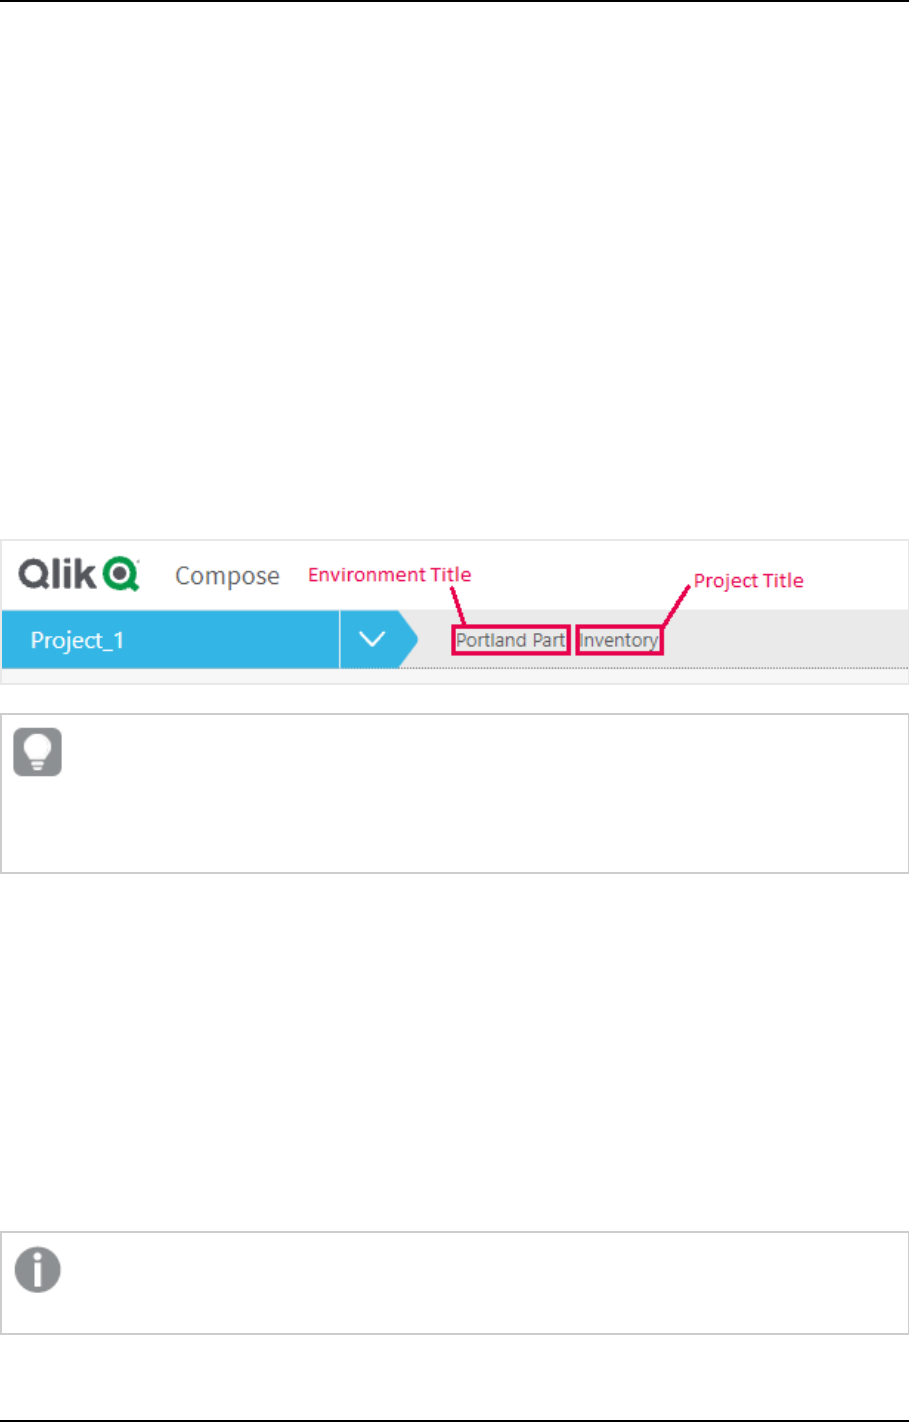
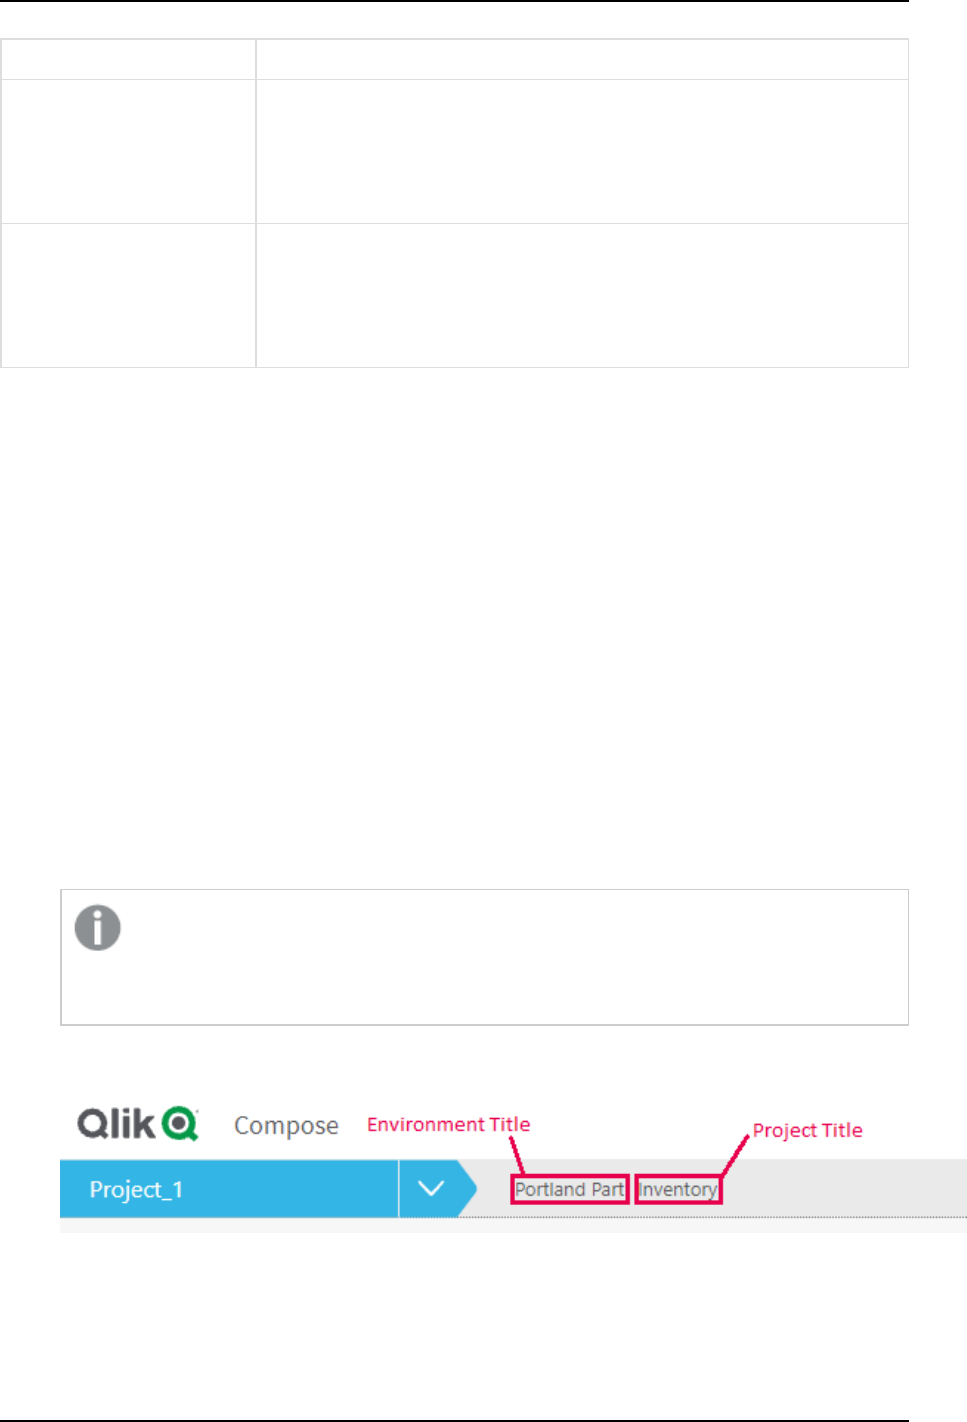
New Project title setting
A new Project title setting had been added to the Environment tab of the project settings. The project title
will be shown in the console banner. If both an Environment Title and a Project Title are defined, the project
title will be displayed to the right of the environment title. Unlike the Environment title and Environment
type, which are unique for each environment, the project title is environment independent. This means that
the project title will always be retained, even when deploying to a different environment.
The following image shows the banner with both an Environment title and a Project title:
The banner text is shown without the Environment title and Project title console labels. This
provides greater flexibility as it allows you add any banner text you like, regardless of the actual
label name. For example, specifying Project owner: Mike Smith in the Project title field,
will display that text in the banner.
Support for Microsoft Edge Browser
This version introduces support for accessing the Compose console using Microsoft Edge.
Windows Server 2022 (64-bit) support
Windows Server 2022 support is available from Compose May 2022 SR1.
Security Hardening
For security reasons, command tasks are now blocked by default. To be able to run command tasks, a
Compose administrator needs to turn on this capability using the Compose CLI. For more information, see the
Compose online help.
This functionality only applies to command tasks created after a clean installation. If you upgrade to
this version, command tasks will continue to work as previously.
Setup and User Guide - Qlik Compose, May 2022 15

1 What's new?
Managing user and group roles using the Compose CLI
This feature is available from Compose May 2022 SR1 only.
You can set and update user and group roles using the Compose CLI. You can also remove users and groups
from a role in one of the available scopes (for example, Admin in All Projects). This is especially useful if you
need to automate project deployment.
Setup and User Guide - Qlik Compose, May 2022 16

2 Introduction
2 Introduction
Qlik Compose provides an all-in-one purpose built automation solution for creating an agile data warehouse
and/or ingesting data from multiple sources to your data lake for further downstream processing. To this end,
Qlik Compose offers two project types: Data Warehouse and Data Lake. This introduction will take a closer
look at how these projects can help your organization overcome the hurdles typically faced when confronted
with the challenge of setting up and maintaining an agile data warehouse, or when faced with challenge of
ingesting data from multiple source to a single analytics-ready storage system.
2.1 Data warehouse projects
Traditional methods of designing, developing, and implementing data warehouses require large time and
resource investments. The ETL stand-up development effort alone – multi-month and error-prone with prep
times of up to 80 percent and expertise from specialized developers – often means your data model is out of
date before your BI project even starts. Plus, the result of a traditional data warehouse design, development,
and implementation process is often a system that can’t adapt to continually changing business
requirements. Yet modifying your data warehouse diverts skilled resources from your more innovation-related
projects. Consequently, your business ends up with your data warehouse becoming a bottleneck as much as
an enabler of analytics.
Qlik Compose data warehouse projects allows you to automate these traditionally manual, repetitive data
warehouse tasks: design, development, testing, deployment, operations, impact analysis, and change
management. Qlik Compose automatically generates the task statements, data warehouse structures, and
documentation your team needs to efficiently execute projects while tracking data lineage and ensuring
integrity. Using Qlik Compose, your IT teams can respond fast – in days – to new business requests, providing
accurate time, cost, and resource estimates. Then once projects are approved, your IT staff can finally deliver
completed data warehouses, data marts, and BI environments in far less time.
Data warehouse projects architecture
The process is illustrated in the following diagram and described below:
Setup and User Guide - Qlik Compose, May 2022 17

2 Introduction
Key features
The comprehensive set of automation features in our Qlik Compose solution simplifies data warehousing
projects. It eliminates the cumbersome and error-prone manual coding required by legacy data warehouse
design and implementations’ many repetitive steps. In addition, our solution includes the operational features
your business needs for ongoing data warehouse and data mart maintenance.
Automation Features Operational Features
l
Optimized for either model-driven or
data-driven data warehousing
approaches
l
Real-time source data integration
l
Automated ETL generation
l
Physical data warehouse management
l
Data mart generation
l
Monitoring
l
Workflow designer and scheduler
l
Notifications
l
Data profiling and quality enforcement
l
Lineage and impact analysis
l
Project documentation generation
l
Migration between environments
2.2 Data lake projects
Leverage Qlik Compose data lake projects to automate your data pipelines and create analytics-ready data
sets. By automating data ingestion, schema creation, and continual updates, organizations realize faster time-
to-value from their existing data lake investments.
Easy data structuring and transformation
An intuitive and guided user interface helps you build, model and execute data lake pipelines. Automatically
generate schemas and Hive Catalog structures for operational data stores (ODS) and historical data stores
(HDS) without manual coding.
Continuous updates
Be confident that your ODS and HDS accurately represent your source systems.
l
Use change data capture (CDC) to enable real-time analytics with less administrative and processing
overhead.
l
Efficiently process initial loading with parallel threading.
l
Leverage time-based partitioning with transactional consistency to ensure that only transactions
completed within a specified time are processed.
Historical data store
Derive analytics-specific data sets from a full historical data store (HDS).
l
New rows are automatically appended to HDS as data updates arrive from source systems.
l
New HDS records are automatically time-stamped, enabling the creation of trend analysis and other
time-oriented analytic data marts.
l
Supports data models that include Type-2, slowing changing dimensions.
Setup and User Guide - Qlik Compose, May 2022 18

2 Introduction
Data lake project architecture
The flow is as follows:
1. Land: The source tables are loaded into the Landing Zone using Qlik Replicate or other third-party
replication tools.
When using Qlik Replicate to move the source table to the Landing Zone, you can define either a Full
Load replication task or a Full Load and Store Changes task to constantly propagate the source table
changes to the Landing Zone in write-optimized format.
2. Store: After the source tables are present in the Landing Zone, Compose auto-generates metadata
based on the data source(s). Once the metadata and the mappings between the tables in the Landing
Zone and the Storage Zone have been finalized, Compose creates and populates the Storage Zone
tables in read-optimized format, ready for consumption by downstream applicaitons.
It should be noted that even though setting up the initial project involves both manual and automatic
operations, once the project is set up, you can automate the tasks by designing a Workflow in Compose
and/or utilizing the Compose scheduler.
Setup and User Guide - Qlik Compose, May 2022 19
3 Qlik Compose installation and setup
3 Qlik Compose installation and setup
This section describes how to install and set up Qlik Compose.
Note that as Qlik Replicate serves as a data (and metadata) provider for Qlik Compose, you also need to install
Replicate in your organization. For a description of the Replicate installation procedure, refer to the Qlik
Replicate Setup and User Guide.
In this section:
l
Preparing your system for Compose (page 20)
l
Installing or upgrading Compose (page 21)
l
Installing and upgrading Compose silently (page 22)
l
Determining the required number of database connections (page 24)
l
Accessing Qlik Compose (page 25)
3.1 Preparing your system for Compose
Compose should be installed on a Windows Server machine that is able to access the data warehouse and
optionally the source database(s) defined in your Compose project. Note that Compose only needs to access
the source database if you plan to discover the source database when generating your model. For more
information on discovery, see Discovering the Source Database or Landing Zone (page 156).
Before installing Compose, make sure that the following prerequisites have been met:
Hardware prerequisites
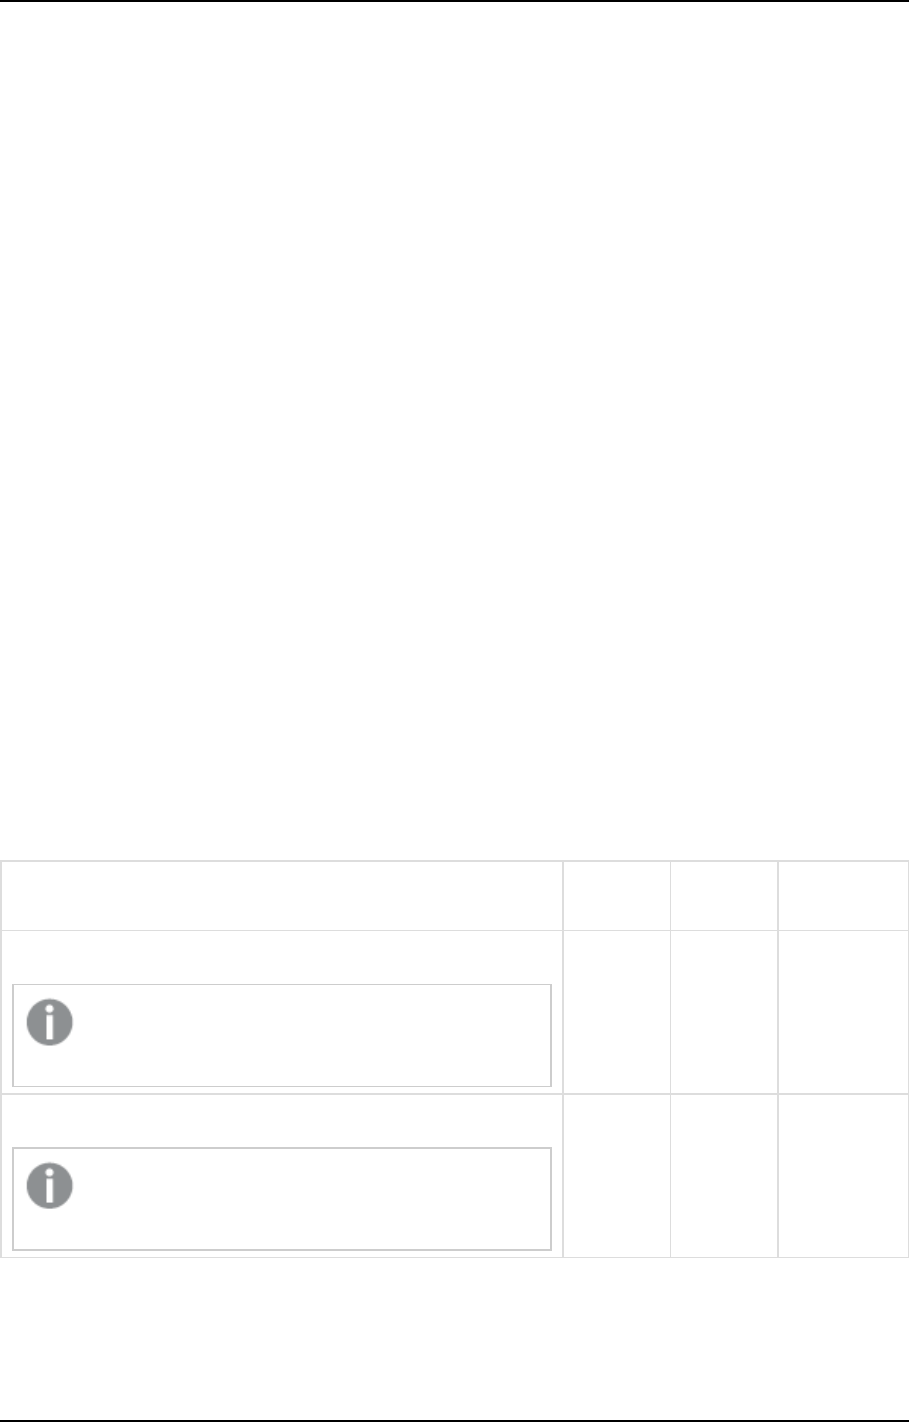
The following table lists the required hardware for varied deployment scales:
Component
Basic
System
Large
System
Extra-Large
System
Processor
Additional cores may improve performance when
several ETL processes are running concurrently.
Quad core Quad core
base
8-core base
Memory
Additional memory may improve performance when
several ETL processes are running concurrently.
8 GB 16 GB 32 GB
Hardware component requirements
Setup and User Guide - Qlik Compose, May 2022 20
3 Qlik Compose installation and setup
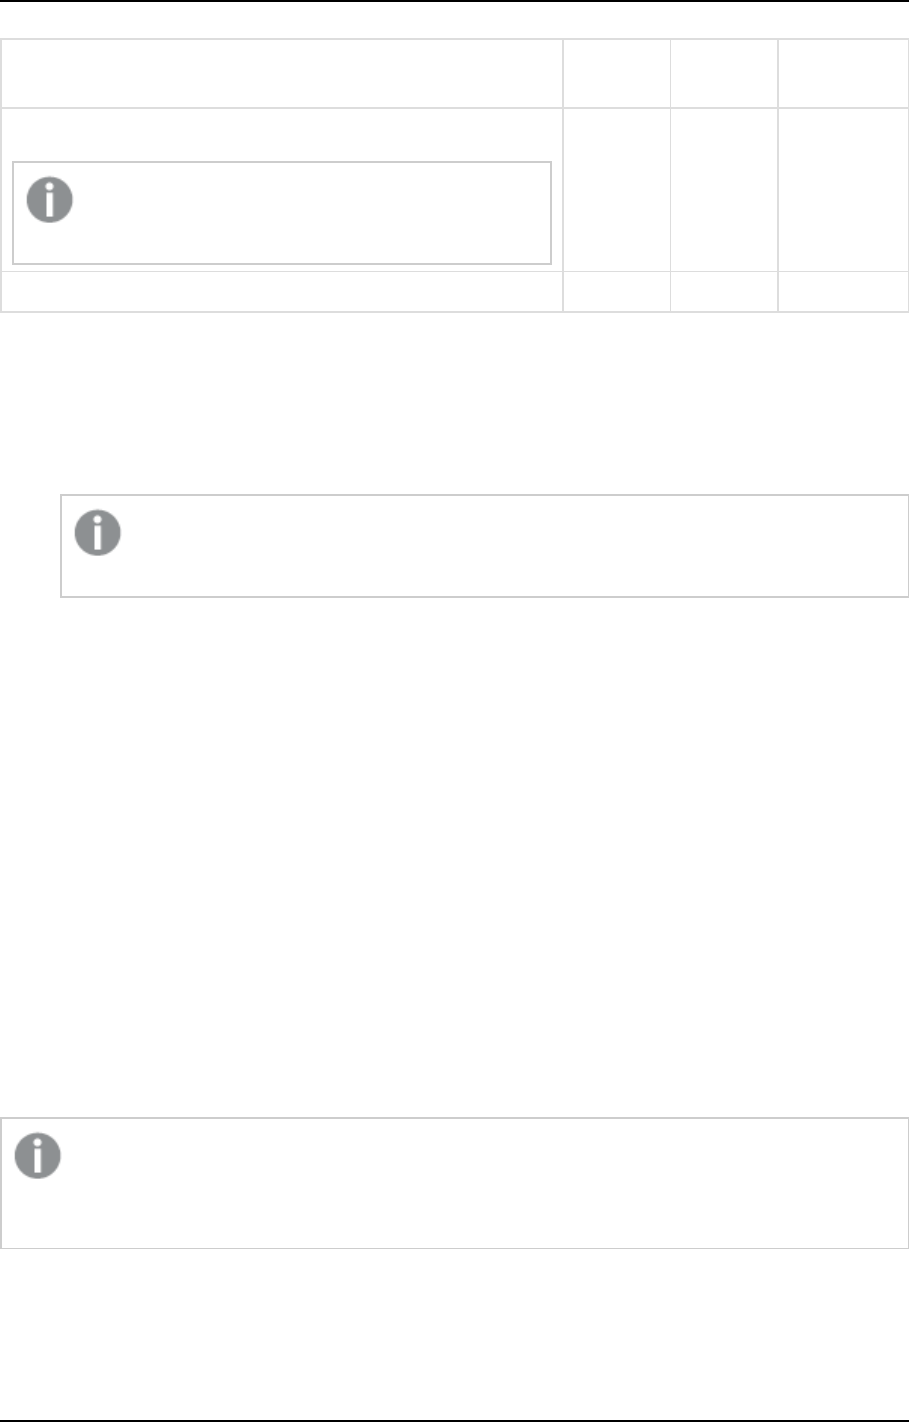
Component
Basic
System
Large
System
Extra-Large
System
Disk requirements
For all configurations, RAID is recommended for higher
system availability in case of disk failure.
100 GB
SSD
500 GB
10,000
RPM
RAID
500 GB
15,000 RPM
RAID
Network 1 Gb 10 Gb Two 10 Gb
Software and network prerequisites
l
Firewall ports 80/443 should be open on the Compose machine.
l
.NET Framework 4.8 or later installed on the Compose machine.
l
TLS 1.2 or later must be supported in the underlying OS.
On Windows Server 2012 R2, TLS 1.2 should be turned on by default. If it is not, refer to the
Microsoft online help for instructions on how to turn it on.
For information on supported databases and browsers, see Support matrix (page 389).
Required permissions for the Compose service
Qlik Compose needs to be installed and run as Administrator.
Reserved system names
All database object names (queries, tables, columns, schemas, and indexes) starting with the prefix qlk__,
and regardless of case, are reserved for internal Compose use.
Thus, a table named qlK__MyTable or a column named QLK__MyColumn would not be permitted.
3.2 Installing or upgrading Compose
The following topic describes how to install and upgrade Qlik Compose.
Installation Instructions
For best performance when using cloud-based databases (such as, Snowflake) as your data source
or data warehouse, it is strongly recommended to install Qlik Compose on a machine (such as
Amazon EC2) located in the same region as your database instance.
Setup and User Guide - Qlik Compose, May 2022 21
3 Qlik Compose installation and setup
To install Compose:
1. Run the Compose setup file (Qlik_Compose_<version.number>.exe).
The Qlik Compose setup wizard opens.
2. Click Next. Select I accept the terms of the license agreement and then click Next again.
3. Optionally change the installation directory and then click Next.
4. Click Next and then click Next again to start the installation.
5. When the installation completes, click Finish to exit the Wizard.
As part of the installation, a new Windows Service called Qlik Compose is created.
6. Open the Qlik Compose console as described in Accessing Qlik Compose (page 25).
When you first open the Qlik Compose Console, you will be prompted to register an
appropriate license. Register the license that you received from Qlik.
Upgrade Instructions
Depending on your existing Compose version, you may also need to perform additional version-
specific upgrade tasks. It is therefore strongly recommended to review the release notes for the new
version before upgrading.
1. Stop all Compose tasks and services.
2. After the Qlik Compose service has been stopped by the Installer, make sure that all child processes
are also stopped.
Compose runs a check to verify the termination of tasks and processes before running an
upgrade. If any processes are found to be still running, the installation will be aborted.
3. Run the Qlik Compose setup wizard.
4. Start all Compose tasks and services.
3.3 Installing and upgrading Compose silently
Compose can be installed silently (i.e. without requiring user interaction). This option is useful, for example, if
you need to install Compose on several machines throughout your organization.
Before commencing the installation, make sure that the prerequisites have been met. See Preparing
your system for Compose (page 20).
The following topics describe how silently install, upgrade, and uninstall Compose:
Setup and User Guide - Qlik Compose, May 2022 22

3 Qlik Compose installation and setup
l
Silently installing Compose (page 23)
l
Silently upgrading Compose (page 24)
l
Silently uninstalling Compose (page 24)
Silently installing Compose
The installation process consists of two stages: creating a response file, and running the silent install.
Creating a response file
Before starting the installation, you need to create a response file.
To create the response file:
1. From the directory containing the Compose setup file, run the following command(note that this will
also install Compose):
Qlik_Compose_<version.number>.exe /r /f1<my_response_file>
where:
<my_response_file> is the full path to the generated response file.
Example:
Qlik_Compose_<version.number>.exe /r /f1C:\Compose_install.iss
2. To change the default installation directory, open the response file in a text editor and edit the first
szDir value as necessary.
3. To change the default data directory, edit the third szDir value as necessary.
4. Save the file as <name>.iss, e.g. Compose_install_64.iss.
Running the silent install
To silently install Compose, open a command prompt and change the working directory to the directory
containing the Compose setup file. Then issue the following command (where <response file> is the path to
the response file you created earlier):
Syntax:
<Compose_setup_file> /s /f1<my_response_file> [/f2<LOG_FILE>]
Example:
C:\>Qlik_Compose_<version.number>.exe /s /f1C:\temp\1\Compose_install.iss /f2C:\temp\1\silent_
x64_install.log
If the installation was successful, the log file should contain the following rows:
[ResponseResult]
ResultCode=0
Setup and User Guide - Qlik Compose, May 2022 23

3 Qlik Compose installation and setup
Silently upgrading Compose
Before starting the silent upgrade:
1. Create a response file. See Step 1 of "Creating a Response File" in Silently installing Compose
(page 23)
2. It is strongly recommended to back up the Compose "Data" folder.
3. All tasks and java processes must be terminated. Compose runs a check to verify the
termination of tasks and processes before running the upgrade. If any processes are found to
be still running, the upgrade will be aborted.
To silently upgrade Compose:
1. Open a command prompt and change the working directory to the directory containing the Compose
setup file.
2. Issue the following command (where <my_response_file> is the path to the response file you created
earlier):
Syntax:
<COMPOSE_KIT> /s /f1<my_response_file> [/f2<LOG_FILE>]
Example:
C:\>Qlik_Compose_<version.number>.exe /s /f1C:\temp\1\Compose_upgrade.iss /f2C:\temp\1\silent_
x64_up.log
If the upgrade was successful, the log file should contain the following rows:
[ResponseResult]
ResultCode=0
Silently uninstalling Compose
Silently uninstalling Compose is also comprised of creating a response file and running the silent uninstall.
The process is the same as for silently installing Compose. For instructions, see Silently installing Compose
(page 23)
3.4 Determining the required number of database
connections
As a rule of thumb, the higher the number of database connections opened for Compose, the more tables
Compose will be able to load in parallel. It is therefore recommended to open as many database connections
as possible for Compose. However, if the number of database connections that can be opened for Compose is
limited, you can calculate the minimum number of required connections as described below.
Setup and User Guide - Qlik Compose, May 2022 24
3 Qlik Compose installation and setup
To determine the number of required connections:
1. For each task, determine the number of connections it can use during runtime. This value should be
specified in the Advanced tab in the Manage Data Warehouse Tasks Settings window (Data Warehouse
projects) or in the Manage Storage Tasks Settings window (Data Lake projects). When determining the
number of required connections, various factors need to be taken into account including the number
of tables, the size of the tables, and the volume of data. It is therefore recommended to determine the
required number of connections in a Test environment.
2. Calculate the number of connections needed by all tasks that run in parallel. For example, in a Data
Lake project, if three data storage tasks run in parallel, and each task requires 5 connections, then the
number of required connections will be 15.
Similarly, in a Data Warehouse project, if a workflow contains two data warehouse tasks that run in
parallel and each task requires 5 connections, then the minimum number of required connections will
be 10. However, if the same workflow also contains two data mart tasks (that run in parallel) and the
sum of their connections is 20, then the minimum number of required connections will be 20.
3. Factor in the connections required by the Compose Console. To do this, multiply the maximum
number of concurrent Compose users by three and then add to the sum of Step 2 above. So, if the
number of required connections is 20 and the number of concurrent Compose users is 4, then the total
would be:
20 + 12 = 32
3.5 Accessing Qlik Compose
You can use a Web browser to access the Qlik Compose Console from any computer in your network. For
information on supported browsers, see Preparing your system for Compose (page 20).
The person logged in to the computer where you are accessing the Console must be an authorized
Qlik Compose user. For more information, see Managing user permissions (page 377).
To access the Qlik Compose Console:
1. To access the Qlik Compose Console from the machine on which it is installed, select All Programs >
Qlik Compose > Qlik Compose Console from the Windows Start menu. To access the Qlik Compose
Console from a remote browser, type the following address in the address bar of your Web browser
https://<ComputerName>/qlikcompose/
Where <ComputerName> is the name or IP address of the computer on which Compose is installed.
2. If no server certificate is installed on the Compose machine, a page stating that the connection is
untrusted will be displayed. This is because when Compose detects that no server certificate is
installed, it installs a self-signed certificate. Since the browser has no way of knowing whether the
certificate is safe, it displays this page. For more information, see Setting up HTTPS for the Compose
console (page 26).
3. When prompted for your password, enter your domain username and password.
Setup and User Guide - Qlik Compose, May 2022 25

4 Security considerations
4 Security considerations
During normal operation, Qlik Compose needs to access databases and storage systems for the purpose of
reading and writing data and metadata.
This section describes the procedure you should follow to ensure that any data handled by Qlik Compose will
be completely secure.
In this section:
l
Setting up HTTPS for the Compose console (page 26)
l
Setting the hostname and changing the HTTPS port (page 30)
l
Setting up HSTS on Compose (page 31)
l
Setting Single Sign-On Authentication with Kerberos (page 32)
l
Changing the master user password (page 32)
4.1 Setting up HTTPS for the Compose console
Industry-standard security practices dictate that web user interface for enterprise products must use secure
HTTP (HTTPS). Qlik Compose enforces the use of HTTPS and will not work if HTTPS is configured incorrectly.
As Compose uses the built-in HTTPS support in Windows, it relies on the proper setup of the Windows
machine it runs on to offer HTTPS access. In most organizations, the IT security group is responsible for
generating and installing the SSL server certificates required to offer HTTPS. It is strongly recommended that
the machine on which Compose is installed already has a valid SSL server certificate installed and bound to
the default HTTPS port (443).
Checking if an SSL certificate is installed
To check whether an SSL certificate is installed, you can use the following command:
netsh http show sslcert | findstr /c:":443 "
If an SSL certificate is installed, the output should look like this:
netsh http show sslcert | finds
tr /c:":443 "
IP:port : 192.168.1.13:443
IP:port : 192.168.1.11:443
IP:port : [fe80::285d:599c:4a55:1092%11]:443
IP:port : [fe80::3d0e:fb1c:f6c3:bc52%23]:443
With a valid SSL certificate installed, the Qlik Compose web user interface will automatically be available for
secure access from a web browser using the following URL:
https://<ComputerName>/qlikcompose/
Where <ComputerName> is the name or IP address of the computer on which Compose is installed.
Setup and User Guide - Qlik Compose, May 2022 26
4 Security considerations
Using the self-signed certificate
Due to the way the HTTPS protocol works, there is no way for Compose to automatically provide and install a
valid SSL server certificate. Still, in the event that no SSL server certificate is installed, Compose automatically
generates and installs a self-signed SSL server certificate (as a temporary measure). This certificate is
generated on the Compose machine and cannot be exported or used elsewhere.
It should be noted that browsers do not consider the certificate to be valid because it was not signed by a
trusted certificate authority (CA). When connecting with a browser to a server that uses a self-signed
certificate, a warning page is shown such as this one in Chrome:
Or this one in Firefox:
Setup and User Guide - Qlik Compose, May 2022 27
4 Security considerations
The warning page informs you that the certificate was signed by an unknown certificate authority. All
browsers display a similar page when presented with a self-signed certificate. If you know that the self-signed
certificate is from a trusted organization, then you can instruct the browser to trust the certificate and allow
the connection. Instructions on how to trust the certificate vary between browsers and even between different
versions of the same browser. If necessary, refer to the help for your specific browser.
Some corporate security policies prohibit the use of self-signed certificates. In such cases, it is
incumbent upon the IT Security department to provide and install the appropriate SSL server
certificate (as is the practice with other Windows products such as IIS and SharePoint). If a self-
signed certificate was installed and needs to be removed, then the following command can be used:
composeCtl.exe certificate clean
Note that after the self-signed certificate is deleted, connections to the Qlik Compose machine will
not be possible until a valid server certificate is installed. Should you want to generate a new self-
signed certificate (to replace the deleted certificate), simply restart the Qlik Compose service.
Setup and User Guide - Qlik Compose, May 2022 28

4 Security considerations
Replacing the self-signed certificate on Windows
The instructions below are intended for organizations who wish to replace the self-signed certificate
generated by the Compose Server on Windows with their own certificate. The process, which is described
below, involves removing the self-signed certificate and then importing the new certificate.
See also Setting up HTTPS for the Compose console (page 26).
Before starting, make sure that the following prerequisites have been met:
l
The replacement certificate must be a correctly configured SSL PFX file containing both the private key
and the certificate.
l
The common name field in the certificate must match the name browsers will use to access the
machine.
To remove the self-signed certificate created by Qlik Compose:
1. Stop the Qlik Compose service.
2. Open a command prompt (using the "Run as administrator" option) and change the path to the
Compose bin directory. The default path is C:\Program Files\Qlik\Compose\bin.
3. Run the following command:
composeCtl.exe certificate clean
To import your own certificate:
1. Run mmc.exe to open the Microsoft Management Console.
2. From the File menu, select Add/Remove Snap-in. The Add or Remove Snap-ins window opens.
3. In the left pane, double-click Certificates. The Certificates snap-in wizard opens.
4. Select Computer account and then click Next.
5. In the Select Computer screen, make sure that Local computer is selected and then click Finish.
6. Click OK to close the Add or Remove Snap-ins window.
7. In the left pane, expand the Certificates folder. Then, right-click the Personal folder and select All
Tasks > Import.
8. In the File to Import screen, select your PFX certificate file. Note that by default the Open window
displays CER files. In order to see your PFX files, you need to select Personal Information Exchange
from the drop-down list in the bottom right of the window.
9. Click Next and enter the private key password.
10. Continue clicking Next until you reach the Completing the Certificate Import Wizard screen. Then
click Finish to exit the wizard.
11. In the Personal > Certificates folder, double-click the newly imported certificate. The Certificate
window opens.
12. Scroll down the Details tab until you see the Thumbprint details and copy them to the clipboard.
13. Open a command prompt and run the following commands:
Setup and User Guide - Qlik Compose, May 2022 29

4 Security considerations
Syntax:
¢ netsh http add sslcert ipport=0.0.0.0:443 certhash=[YOUR_CERTIFICATE_THUMBPRINT_
WITHOUT_SPACES] appid={4dc3e181-e14b-4a21-b022-59fc669b0914}
Example:
netsh http add sslcert ipport=0.0.0.0:443
certhash=5f6eccba751a75120cd0117389248ef3ca716e61 appid={4dc3e181-e14b-4a21-b022-
59fc669b0914}
Syntax:
¢ netsh http add sslcert ipport=[::]:443 certhash=[YOUR_CERTIFICATE_THUMBPRINT_WITHOUT_
SPACES] appid={4dc3e181-e14b-4a21-b022-59fc669b0914}
Example:
netsh http add sslcert ipport=[::]:443 certhash=5f6eccba751a75120cd0117389248ef3ca716e61
appid={4dc3e181-e14b-4a21-b022-59fc669b0914}
14. Close the command prompt and Microsoft Management Console.
15. Start the Qlik Compose service.
4.2 Setting the hostname and changing the HTTPS port
After installing Qlik Compose, you can use the Compose CLI to set the hostname and HTTPS port for accessing
the Qlik Compose server machine.
Under normal circumstances, you should not need to set the hostname. However, on some systems,
connecting using HTTPS redirects to localhost. If this occurs, set the hostname of the Compose machine by
running the command shown below.
To set the hostname:
Run the following command from the Compose bin directory:
Command syntax
ComposeCtl.exe configuration set --address
address
Where:
--address is the hostname of the Compose server machine.
Example
ComposeCtl.exe configuration set --address MyHostName
To change the HTTPS port:
Run the following command from the Compose bin directory:
Command syntax
ComposeCtl.exe configuration set --https_port
port_number
Where:
Setup and User Guide - Qlik Compose, May 2022 30
4 Security considerations
--https_port is the HTTPS port number of the Compose server machine. The default HTTPS port is 443.
Example
ComposeCtl.exe configuration set --https_port 442
4.3 Setting up HSTS on Compose
HSTS is a web security policy mechanism that helps to protect websites against man-in-the-middle attacks
such as protocol downgrade attacks and cookie hijacking. It allows web servers to declare that web browsers
(or other complying Dilqam) should automatically interact with it using only HTTPS connections, which
provide Transport Layer Security (TLS/SSL).
You can force the Compose Web UI and/or the Compose REST API connections to use HSTS (HTTP Strict
Transport Security). To do this, run the commands described below.
All commands should be run from as Admin from the product bin folder.
Enabling HSTS
Command syntax
ComposeCtl.exe configuration set --static_http_headers
header_list
--rest_http_headers
header_
list
Parameters
Parameter Description
--static_http_headers The headers required to connect to the Compose Web UI.
--rest_http_headers The headers required to connect using the API.
Headers should be specified using the following format:
ComposeCtl.exe configuration set --static_http_headers "header1:value1" "header2:value2" --
rest_http_headers "header1:value1" "header2:value2"
Example
ComposeCtl.exe configuration set --static_http_headers "Strict-Transport-Security:max-
age=31536000; includeSubDomains;" --rest_http_headers "Strict-Transport-Security":"max-
age=31536000; includeSubDomains;"
Disabling HSTS
You can also revert to regular HTTPS connections.
Command syntax
ComposeCtl.exe configuration set --static_http_headers ""|--rest_http_headers ""
Setup and User Guide - Qlik Compose, May 2022 31
4 Security considerations
Parameters
Parameter Description
--static_http_headers Use this parameter to revert the headers required to connect to the
Compose Web UI.
--rest_http_headers Use this parameter to revert the headers required to connect using the
API.
Example
Disable static_http_headers
ComposeCtl.exe configuration set --static_http_headers ""
Disable rest_http_headers
ComposeCtl.exe configuration set --rest_http_headers ""
4.4 Setting Single Sign-On Authentication with Kerberos
Kerberos is an enterprise authentication protocol that uses the concept of tickets and three-way
authentication to enable users and computers to identify themselves and secure access to resources.
Using Kerberos SSO, users can seamlessly log into Compose and administrators can completely externalize
and centrally manage users or group memberships using their existing Kerberos infrastructure.
To set the authentication method to single sign-on with Kerberos, run:
ComposeCtl.exe configuration set --authentication_method sso-kerberos
To revert the authentication method to standard single sign-on, run:
ComposeCtl.exe configuration set --authentication_method sso
If the Kerberos protocol fails, Compose will try to log in using NTLM authentication. If NTLM
authentication is not enabled in the system, an error will be returned.
4.5 Changing the master user password
All passwords are encrypted using a one-time randomly generated master key. The master key is stored
automatically in the root repository of Compose (<product_dir>\data\projects\GlobalRepo.sqlite).
The master key is encrypted by a user key, which in turn, is derived from a master password entered by the
user. By default, the Master User Password is randomly generated by Compose. The best practice, however, is
to change the Master User Password, as this will allow Compose projects and configuration settings to be
imported to another machine without needing to re-enter the project credentials.
Setup and User Guide - Qlik Compose, May 2022 32
4 Security considerations
It may also be convenient to use the same Master User Password within a trusted environment. In other
words, if the same administrators control both the production and the testing environments, using the same
Master User Password in both environments will facilitate the transfer of projects with credentials between
the testing and production environments.
The user key is stored in the muk.dat file located in <product_dir>\data\.
The Master User Password must be a minimum of 32 characters. You can either use your own
password or run the
genpassword
utility described below to generate a password for you. Note also
that the password can only contain alphanumeric characters (i.e. it cannot contain special keyboard
characters such as # or @).
All of the commands listed below must be run as Admin from:
<product_dir>\bin
To generate a random 32 character password:
Issue the following command:
ComposeCtl.exe utils genpassword
To change the randomly generated master user password:
1. Issue the following command:
ComposeCtl.exe masterukey set --password <new_master_password>
If you add the
--prompt
parameter to the command and omit the
--password
parameter,
the CLI will prompt you for the password. When you enter the password, it will be obfuscated.
This is especially useful if you do not want passwords to be retained in the command prompt
history.
Syntax:
ComposeCtl.exe masterukey set --prompt
2. Restart the Compose service.
To change a user-defined master user password:
1. Issue the following command:
ComposeCtl.exe masterukey set --current-password <current_master_password> --password
<new_master_password>
Setup and User Guide - Qlik Compose, May 2022 33

4 Security considerations
If you add the
--prompt
parameter to the command and omit the
--password
and
--
current-password
parameters, the CLI will prompt you for the required passwords. When
you enter the passwords, they will be obfuscated. This is especially useful if you do not want
passwords to be retained in the command prompt history.
Syntax:
ComposeCtl.exe masterukey set --prompt
2. Restart the Compose service.
Setup and User Guide - Qlik Compose, May 2022 34

5 Data Warehouse projects
5 Data Warehouse projects
This section explains how to set up data warehouse projects.
In this section:
l
Defining a Qlik Replicate task (page 36)
l
Adding and managing data warehouse projects (page 37)
l
Getting started with Data Warehouse projects (page 104)
l
Setting up a data warehouse connection (page 111)
l
Setting up Landing Zone and Data Source connections (page 131)
l
Creating and managing the model (page 154)
l
Creating and managing the data warehouse (page 190)
l
Creating and managing data marts (page 225)
l
Creating and managing command tasks (page 258)
l
Controlling and monitoring tasks and workflows (page 260)
Setup and User Guide - Qlik Compose, May 2022 35

5 Data Warehouse projects
5.1 Defining a Qlik Replicate task
In order to work with Compose, you first need to define a Qlik Replicate task that replicates the source tables
from the source endpoint to a landing zone in the data warehouse (defined as the target endpoint in the
Replicate task). The landing zone should then be defined as the data source for the Compose project.
For information on which endpoints can be used in a Replicate task that lands data for Compose, see
Supported data warehouses (page 390).
Configuring multiple Replicate tasks with the same landing zone is not supported.
The steps below highlight the settings that are required when using Qlik Replicate with Compose. For a full
description of setting up tasks in Qlik Replicate, please refer to the Qlik Replicate Help.
Prerequisites
When Oracle is defined as the source endpoint in the Replicate task, full supplemental logging should be
defined for all source table columns that exist on the target and any source columns referenced in filters, data
quality rules, lookups, and expressions.
Limitations and considerations
l
Replicate allows you to define global transformations that are applied to source/Change tables during
task runtime. The following global transformations, however, should not be defined (as they are not
compatible with Compose tasks):
l
Rename Change Table
l
Rename Change Table schema
l
The Create target control tables in schema option in the Replicate task settings' Control Table tab is
not supported.
l
Support for the JSON and XML data types is limited to the Snowflake VARIANT data type. Therefore,
apart from the Snowflake VARIANT data type, columns that are usually created with these data types
(by the Replicate target endpoint) should be created as STRINGs instead. Therefore, columns that are
usually created with these data types (by the Replicate target endpoint) should be created as STRINGs
instead. This can be done automatically within Replicate using a data type transformation. For
information on which target endpoints support JSON and XML data types as well as instructions on
how to create a data type transformation, please refer to the Replicate Help.
l
As Compose requires a full-after image to be able to perform Change Processing, the following
Replicate source endpoints are not directly supported (as they do not provide a full-after image):
l
SAP HANA (log based)
l
Salesforce
Setup and User Guide - Qlik Compose, May 2022 36

5 Data Warehouse projects
Setting up the task
To define the task:
1. Open Qlik Replicate and in the New Task dialog, do one of the following:
l
To enable Full Load and Change Processing replication, enable the Full Load and Store
Changes options (the Apply Changes option should not be enabled).
l
To enable Full Load only replication, enable the Full Load replication option only.
l
To enable Change Processing replication only, make sure that only the Store Changes option is
enabled. Note that this option should only be selected if the Full Load tables and data already
exist in the landing zone.
l
To enable Change Processing for lookup tables that already exist in the landing zone and are
not part of the Compose model, enable the Apply Changes option only. Note that such a task
should be defined in addition to the Full Load and Store Changes replication task described
above. For more information on updating standalone lookup tables, see Using lookup tables
that do not have a task for CDC mapping (page 208).
2. Open the Manage Endpoint Connections window and define a source and target endpoint. The target
endpoint must be the database where you want Compose to create the data warehouse.
3. Add the endpoints to the Qlik Replicate task and then select which source tables to replicate.
4. This step is not relevant if you selected the Apply Changes or Full Load replication option only. In the
Task Settings' Store Change Setting tab, make sure that Store Changes in is set to Change tables.
5. In the Task Settings’ Target Metadata tab, specify a Target table schema name.
6. If a Primary Key in a source table can be updated, it is recommended to turn on the DELETE and
INSERT when updating a primary key column option in Replicate's task settings' Change
Processing Tuning tab. When this option is turned on, history of the old record will not be preserved
in the new record. Note that this option is supported from Replicate November 2022 only.
7. Run the task. Wait for the Full Load replication to complete and then continue the workflow in
Compose as described in the Data warehouse project tutorial (page 107) below and inAdding and
managing data warehouse projects (page 37).
Replicate allows you to define global transformations that are applied to source/Change tables
during task runtime. The following global transformations, however, should not be defined (as they
are not compatible with Compose tasks):
l
Rename Change Table
l
Rename Change Table schema
5.2 Adding and managing data warehouse projects
This section describes how to add and manage a data warehouse project.
In this section:
Setup and User Guide - Qlik Compose, May 2022 37

5 Data Warehouse projects
l
Adding data warehouse projects (page 38)
l
Managing and monitoring projects (page 282)
l
Project settings (page 40)
l
Resetting projects (page 46)
l
Project deployment (page 47)
l
Migrating objects as CSV files (page 49)
l
Exporting and importing projects using the CLI (page 78)
l
Generating projects using the CLI (page 98)
l
Exporting project documentation (page 99)
l
Viewing and downloading DDL scripts (page 100)
l
Project versioning (page 300)
l
Creating a diagnostics package (page 301)
Adding data warehouse projects
Adding a new project is the first task you need to undertake in order to work with Qlik Compose.
There are two types of project:
l
Data Warehouse - for ingesting data from multiple sources and creating analytics-ready data marts.
l
Data Lake - for ingesting data from multiple sources and moving it to a storage system for analytics.
This topic guides you through the steps required to set up a data warehouse project. For instructions on
setting up a Data Lake project, see Adding data lake projects (page 280).
You can set up as many projects as you need, although the ability to actually run tasks is determined by your
Compose license.
Adding a Data Warehouse project
To add a new Data Warehouse project:
1. Click the New Project toolbar button.
The New Project wizard opens.
2. In the Project Name tab, specify the following and then click Next:
l
Name: The project name.
Project names cannot contain the following characters: /\,&#%$@=^*+"'`~?<>:;[]{} as
well as all non-printable characters (below 0x20). The project name can contain a
single dot, but it cannot be the first or last character.
l
Environment Type: Optionally, change the default environment type.
l
Environment Title: Optionally, specify an environment title.
For information about the environment settings, see Environment tab (page 43).
Setup and User Guide - Qlik Compose, May 2022 38
5 Data Warehouse projects
The following names are reserved system names and cannot be used as project names:
CON,
PRN, AUX, CLOCK$, NUL, COM1, COM2, COM3, COM4, COM5, COM6, COM7, COM8, COM9,
LPT1, LPT2, LPT3, LPT4, LPT5, LPT6, LPT7, LPT8
and
LPT9
.
3. Select Data Warehouse as your project type and then click Finish.
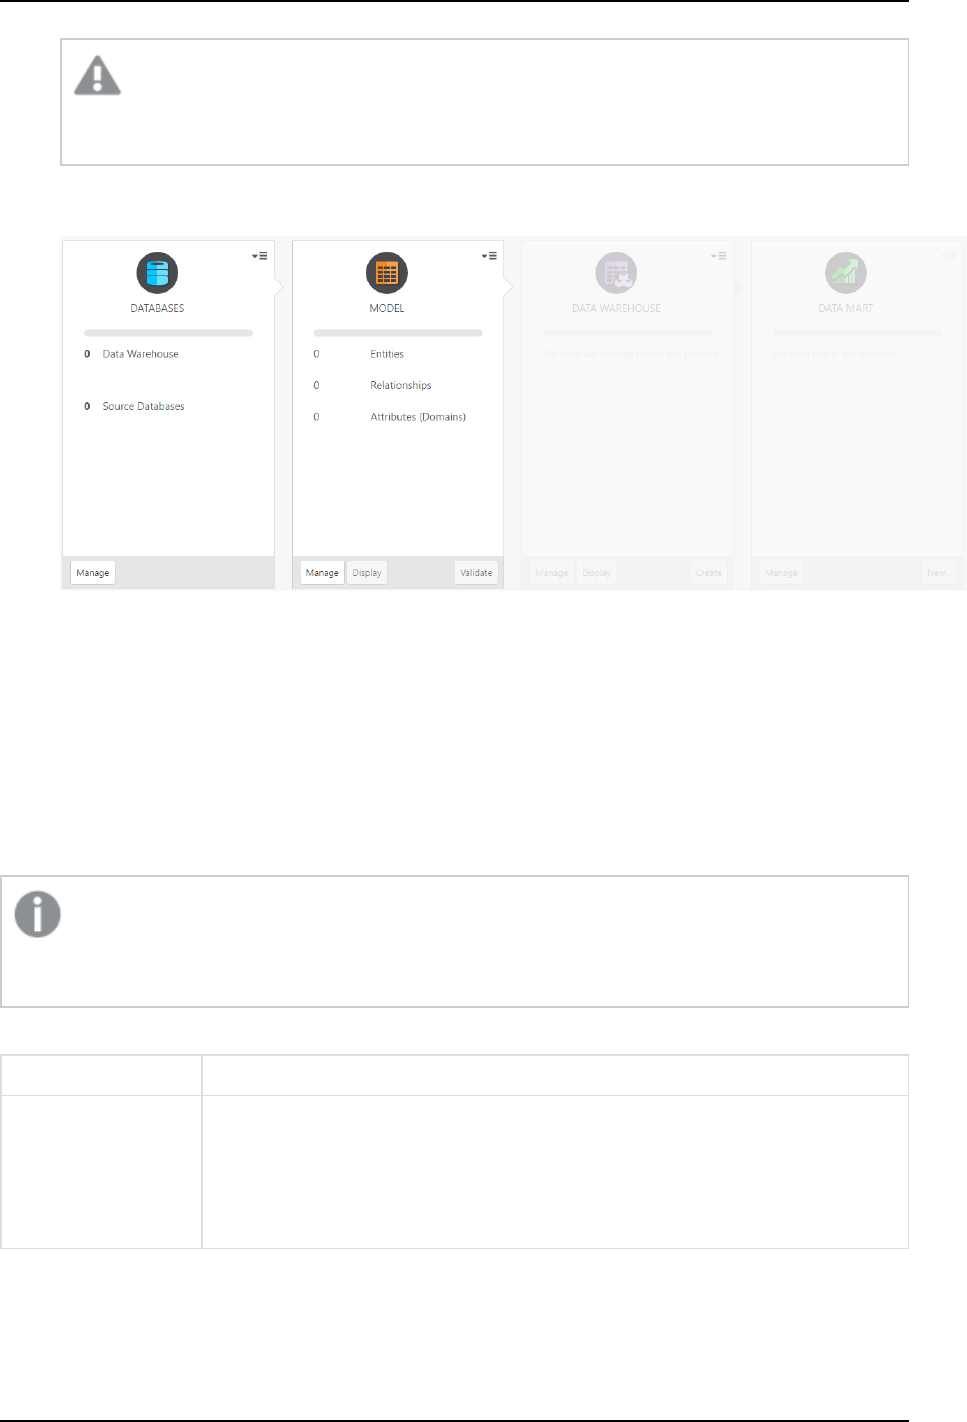
4. The project panels will be displayed.
5. Add at least one source database and a data warehouse as described in Setting up Landing Zone and
Data Source connections (page 131)and Setting up a data warehouse connection (page 111) respectively.
6. Create a model as described in Creating and managing the model (page 154).
7. Set up the data warehouse as described in Creating and managing the data warehouse (page 190).
8. Set up the data mart as described in Creating and managing data marts (page 225).
Managing and monitoring projects
The table below describes the available project management options.
Project management actions are performed in the main Compose window. To switch from a specific
project to the main window, click the downward arrow to the right of the project name and then
select All Projects from the drop-down menu.
To Do this
Edit a project Any of the following:
l
Double-click the project.
l
Right-click the project and select Designer.
l
Select the project and then click the Open toolbar button.
Project management procedures
Setup and User Guide - Qlik Compose, May 2022 39
5 Data Warehouse projects
To Do this
Monitor a project Any of the following:
l
Right-click the project and select Monitor.
l
Double-click the project and select the Monitor tab on the right of the
console.
Create a deployment
package
Any of the following:
l
Right-click the project and select Create Deployment Package.
l
Select the project and then select Create Deployment Package from the
Deployment toolbar menu.
See also: Project deployment (page 47) (Data Warehouse projects) and Project
deployment (page 289) (Data Lake projects).
Delete a project Any of the following:
l
Right-click the project and select Delete.
l
Select the project and then click the Delete toolbar button.
View or change user
permissions
Right-click the project and select User Permissions.
Relevant for Data Warehouse projects only.
See also: User permissions (page 371).
Project settings
You can change the project settings according to your needs.
To access the project settings:
1. Open your project as described in Managing and monitoring projects (page 282).
2. Click the downward arrow to the right of the project name and select Settings from the drop-down
menu.
The Settings window opens, displaying the following tabs:
l
General tab (page 40)
l
Naming tab (page 42)
l
Environment tab (page 43)
l
Table creation modifiers tab (page 45)
General tab
In this tab, the following settings are available:
Setup and User Guide - Qlik Compose, May 2022 40
5 Data Warehouse projects
Miscellaneous
l
Generate DDL scripts but do not run them: By default, Compose executes the CREATE, ADJUST and
DROP statements immediately upon user request. When you select this option, Compose will only
generate the scripts but not execute them. This allows you to review and edit the scripts before they
are executed.
For example, if you want your data warehouse/storage tables to contain partitions, you will need to
edit the CREATE statement to create the partitions.
You can view, copy and download the DDL scripts as described in Viewing and downloading DDL scripts
(page 100).
When this option is selected, you need to do the following to see the results:
l
After running the scripts, clear the metadata cache as described in Clearing the data
warehouse metadata cache (page 224).
l
When this option is selected, you need to press [F5] (i.e. refresh the page) in order for
the web console to display the updated list of tables. This can be done either before
running the scripts (recommended) or after running the scripts. Note that until you
refresh the browser, the information in the web console will only be partially updated.
l
Ignore Mapping Data Type Validation: By default, Compose issues a validation error when a landing
table is mapped to a logical entity with a different data type. You can select this option to allow the
mapping of different data types. Note that you should only select this option if you need to map
landing table data types to compatible (though not identical) logical entity data types.
l
Write metadata to the TDWM tables in the data warehouse:
When this option is selected (the default unless Amazon Redshift is the data warehouse), Compose
writes the metadata for the data warehouse tables to the following tables:
<schema>.TDWM_Tables and <schema>.TDWM_COLUMNS.
Centralizing the metadata in two dedicated tables makes it easier for external metadata tools to
analyze the metadata. The metadata is also written to the local Compose repository, so clearing this
option (if performance issues are encountered) will not affect Compose functionality in any way.
l
Do not display the default workflows in the monitor: Select this option if you want to prevent the
default workflows from being executed.
Dates
l
Lowest Date: The value stored in the "From Date" column. This is the date when the version started.
l
Highest Date: The value stored in the "To Date" column. This is the date when the version ended.
Current Time Convention
When a source record’s timestamp cannot be determined, select one of the following to use instead:
l
Current time in UTC (the default for new projects)
To preserve backward compatibility when upgrading or deploying old projects, local server
time is the default.
Setup and User Guide - Qlik Compose, May 2022 41
5 Data Warehouse projects
Before changing this option, make sure that existing data will not be impacted.
l
Current time in server local time
For existing objects, Compose will not be able to determine a source record's timestamp if both of the
following are true:
l
The "From Date" columns are not mapped
l
The task is set up to perform Incremental Load
Naming tab
In this tab, you can change the default "From Date" and "To Date" column names, as well as the prefixes and
suffixes used to identify tables, views, and columns.
If you change the prefix or suffix of existing tables (e.g. data warehouse tables), you need to drop
and create the data warehouse and data mart tables.
Name Description
Suffix for Replicate Change
Tables
The suffix used to identify Replicate Change Tables in the landing zone of
the data warehouse.
Prefix for data warehouse
tables
The prefix used to identify tables in the Data Warehouse.
Prefix for data warehouse
views
The prefix used to identify views in the Data Warehouse.
Suffix for archived Replicate
Change Tables
The suffix used to identify archived Change Tables in the specified database.
For more information on archiving Change Tables, see After applying
changes.
Prefix for data mart tables The prefix used to identify tables in the data mart.
Suffix for exception mart
tables
The suffix used to identify error tables in the data warehouse. These tables
contain data that was rejected by a data quality rule.
Suffix for hub tables The suffix used to identify hub tables in the Data Warehouse. Hub tables
contain History Type 1 columns. History Type 1 column do not contain any
version history as opposed to History Type 2 columns that do.
Suffix for satellite tables The suffix used to identify satellite tables in the Data Warehouse. Satellite
tables contain History Type 2 columns. History Type 2 columns keep a
history of the data version by adding a new row whenever the data is
updated.
Name management options
Setup and User Guide - Qlik Compose, May 2022 42
5 Data Warehouse projects
Name Description
"From Date" column name The name of the "From Date" column. This column is added to tables that
contain attributes (columns) with a History Type 2. The column is used to
delimit the range of dates for a given record version.
This name cannot be used in other columns.
"To Date" column name The name of the "To Date" column. This column is added to tables that
contain attributes (columns) with a History Type 2. The column is used to
delimit the range of dates for a given record version.
This name cannot be used in other columns.
Environment tab
In this tab, you can:
l
Specify information about your environment, part of which will be displayed as a banner at the top of
the window when you open the project.
l
Determine the number of database connection to open concurrently.
After providing the following information, click OK to save your settings:
l
Environment type:Select one of the following types according to your environment type:
Development, Test, Acceptance, Production, Other. This information will not be displayed in the
banner.
l
Environment title: Specify a title for your environment. The title will be displayed in the banner at the
top of the console.
l
Project title: Specify a title for your project. The project title will be shown in the console banner. If
both an Environment Title and a Project Title are defined, the project title will be displayed to the
right of the environment title.
l
The Project title option requires Compose August 2021 Patch Release 12 or later.
l
When a project is deployed to a new environment, the environment title and
environment type in the new environment will not be overridden.
The following image shows the banner with both an Environment title and a Project title:
Setup and User Guide - Qlik Compose, May 2022 43

5 Data Warehouse projects
The banner text is shown without the Environment title and Project title labels. This
provides greater flexibility as it allows you add any banner text you like, regardless of the
actual label name. For example, specifying Project owner: Mike Smith in the
Project title field, will display that text in the banner.
Creating or Dropping Data Warehouse Tables
Limit the number of database connections to: The higher the number of database connections, the more
data warehouse tables Compose will be able to create or drop in parallel. While increasing the default should
improve performance, it might also impact other database applications. It is therefore not recommended to
increase the default unless you encounter performance issues.
The environment properties can be exported and imported to a new project, but cannot be
imported to an existing project.
Task recovery
You can set SQL state classes and error codes, on the occurrence of which, a task will be retried.
You can set the following parameters:
l
Maximum retry count: The number of times to retry a task before exiting with failure. Increasing the
number of retries will impact system resources. Therefore, only increase the default value if you expect
tasks to recover after the default number of retries.
l
Interval between retry attempts (sec): The time to wait between retry attempts. Increasing the
interval will consume more system resources. Therefore, only increase the default value if it is critical
that the task recover as soon as possible.
l
Retry on these SQL state classes: The default is 08 (connection exceptions). You can add additional
classes as desired. Classes should be separated with a comma.
Example: 08,22,2F
l
Retry also on these error codes: The default is 1205 (which occurs when a table is locked by another
process). You can add additional error codes as desired. Error codes should be separated with a
comma.
Example: 1205,2020,233
Limitations and considerations:
l
ODBC statements comprise a small part of the task execution sequence. However, as the task retry
mechanism is JDBC-based, ODBC statements will not be retried even if the specified SQL state/error
code is encountered.
Setup and User Guide - Qlik Compose, May 2022 44

5 Data Warehouse projects
Task and Workflow Information Retention
You can set the maximum number of runs to keep task and workflow logs and messages. The default is 100.
Task information includes logs, the number of inserted/updated rows per table, errors, and various other
runtime messages. If you find that the number of accumulated logs and messages is degrading performance,
reducing this value might help.
This setting requires Compose August 2021 SR1 or later.
Table creation modifiers tab
By default, Compose creates tables in the data warehouse using the standard CREATE TABLE statement.
However, organizations often need tables to be created with custom properties for better performance,
special permissions, custom collation, and so on. For example, in Microsoft Azure Synapse Analytics, it’s
possible to create a table as a HEAP, which is optimized for smaller tables. By default, Compose creates tables
in Microsoft Azure Synapse Analytics as a CLUSTERED COLUMNSTORE INDEX, which offers the best overall
query performance for large tables.
In the Table creation modifiers tab, you can append table creation modifiers as SQL parts to the CREATE
TABLE statement. You can set table creation modifiers for both data warehouse tables and for data mart
tables. In the data warehouse, separate modifiers can be set for Hub and Satellite tables while in the data
mart, separate modifiers can be set for fact and dimension tables. Once set, all tables will be created using the
specified modifiers, unless overridden at the entity level.
To set table creation modifiers:
1. Select the Custom option for any of the available table types.
2. Click the Edit button to open the Table Creation Modifier editor.
3. Enter the SQL parts you want to append to the CREATE TABLE statement.
4. Optionally, but strongly recommended, validate the SQL in an external validation tool that supports
your specific database and version.
Compose does not provide any way of validating your SQL. Therefore, make sure to validate
the SQL before deploying in a production environment.
5. Click OK to close the editor and save your SQL.
Limitations
If you change an existing table creation modifier, you will not be prompted to adjust affected tables when
validating the model. If you want to apply the change to existing tables, dropping and recreating all tables
might not be an issue in a development environment. However, in a production environment (where dropping
and recreating all tables might not be a viable option), you will need to adjust the tables outside of Compose.
Example of a Valid Table Creation Modifier
In the following example, the Compose CREATE TABLE statement (rows 1-5) is appended with an SQL part
instructing Compose to create the table as a HEAP (row 6).
CREATE TABLE MyTable
Setup and User Guide - Qlik Compose, May 2022 45

5 Data Warehouse projects
(
column1 integer,
column2 varchar(50),
)
WITH (HEAP)
For an explanation of how to define table creation modifiers for individual data warehouse tables, see Defining
Table Creation Modifiers (page 179)
For an explanation of how to define table creation modifiers for individual fact tables, see Example of a Valid
Table Creation Modifier (page 241).
For an explanation of how to define table creation modifiers for individual dimension tables, see Example of a
Valid Table Creation Modifier (page 246).
Resetting projects
You can reset projects as required. This can be useful in the project development stage as it allows you to
easily delete unwanted project elements.
Be careful not to reset a project and delete data in a production environment.
To reset a project:
1. Open your project as described in Managing and monitoring projects (page 282).
2. Click the downward arrow to the right of the project name and select Reset Project from the drop-
down menu.
The Reset Project window opens.
3. Select which elements to reset according to your project type.
l
Model (Entities, Relationships, Attribute Domains), mappings, and data mart definitions
For more information on models, see Creating and managing the model (page 154) .
l
Reusable transformations
For information on the reusable transformations, seeDefining reusable transformations (page
188).
l
Global mappings
For more information on global mapping, see Managing global mappings (page 160).
l
Data warehouse and data mart tables
For more information on data warehouses and data marts, see Creating and managing the data
warehouse (page 190) and Creating and managing the data warehouse (page 190) respectively.
l
Command tasks
For more information on data warehouses and data marts, see Creating and managing
command tasks (page 258).
l
DDL Scripts
Setup and User Guide - Qlik Compose, May 2022 46

5 Data Warehouse projects
For more information on DDL scripts, see Project settings (page 40) and Viewing and
downloading DDL scripts (page 100).
l
Drop Archive Tables
For more information on Archive Tables, see Defining landing zones (page 140)
4. Click Reset Project and then click Yes when prompted to confirm your request.
Project deployment
Project deployment packages can be used to back up projects or migrate projects between different
environments (e.g. testing to production). As a deployment package is intended to be deployed in a new
environment, it contains the Data Warehouse and data source definitions, but without any passwords. The
deployment package also does not contain any data from the Data Warehouse or data mart, only the
metadata. The deployment package also contains the project metadata and mapping information, which
should be consistent with the landing zone tables in the new environment.
For a complete list of objects contained in the deployment package, see Exporting a project (page 79).
Creating deployment packages
This section explains how to create a project deployment package.
To create a deployment package
1. Choose one of the following methods:
l
In the main Compose window, right-click the desired project and select Create Deployment
Package from the context menu.
l
In the main Compose window, select the desired project. Then, click the Deployment toolbar
button and select Create Deployment Package from the drop-down menu.
l
In the project window, select Deployment > Create Deployment Package from the project
drop-down menu.
The Create Deployment Package - <Project_Name> window opens.
2. Select Exclude environment variable values to exclude all of the environment specific settings from
the deployment package (the default). Leave this option selected if the project you are exporting
includes environment variables and the settling in the target environment are significantly different
from the source environment. The variables will be replaced with their default values (either empty or
the default Boolean value).
See also: Working with environment variables (page 88)
3. Provide a Version number and a Description in the designated fields and then click OK.
A ZIP file containing a JSON file (i.e. the project settings) and a readme.txt file will be saved to your browser's
default download location. The ZIP file name is in the following format: <Project_Name>_deployment_<Date>_
_<Time>.zip
The readme.txt file contains the following information about the deployment package: project name, export
date, exporter user name, deployment version, and description.
Setup and User Guide - Qlik Compose, May 2022 47

5 Data Warehouse projects
Deploying packages
This section explains how to deploy a project deployment package. This section explains how to deploy a
project deployment package. You can only deploy packages to an existing project. Therefore, before deploying
a project, create a new project with the user name and password required for connecting to the Data
Warehouse database and the Landing Zone database (if defined) in the new environment. In addition, the
Landing Zone databases in the target project must have the same display name (defined in the Compose
console) as the corresponding databases in the source project. Note that as database settings are usually
environment specific, the database settings in the target project will not be overwritten by those of the source
project.
Deploying a project between different database types is not supported. For example, you cannot
create a package in SQL server and deploy it to an Oracle database.
When deploying, Compose does not override existing connection parameters. This enables you to easily
migrate projects from test to production, for example, without needing to change user names, passwords or IP
addresses.
If preferred, you can create an empty project and provide the required credentials after the
deployment completes. In this case, an error message prompting you for the missing credentials will
be displayed after the deployment completes.
To deploy a project:
1. Copy the ZIP file created in Creating deployment packages (page 47) to a location that is accessible
from the Compose machine.
2. Open Compose and choose one of the following methods:
l
In the main Compose window, select the desired project. Then, click the Deployment toolbar
button and select Deploy from the drop-down menu.
l
In the project window, select Deployment > Deploy from the project drop-down menu.
The Deploy window opens.
3. Either drag and drop the file on the window.
OR
Click Select and browse to the location of the deployment package. In the Open window, either
double-click the deployment package ZIP file or select the file and click OK.
The package details will be displayed.
4. Click Deploy to deploy the package. When prompted to replace the existing project, confirm the
operation. The project will be deployed.
Setup and User Guide - Qlik Compose, May 2022 48

5 Data Warehouse projects
When deploying a project defined with multiple Replicate Servers to any of the following:
l
A project without any Landing Zone databases
l
A project which is missing one or more Landing Zone databases defined in the source project
Then the Landing Zone settings from the source project will be used, but the missing databases will
be created without a password and Replicate Server. These will need to be configured manually.
Migrating objects as CSV files
Relevant to Data Warehouse projects only.
Migrating Compose objects as CSV files, provides a level of granularity that is not available when using the
standard project export and deployment options. Instead of importing the entire project, you can import
specific objects and then apply periodic updates as needed.
The following objects can be migrated:
l
Model objects: Entities, Attributes, Attributes Domain, Relationships, Reusable transformations, and
Reusable transformation parameters
l
Mappings and Mapping Metadata
l
Data Mart objects: Fact tables, Fact attributes, Star schemas, Dimensions, and Dimension attributes
In this section:
l
Overview (page 49)
l
Migrating models (page 51)
l
Migrating mappings (page 57)
l
Migrating tasks (page 60)
l
Migrating data marts (page 64)
l
Migrating reusable transformations (page 70)
l
Commands for exporting/importing objects (page 71)
l
Commands for comparing and applying objects (page 74)
Overview
The ability to export object definitions to a CSV file and then import them to another environment provides
many benefits, enabling:
l
Migration of data from a custom database table and/or Excel sheets to Compose
l
Data to be reviewed by business analysts who are not able to (or do not want to) access Compose
l
Synching with third-party tools that output data in CSV format
l
Comparison of versions in order to review changes
Setup and User Guide - Qlik Compose, May 2022 49

5 Data Warehouse projects
l
Resolving of object-specific issues in a development environment and then deploying to the
production environment, even when they are not completely in sync
l
Sharing of resources between projects in the same environment
l
Granular version management of specific objects such as mappings
Manually typing these definitions into Compose would be a laborious and time-consuming undertaking; using
the CLI however, this can be done in a matter of minutes. Following the initial import, customers who need to
apply selective updates to the target environment (such as adding attributes with their descriptions), can do
so using the Compare and Apply CLI commands.
A typical workflow would be as follows:
1. Run the export command to output the source object(s) (to CSV files).
2. Run the import command to bring the objects into the target environment.
3. Following changes to the source environment, run the export command to output the source object(s)
to (CSV files).
4. Run the Compare command to see the differences between the exported objects and the
corresponding target objects.
Alternatively, run the Compare command on the source environment to see the differences between
previous and current source project versions; then determine which changes needs to be migrated to
the target project. This approach is useful if changes were made directly to the target project as it
allows you to retain the custom changes while still applying changes to other objects.
5. Review the changes and make any edits as necessary.
6. Run the Apply command to apply the changes to the target environment.
7. Periodically repeat steps 3-6 as necessary.
An understanding of the CSV file structure and their impact on the target environment is crucial, not only for
customers who wish to create these files manually, but also for ensuring the import/apply operations succeed
with the expected results. For this reason, this section first discusses the CSV file structure of the supported
objects and only then provides instructions for performing the actual CLI operations.
l
Only import of new objects is supported.
l
UPDATEs and DELETEs will be ignored by the Apply command (which supports ADD
operations only), but can still be applied manually if needed.
Valid CSV file formats
CSV files must be in a valid format; otherwise, the import/compare/apply operation will fail.
CSV formatting rules:
l
Fields must be separated with a comma.
l
The first line must be a header line which contains the column names.
l
The escaping convention is similar to Excel:
l
If a field contains a comma, then the comma must be wrapped with quotation marks, for example:
"a,b"
Setup and User Guide - Qlik Compose, May 2022 50

5 Data Warehouse projects
l
If the value contains a quotation mark, then ithe quotation mark must be doubled. For example:
"Mike ""The Hammer"" Smith"
l
If the value contains a new line, then it must be wrapped with double quotes. For example:
"Field owned by Mike.
Comment added by Shelley."
Stored objects
Several objects may have multi-lines, commas, and other such complexities.
Expressions, for example, are stored as two fields:
First field - expression value:
Example:
${x1}*${x2}
Note: The expression may need to be escaped.
Second field - semicolon parameters mappings:
Example:
x1:unit price;x2:quantity
Migrating models
Migrating a Compose Model allows you to:
l
Import existing column definitions (i.e. definitions stored independently of Compose) to a Compose
project
l
Reuse the same Model across several projects or Compose installations
Model objects
A Compose Model consists of the following objects:
l
Entities (entities.csv)
l
Attributes (attributes.csv)
l
Attributes Domain (attributesDomain.csv)
l
Relationships (relationships.csv)
During the export process, each of these objects is exported to a separate CSV file.
You can either import the Model in its entirety or only specific elements, according to your needs. You can also
manually create a CSV file containing a Model element (or edit an existing file) and then import it to a
Compose project.
Setup and User Guide - Qlik Compose, May 2022 51

5 Data Warehouse projects
l
The Model must be valid before you can export it to or import it from a CSV file. For details,
see Validating the model (page 163).
l
CSV files must be in a valid format. For details, see Valid CSV File Formats.
l
Only a user with Model privileges can import the Model.
Non-privileged users can import just the mappings. For details, see the SCOPE parameter in
the command for importing a model.
l
Replacing an existing object is not supported. For example, if the Products entity already
exists in the Model, you cannot import an entities.csv file that contains an entity called
Products.
Guidelines for exporting a Compose model
Note the following:
l
For Boolean fields, accepted values are True/False
l
Data type is the Compose logical type
l
The order of writing the attributes is according to the ordinal in the entity. Primary Keys will be shown
first, even if they were not first in the source model
l
Attribute domain and entity order is alphabetical in the CSV
l
Relationship order is by entity name (alphabetical) and according to their order in the entity
Guidelines for importing a Compose model
Note the following:
l
For boolean fields, accepted values are True/False
l
Column order has no meaning; only column names, which are case insensitive, unless defined
differently
l
If the entities.csv file is missing, the entities can be inferred from the attributes.csv file (with no
description). In such cases, duplicate objects are verified to be the same and added only once. For
example, if there are several rows with entity name myEntity, the entity will only be added once
l
Data type is the Compose logical type
l
Relationship details override the underlying attributes information (e.g. history type, is key, etc.)
l
When importing the attributes.csv file, a new entity will not be created if wasn’t already created in the
entities.csv file, and its attributes all have relationships to other entities. In such cases, you should
create the entity manually or add it to the entities.csv file
l
When importing the relationships.csv file, existing attributes will be replaced if:
child attribute prefix+attribute name = relationship_prefix+parent_attribute_name_
prefix+parent_attribute_name
For example, the attribute named CustomerDesignatedID will be replaced by the relationship where:
l
ID is the name of the attribute in the parent entity and
l
Customer is the prefix of the relationship and
l
Designated is the prefix of the parent attribute.
Note that attributes marked as relationships will be skipped when imported from attributes.csv as they
must derive their data type from the Attributes Domain.
Setup and User Guide - Qlik Compose, May 2022 52
5 Data Warehouse projects
Entities CSV file format
Column Name Required If column/value is missing Comments
Entity Name Yes Reject Case insensitive
Entity Description No Empty -
Entity CSV mapping rules
Attributes CSV file format
If
Attribute Domain
is missing in the attributes.csv file, there must be a data type. Attribute
domains that differ but have the same name will be appended with the suffix _01.
Column Name Required
If column is
missing
If value is
missing
Comments
Entity Name Yes Reject Reject Case insensitive
Attribute Name Yes Reject Reject Case insensitive
Description No Empty Accept -
Is Key No No attributes will be
defined as keys. In
such a case,
validation will fail as
at least one key
needs to be defined.
No Key On import, Compose does not
validate that each entity has at
least one key attribute (required).
If you import entities without key
attributes, then you must define a
key attribute in Compose after
importing the entity. Otherwise,
Model validation will fail.
Attribute
Domain
No If it is missing, Data
Type must exist and
attribute domains
will be built or used
the same as they
are during
discovery.
Reject The Attribute Domain name or the
word "Relationship"
Data Type No If it is missing, the
Attribute Domain
must exist. An error
will be returned if
the data type does
not match the
attribute domain or
if both exist.
Reject Use combined syntax:
Varchar(50)
Decimal(10,2)
Attribute CSV mapping rules
Setup and User Guide - Qlik Compose, May 2022 53

5 Data Warehouse projects
Column Name Required
If column is
missing
If value is
missing
Comments
Prefix No Empty Accept (an
empty feld
means there
will be no
prefix)
-
History Type No Key - Type 1, Not
key - type 2
Reject Values are Type 1 or Type 2.
Yes (Type 2) and No (Type 1) are
also allowed.
Satellite/Hub No Key is Hub; other
attributes are SAT 1
Reject Hub/1/2/3
Expression No No expressions in
any attribute
No
expression in
any attribute
-
Expresssion
Params
No All attribute-
parameter
mappings are trivial
(same name)
All attribute-
parameter
mappings
are trivial
(same name)
-
Setup and User Guide - Qlik Compose, May 2022 54

5 Data Warehouse projects
Column Name Required
If column is
missing
If value is
missing
Comments
Add after No Not relevant. Not relevant. Instructs Compose to add the
attribute after a specific attribute.
The column is only relevant when
adding attributes. When the
column is empty, the
corresponding attributes should
be added at the end (according to
their order in the CSV file).
Note that it may refer to any
attribute that is defined above the
current row.
For example, assuming a record
contains the attributes address,
height, and weight, specifying the
following:
school, add after=weight
ID, add after=school
email, add after=empty
Will result in the following order:
address, height, weight, school,
ID, email
Attributes Domain CSV file format
Column
Name
Required
If column is
missing
If value is missing Comments
Name Yes Reject Reject Case insensitive
Description No Empty The specific attribute value may be
empty as well.
-
Data Type No Reject Reject Use combined
syntax:
Varchar(50)
Decimal(10,2)
Attributes Domain CSV mapping rules
Setup and User Guide - Qlik Compose, May 2022 55

5 Data Warehouse projects
Relationships
Column Name Required If column is missing
If value is
missing
Comments
Child Entity Yes Reject Reject This is the more
detailed entity (e.g.
OrderDetails). Case
insensitive.
Parent Entity Yes Reject Reject This is the less
detailed entity (e.g.
Products). Case
insensitive.
Prefix No Empty
If there are several
relationships from the same
source to the same target, a
prefix must be added.
If all the
originating
attributes have
the same prefix,
use it here.
A relationship
may not have a
prefix to its
underlying
attributes.
The specific
attribute value
may be empty
as well.
-
Position After No Add the relationships to the
end. Relationships are
ordered according to their
order in the file.
Same as missing
column
The attribute name
or relationship to
position it after or
”0” to position it
first.
Description No Empty Specific
attribute may
have empty
value as well
-
Is Key No No attributes will be defined
as keys. In such a case,
validation will fail as at least
one key needs to be defined.
No key -
Relationships CSV mapping rules
Setup and User Guide - Qlik Compose, May 2022 56

5 Data Warehouse projects
Column Name Required If column is missing
If value is
missing
Comments
History Type No Key: Type 1
Non-key: Type 2
Reject Values are Type 1 or
Type 2.
Yes (Type 2) and No
(Type 1) are also
allowed.
Satellite/Hub No Key: Hub
Other attributes: SAT 1
Reject Hub/1/2/3
Migrating mappings
Migrating mappings allows you to:
l
Export mapping metadata and mappings from a Compose project to CSV files. Mapping metadata will
be exported to mappingsMetadata.csv while mappings will be exported to mappings.csv. The former
shows the table mappings while the latter show the column mappings.
l
Import new mappings that do not exist in the current Compose project.
l
Reuse the same mappings across several projects or Compose installations.
Mappings export guidelines
When exporting mappings and mapping metadata from Compose, it is important to note the following:
l
The export of mappings is allowed for users with the Viewer security role.
l
The order of writing the mapping metadata is according to metadata name alphabetically (e.g. Map_
Orders appears after Map_Customers).
l
The order of writing a mapping is according to target columns (same as Model ordinal).
l
Source columns which are not mapped to anything will not appear in the exported file.
l
All target columns will appear in the mappings even if they were not mapped.
Mappings import guidelines
When importing mappings and metadata to the Model, it is important to note the following:
l
If required, you can import one CSV file at a time:mappingsMetadata.csv or mappings.csv.
l
Column order has no meaning; only column names (case insensitive).
l
When importing metadata, Compose validates that the targets exist in the Model. Source columns are
not validated on import.
l
If the source schema, table, view or query don't exist, they will be validated after the import.
l
Importing mappings will fail in the following scenarios:
l
If the target entity doesn't exist in the Model.
l
If the compose database object doesn't exist.
l
If the mapping attribute doesn't exist in the Model.
Setup and User Guide - Qlik Compose, May 2022 57

5 Data Warehouse projects
Valid CSV file formats
The CSV files must be in a valid format. For more detailed information, see the notes in Valid CSV file formats
(page 50).
Mapping metadata CSV file format
Column
Name
Required
If column is
missing
If value is
missing
Comments
Name Yes Reject Reject Case insensitive
Landing
Zone
Database
Yes Reject Reject The Compose "source database" name
(excluding the word "landing")
Schema No If there is no
Schema
column,
either the
default
schema will
be used or
none (as
some
databases do
not have
separate
schemas)
If no schema
is specified,
either the
default
schema will
be used or
none (as
some
databases do
not have
separate
schemas)
-
Source Type No Table Reject Table/View/Query
Source
Object
Yes Reject Reject If Source Type is Table or View, the Source
Object is its name.
If Source Type is Query, the rules and
limitations described in Valid CSV file
formats (page 50) will be applied.
Target Entity Yes Reject Reject -
Filter No No filter No filter
Filter Params No Same name
for attribute-
parameter,
like
expression
below
Same name
for attribute-
parameter,
like
expression
below
Example of Semicolon parameters
mappings:
x1:unit >price;x2:quantity
CSV metadata mapping rules
Setup and User Guide - Qlik Compose, May 2022 58

5 Data Warehouse projects
Column
Name
Required
If column is
missing
If value is
missing
Comments
Mapping
Name
Yes Reject Reject Case insensitive
Target
Column
Yes Reject No mapping
if there is also
no expression
or lookup.
Case insensitive
Mapping
Type
No Field
mapping
Allow the
field to be
empty if
there is no
field
mapping, no
expression,
and no
lookup.
Field Mapping /Expression/Lookup
Field
Mapping
No Reject No mapping
to this
attribute.
The name of the source field, or empty if
this field is not mapped.
Expression No No
expression
No
expression in
this attribute.
Example of an expression value:
${x1}*${x2}
Expression
Params
No All attribute-
parameter
mapping is
trivial (same
name)
No
expression in
that attribute
Example of Semicolon parameters
mappings:
x1:unit >price;x2:quantity
Lookup
Landing
Database
No No lookups No
expression in
that attribute
Lookup Landing Database name
Example:
Northwind on MySQL
Lookup
Table
No No lookups No
expression in
that attribute
Lookup table or view name in schema table
format.
Example:
Schema1.Orders
Lookup Type No No lookups No
expression in
that attribute
Table or View
Setup and User Guide - Qlik Compose, May 2022 59

5 Data Warehouse projects
Column
Name
Required
If column is
missing
If value is
missing
Comments
Lookup
Condition
Value
No No lookups No
expression in
that attribute
-
Lookup
Condition
Params
No No lookups No
expression in
that attribute
Include Lookup/Landing.
Example:
x:$Lookup$.a;y:$Landing$.CustomerID
Lookup
Result Value
No No lookups No
expression in
that attribute
-
Lookup
Result
Params
No No lookups No
expression in
that attribute
Same format as the lookup condition
parameters.
Migrating tasks
You can migrate data warehouse tasks, data mart tasks, and custom ETLs (tasks) from one environment to
another, while preserving custom objects in the target environment. This is especially useful for customers
who wish to incrementally updated production environments with new versions from the test environment.
The following files will be exported:
For the data warehouse:
l
<specified export folder>/customEtl.csv - Contains details of any (enabled or disabled) custom ETLs
defined for the task.
l
<specified export folder>/taskCustomEtl.csv - Lists any enabled custom ETLs defined for the data
warehouse task.
l
<specified export folder>/taskSettings.csv - Contains details of the task settings defined for each of
the data warehouse tasks.
l
<specified export folder>/tasks.csv - Lists the data warehouse tasks.
l
<specified export folder>/taskDataWarehouseTables.csv - Lists the data warehouse tables and
properties.
l
<specified export folder>/taskMappings.csv - Lists the mappings used in the task.
l
<specified export folder>/SQL/DW_Custom_ETL_<custom ETL name>.SQL - One SQL file for each
custom ETL.
For each data mart:
l
<specified export folder>/<data mart name>/customEtl.csv - Contains details of any custom pre-
loading or post-loading ETLs defined for the data mart task
l
<specified export folder>/<data mart name>/taskSettings.csv - Contains details of the task settings
Setup and User Guide - Qlik Compose, May 2022 60

5 Data Warehouse projects
l
<specified export folder>/<data mart name>/SQL/DM_Custom_ETL_<custom ETL name>.SQL - One
SQL file for each custom ETL
Considerations
Export considerations
l
Parameters will be written to CSV files in alphabetical order (as they appear in the web console).
Import considerations
l
Importing tasks or custom ETLs will override any existing objects with the same names.
l
Importing logical entities or mappings that do not exist in the target project will result in failure.
Valid CSV file formats
The CSV files must be in a valid format. For more detailed information, see the notes in Valid CSV file formats
(page 50).
Data warehouse CSV file formats
Tasks file
The tasks.csv file consists of one row per task.
Header
name
Mandatory
If column is
missing
If column exists but value is
empty
Comments
Task name Yes Reject Reject Case insensitive
Description No Empty Empty -
Type No Full Load Only Reject Full Load Only or
Change Tables
Only
Tasks
Task settings file
The taskSettings.csv file consists of one row per setting.
Header
name
Mandatory
If column is
missing
If column exists but value is
empty
Comments
Task Name Yes Reject Reject Case
insensitive
Setting
Name
Yes Reject Reject Case
insensitive
Setting Value Yes Reject Reject -
Data warehouse task settings
Task entities file
The taskDataWarehouseTables.csv file consists of one row per entity.
Setup and User Guide - Qlik Compose, May 2022 61

5 Data Warehouse projects
Header name Mandatory
If column
is missing
If column exists
but value is
empty
Comments
Task Name Yes Reject Reject Case
insensitive
Entity Name Yes Reject Reject Case
insensitive
Handle duplicates Yes Reject Reject Boolean
Task logical entities
Task mappings file
The taskMappings.csv consists of one row per task for each mapping that is used in the task.
Header name Mandatory
If column is
missing
If column exists but value is
empty
Comments
Task Name Yes Reject Reject Case
insensitive
Mapping
Name
Yes Reject Reject Case
insensitive
Task mappings
Custom ETL file
The customEtl.csv consists of one row for each custom ETL defined for the task (Pre-Loading, Multi-Table,
Single Table, or Post-Loading), regardless of whether or not the ETL is enabled.
Header name Mandatory
If column
is missing
If column exists
but value is
empty
Comments
Name Yes Reject Reject Case insensitive
Description No Empty Empty -
Type Yes Reject Reject Pre Loading ETL, Multi Table ETL,
Single Table ETL or Post Loading ETL
Entity Yes Reject Reject Relevant only for single table ETL
Sequence
Number
Yes Reject Reject Valid values are positive integer
numbers
Execute as
Stored
Procedure
Yes Reject Reject Boolean
Data warehouse custom ETL
Setup and User Guide - Qlik Compose, May 2022 62

5 Data Warehouse projects
l
For each custom ETL, Compose will export/import an SQL file to:
<specified export folder>/SQL
l
The file name will be DW_Custom_ETL_<custom ETL name>.SQL
l
If you wish to edit the file name, make sure that it only contains the following characters: A-Z,
0-9, underscore (_), or space. On import, any other character will be replaced with an
underscore.
Task custom ETL file
The taskCustomEtl.csv file consists of one row for each enabled custom ETL used in the data warehouse
task.
Header name Mandatory
If column
is missing
If column
exists but
value is empty
Comments
DWH Task Name Yes Reject Reject Case
insensitive
Custom ETL Name Yes Reject Reject Case
insensitive
Data warehouse task custom ETL
Data mart CSV file formats
Task settings file
The taskSettings.csv file consists of one row per setting.
Header
name
Mandatory
If column is
missing
If column exists but value is
empty
Comments
Setting
Name
Yes Reject Reject Case
insensitive
Setting Value Yes Reject Reject -
Data mart task settings
Custom ETL file
The customEtl.csv file consists of one row per custom ETL (Pre Loading ETL or Post Loading ETL).
Header name Mandatory
If column is
missing
If column exists but
value is empty
Comments
Name Yes Reject Reject Case insensitive
Description No Empty Empty -
Data mart custom ETL
Setup and User Guide - Qlik Compose, May 2022 63
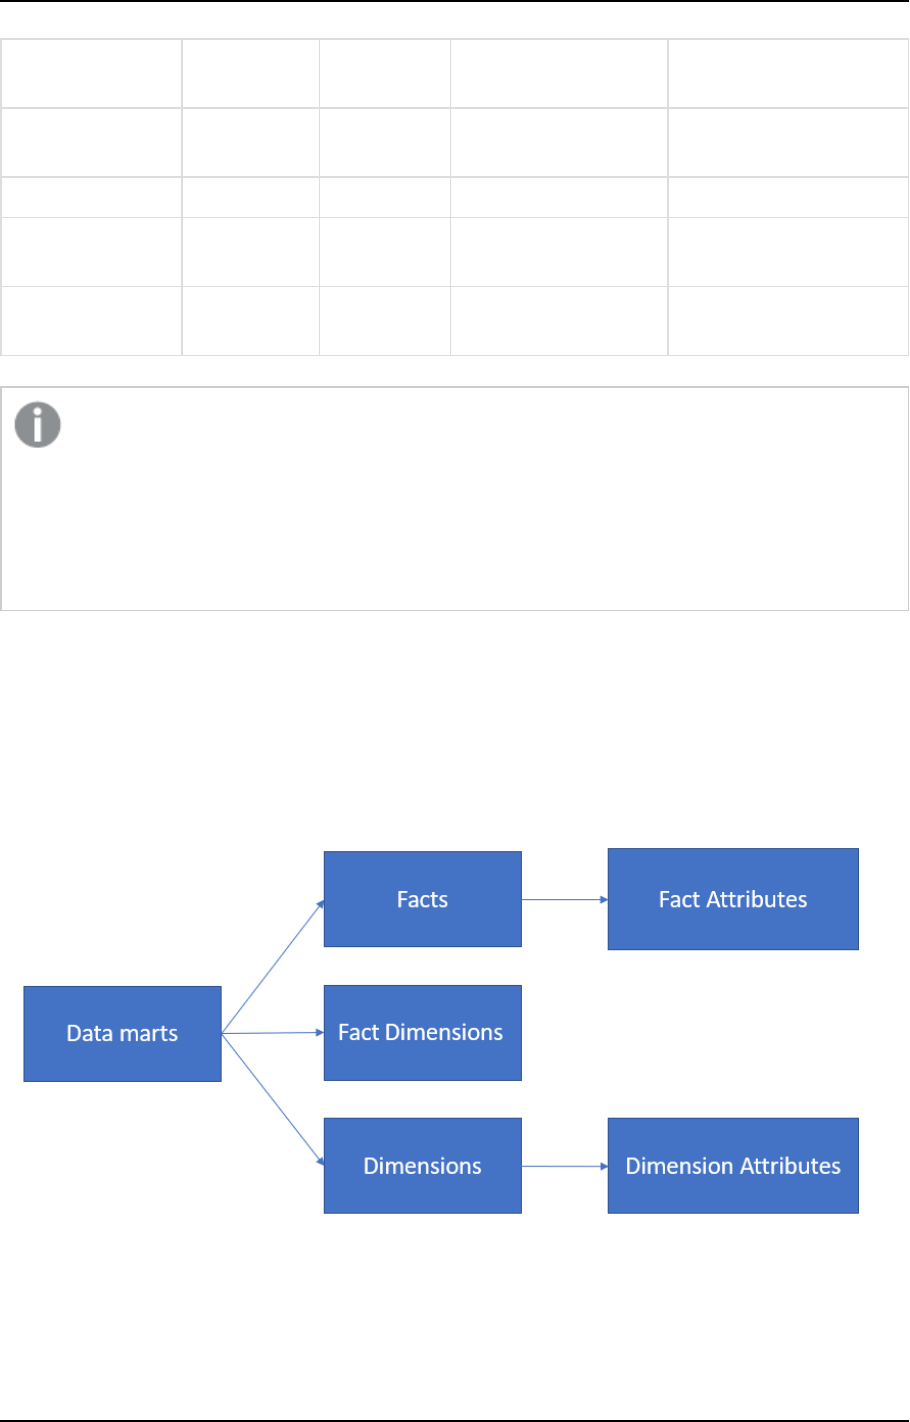
5 Data Warehouse projects
Header name Mandatory
If column is
missing
If column exists but
value is empty
Comments
Type Yes Reject Reject Pre Loading ETL or Post
Loading ETL
Active Yes False False Boolean
Sequence Number Yes Reject Reject Valid values are positive
integer numbers
Execute as Stored
Procedure
Yes Reject Reject Boolean
l
For each custom ETL, Compose will export/import an SQL file to:
<specified export folder>/<data mart name>/SQL
l
The file name will be DM_Custom_ETL_<custom ETL name>.SQL
l
If you wish to edit the file name, make sure that it only contains the following characters: A-Z,
0-9, underscore (_), or space. On import, any other character will be replaced with an
underscore.
Migrating data marts
You can migrate data marts from one environment to another, while preserving custom objects in the target
environment.
The following diagram shows a data mart model:
Exporting data marts
When you export data marts, a separate folder containing the CSV files will be created for each data mart:
Setup and User Guide - Qlik Compose, May 2022 64
5 Data Warehouse projects
Example:
datamarts.csv
datamart1\facts.csv
datamart1\FactDimensionsLinks.csv
datamart1\dimensions.csv
datamart1\factattributes.csv
datamart1\dimensionattributes.csv
datamart2\facts.csv
datamart2\factdimensions.csv
datamart2\dimensions.csv
datamart2\factattributes.csv
datamart2\dimensionattributes.csv
Data marts CSV
The datamarts.csv consists of one row per data mart.
Header
name
Required
If column is
missing
If column exists but
value is empty
Comments
Data Mart
Name
Yes Reject Reject Case insensitive
Description No Empty Empty -
Table Prefix No Empty Empty Default for future fact and
dimension creation
View Prefix No Empty Empty Default for future fact and
dimension creation
Data marts CSV metadata mapping
When exporting a data mart, the following objects will not be included: View schema, database
name, and schema name. As these objects are environment-specific, they need to be set them up
manually after importing the data mart to the target environment (unless you wish to user the
defaults from the data warehouse).
Facts CSV
The facts.csv consists of one row per fact table.
Setup and User Guide - Qlik Compose, May 2022 65

5 Data Warehouse projects
Header name Required
If column is
missing
If column
exists but
value is empty
Comments
Name Yes Reject Reject Case insensitive
The name corresponds to the fact
dimension name
Description No Empty Empty -
Fact Type No On ADD:
Transactional
On ADD:
Transactional
Transactional, Aggregated, or State
Oriented
Fact Table
Name
Yes Reject Reject -
Fact View
Name
No Empty Empty Empty means that no view is created
Transaction
Date
*No If mandatory,
reject
If mandatory,
reject
Mandatory for transactional and
aggregated facts
Ignored for state-oriented facts
Includes full path with dot notation; for
example, in AdventureWorks it might
be:
OrderDetail.OrderHeader.ModifiedDate
Source Filter No No filter No filter Filter on the source columns (which
would eventually translate to an SQL
"where" statement)
Must be formatted as an expression
Source Filter
Params
No Same name for
attribute-
parameter,
similar to
expression
below
Same name for
attribute-
parameter,
similar to
expression
below.
-
Aggregation
Filter
No No filter No filter Filter on the aggregated columns
(which would eventually translate to
an SQL "having" statement)
Must formatted as an expression
Facts CSV metadata mapping
Setup and User Guide - Qlik Compose, May 2022 66

5 Data Warehouse projects
Aggregation
Filter Params
No Same name for
attribute-
parameter, like
expression
below
Same name for
attribute-
parameter, like
expression
below
-
Root entity Yes Reject Reject The root entity used. For example, if
the fact is a denormalization of order
details and orders, it will contain
"orders"
Fact As Type
1
No Enable the
option
Enable the
option
Boolean: Accepts the values TRUE or
FALSE
For an explanation of this option, see
Editing star schemas (page 238).
Dimensions CSV
The dimensions.csv consists of one row per dimension.
Header
name
Required
If column is
missing
If column exists
but value is
empty
Comments
Name Yes Reject Reject Case insensitive
Description No Empty Empty -
Dimension
Table Name
Yes Reject Reject -
Dimension
View Name
No Empty Empty Empty means that no view is
created
History Type No Type 2 Type 2 Type 1/ Type 2
Source Filter No No filter No filter Filter on the source columns (which
would eventually translate to an
SQL "where" statement)
Must be formatted as an expression
Source Filter
Params
No Same name for
attribute-
parameter, like
expression below
Same name for
attribute-
parameter, like
expression below
-
Root entity Yes Reject Reject The root entity used. For example,
if the fact is a denormalization of
order details and orders, it will
contain "orders"
Dimensions CSV metadata mapping
Setup and User Guide - Qlik Compose, May 2022 67

5 Data Warehouse projects
Fact dimensions CSV
The FactDimensionsLinks.csv consists of one row per dimension usage in the fact.
Header
name
Required If column is missing
If column exists but
value is empty
Comments
Fact Name Yes Reject Reject Case insensitive
Dimension
Name
Yes Reject Reject Case insensitive
Referenced
data mart
No The data mart does not
contain a referenced
dimension.
Means that it is not a
referenced
dimension.
-
Referenced
dimension
name
Only for
referenced
dimensions.
The data mart does not
contain a referenced
dimension.
Means that it is not a
referenced
dimension.
Name in the
referencing data
mart.
Fact dimensions CSV metadata mapping
Fact attributes CSV
The factattributes.csv consists of one row per attribute and includes the OID attributes as well.
On export, the order is determined by the attributes order. On import, the order is determined by the read
order.
Header name Required
If column is
missing
If column
exists but
value is
empty
Comments
Star schema
Name
Yes Reject Reject Case insensitive
Attribute
Name
Yes Reject Reject Case insensitive
Entity Path No Treat as empty Treat as
empty
Case insensitive.
If the column is directly mapped to
a data warehouse, the field will
contain the model entity path (for
example: Orders.Customers).
An empty field means that the
entity path should be calculated
using an expression
Fact attributes CSV metadata mapping
Setup and User Guide - Qlik Compose, May 2022 68

5 Data Warehouse projects
Header name Required
If column is
missing
If column
exists but
value is
empty
Comments
Description No Empty A specific
attribute may
have empty
value as well.
-
Data Type Yes Reject Reject Use combined syntax: Varchar(50)
Decimal(10,2)
Aggregation No No aggregation
columns (this will
return an error if
the Fact is
aggregated).
No
aggregation
columns.
Empty or
SUM/COUNT/MAX/MIN/COUNT_
DISTINCT
Expression No No expressions in
any attribute.
No expression
in that
attribute.
See Stored objects (page 51).
Expression
Params
No All attribute-
parameter
mapping is trivial
(same name)
All attribute-
parameter
mapping is
trivial (same
name)
See Stored objects (page 51).
Dimension attributes CSV
The dimensionattributes.csv consists of one row per dimension attribute in a fact dimension. These may also
include Date or Time dimensions (e.g. Customer.ModifiedDate).
On export, the order is determined by the attributes order. On import, the order is determined by the read
order.
Header
name
Required
If column is
missing
If value is
missing
Comments
Dimension
Name
Yes Reject Reject Case insensitive
Attribute
Name
Yes Reject Reject Case insensitive
Dimension attributes CSV metadata mapping
Setup and User Guide - Qlik Compose, May 2022 69

5 Data Warehouse projects
Header
name
Required
If column is
missing
If value is
missing
Comments
Entity Path No Treat as empty Treat as empty Case insensitive.
If the column is directly mapped to a
data warehouse, the field will contain
the model entity path (for example:
Orders.Customers)
Am empty field, means that the entity
path should be calculated using an
expression
Description No Empty Specific
attribute may
have empty
value as well
-
Data Type Yes Reject Reject Use combined syntax: Varchar(50)
Decimal(10,2)
Expression No No expressions
in any attribute
No expression
in that
attribute.
See Stored objects (page 51).
Expression
Params
No All attribute-
parameter
mapping is
trivial (same
name)
All attribute-
parameter
mapping is
trivial (same
name)
See Stored objects (page 51).
Migrating reusable transformations
You can migrate reusable transformations from one environment to another, while preserving custom objects
in the target environment.
For information on reusable transformations, see Defining reusable transformations (page 188).
Reusable transformations
The ReusableTransformation.csv file includes a row per reusable transformation parameter and is described in
the table below. Note that some reusable transformations may have no parameters.
Header name Required If column is missing If value is missing Comments
Name Yes Reject Reject Case insensitive
Category No On ADD: General On ADD: General Case sensitive
Description No Empty Empty
Expression No On ADD: Empty On ADD: Empty
Reusable transformations CSV mapping rules
Setup and User Guide - Qlik Compose, May 2022 70
5 Data Warehouse projects
Reusable transformations parameters
The ReusableTransformationParams.csv file is described in the table below.
Header
name
Required
If column
is missing
If value is
missing
Comments
Reusable
Transformation
Name
Yes Reject Reject Case insensitive
Parameter Name Yes Reject Reject Case insensitive
Data Type No On ADD:
VarChar
On ADD:
VarChar
According to reusable transformation data
types (i.e. no length and scale)
Description No Empty Empty
Reusable transformations parameters CSV mapping rules
General guidelines
It's important to take note of the following:
l
On export:
l
The order in which the parameters will be written is determined by their order in the web
console
l
The order of reusable transformations in the CSV file is alphabetical
l
Reusable transformations are considered part of the model, which means users need the
import model permission in order to import them.
l
Column order has no meaning; only column names (case insensitive)
l
All CSVs are optional
l
The CSV files do not contain or rely on internal object IDs, rather, they rely on object names.
l
On import, existing reusable transformations will be overridden by the information from the CSV file.
Commands for exporting/importing objects
You can export and import Compose objects using the export_csv and import_csv CLI
To import specific entities, use the CSV mechanism described in Migrating models (page 51).
Compose CLI requires Administrator permission. To grant Administrator permission, select "Run as
administrator" when opening the command prompt. All commands should be run from the Compose
bin directory (C:\Program Files\Qlik\Compose with a default installation).
Exporting objects
Run the following command from the Compose bin directory:
Command syntax
ComposeCli.exe export_csv --project project_name --outfolder folder
Setup and User Guide - Qlik Compose, May 2022 71
5 Data Warehouse projects
Parameters
Parameter Description
--project The name of the project.
--outfolder The name of the target folder for the CSV files.
Example
ComposeCli.exe export_csv --project myproject --outfolder c:\MyCFDWProject
Importing objects
As CSV files do not have versions, Compose cannot know which Compose version the CSV file being
imported originated from. If the default behavior has changed between versions, the rule is that the
default of the new version will always be applied. For example, in the Compose May 2021 version,
the option to update the fact with changes to Type 2 data warehouse entities is now enabled by
default. In previous versions, facts were not updated with changes to Type 2 data warehouse entities
and there was no option to change this behavior. Therefore, continuing with our example, if you
want this option to be disabled by default, you would need to add the column for that setting (Fact
As Type 1) to the fact.csv file and set the value to "FALSE" before importing.
Before performing any import operations, it is strongly recommended to review the topic(s) that discuss CSV
file structure and the impact of missing columns and/or values on the target environment. For example,
before importing Data Marts, review the Migrating Data Marts topic.
Run the following command from the Compose bin directory:
Command syntax
ComposeCli.exe import_csv --project
project_name
[--infolder
folder
] [--scope
model|mappings|datawarehouse|DatawarehouseTasks|datamarts] [–-filetype
objecttype
] [–-infile
filename
]
Parameters
Parameter Description
--project The name of the project.
--infolder The full path to the folder containing the CSV files. This parameter is only
required if you want to import all files.
Setup and User Guide - Qlik Compose, May 2022 72
5 Data Warehouse projects
Parameter Description
--scope Use this parameter to allow non-privileged users to import specific
objects. When this parameter is omitted, all objects will be imported.
Possible values are:
l
--scope model - Imports the model objects (Attributes Domain,
Entities, Attributes, Relationships, Reusable Transformations, and
Reusable Transformation Parameters)
l
--scope mappings - Imports the mappings metadata and the
actual mappings.
l
--scope datawarehouse - Imports the mappings as well as all
objects included in the DatawarehouseTasks described below.
l
--scope DatawarehouseTasks - Imports the data warehouse tasks
and related objects (Tasks, Task Settings, Task Mappings, Task
Data Warehouse Tables, Task Custom ETLs, and Custom ETLs).
l
--scope datamarts - Imports the data mart objects (Data Marts,
Facts, Star Schemas, Fact Attributes, Dimension Attributes, Task
Settings, and Custom ETLs).
The --scope parameter cannot be included in the same
command as the --filetype parameter
Setup and User Guide - Qlik Compose, May 2022 73
5 Data Warehouse projects
Parameter Description
--filetype The type of CSV file to import. When this parameter is omitted, all objects
will be imported.
Possible values are:
l
AttributesDomain
l
Entities
l
Attributes
l
Relationships
l
MappingsMetadata
l
Mappings
l
ReusableTransformation
l
ReusableTransformationParams
l
DataMarts
l
Tasks
l
TaskSettings
l
TaskMappings
l
TaskDataWarehouseTables
l
TaskCustomETLs
l
CustomETLs
The --filetype parameter cannot be included in the same
command as the --scope parameter
--infile The full path to the file to import when using non-default file names. This
must be specified together with the --filetype parameter described
above.
Examples
Import all CSV files
ComposeCli.exe import_csv --project myproject --infolder c:\composecfdw_csv
Import a specific CSV file with a custom Name
ComposeCli.exe import_csv --project myproject --filetype AttributesDomain --infile
c:\myattributesdomain.csv
Commands for comparing and applying objects
You can compare and apply Compose objects using the compare_csv and apply_csv CLI. Before
performing any of these operations, it is strongly recommended to review the topic(s) that discuss CSV file
structure and the impact of missing columns and/or values on the target environment. For example, before
applying changes to a Model, review the "Migrating the Model" topic.
Setup and User Guide - Qlik Compose, May 2022 74

5 Data Warehouse projects
Comparing objects
Comparing the model to be imported with the existing project model allows you to view and optionally edit
the proposed changes before applying them.
When you run the Compare command, the structure of the CSV output files will be identical to the export
output files, but with the addition of Change Type and Action columns at the end. Note that as the Apply
command only supports ADD operations, the only value in the Change Type column will be ADD.
If a column or value was deleted in the source environment, the Action column will contain the value
"IGNORE". This tells Compose not to delete the corresponding column/value in the target environment when
the Apply command is run. You can delete the "IGNORE" before running the Apply command to force the
deletion of the corresponding column/value in the target environment. However, as the Apply command does
not support DELETE operations, deleting the "IGNORE" before running the Apply command will have no effect.
Compare guidelines:
l
Unchanged objects will not be written to the output file(s).
l
If there was no changes at all to any of the object types, an empty output file will only be created if you
include the --create_files_even_when_no_diff parameter in the command (see below).
l
For Boolean fields, values are True/False
l
Data type is Compose's logical type.
l
For model, the attributes writing order is according to the new ordinal in the entity.
l
Mapping metadata, attributes domain and entity order is alphabetical in the CSV file.
l
Relationship order is by entity name (alphabetical) and according to their order in the entity.
l
For mapping, the listed order is:
l
Alphabetical for mapping names (e.g. Map_Orders follows Map_Customers)
l
According to target columns (model ordinal) within a mapping.
l
Within a mapping, FD (From Date) could be one of the rows.
l
Source columns which are not mapped to anything will not be included in the output file.
l
If the model is not valid, the Compare command may fail.
Compose CLI requires Administrator permission. To grant Administrator permission, select "Run as
administrator" when opening the command prompt. All commands should be run from the Compose
bin directory (C:\Program Files\Qlik\Compose with a default installation).
Command syntax
ComposeCli.exe compare_csv --project project_name --infolder folder --changes_folder folder [-
-create_files_even_when_no_diff]
Setup and User Guide - Qlik Compose, May 2022 75

5 Data Warehouse projects
Parameters
Parameter Description
--project The name of
the project.
--infolder The folder
containing the
exported CSV
files.
--changes_folder The folder to
where the
change files
will be written.
The file names
will be
identical to the
exported CSV
files, but with
a _changes
suffix (e.g.
entity_
changes.csv).
--create_files_even_when_no_diff Use this
parameter if
you want a
template
output file to
be created
when there are
no differences
(e.g. an empty
entity_
changes.csv
file containing
only the
header
columns). This
may be useful,
for example, if
you wish to
manually
create a
changes file.
Setup and User Guide - Qlik Compose, May 2022 76
5 Data Warehouse projects
Example
ComposeCli.exe compare_csv --project ProjectEmpty --infolder "C:\1" --changes_folder "C:\2" --
create_files_even_when_no_diff
Applying objects
Once you are satisfied with the proposed changes, you can then apply them to your project.
Apply guidelines:
l
If a column is missing on ADD, then the action will be as described in the topic discussing the object
elements.
l
By default, all changed object definitions will be added. To filter out rows or columns, edit the
outputted CSV file as needed. For example, to only apply changes to a specific Data Mart, delete all of
the other Data Marts' rows.
l
Any non-standard field name headings, should be renamed in the CSV to the Compose standard.
l
Column order is insignificant as the columns will be ordered by name (case insensitive).
l
For Boolean fields, accepted values are Yes/No, True/False, 1/0 (case insensitive)
l
Data type is Compose's logical type.
l
Relationship details override the underlying attributes information (e.g. History Type, Is Key, etc.).
Attributes that are marked as relationships will be skipped on import as they derive their
data type from the relationship.
l
All CSV files are optional in the folder.
l
For mappings, the apply operation will fail in the following scenarios:
l
The model is not valid.
l
The target does not exist in the model.
l
The mapping attribute does not exist in the model (after applying attributes.csv)
l
The Compose database object does not exist.
l
If the source schema, table, view or query does not exist, it will be validated after the Apply operation .
Run the following command from the Compose bin directory:
Command syntax
ComposeCli.exe apply_csv --project
project_name
--changes_folder
folder
Parameters
Parameter Description
--project The name of the project.
--changes_folder The folder containing the change files written
by the compare command.
Setup and User Guide - Qlik Compose, May 2022 77

5 Data Warehouse projects
Example
ComposeCli.exe apply_csv --project ProjectEmpty --changes_folder "C:\1"
Exporting and importing projects using the CLI
Compose CLI requires Administrator permission. To grant Administrator permission, select "Run as
administrator" when opening the command prompt. All commands should be run from the Compose
bin directory (C:\Program Files\Qlik\Compose with a default installation).
Under normal circumstances, use the deployment options described in Project deployment (page 47) to export
and import projects. For deployment automation or control by another tool, you can use the command line
interface (CLI) to perform such tasks.
To export or import a project or project configuration, you first need to change the default Master
User Password.
For more information on changing the master user password, see Changing the master user
password (page 32).
See also: Moving projects from the test environment to the production environment (page 86) and
Import/export scenarios - When is a password required? (page 86)
Before running any command, you must run the Connecting to Qlik Compose server (page 78) command.
To get help when using the command line, you can run the Help command. For example, for help about
exporting a project, issue the following command:
ComposeCli.exe export_project_repository --help
This brings up a list of help parameters.
In this section:
l
Connecting to Qlik Compose server (page 78)
l
Exporting a project (page 79)
l
Importing a project (page 81)
l
Exporting the project configuration (page 83)
l
Importing the project configuration (page 85)
l
Moving projects from the test environment to the production environment (page 86)
Connecting to Qlik Compose server
Run the Connect command to establish a connection to the Qlik Compose Server. You must run this command
before running any other command.
Command syntax
ComposeCli.exe connect [--url connection_url]
Setup and User Guide - Qlik Compose, May 2022 78
5 Data Warehouse projects
Where:
--url is the connection URL to the system where the server is running.
Example
ComposeCli.exe connect --url https://mymachine.mydomain/qlikcompose
Exporting a project
You can use the export_project_repository CLI to export a project.
Exported projects include the following:
l
Databases
l
Model definitions (entities and attributes)
l
Mappings
l
Custom ETLs
l
Data warehouse tasks
l
Data mart definitions
Existing data warehouse tables and generated tasks are not exported. Notifications and schedules
are also not exported as they are considered to be environment-specific.
Command syntax
ComposeCli.exe export_project_repository --project
project_name
--outfile
output_file
[--is_
without_credentials or --without_environment_specifics] [--password
password
] [--master_user_
password
master_user_password
]
Parameters
Parameter Description
--project The name of the project.
--outfile The path to and name of the output file. This file is in JSON
format (e.g. C:\file.json).
Setup and User Guide - Qlik Compose, May 2022 79

5 Data Warehouse projects
Parameter Description
--is_without_credentials Use this parameter to specify that you want to export the
project settings without the encrypted fields. When
importing to a new project, you will need to manually enter
the project passwords (in the Compose database
connection settings) after the import completes. In addition
to eliminating the need to specify a password when
exporting or importing the project, the is_without_
credentials parameter also allows the project to be used
in every Compose installation, regardless of its master user
password. It is also useful in the event that you would like
to keep the existing passwords in the target environment
(e.g. when exporting from a testing environment to an
existing project in the production environment).
--password The password for encrypting the credentials in the exported
project. When used, this parameter must be used together
with the master_user_password parameter described
below. Use the password > parameter if you want to
encrypt the credentials in the exported project, but do not
want the source master password to be used in a different
environment. The specified password must be at least 32
characters in length and can either be user-devised or
generated using the genpassword utility described in
Changing the master user password (page 32).
--master_user_password The master user password defined for the source machine.
When used, this parameter must be used together with the
password parameter. Use the master_user_password >
parameter if you want to encrypt the credentials in the
exported project, but do not want the source master
password to be used in a different environment. In such a
case, when you import the project to an environment that
has a different master password, you will only need to
specify the password qualifier.
For instructions on changing the master user password, see
Changing the master user password (page 32).
See also: Moving projects from the test environment to the
production environment (page 86) and Import/export
scenarios - When is a password required? (page 86)
Setup and User Guide - Qlik Compose, May 2022 80

5 Data Warehouse projects
Parameter Description
--without_environment_specifics Use this parameter to exclude all of the environment
specific settings from the export. This is useful if the project
you are exporting includes environment variables and the
settling in the target environment are significantly different
from the source environment. The variables will be replaced
with their default values (either empty or the default
Boolean value).
See also: Working with environment variables (page 88)
Example
Export project without a password
ComposeCli.exe export_project_repository --project MyProject --outfile file.json --is_without_
credentials
Export project with a password
ComposeCli.exe export_project_repository --project MyProject --outfile file.json --password
MyPassword --master_user_password MyMasterUserPassword
Importing a project
You can use the import_project_repository CLI to import a project. If you import to an existing
project, all of the project settings, except the project configuration items will be overridden. For information
on the project configuration items, see Exporting the project configuration (page 83).
Imported projects include the following:
l
Databases
l
Model definitions (entities and attributes)
l
Mappings
l
Custom ETLs
l
Data warehouse tasks
l
Data mart definitions
Command syntax
ComposeCli.exe import_project_repository --project
project_name
--infile
input_file
[--
password
password
] [--is_without_credentials] [--override_configuration] [--dont_backup_
existing_project] [--autogen]
Parameters
Parameter Description
--project The name of the project.
Setup and User Guide - Qlik Compose, May 2022 81

5 Data Warehouse projects
Parameter Description
--infile The full path to the input file, including the file name. This
file is in JSON format (e.g. C:\file.json).
--password The password specified with the password parameter
during export.
For instructions on changing the master user password, see
Changing the master user password (page 32).
See also: Moving projects from the test environment to the
production environment (page 86) and Import/export
scenarios - When is a password required? (page 86)
--is_without_credentials Use this parameter to specify to import the project settings
without the encrypted fields. In this case, you will need to
manually enter the project passwords in the Compose
database connection settings.
--override_configuration Use this parameter to override the existing project
configuration. When importing a project, the default setting
is not to override the existing project configuration.
--dont_backup_existing_project Use this parameter to specify not to back up the existing
project. By default, existing projects are backed up to the
following location (and automatically restored if the import
fails):
<product_dir>\data\projects\<project_name>_backup_
<timestamp>
Setup and User Guide - Qlik Compose, May 2022 82
5 Data Warehouse projects
Parameter Description
--autogen Use this paramter to automatically generate the imported
project. If the project is imported successfully, Compose
will:
l
Validate the model and adjust the data warehouse if
needed
l
Create the data warehouse tables if they do not exist
l
Validate the data warehouse
l
Adjust the data warehouse if needed.
If the "Adjust" cannot be performed automatically,
the "autogen" process will be stopped.
l
Generate all data warehouse tasks.
If Compose encounters an error while generating a
data warehouse task, it will skip the problematic
task and continue with the remaining tasks.
l
Create, adjust and generate all data marts
If an error is encountered during the "Create" or
"Generate" operations, it is recommended to
switch to the Compose Console and perform
these operations manually. Doing so will
generate a more detailed error message and
enable you to resolve the issue.
For information on validating the data warehouse and
generating the task, see Creating and managing the data
warehouse (page 190). For information on generating the
data mart task, see Creating and managing data marts
(page 225).
Example
ComposeCli.exe import_project_repository --project MyProject --infile file.json --password
MyPassword --override_configuration --autogen
Exporting the project configuration
You can use the export_project_repository_config CLI to export the configuration settings of an
existing project. This includes database definitions, scheduling jobs, and notifications. This is helpful, for
example, when you need to migrate configuration settings from a test environment to the production
environment.
For information about migrating projects, see Moving projects from the test environment to the production
environment (page 86).
Setup and User Guide - Qlik Compose, May 2022 83

5 Data Warehouse projects
Command syntax:
ComposeCli.exe export_project_repository_config --project
project_name
--outfile
output_file
[--is_without_credentials] [--password
password
] [--master_user_password
master_user_password
]
Parameters
Parameter Description
--project The name of the project.
--outfile The path to and name of the output file. This file is in JSON format (e.g.
C:\file.json).
--is_without_credentials Use this parameter to specify that you want to export the project settings
without the encrypted fields. When importing to a new project, you will
need to manually enter the project passwords (in the Compose database
connection settings) after the import completes. In addition to eliminating
the need to specify a password when exporting or importing the project,
the is_without_credentials parameter also allows the project to be
used in every Compose installation, regardless of its master user
password. It is also useful in the event that you would like to keep the
existing passwords in the target environment (e.g. when exporting from a
testing environment to an existing project in the production
environment).
--password The password for encrypting the credentials in the exported project. When
used, this parameter must be used together with the master_user_
password parameter described below. Use the password > parameter if
you want to encrypt the credentials in the exported project, but do not
want the source master password to be used in a different environment.
The specified password must be at least 32 characters in length and can
either be user-devised or generated using the genpassword utility
described in Changing the master user password (page 32).
--master_user_password The master user password defined for the source machine. When used,
this parameter must be used together with the password parameter. Use
the master_user_password > parameter if you want to encrypt the
credentials in the exported project, but do not want the source master
password to be used in a different environment. In such a case, when you
import the project to an environment that has a different master
password, you will only need to specify the password qualifier.
For instructions on changing the master user password, see Changing the
master user password (page 32).
See also: Moving projects from the test environment to the production
environment (page 86) and Import/export scenarios - When is a password
required? (page 86)
Example
Export project configuration without a password
Setup and User Guide - Qlik Compose, May 2022 84
5 Data Warehouse projects
ComposeCli.exe export_project_repository_config --project MyProject --outfile file.json --is_
without_credentials
Export project configuration with a password
ComposeCli.exe export_project_repository_config --project MyProject --outfile file.json --
password MyPassword --master_user_password MyMasterUserPassword
Importing the project configuration
You can use the Compose CLI to import the configuration settings of an existing project. This includes
database definitions, scheduling jobs, and notifications. This is helpful, for example, when you need to
migrate configuration settings from a test environment to the production environment. For information about
migrating projects, see Moving projects from the test environment to the production environment (page 86).
Before you can import the project configuration, you must first run the
import_project_repository
command described in Importing a project (page 81).
Command syntax:
ComposeCli.exe import_project_repository_config --project
project_name
--infile
input_file
[--
password
password
] [--is_without_credentials]
Parameters
Parameter Description
--project The name of the project.
--infile The full path to the input file, including the file name. This file is in JSON
format (e.g. C:\file.json).
--password The password specified with the password parameter during export.
For instructions on changing the master user password, see Changing the
master user password (page 32).
See also: Moving projects from the test environment to the production
environment (page 86) and Import/export scenarios - When is a password
required? (page 86)
--is_without_credentials Use this parameter to specify to import the project settings without the
encrypted fields. In this case, you will need to manually enter the project
passwords in the Compose database connection settings.
Example
ComposeCli.exe import_project_repository_config --project MyProject --infile file.json --
password MyPassword
Setup and User Guide - Qlik Compose, May 2022 85
5 Data Warehouse projects
Moving projects from the test environment to the production environment
After successfully creating and testing projects in the test environment, you now want to move those projects
to the production environment. You also need to propagate updates from the testing environment to the
production environment as necessary. Although it sounds complicated, moving new and updated projects
from the test environment to the production environment is actually quite straightforward, as explained
below.
See also Import/export scenarios - When is a password required? (page 86).
The data source and data warehouse display names must be identical in both the testing and the
production environments.
To perform the initial migration from the testing environment to the production environment:
1. Export the project from the test environment as described in Exporting a project (page 79).
2. Import the test project to the production environment as described in Importing a project (page 81).
3. Edit the connection settings to point to the production data source and data warehouse.
For more information, see Setting up Landing Zone and Data Source connections (page 131)and Setting
up a data warehouse connection (page 111)respectively.
4. Configure notifications and scheduling as needed.
For more information, see Scheduling tasks (page 264) and Notifications (page 266) respectively.
To propagate updates from the testing environment to the production environment:
1. Export the project from the test environment as described in Exporting a project (page 79).
2. Import the test project to the production environment as described in Importing a project (page 81).
Import/export scenarios - When is a password required?
The following section describes which of the various export/import scenarios require a password to be
specified.
In all scenarios, if you import a project to an existing project, the credentials of the existing projects
are preserved (as they are part of the project configuration).
Example 1: Moving a project or project configuration between two Compose machines without
retaining the project credentials.
This is useful when importing to a new project that will have different project credentials.
In such a scenario, simply add the is_without_credentials parameter to either the export or the import
command.
Setup and User Guide - Qlik Compose, May 2022 86

5 Data Warehouse projects
Example 2: Moving a project or project configuration between two Compose machines that have the
same Master User Password.
In such a scenario, neither the export command nor the import command need to include a password. If you
do not want the source and target projects to have the same credentials (for database connectivity, etc.), then
you also need to specify the is_without_credentials parameter in either the export or the import command.
Example 3: Moving a project or project configuration between two Compose machines that have a
different Master User Password, but without revealing the Master User Password of the source
machine.
In such a scenario, the export command must include the password and master_user_password parameters
while the import command must include the password parameter. The same password (specified with the
password parameter) must be used for both export and import.
Example 4: Moving a project or project configuration between two Compose machines that have a
different Master User Password.
In such a scenario, the export command does not need to include a password, but the import command
should specify the Master User Password of the source machine (using the password parameter).
Setup and User Guide - Qlik Compose, May 2022 87

5 Data Warehouse projects
Working with environment variables
Requires Compose August 2021 Service Release 03 or later.
Environment variables allow developers to build more portable expressions, custom ETLs, and Compose
configurations, which is especially useful when working with several environments such as DTAP
(Development, Testing, Acceptance and Production). Different environments (for example, development and
production) often have environment-specific settings such as database names, schema names, and Replicate
task names. Variables allow you to easily move projects between different environments without needing to
manually configure the settings for each environment. This is especially useful if many settings are different
between environments. For each project, you can use the predefined environment variables or create your
own environment variables.
Database and schema name variables are supported with the following objects:
l
Reusable transformations
l
Custom ETLs (Data warehouse and Data marts)
l
Mappings lookups
l
Mappings and model expressions
l
Data mart settings
In this section:
l
Limitations and considerations (page 88)
l
Locations and names of predefined variables (page 89)
l
Compose environment_variables CLI guidelines (page 92)
l
Working with predefined variables only (page 92)
l
Working with user-defined variables only (page 93)
l
Working with both user-defined and predefined variables (page 95)
l
Removing environment variables (page 96)
l
Manually editing the JSON file (page 97)
Limitations and considerations
l
Values for predefined variables will be shown in the Compose user interface, but user-defined variables
will be shown in variable format (for example, $$${myVariable}).
l
Variable names are case sensitive and can include alphanumeric characters, underscores, and periods
only.
l
User-defined variable definitions will not be included in projects exported as JSON files or in projects
exported as CSV files. However, user-defined variable names will be included in the relevant places in
the exported files.
See also: Exporting and importing projects using the CLI (page 78) and Migrating objects as CSV files
(page 49).
l
Exported CSV objects that are associated with predefined environment variables (for example, a
mapping database and schema) cannot contain user-defined environment variables.
Setup and User Guide - Qlik Compose, May 2022 88
5 Data Warehouse projects
For instance, this is not allowed:
Name Landing Zone Database Schema
MyMapping $$${MyDatabase} $$${MySchema}
See also: Migrating objects as CSV files (page 49).
Locations and names of predefined variables
Predefined variables are located in the following places:
Predefined data warehouse variables
The following predefined data warehouse connection variables can be set:
l
$$${database.Data Warehouse.connectionInputModeStandard} - The value can be "True" or "False".
"False" means that Advanced will be used.
l
$$${database.Data Warehouse.serverName}
l
$$${database.Data Warehouse.port}
l
$$${database.Data Warehouse.authenticationMethodSQLServer} - The value can be "True" or "False".
Relevant for Microsoft SQL Server only.
l
$$${database.Data Warehouse.userName}
l
$$${database.Data Warehouse.encryptedPassword}
l
$$${database.Data Warehouse.odbcString}
Only relevant when the Advanced connection option is set.
l
$$${database.Data Warehouse.jdbcString}
Only relevant when the Advanced connection option is set.
l
$$${database.Data Warehouse.warehouse}
Relevant for Snowflake only.
l
$$${database.Data Warehouse.database}
l
$$${database.Data Warehouse.datawarehouseSchema}
l
$$${database.Data Warehouse.datamartSchema}
For an explanation of data warehouse settings, see Setting up a data warehouse connection (page 111)
Predefined landing zone variables
The following predefined landing zone connection variables can be set:
Setup and User Guide - Qlik Compose, May 2022 89
5 Data Warehouse projects
As there can be several landing zones, the middle part of the variable name (landing1 below) is the
landing zone name and should be replaced with the actual name of your Landing Zone.
l
$$${database.landing1.contentType} - Values can be "Full Load Only", "ChangeProcessing", or "Full
Load and Change Processing"
l
$$${database.landing1.designatedBy} - The value can be "database" or "schema".
l
$$${database.landing1.database}
l
$$${database.landing1.schema}
l
$$${database.landing1.errorMartSchema}
l
$$${database.landing1.afterApplyingChanges} - Values can be "Delete" (the default) or "Archive".
l
$$${database.landing1.archiveDatabase}
Only relevant if "Archive" is set.
l
$$${database.landing1.archiveSchema}
Only relevant if "Archive" is set.
l
$$${database.landing1.isAssociatedWithReplicateTask} - The value can be "True" or "False".
l
$$${database.landing1.replicateServer}
Only relevant if the Associate with Replicate task option is set.
l
$$${database.landing1.replicateTask}
Only relevant if the Associate with Replicate task option is set.
l
$$${database.landing1.source.isSourceDefined} - The value can be "True" or "False".
l
$$${database.landing1.source.connectionInputModeStandard} - The value can be "True" or "False".
"False" means that Advanced will be used.
l
$$${database.landing1.source.serverName}
l
$$${database.landing1.source.port}
l
$$${database.landing1.source.authenticationMethodSQLServer} - The value can be "True" or "False".
Relevant for Microsoft SQL Server only.
l
$$${database.landing1.source.userName}
l
$$${database.landing1.source.encryptedPassword}
l
$$${database.landing1.source.odbcString}
Setup and User Guide - Qlik Compose, May 2022 90
5 Data Warehouse projects
Only relevant when the Advanced connection option is set.
l
$$${database.landing1.source.jdbcString}
Only relevant when the Advanced connection option is set.
l
$$${database.landing1.source.database}
l
$$${database.landing1.source.datawarehouseSchema}
For an explanation of landing zone settings, see Defining landing zones (page 140).
Predefined data mart variables
The following predefined data mart connection variables can be set:
As there can be several data marts, the middle part of the variable name (datamart1 below) is the
data mart name and should be replaced with the actual data mart name.
l
$$${datamart.datamart1.databaseDefault} - The value can be "True" or "False".
l
$$${datamart.datamart1.database}
l
$$${datamart.datamart1.tablesSchemaDefault} - The value can be "True" or "False".
l
$$${datamart.datamart1.tablesSchema}
l
$$${datamart.datamart1.viewsSchemaDefault} - The value can be "True" or "False".
l
$$${datamart.datamart1.viewsSchema}
For an explanation of data mart settings, see Modifying data mart settings (page 255).
Predefined lookup variables
The following predefined lookup variables can be set:
As there are usually multiple mappings and columns, the middle part of the variable name
(mapping1.column1 below) are the mapping and column names and should be replaced with the
actual mapping and column name.
l
$$${mapping.mapping1.column1.lookup.schema}
For an explanation of lookup settings, see Using lookup tables (page 207).
Predefined mappings variables
The following predefined mapping variables can be set:
As there are usually multiple mappings, the middle part of the variable name (mapping1 below) is
the mapping name and should be replaced with the actual mapping name.
Setup and User Guide - Qlik Compose, May 2022 91

5 Data Warehouse projects
l
$$${mapping.mapping1.schema}
For an explanation of mappings settings, see Editing column mappings (page 202).
Compose environment_variables CLI guidelines
The procedures below describe how to manage environment variables using the Compose CLI. When using the
Compose CLI, make sure to adhere to the following guidelines:
l
Before running any environment_variables commands, run the Connect command to establish a
connection to the Compose Server. For more information on this command, see Connecting to Qlik
Compose server (page 78).
l
Variable names should be specified in the CLI without dollar signs or curly brackets. So, for example,
assuming the name of your landing database is MyLanding, $$${database.MyLanding.database}
should be specified as database.MyLanding.database.
l
When setting a variable with the Compose CLI, any variable names and values with spaces (both user-
defined and predefined) must be specified in quotation marks. This means, for example, that all data
warehouse variables must be specified with quotation marks as their names always contain a space
(for example, "database.Data Warehouse.serverName").
l
When setting a Boolean value, use --boolVal instead of --val. For example, to set database.Data
Warehouse.connectionInputModeStandard to "True", specify:
--var "database.Data Warehouse.connectionInputModeStandard" --boolVal true
Working with predefined variables only
When working with predefined environment variables only, the flow is as follows:
1. In the source environment:
a. Configure your project as desired.
b. Run the following command to write the predefined environment variables to a JSON file
(replacing
projectName
with the name of your Compose project and
JsonFileLocation
with
the full path of your JSON file):
ComposeCli environment_variables --command writePredefined --project
projectName
--jsonFile
JsonFileLocation
For security reasons, Compose never writes encrypted passwords to files.
1. a. Create a deployment package or export the project using the Compose CLI.
See also: Project deployment (page 47) and Exporting a project (page 79).
2. In the target environment:
a. Deploy the project if you created a deployment package or import the project if you exported it
using the Compose CLI.
See also: Project deployment (page 47) and Importing a project (page 81).
b. Copy the JSON file created in the source environment to your preferred location.
c. Edit the JSONfile and replace the variable values with the values you want to propagate to the
target environment.
See also: Working with environment variables (page 88).
Setup and User Guide - Qlik Compose, May 2022 92
5 Data Warehouse projects
d. Run the following command to propagate the JSON file variables to the Compose user interface
(replacing
projectName
with the name of your Compose project and
JsonFileLocation
with
the full path of your edited JSON file):
ComposeCli environment_variables --command setALL --project
projectName
--
jsonFile
JsonFileLocation
Example:
ComposeCli environment_variables --command setALL --project analytics --jsonFile
C:\compose\compose-variables.json
Running the setAll command will remove any existing environment variables that are
not included in the JSON file. Therefore, if you want to make sure that such variables
are not removed when setAll is run, add them to the JSON file.
You can also set any variable by running the set command. This is especially useful if
you do not want the JSON file to include passwords. In this case, you would need to
run the following command (shown as an example):
ComposeCli environment_variables --command set --project MyProject --
var encryptedPassword --val g56g56y563%
When you set a password with the CLI, Compose encrypts the password first and then
sets it.
e. Run the following command to apply the predefined environment variables and complete the
process (replacing
projectName
with the name of your Compose project):
ComposeCli environment_variables --command applyPredefined --project
projectName
Working with user-defined variables only
When working with user-defined environment variables only, the flow is as follows:
User-defined variables should have the following format in the Compose user interface:
$$${myVariable}
You can use user-defined variables in the following places:
l
Expressions - in model, mappings (column expressions, data quality and filters) or data mart
l
Lookup conditions and expressions
l
Custom ETLs
To set user-defined variables:
1. In the source environment:
a. In the Compose user interface, include your variable in an object that supports user-defined
variables (for example, a Custom ETL in a data warehouse task or an expression), and save your
settings.
Setup and User Guide - Qlik Compose, May 2022 93

5 Data Warehouse projects
Example: User-defined variable in a Custom ETL
UPDATE
"ROSIE"."DWH2"."TSTG_Employees"
SET
"Title" = $$${myVar}
WHERE "EmployeeID" < 150
b. For user-defined variables, use one of the following methods:
Method 1:
Set each variable individually by running the following command (replacing
projectName
with
the name of your Compose project,
varName
with the variable name, and
value
with the
variable value):
ComposeCli environment_variables --command set --project
projectName
--var
varName
--val
value
Example:
ComposeCli environment_variables --command set --project MyProject --var myVar --
val Manager
Method 2:
Add the user-defined variables directly to the JSON file as described in Manually editing the
JSON file (page 97) below.
c. Generate the task(s) with the user-defined variables.
d. If you set the user-defined variables with the CLI, run the following command to write the user-
defined variables to a JSON file (replacing
projectName
with the name of your Compose project
and
JsonFileLocation
with the full path of your JSON file):
ComposeCli environment_variables --command writeCLISet --project
projectName
--
jsonFile
JsonFileLocation
e. Create a deployment package or export the project using the Compose CLI.
See also: Project deployment (page 47) and Exporting a project (page 79).
2. In the target environment:
a. Deploy the project if you created a deployment package or import the project if you exported it
using the Compose CLI.
See also: Project deployment (page 47) and Importing a project (page 81).
b. Copy the JSON file created in the source environment to your preferred location.
c. Edit the JSONfile and replace the variable values with the values you want to appear in the
target environment.
See also: Working with environment variables (page 88).
d. Run the following command to propagate the JSON file variables to the Compose user interface
(replacing
projectName
with the name of your Compose project and
JsonFileLocation
with
the full path of your edited JSON file)::
ComposeCli environment_variables --command setALL --project
projectName
--
jsonFile
JsonFileLocation
Setup and User Guide - Qlik Compose, May 2022 94

5 Data Warehouse projects
Running the setAll command will remove any existing environment variables that are
not included in the JSON file. Therefore, if you want to make sure that such variables
are not removed when setAll is run, add them to the JSON file.
e. Generate the relevant tasks as well.
Working with both user-defined and predefined variables
Each time Compose writes to the JSON file, it overwrites the existing content. Therefore, when
working with both user-defined and predefined variables, you need to specify the path to two
different JSON files. For convenience, you can then merge the two files into a single JSON file while
taking care to use the format described in Manually editing the JSON file (page 97) below.
When working with both user-defined and predefined environment variables, the flow is as follows:
1. In the source environment:
a. Configure your project as desired.
b. Run the following command to write the predefined environment variables to a JSON file
(replacing
projectName
with the name of your Compose project and
predefinedJsonFileLocation
with the full path of the JSON file that you want to contain your
predefined variables):
ComposeCli environment_variables --command writePredefined --project
projectName
--jsonFile
predefinedJsonFileLocation
For security reasons, Compose never writes encrypted passwords to files.
c. In the Compose user interface, add user-defined variables to supported objects (for example, a
Custom ETL in a data warehouse task), and save your settings.
Example: User-defined variable in a Custom ETL
UPDATE
"ROSIE"."DWH2"."TSTG_Employees"
SET
"Title" = $$${myVar}
WHERE "EmployeeID" < 150
d. For user-defined variables, use one of the following methods:
Method 1:
Set each variable individually by running the following command (replacing
projectName
with
the name of your Compose project,
varName
with the variable name, and
value
with the
variable value):
ComposeCli environment_variables --command set --project
projectName
--var
varName
--val
value
Setup and User Guide - Qlik Compose, May 2022 95

5 Data Warehouse projects
Example:
ComposeCli environment_variables --command set --project MyProject --var myVar --
val Manager
Method 2:
Add the user-defined variables directly to the JSON file as described in Manually editing the
JSON file (page 97) below.
e. Generate the task with the user-defined variable(s).
f. If you set the user-defined variables with the CLI, run the following command to write the user-
defined variables to a JSON file (replacing
projectName
with the name of your Compose project
and
JsonFileLocation
with the full path of the JSON file that you want to contain your user-
defined variables):):
ComposeCli environment_variables --command writeCLISet --project
projectName
--
jsonFile
userDefinedJsonFileLocation
g. Create a deployment package or export the project using the Compose CLI.
See also: Project deployment (page 47) and Exporting a project (page 79).
2. In the target environment:
a. Deploy the project if you created a deployment package or import the project if you exported it
using the Compose CLI.
See also: Project deployment (page 47) and Importing a project (page 81).
b. Copy the JSON file created in the source environment to your preferred location.
c. Edit the JSONfile and replace the variable values with the values you want to appear in the
target environment.
See also: Working with environment variables (page 88).
d. Run the following command to propagate the JSON file variables to the Compose user interface
(replacing
projectName
with the name of your Compose project and
JsonFileLocation
with
the full path of your edited JSON file)::
ComposeCli environment_variables --command setALL --project
projectName
--
jsonFile
JsonFileLocation
Running the setAll command will remove any existing environment variables that are
not included in the JSON file. Therefore, if you want to make sure that such variables
are not removed when setAll is run, add them to the JSON file.
e. Generate all tasks with user-defined variables.
f. Run the following command to apply the predefined environment variables and complete the
process (replacing
projectName
with the name of your Compose project):
ComposeCli environment_variables --command applyPredefined --project
projectName
Removing environment variables
Run the "Remove" command if you set a variable that you no longer want to use in the target environment.
Setup and User Guide - Qlik Compose, May 2022 96
5 Data Warehouse projects
Removing a predefined variable will reset it to its previous value. To prevent errors, make sure when
you remove user-defined variables, to also edit or remove the custom ETL or expression where the
variable is located.
1. Run the following command:
ComposeCli environment_variables --command remove --var
VarName
--project
projectName
Example:
ComposeCli environment_variables --command remove --var MyVariable --project MyProject
2. Generate any task(s) configured with user-defined variables.
Manually editing the JSON file
Before you propagate the JSON file variables to the Compose user interface in the target environment, you
need to edit the file and replace the source variable values with the target variable values. It might also be
more convenient to create, edit and maintain the JSON file manually instead of (or in addition to) using the
writeCLISet and writePredefined commands described above.
The JSON file is split into two sections: “predefinedVariables” and “userDefinedVariables”. When you edit
the JSON file, make sure to put predefined variables in the “predefinedVariables” section and user-defined
variables in the “userDefinedVariables” section. In addition, make sure to use standard JSON escaping
conventions, as shown in the following example:
{
“predefined”: {
"databases.Data Warehouse.serverName": "myhostname"
},
“userDefined”: {
"variable": "value",
"var2": "val2"
}
Editing and saving the JSON file does not automatically set and apply the variables. To do this, run
the 'SetAll' and 'ApplyPredefined' commands. If the JSON file also contains user-defined variables,
you will need to generate the associated tasks as well. See below for details.
Propagating the JSON file variables to the Compose user interface
After you have prepared your JSON file and copied it to your preferred location, perform the following
procedure to propagate the variables to the Compose user interface:
1. Run the following command to propagate the JSON file variables to the Compose user interface
(replacing
projectName
with the name of your Compose project and
JsonFileLocation
with the full
path of your edited JSON file):
ComposeCli environment_variables --command setALL --project
projectName
--jsonFile
JsonFileLocation
Setup and User Guide - Qlik Compose, May 2022 97
5 Data Warehouse projects
Example:
ComposeCli environment_variables --command setALL --project MyProject --jsonFile
C:\composeVariables\myVariables.json
Running the setAll command will remove any existing user-defined environment variables
from the user-interface, and reset any modified predefined environment variables that are
not included in the JSON file to their previous values.
2. If the JSON file contains predefined environment variables, run the following command (replacing
projectName
with the name of your Compose project):
ComposeCli environment_variables --command applyPredefined --project projectName
3. If the JSON file contains user-defined environment variables, generate the associated task(s).
Generating projects using the CLI
The instruction below explain how to automatically generate projects using the CLI. This can be especially
useful when deploying projects between different environments.
Command syntax
ComposeCli.exe generate_project --project
project_name
[--database_already_adjusted] [--
stopIfDatamartsNeedRecreation]
Parameters
Parameter Description
--project The name of the project.
--database_already_adjusted This should only be included if the data warehouse and data
marts were adjusted outside of Compose.
--stopIfDatamartsNeedRecreation Stops the process if any data marts cannot be automatically
adjusted and need to be recreated.
Example
ComposeCli.exe generate_project --project MyProject --stopIfDatamartsNeedRecreation
When the command is run, Compose will:
l
Validate the model.
l
Create any data warehouse tables that do not exist.
l
Validate the data warehouse.
l
Adjust the data warehouse if needed.
If an Adjust script is needed and
--database_already_adjusted
is included in the
command, the script (DDL) will not be run as it is assumed that the user ran it manually.
Setup and User Guide - Qlik Compose, May 2022 98
5 Data Warehouse projects
l
Generate all data warehouse tasks.
If Compose encounters an error while generating a data warehouse task, it will skip the
problematic task and continue with the remaining tasks.
l
Create, adjust and generate all data marts.
If the "Adjust" cannot be performed automatically and
--stopIfDatamartsNeedRecreation
is included in the command, the process will stop.
Certain limitations apply when adjusting the data mart. For more information, see Auto-adjust limitations and
considerations (page 254).
Exporting project documentation
Relevant to Data Warehouse projects only.
You can export a project to a zip file for record keeping and sharing offline. The project is exported as HTML
files which can be easily printed to PDF using the print toolbar button in the HTML page.
To export the project documentation:
1. Open the project as described in Managing and monitoring projects (page 282).
2. Click the downward arrow to the right of the project name and select Generate Project
Documentation from the drop-down menu.
A zip file with the name of the project and a timestamp of when the documentation was generated will
be created (e.g. MyComposeProject_documentation_03_22_2016__15_01_10.zip). Depending on your
browser settings, the file will either be automatically downloaded to your browser’s Downloads folder
or you will be prompted to save it.
3. To view the documentation, extract the contents of the zip file and then open the index.html file.
A browser tab will open displaying the documentation categories in the left pane.
Setup and User Guide - Qlik Compose, May 2022 99
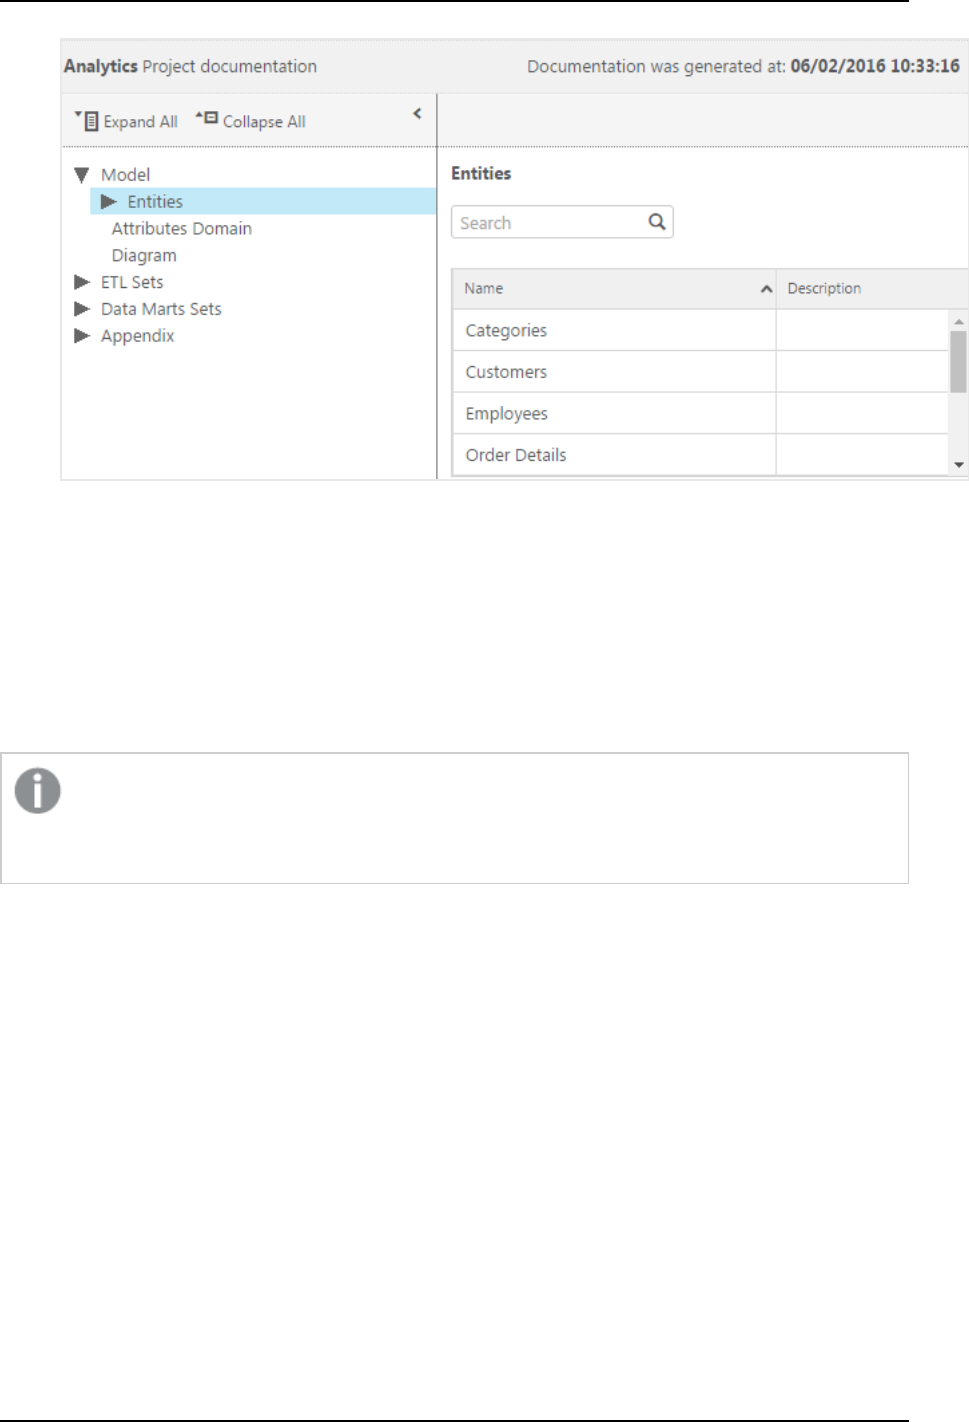
5 Data Warehouse projects
4. Navigate through the documentation using the tree in the left pane and the breadcrumbs above the
documentation.
Viewing and downloading DDL scripts
In the DDL Script Files window, you can view and download the data warehouse DDL script files. By default,
Compose executes the Create, Adjust and Drop statements immediately upon user request. However, when
the Generate DDL scripts but do not run them option is enabled, Compose will only generate the scripts but
not execute them.
DDL scripts must be run from the data warehouse database and schema or data warehouse
database and data mart schema, depending on the DDL script and the platform type (for example,
in Oracle there are no schemas just the database).
For more information on the Create DDL scripts only option, see Project settings (page 40).
To open the DDL Script Files window:
1. Open your project as described in Managing and monitoring projects (page 282).
2. Click the downward arrow to the right of the project name and select Show DDL Scripts from the
drop-down menu.
The DDL Script Files window opens.
Setup and User Guide - Qlik Compose, May 2022 100
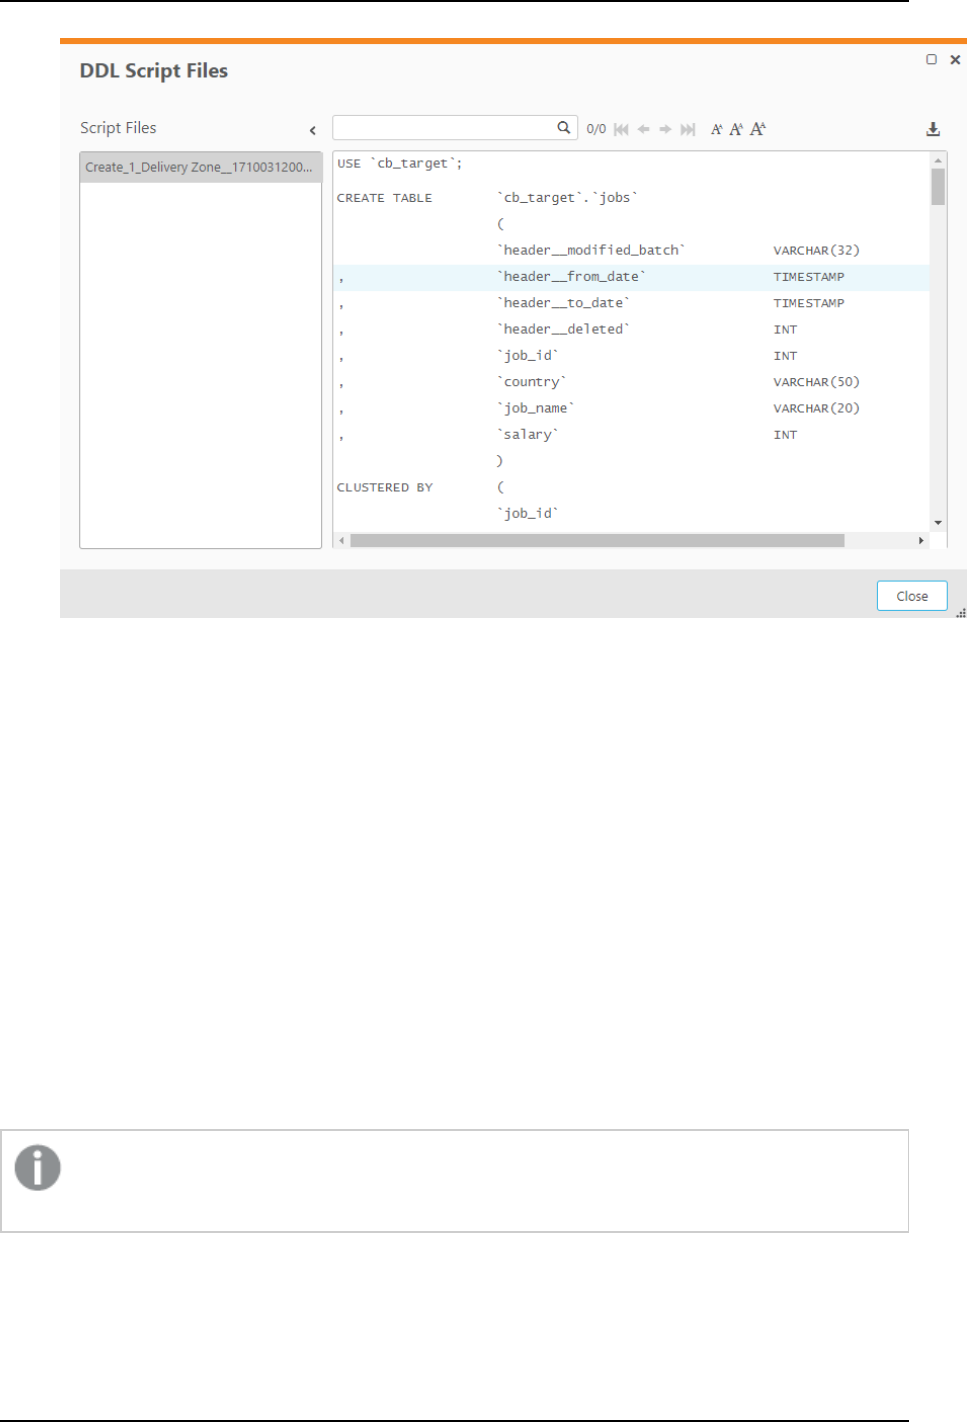
5 Data Warehouse projects
3. To view a script, select the desired script in the Script Files pane on the left. The script will be
displayed on the right.
4. To download a script, select the desired script in the Script Files pane on the left. Then click the
download button in the top right of the window.
5. To search for an element in the script, start to type in the search box. All strings that match the search
query will be highlighted blue.
You can navigate between search query matches using the arrows to the right of the search box. Use
the right and left single arrows to navigate matches sequentially. Use the right and left double arrows
to jump to the last and first match respectively.
6. To reset the search, either delete the search query or click the "x" to the right of the search box.
Project versioning
Compose provides built-in project version control using the Git engine. Version control enables Compose
developers to commit project revisions to both a local and a remote Git repository. If a mistake is made,
Compose developers can easily roll back to earlier versions of the project while minimizing disruption to all
team members.
Revisions only store metadata and mapping information. After you revert to a saved revision, you
will need to recreate the data warehouse and data mart tables.
Setup and User Guide - Qlik Compose, May 2022 101

5 Data Warehouse projects
Configuring version control settings
To define Version Control Settings:
1. From the project drop-down menu, select Version Control > Settings.
The Version Control Settings - Git window opens.
The Local Commits area shows the local root folder where project revisions are committed. The first
time a project revision is committed, Compose creates a JSON file with the current project settings.
The <project_name>.json file is archived to a ZIP file (<project_name>_deployment.zip), which is
located in a project-specific folder under the source-control folder.
2. To enable commits to a remote Git database, select Enable remote commits and then provide the
following information:
l
URL - The address of the remote Git database.
l
User name - Your user name for accessing the remote Git database.
l
Password - Your password for accessing the remote Git database.
Committing projects
You can commit a project using the console or using the CLI:
To commit a project to Version Control using the web console:
1. From the project drop-down menu, select Version Control > Commit.
The Commit - <Project_Name> window opens.
2. Enter a message in the Message box and optionally select the Remote push check box. Note that the
Remote push check box will be disabled if the Enable remote commits option described above is not
selected.
To commit a project to Version Control using the CLI:
Run the following command from the Compose bin directory:
Command syntax
ComposeCli.exe commit --project
project_name
[--message
message
] [--remote]
Parameters
Parameter Description
--project The name of the project.
--message An optional message to accompany the commit.
--remote This parameter is required if you want to commit the project to a remote
Git repository (see above). By default, the project will be committed locally
to <product_dir>\data\source-control.
Example
ComposeCli.exe commit --project MyProject --remote
Setup and User Guide - Qlik Compose, May 2022 102

5 Data Warehouse projects
To revert to a saved revision:
1. From the project drop-down menu, select Version Control > Revisions history.
The Revision History - <Project_Name> window opens.
By default, the last 10 revisions are shown. You can change this number by selecting one of the
available options from the Show drop-down list.
2. Optionally, use the Search box to find a specific revision.
3. Select the desired revision and then click the Deploy to Revision toolbar button.
4. When prompted to confirm the operation, click Yes.
The existing project will be replaced.
5. Click Close to close the Revision History - <Project_Name> window.
To download a saved revision:
1. From the project drop-down menu, select Version Control > Revisions history.
The Revision History - <Project_Name> window opens.
By default, the last 10 revisions are shown. You can change this number by selecting one of the
available options from the Show drop-down list.
2. Optionally, use the Search box to find a specific revision.
3. Select the desired revision and then click the Download Revision as Package toolbar button.
The package will be saved as a ZIP file in your browser's default download location.
Creating a diagnostics package
To assist in troubleshooting esoteric issues, a Qlik Support Engineer may ask you for a diagnostics package.
The diagnostics package contains the following information:
l
The project "data" directory
l
Java logs and workflow logs
l
.NET logs
l
Deployment package file
As a prerequisite to creating a diagnostics package, the project must have at least one database
connection configured.
To create a diagnostics package:
1. From the Project menu, select Create Diagnostics Package.
2. A zip file in the following format will either be downloaded to your computer or you will be prompted
to download it (according to your browser settings):
Compose_Diagnostics_<project_name>_<timestamp>.zip
Setup and User Guide - Qlik Compose, May 2022 103

5 Data Warehouse projects
5.3 Getting started with Data Warehouse projects
This section provides an overview of the Qlik Compose architecture, familiarizes you with its interface and
ends with a short tutorial.
In this section:
l
High-level flow (page 104)
l
Console elements (page 104)
l
Data warehouse project tutorial (page 107)
High-level flow
Setting up data warehouse project typically consists of the following stages (simplified):
1. In Qlik Replicate, define a task that replicates the source tables to a landing zone in the data
warehouse.
2. In Compose:
a. Configure access to your data warehouse.
b. Configure access to your data sources.
c. Use the "Discover" option to auto-generate a model from the source tables or import an
existing model that was created in ERwin. You can even create the model manually if you
prefer.
d. Once your model is ready, create the data warehouse tables and populate them with the source
data.
e. Create a data mart from the data warehouse tables.
f. Populate the data mart tables.
See also Introduction (page 17).
Console elements
This section will familiarize you with the elements that comprise the Qlik Compose UI.
To open Qlik Compose, from the Windows Start menu, select All Programs > Qlik Compose > Qlik Compose
Console.
Management view
The Qlik Compose Console opens in Management view.
Setup and User Guide - Qlik Compose, May 2022 104
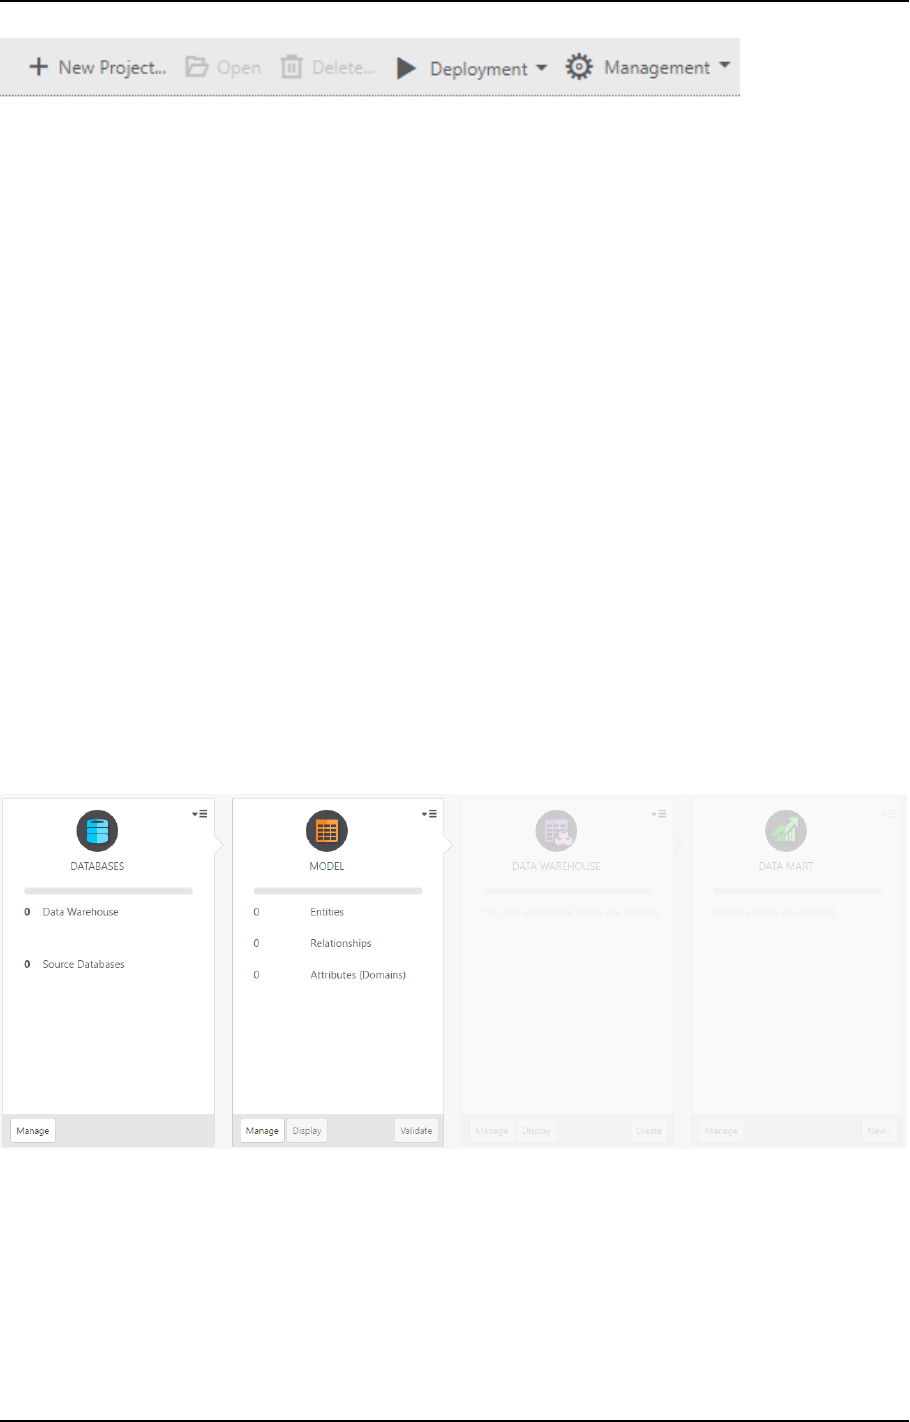
5 Data Warehouse projects
In Management view, you can perform the following tasks:
l
Create, edit, and delete projects
For more information, see Adding and managing data warehouse projects (page 37).
l
Access Qlik Compose management options, including:
l
Register and view the product license
l
Manage log levels and cleanup options
l
Manage email settings
For more information, see Managing Compose (page 366).
Designer view
When you add a new project or open an existing project, the console switches to Designer view. If you are in
Monitor view (see below), you can switch back to Designer view by clicking the Designer tab in the top right of
the console.
Designer view comprises the following panels:
l
Databases - Configure access to your source database(s) and data warehouse.
For more information, see Setting up Landing Zone and Data Source connections (page 131) and Setting
up a data warehouse connection (page 111)respectively.
l
Model - Create and edit your model.
Setup and User Guide - Qlik Compose, May 2022 105
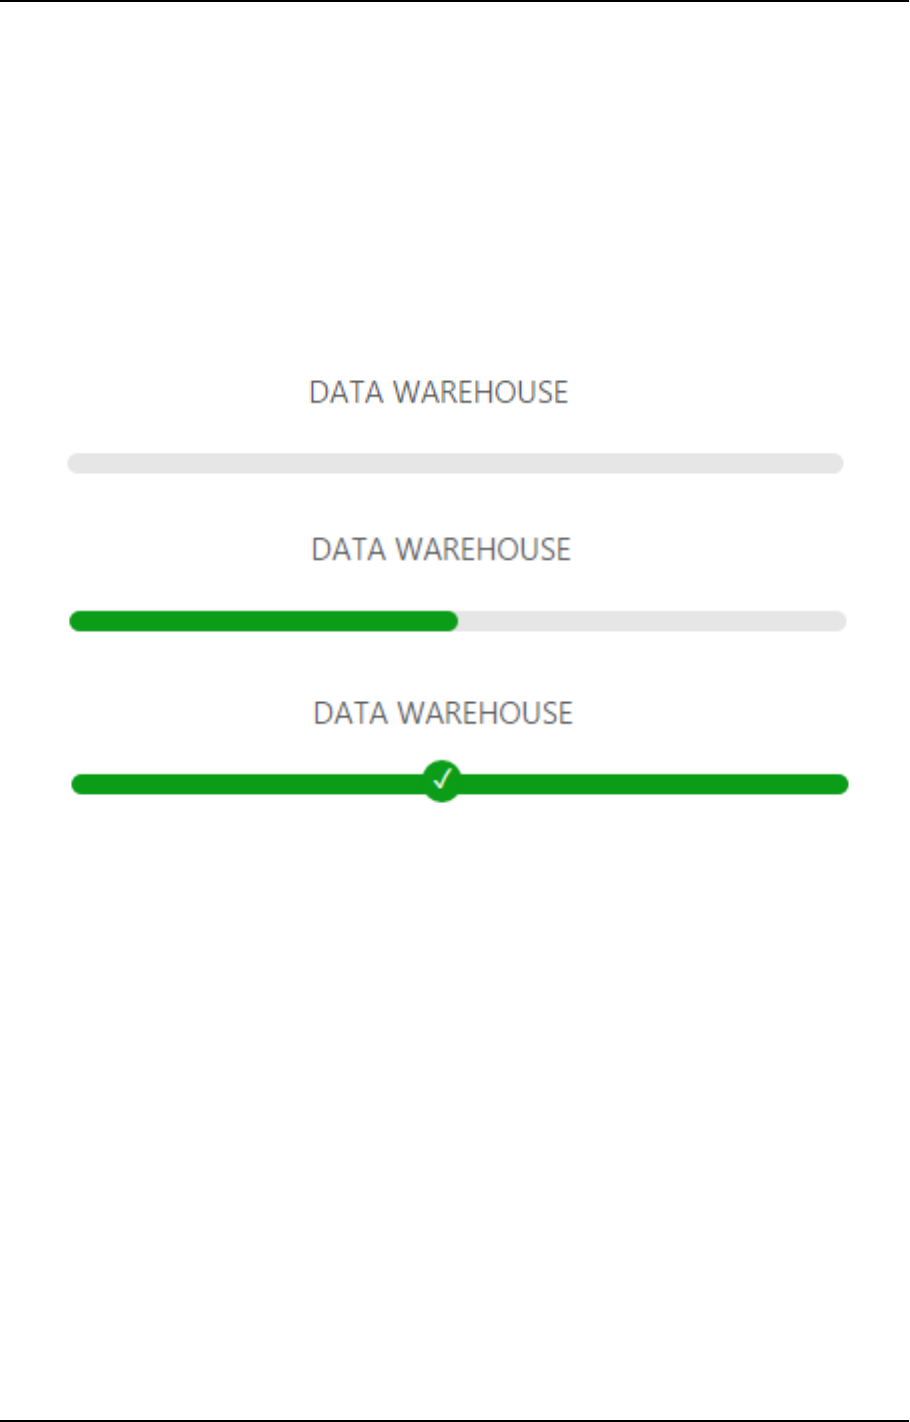
5 Data Warehouse projects
For more information, see Creating and managing the model (page 154).
l
Data Warehouse - Create the data warehouse tables, generate the task statements, and run data
warehouse tasks.
For more information, see Creating and managing the data warehouse (page 190).
l
Data Mart - Define data marts, create the data mart tables, generate the task statements, and run data
mart tasks.
For more information, see Creating and managing data marts (page 225).
In Designer view, each of the panels has a bar below the panel name. The bar can be empty, half-filled or
completely filled, according to the current configuration status of the panel properties, as follows:
l
No fill (gray) - Not configured
l
Half filled - Configuration is not complete
l
Completely filled - Fully configured
Monitor view
To switch to Monitor view, click the Monitor tab in the top right of the console.
Setup and User Guide - Qlik Compose, May 2022 106
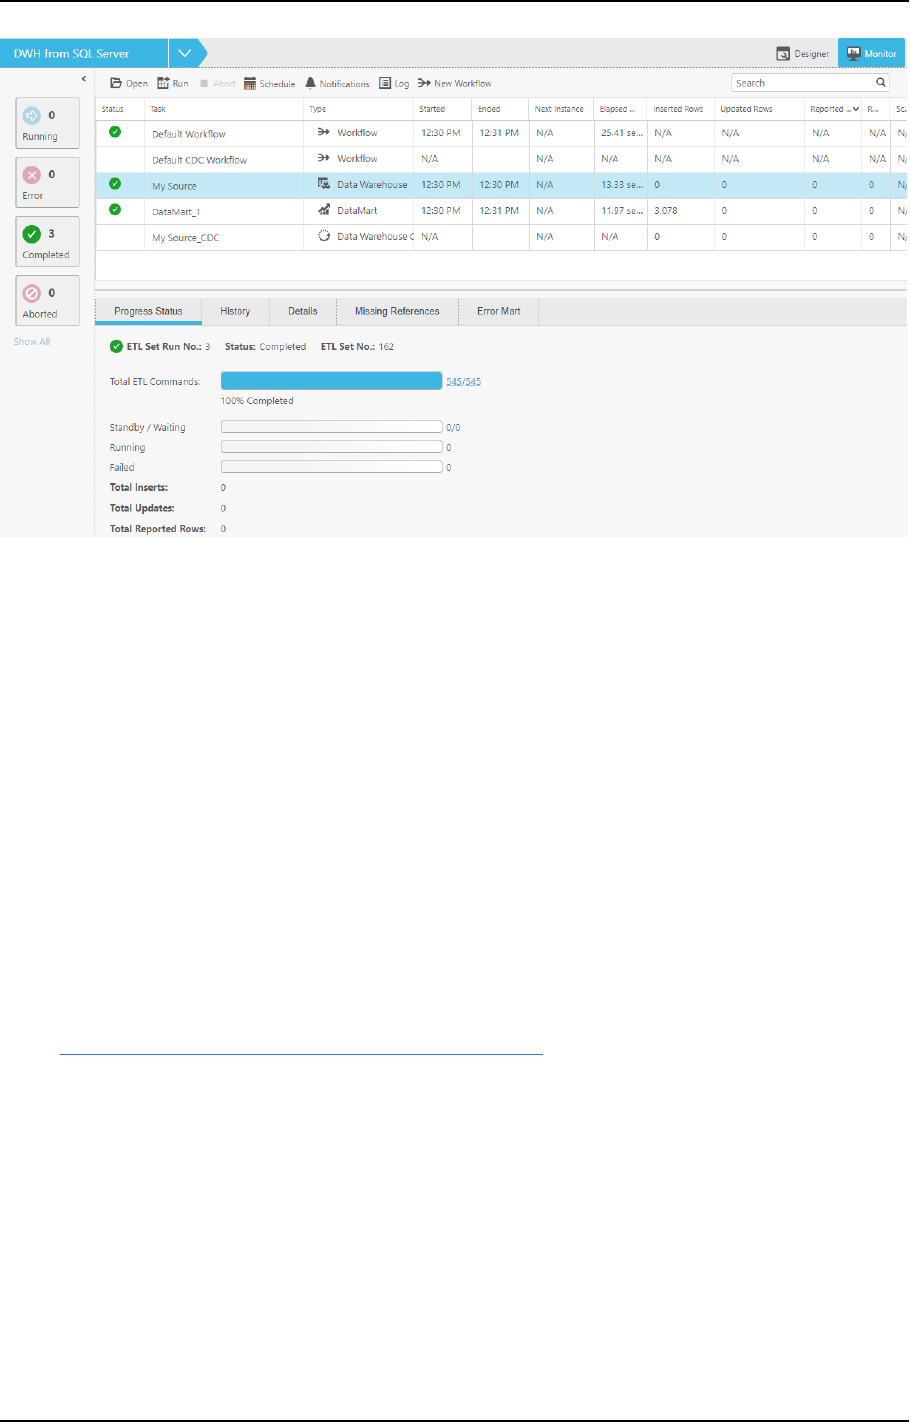
5 Data Warehouse projects
In Monitor view, you can view the status of data warehouse and data mart tasks and schedule their execution,
either individually or as a workflow.
For more information, see Controlling and monitoring tasks and workflows (page 260).
Data warehouse project tutorial
This short tutorial will walk you through each of the stages required to create a data warehouse project. For
simplicity’s sake, we will be using Microsoft SQL Server as both the source database server and the target Data
Warehouse. You can of course use any of the supported source or target databases, but instructions for doing
so are outside the scope of this tutorial.
What you need:
l
Qlik Compose installed according to the instructions in Qlik Compose installation and setup (page 20).
l
The Northwind.MDF sample database attached to Microsoft SQL Server.
An easy-to-follow set of instructions for downloading and installing Northwind.MDF can be found at
the following website:
http://businessimpactinc.com/install-northwind-database/
l
Define an empty database on Microsoft SQL Server (e.g. northwind_dwh) and make a note of its name.
This will serve as the target Data Warehouse for the Northwind.MDF source tables.
l
Microsoft SQL Server Native Client 11.0 installed on the Compose machine.
To set up a Compose project:
1. Define and run a replication task in Qlik Replicate as described in Defining a Qlik Replicate task (page
36).
2. Open Qlik Compose.
3. Add a data warehouse project as described in steps 1-3 of Adding data warehouse projects (page 38).
Setup and User Guide - Qlik Compose, May 2022 107
5 Data Warehouse projects
4. In the Databases panel, perform the following steps to define your data warehouse:
a. Click Manage. The Manage Databases window opens.
b. Click the Add New Database link or the New toolbar button. The New Data Warehouse
window opens.
c. In the New Data Warehouse window:
l
In the Name field, specify a display name for your data warehouse.
l
From the Type drop-down list, select Microsoft SQL Server.
l
In the Server Name field, specify the Microsoft SQL Server name using the following
format:
l
To connect to a named Microsoft SQL Server instance: computer_name\db_
server_name
l
To connect to the default Microsoft SQL Server instance: computer_name
l
In the User Name and Password fields, enter your credentials for logging in to the
server specified in the Server Name field.
l
In the Database Name field, specify the name of the database specified in the target
endpoint of the Qlik Replicate task.
l
In the Data Warehouse Schema field, specify dbo or your preferred schema.
l
In the Data Mart Schema field, specify dbo or your preferred schema.
You can specify different schemas for the data warehouse and data mart
tables, but for the purpose of this quick start, we’ll use the same schema.
l
Click Test Connection to verify that Compose is able to establish a connection to the
specified database and then click OK to save your settings.
d. Click New. The New Data Source window opens.
e. In the New Data Source window:
l
In the Name field, specify a display name for your data source.
l
From the Content Type drop-down list, choose Full Load and Change Processing.
l
From the Designate By drop-down list, choose Schema.
l
In the Schema name field, enter the schema name that you specified in the Target
Metadata tab of the Replicate task. For more information, see Defining a Qlik Replicate
task (page 36).
l
In the Error mart schema name field, specify the schema where you want the data
mart exception tables to be created. Data that is rejected by data quality rules will be
copied to tables in the specified schema.
l
Select the Source database connection check box and then provide the details for
connecting to the source database. For the purpose of this tutorial, except for the
Schema, these should be the same as the data warehouse connection details.
l
Click Test Connection to verify that Compose is able to establish a connection to the
specified database and then click OK to save your settings.
l
Click OK to save your settings.
5. In the Model panel, perform the following steps to create the model for data warehouse generation:
Setup and User Guide - Qlik Compose, May 2022 108

5 Data Warehouse projects
a. From the drop-down menu in the top right corner of the Model panel, select Discover. The
Discover window opens.
b. Select the source database (i.e. the database without the "_landing" suffix). This is the source
endpoint in the Qlik Replicate task. The Source Table/View Selection - <Data_Source_Name>_
Landing window opens.
c. In the Source Table/View Selection window:
l
Select the Tables option.
l
Click the Search button.
l
From the Results list, select which tables to discover and then click OK. The Generating
Model from <db_name> window opens.
d. Wait for the model generation to complete and then click Close.
6. In the Data Warehouse panel, perform the following steps to populate the Data Warehouse with the
source data:
a. Click Create. The Creating Data Warehouse window opens. Wait for the Data Warehouse to be
created and then click Close.
b. Click Manage. The Manage Data Warehouse Tasks window opens.
c. Click Generate. The Generating Statements for Task: <Name> window opens. Wait for the
ETL instruction set to be generated and then click Close.
d. Click Run. The Manage Data Warehouse Tasks window switches to Monitor view and Qlik
Compose starts to populate the Data Warehouse with data (this may take a few seconds).
e. Wait for the Data Warehouse to be populated and then close the Manage Data Warehouse
Tasks window.
7. In the Data Mart panel, perform the following steps to create a data mart with a star schema:
a. Click New. The New Data Mart window opens. Leave the default name.
b. Make sure the Start New Star Schema Wizard check box is selected, and click OK.The New
Star Schema wizard opens. Leave the default name.
c. Select Transactional as the star schema type and then click Next.
d. In the Facts screen, select Order Details. Then click Next.
e. In the Dimensions screen, clear all the check boxes and then select Customers and Products
only, as shown below.
Setup and User Guide - Qlik Compose, May 2022 109
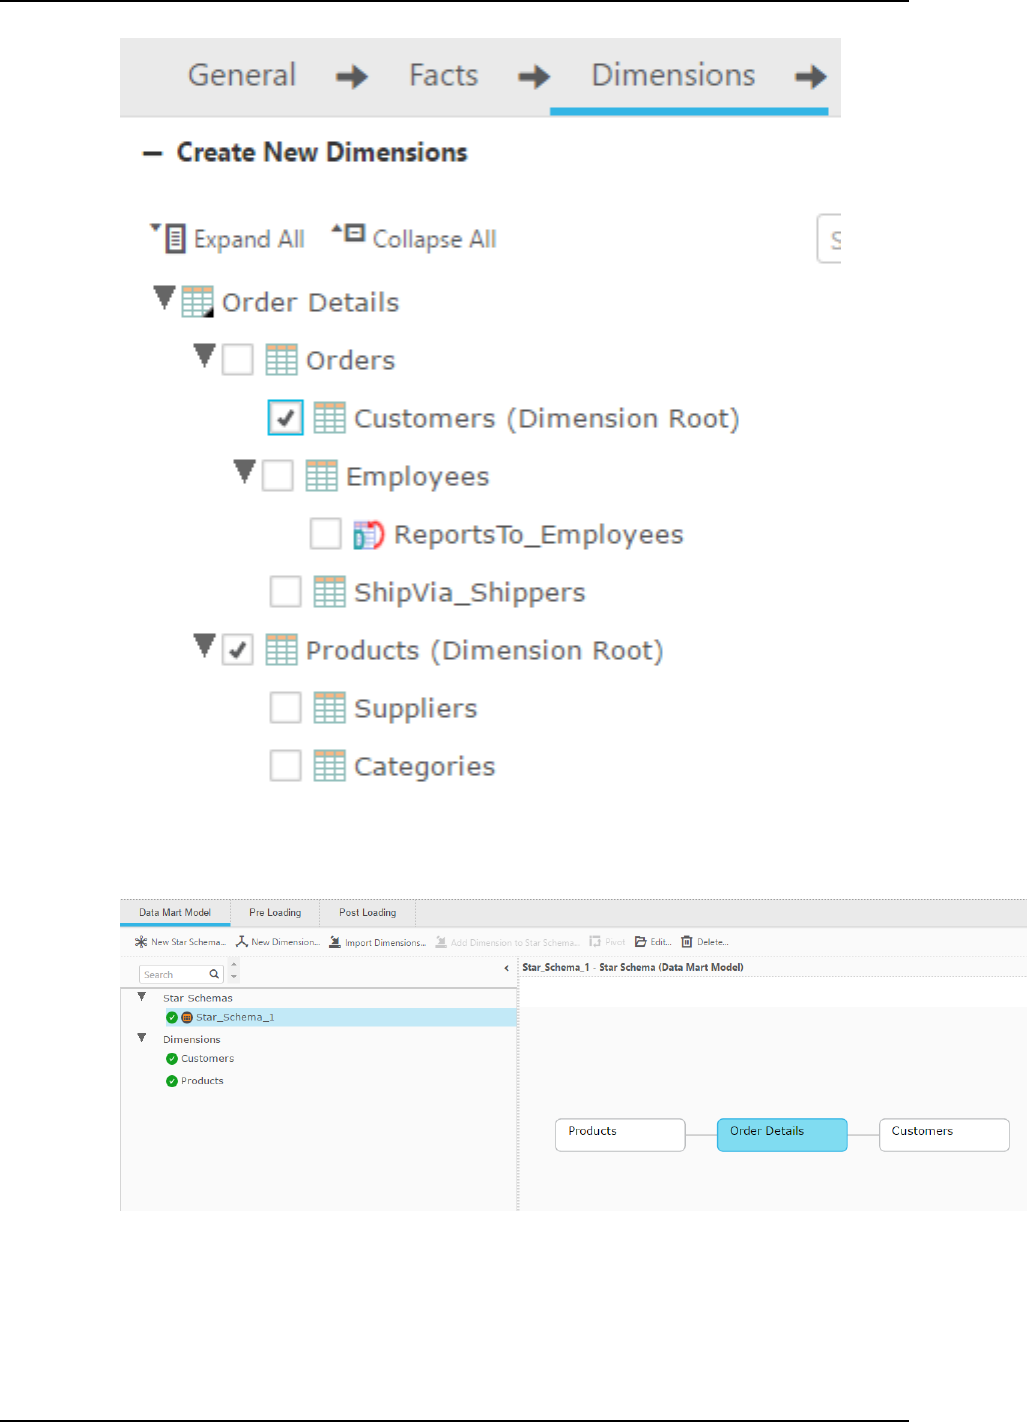
5 Data Warehouse projects
f. Then click Next.
g. In the Transaction Date screen, select OrderDate and then click Finish. The star schema is
displayed on the right of the Manage Data Marts window.
h. Click Create Tables. The Creating Data Mart: <Data Mart Name> window opens. Wait for the
Data Mart tables to be created and then close the window.
i. Click Generate. The Generating Statements for Data Mart: <Data Mart Name> window
opens. Wait for the generation of the task statements to complete and then close the window.
Setup and User Guide - Qlik Compose, May 2022 110
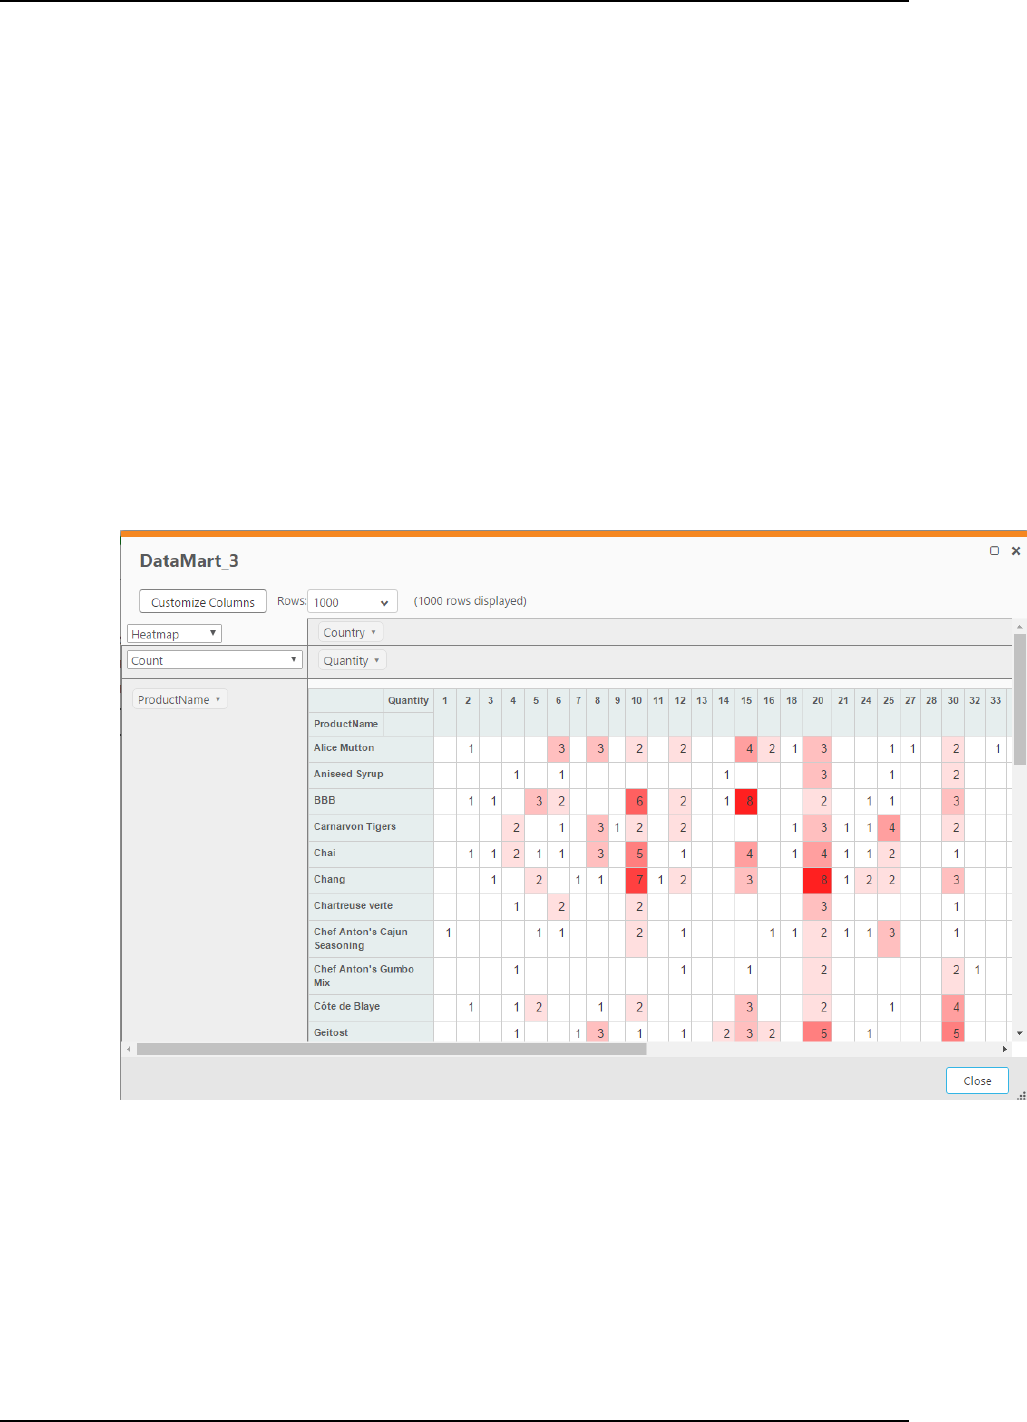
5 Data Warehouse projects
j. Click Run.
The Manage Data Marts window switches to Monitor view and Qlik Compose populates the
Data Mart with data. Leave the Manage Data Marts window open in Monitor view for now (The
two buttons at the top right of the window allow you to switch between Designer and Monitor
views).
8. To display the data in a pivot table:
a. Click the Pivot toolbar button. The Select Columns for Pivot Table window opens.
b. From the drop-down list at the top of the window, select the Pivot Table columns as follows:
l
In the 1Fct_Order Details table, select Quantity.
l
In the 1Dim_Customers table, select Country.
l
In the 1Dim_Products table, select ProductName.
c. Click OK. A Pivot Table is created with your selected columns.
d. Drag the Quantity box to the space above the table and the ProductName box to the space on
the left.
e. Select Heatmap from the drop-down list below the Customize Columns button.
Your pivot table should now look like this:
5.4 Setting up a data warehouse connection
This section explains how to set up data warehouse connectivity in a Qlik Compose project.
The data warehouse contains the landing zone tables (the target of the Qlik Replicate task), the logical
entities, the actual data warehouse tables and the data mart tables.
Setup and User Guide - Qlik Compose, May 2022 111
5 Data Warehouse projects
For more information on the data warehouse structure in an project Qlik Compose project, see Introduction
(page 17).
Note that Qlik Compose will not let you add data sources before you add a data warehouse. This is because
the server connection settings for the source landing zone are derived from the data warehouse settings.
For all supported data warehouse types, each data warehouse schema (or database if there are no
schemas) should be used exclusively for a single data warehouse. In other words, using the same
schema for different projects, data warehouses and landing zones is not allowed. Data mart
schemas, however, can be shared by different data marts.
For more information on adding data sources, see Setting up Landing Zone and Data Source connections (page
131).
For instructions on adding a data warehouse, see the following according to your data warehouse type.
l
Using Microsoft SQL Server as a data warehouse (page 112)
l
Using Oracle as a data warehouse (page 115)
l
Using Amazon Redshift as a data warehouse (page 121)
l
Using Microsoft Azure Synapse Analytics as a data warehouse (page 124)
l
Using Snowflake as a data warehouse (page 118)
l
Using Google Cloud BigQuery as a Data Warehouse (page 128)
Using Microsoft SQL Server as a data warehouse
Although the procedures in this section specifically refer to Microsoft SQL Server, they are equally
applicable to Microsoft Azure SQL Managed Instance and Microsoft Azure SQL Database.
It contains the following topics:
l
Prerequisites (page 112)
l
Working with Windows authentication (page 150)
l
Microsoft SQL Server data types (page 113)
l
Defining the connection parameters (page 113)
Prerequisites
Before you can use Microsoft SQL Server as a data warehouse in a Qlik Compose project, make sure that the
following prerequisites have been met:
Client
Microsoft SQL Server Native Client must be installed on the Qlik Compose machine.
Permissions
To use Microsoft SQL Server as a Data Warehouse a Qlik Compose project, the Compose user must be granted
the following privileges in the Microsoft SQL Server database:
Setup and User Guide - Qlik Compose, May 2022 112
5 Data Warehouse projects
l
The Qlik Compose user must have at least the db_owner user role on the Microsoft SQL Server
database.
l
The Qlik Compose user must be granted the CREATE VIEW permission on the Microsoft SQL Server
database.
l
A Microsoft SQL Server system administrator must provide this permission for all Qlik Compose users.
Working with Windows authentication
You can configure the Qlik Compose Microsoft SQL Server source to log in to Microsoft SQL Server using
Windows authentication. If you choose this option, you also need to make sure that:
l
The Microsoft SQL Server instance is set up to allow Windows log on.
l
The Compose user is specified as the "Log on as" user for the Qlik Compose Server service account.
OR
Microsoft SQL Server is configured to allow login for the Qlik Compose Server service account.
Microsoft SQL Server data types
The following table shows the Microsoft SQL Server data warehouse data types that are supported when using
Qlik Compose and the default mapping from Qlik Compose data types.
For information on how to view the data type that is mapped from the source, see the section for the source
database you are using.
Qlik Compose data types Microsoft SQL Server data types
Bigint BIGINT
Decimal NUMERIC (p,s)
Integer INT
Date DATETIME2
Datetime DATETIME2
GUID UNIQUEIDENTIFIER
IntAutoInc INT IDENTITY
Byte VARBINARY (Length)
Data type mappings
Defining the connection parameters
This section describes how to use a Microsoft SQL Server database as a data warehouse in a Qlik Compose
project. You can also use the Microsoft SQL Server data warehouse settings to specify connection details to a
Microsoft Azure SQL Database.
When using Microsoft Azure SQL Database as the data warehouse, the data warehouse must be
located on the same database as the landing zone, although it should use a different schema.
Setup and User Guide - Qlik Compose, May 2022 113

5 Data Warehouse projects
To define Microsoft SQL Server as a data warehouse:
1. Open your project and click Manage in the bottom left of the Databases panel.
The Manage Databases window opens.
2. Click the New toolbar button or click the Add new database link in the middle of the window.
The New Data Warehouse dialog box opens.
3. From the Type drop-down list, select the desired data warehouse.
4. Enter the information as described below.
l
Connection input mode: Select Standard or Advanced.
If you selected Standard connection input mode, specify the following:
l
Server Name: The name or IP address of the Microsoft SQL Server server machine.
l
Port: Optionally, change the default port.
When connecting to a named instance using the instance name, either change the port
to 0 to use the SQL Server Browser service to redirect.
l
Windows authentication / SQL Server authentication: Choose how you want
Compose to log in to the Microsoft SQL Server database. If you choose Windows
authentication, see Working with Windows Authentication below.
l
User Name: The user name for accessing the Microsoft SQL Server database. The
specified user must have read/write privileges on the Microsoft SQL Server database.
l
Password: The password for accessing the Microsoft SQL Server database.
If you selected Advanced connection input mode, specify the following:
l
Password: The password for accessing the Microsoft SQL Server database.
l
ODBCConnection String: The string of parameters required to connect to the Microsoft
SQL Server ODBCDriver.
l
JDBCConnection String: The string of parameters required to connect to the Microsoft
SQL Server JDBCDriver.
Compose will concatenate the database name to the ODBC/JDBC connection
string.
l
Warehouse Properties: Specify the following:
l
Database Name: The name of the Microsoft SQL Server database.
l
Data Warehouse Schema: The schema in which to create the data warehouse tables.
l
Data Mart Schema: The schema in which to create the data mart.
5. Click Test Connection to verify that Compose is able to establish a connection with the specified data
warehouse.
6. Click OK to save your settings.
The database is added to the list on the left side of the Manage Databases window.
Working with Windows authentication
You can configure Qlik Compose for Data Warehouses to log in to Microsoft SQL Server using Windows
authentication.
If you choose this option, you also need to make sure that:
Setup and User Guide - Qlik Compose, May 2022 114
5 Data Warehouse projects
l
The Microsoft SQL Server instance is set up to allow Windows log on.
l
The Qlik Compose for Data Warehouses user is specified as the "Log on as" user for the Qlik Compose
for Data Warehouses service account.
-OR-
l
Microsoft SQL Server is configured to allow login for the Qlik Compose for Data Warehouses service
account.
Using Oracle as a data warehouse
This section describes how to set up Oracle as a data warehouse in a Compose project.
When loading a huge number of records (i.e. hundreds of millions), the UNDO/REDO/TEMP
tablespace on the Oracle database must be large enough to hold the data being loaded.
It contains the following topics:
l
Prerequisites (page 115)
l
Oracle data types (page 116)
l
Defining the connection parameters (page 117)
Prerequisites
Before you can use Oracle as a data warehouse in a Qlik Compose project, make sure that the following
prerequisites have been met:
Client
Before you can use Oracle as a source in a Qlik Compose project, make sure that the following client
prerequisites have been met:
l
The Oracle database should be configured with the required permissions (see below) and accessible
from the Compose machine.
l
Install Oracle Data Access Components (x64) on the computer where Qlik Compose is located. Then,
add the full path of the Oracle Data Access DLL to the system environment variables.
The default path should be:
<ORACLE_PRODUCT_CLIENT_DIR>\ODP.NET\bin\4\
l
The path to the Oracle Data Access DLL also needs to be specified in both the
machine.conf file and the Global Assembly Cache (GAC). In addition, make sure that
the Oracle.DataAccess.dll file exists in the following location:
C:\Windows\Microsoft.NET\assembly\GAC_64.
For more information, see Oracle Help Center.
l
The Qlik Compose service needs to be restarted after installing the required
components.
l
Install Oracle Instant Client for Microsoft Windows (x64) on the computer where Qlik Compose is
located.
Setup and User Guide - Qlik Compose, May 2022 115

5 Data Warehouse projects
l
If you want to use an Oracle TNS name in the connection settings, you first need to set the ORACLE_
HOME environment variable.
Example:
<ORACLE_PRODUCT_CLIENT_DIR>\product\12.1.0\client_1
Permissions
To use Oracle as a Data Warehouse a Qlik Compose project, the Compose user must be granted the following
privileges in the Oracle database:
l
grant create session
l
grant create table
l
grant create view
l
grant connect
l
grant resource
l
grant create sequence
l
grant create any directory
l
grant SELECT on SYS.DBA_REGISTRY
l
grant select any table
l
grant delete any table
l
grant drop any table
l
grant unlimited tablespace
l
grant create any table
l
grant insert any table
l
grant update any table
l
grant drop any table
l
grant alter any table
l
grant create any view
l
grant drop any view
l
grant create any index
Oracle data types
The Oracle database for Qlik Compose supports most Oracle data types. The following table shows the Oracle
data warehouse data types that are supported when using Qlik Compose and the default mapping from Qlik
Compose data types.
For information on how to view the data type that is mapped from the source, see the section for the source
database you are using.
Qlik Compose data types Oracle data types
Bigint DECIMAL (19,0)
Date DATE
Data type mappings
Setup and User Guide - Qlik Compose, May 2022 116
5 Data Warehouse projects
Qlik Compose data types Oracle data types
Datetime DATE
Decimal DECIMAL (p,s)
Integer DECIMAL (10,0)
GUID VARCHAR (38)
IntAutoInc DECIMAL (10,0)
Byte raw (${LENGTH})
Defining the connection parameters
This section describes how to use an Oracle database as a data warehouse in a Qlik Compose project.
To define Oracle as a data warehouse:
1. Open your project and click Manage in the bottom left of the Databases panel.
The Manage Databases window opens.
2. Click the New toolbar button or click the Add new database link in the middle of the window.
The New Data Warehouse dialog box opens.
3. From the Type drop-down list, select the desired data warehouse.
4. Enter the information as described below.
l
Connection input mode: Select Standard or Advanced.
If you selected Standard connection input mode, specify the following:
l
Server Name: The name or IP address of the Oracle server machine.
l
Port: If you specified a TNS name in the Server Name field, make sure this field is
empty. Optionally, change the default port.
l
User Name: The user name for accessing the Oracle database. The specified user must
have read/write privileges on the Oracle database.
l
Password: The password for accessing the Oracle database.
l
SID: If you specified a TNS name in the Server Name field, make sure this field is empty.
Optionally, specify the Oracle SID.
If you selected Advanced connection input mode, specify the following:
l
Password: The password for accessing the Oracle database.
l
ODBCConnection String: The string of parameters required to connect to the Oracle
ODBCDriver.
l
JDBCConnection String: The string of parameters required to connect to the Oracle
JDBCDriver.
Compose will concatenate the database name to the ODBC/JDBC connection
string.
Setup and User Guide - Qlik Compose, May 2022 117

5 Data Warehouse projects
l
Warehouse Properties: Specify the following:
l
Data Warehouse Schema: The schema in which to create the data warehouse tables.
l
Data Mart Schema: The schema in which to create the data mart.
l
Maximum length of identifier names is 128: Select this check box to limit the length of
Oracle dimension table identifier names to 128 characters. This should match your
Oracle configuration. This option is available for Oracle versions starting from 12.2.
5. Click Test Connection to verify that Compose is able to establish a connection with the specified data
warehouse.
6. Click OK to save your settings.
The database is added to the list on the left side of the Manage Databases window.
Using Snowflake as a data warehouse
This section describes how to set up Snowflake as a data warehouse in a Compose project.
It contains the following topics:
l
Prerequisites (page 118)
l
Limitations (page 119)
l
Snowflake data types (page 119)
l
Defining the connection parameters (page 120)
Prerequisites
Before you can use Snowflake as a data warehouse in a Qlik Compose project, make sure that the following
prerequisites have been met:
Client
l
Download and install Snowflake ODBC driver for Windows 2.18.1 or later.
l
The Qlik Compose machine must be set to the correct time (UTC).
Permissions
The user specified in the Snowflake data warehouse settings must be associated with a role that grants the
following privileges:
l
USAGE on the Snowflake warehouse
l
USAGE or OWNERSHIP on the specified database and its schemas
l
SELECT on the INFORMATION_SCHEMA schemas
l
CREATE SCHEMA on the specified database.
Only required for user-specified schemas that do not yet exist on the target.
l
Tables:
l
CREATE
l
SELECT
Setup and User Guide - Qlik Compose, May 2022 118

5 Data Warehouse projects
l
INSERT
l
UPDATE
l
DELETE
l
TRUNCATE
l
REFERENCES (for current and future tables)
l
DROP (for user-initiated Drop and Create operations)
l
Views:
l
SELECT
l
CREATE (for current and future views)
l
DROP (for user-initiated Drop and Create operations)
l
External functions called by user-defined ETLs:
l
USAGE
Limitations
The following limitations apply when using Snowflake as a data warehouse in a Compose project.
l
Variant, object and array columns are not supported when creating the model using the discovery
method. Compose will ignore such columns during discovery and issue a warning.
l
When discovering the landing zone, Snowflake converts all numeric data types to NUMBER (38,0) and is
therefore not recommended. For example, discovering a table with INTEGER i and DOUBLE d columns
in the landing zone would return NUMBER (38,0) for both, whereas discovering these columns in the
source would return more accurate data types.
l
When ingesting data from a Replicate source that may have BIT fields (such as Microsoft SQL Server), it
is recommended to define a global data type transformation in Replicate to convert BIT to STRING (1).
Otherwise, Compose will convert BIT to VARCHAR (1) (as it does not support BOOLEAN), which may
cause a data type mismatch in the landing zone.
Snowflake data types
The following table shows the Snowflake data warehouse data types that are supported when using Qlik
Compose and the default mapping from Qlik Compose data types.
For information on how to view the data type that is mapped from the source, see the section for the source
database you are using.
Qlik Compose data types Snowflake data types
BIGINT INTEGER
INTEGER INTEGER
Data type mappings
Setup and User Guide - Qlik Compose, May 2022 119

5 Data Warehouse projects
Qlik Compose data types Snowflake data types
DECIMAL If column size >38, then:
DOUBLE
If column size <38, then:
DECIMAL (size, scale)
DATE DATE
TIME TIME
DATETIME TIMESTAMP (scale 1-9)
GUID VARCHAR (38)
BIGINTAUTOINC BIGINT IDENTITY
BYTE BINARY
Defining the connection parameters
This section describes how to add Snowflake as a data warehouse in a Qlik Compose project.
To add Snowflake as a data warehouse:
1. Open your project and click Manage in the bottom left of the Databases panel.
The Manage Databases window opens.
2. Click the New toolbar button or click the Add new database link in the middle of the window.
The New Data Warehouse dialog box opens.
3. From the Type drop-down list, select the desired data warehouse.
4. Enter the information as described below.
l
Connection input mode: Select Standard or Advanced.
If you selected Standard connection input mode, specify the following:
l
Server Name: The URL for accessing Snowflake on AWS or Snowflake on Microsoft
Azure.
l
Port: The port through which Snowflake will be accessed (default 443).
l
User Name: The user name for accessing the Snowflake database. The specified user
must have read/write privileges on the Snowflake database.
l
Password: The password for accessing the Snowflake database.
If you selected Advanced connection input mode, specify the following:
l
Password: The password for accessing the Snowflake database.
l
ODBCConnection String: The string of parameters required to connect to the
Snowflake ODBCDriver.
l
JDBCConnection String: The string of parameters required to connect to the
Snowflake JDBCDriver.
Setup and User Guide - Qlik Compose, May 2022 120
5 Data Warehouse projects
Compose will concatenate the warehouse name to the ODBC/JDBC connection
string.
You can connect to Snowflake with ODBC, using a proxy server and entering
the appropriate ODBC environment parameters. For details, see ODBC
Configuration and Connection Parameters - Snowflake Documentation.
You can connect to Snowflake with JDBC, using a proxy server and entering
the appropriate JDBCconnection string:
jdbc:snowflake://<Snowflake server URL>:443/?&user=<snowflake
user name>&warehouse=<Snowflake Warehouse
name>&useProxy=true&proxyHost=<Proxy server
name>&proxyPort=<Proxy server listening port>&proxyUser=<proxy
server user name>&proxyPassword=<proxy server user's password>
l
Warehouse Properties: Specify the following:
l
Warehouse Name: The name of your Snowflake warehouse.
"Warehouse" refers to the Snowflake warehouse and should not be confused
with the data warehouse created by Compose.
l
Database Name: The database in which to create the data warehouse tables.
l
Data Warehouse Schema: The schema in which to create the data warehouse tables.
l
Data Mart Schema: The schema in which to create the data mart.
5. Click Test Connection to verify that Compose is able to establish a connection with the specified data
warehouse.
6. Click OK to save your settings.
The database is added to the list on the left side of the Manage Databases window.
Using Amazon Redshift as a data warehouse
This section describes how to set up Amazon Redshift as a data warehouse in a Compose project.
It contains the following topics:
l
Prerequisites (page 121)
l
Amazon Redshift data types (page 122)
l
Defining the connection parameters (page 123)
Prerequisites
Before you can use Amazon Redshift as a data warehouse in a Qlik Compose project, make sure that the
following prerequisites have been met:
Setup and User Guide - Qlik Compose, May 2022 121

5 Data Warehouse projects
Driver
l
Install and configure the latest Amazon Redshift 64-bit ODBC Driver.
l
Install the Amazon Redshift JDBC Driver on the Compose machine. Amazon are working to resolve a
known issue with their latest driver. Until the issue is resolved, JDBC driver 4.1 needs to be used
instead.
1. Download the JARfile from:
https://mvnrepository.com/artifact/com.amazon.redshift/redshift-jdbc41/1.2.10.1009
2. Copy it to:
<Compose_Installation_Folder>\java\jdbc
The Qlik Compose service needs to be restarted after copying the driver.
Amazon Redshift Cluster
If you haven't already done so, set up an Amazon Redshift cluster and make sure that following information
about your Amazon Redshift Cluster is readily available:
l
Amazon Redshift Cluster Name
l
Amazon Redshift Cluster Port
l
Amazon Redshift User Name and Password
l
Amazon Redshift Database Name
Permissions
Qlik Replicate performs the following operations on the replicated tables within Amazon Redshift:
l
SELECT, INSERT, UPDATE and DELETE
l
Bulk Load
l
CREATE, ALTER, DROP
l
CREATE VIEW
If the user is the 'DB Owner', these permissions are in place by default. Otherwise, the user must be granted
these permissions to achieve successful replication.
Port
Make sure that port 5439 (the Amazon Redshift Cluster port) is open for inbound connections from Qlik
Compose .
Amazon Redshift data types
The following table shows the Amazon Redshift data warehouse data types that are supported when using
Qlik Compose and the default mapping from Qlik Compose data types.
For information on how to view the data type that is mapped from the source, see the section for the source
database you are using.
Setup and User Guide - Qlik Compose, May 2022 122

5 Data Warehouse projects
Qlik Compose data types Amazon Redshift data types
INTEGER INT4
BIGINT INT8
DECIMAL NUMERIC (p,s)
DATE DATE
GUID VARCHAR (38)
DATETIME TIMESTAMP
BYTE VARCHAR (Length in Bytes)
TIME VACHAR (20)
Data type mappings
Defining the connection parameters
This section describes how to use an Amazon Redshift database as a data warehouse in a Qlik Compose
project.
To define Amazon Redshift as a data warehouse:
1. Open your project and click Manage in the bottom left of the Databases panel.
The Manage Databases window opens.
2. Click the New toolbar button or click the Add new database link in the middle of the window.
The New Data Warehouse dialog box opens.
3. From the Type drop-down list, select the desired data warehouse.
4. Enter the information as described below.
l
Connection input mode: Select Standard or Advanced.
If you selected Standard connection input mode, specify the following:
l
Server Name: The name or IP address of the Amazon Redshift cluster.
l
Port: Optionally, change the default port.
l
User Name: The user name for accessing the Amazon Redshift database. The specified
user must have read/write privileges on the Amazon Redshift database.
l
Password: The password for accessing the Amazon Redshift database.
If you selected Advanced connection input mode, specify the following:
l
Password: The password for accessing the Amazon Redshift database.
l
ODBCConnection String: A string of parameters required to connect to the Amazon
Redshift ODBCDriver. After entry, click Test to verify that a connection was established.
l
JDBCConnection String: A string of parameters required to connect to the Amazon
Redshift JDBCDriver. After entry, click Test to verify that a connection was established.
Setup and User Guide - Qlik Compose, May 2022 123
5 Data Warehouse projects
You must include the name of the Amazon Redshift database in the
connection string.
l
Warehouse Properties: Specify the following:
l
Database Name: The name of the Amazon Redshift database.
l
Data Warehouse Schema: The schema in which to create the data warehouse tables.
l
Data Mart Schema: The schema in which to create the data mart.
l
More Options: Click to see or hide the following advanced options:
l
Character column size in bytes: This should be calculated according to the largest
value you are likely to store in a VARCHAR column. Tables in the Landing Zone will be
divided by the specified value (and rounded up).
For example, if the value of Character column size in bytes is 3 (the default), both
VARCHAR (12 bytes) and VARCHAR (10 bytes) will be discovered as VARCHAR (4
characters).
See: Use the smallest possible columnsize - Amazon Redshift
If this value is changed, existing tables will not be affected (i.e. the change will
only take effect if new columns are added to the model and the data
warehouse tables are updated accordingly).
5. Click Test Connection to verify that Compose is able to establish a connection with the specified data
warehouse.
6. Click OK to save your settings.
The database is added to the list on the left side of the Manage Databases window.
Using Microsoft Azure Synapse Analytics as a data warehouse
This section describes how to set up Microsoft Azure Synapse Analytics as a data warehouse in a Compose
project.
By default, Compose creates tables in Microsoft Azure Synapse Analytics as a CLUSTERED
COLUMNSTORE INDEX, which offers the best overall query performance for large tables. Depending
on your environment though, you might want to override the default to create all tables or specific
tables as a HEAP, for example, which is optimized for smaller tables. For information on how to
accomplish this, see Table creation modifiers tab (page 45) in the Project Settings section.
It contains the following topics:
l
Prerequisites (page 125)
l
Microsoft Azure Synapse Analytics data types (page 125)
l
Defining the connection parameters (page 126)
Setup and User Guide - Qlik Compose, May 2022 124

5 Data Warehouse projects
Prerequisites
Before you can use Microsoft Azure Synapse Analytics as a data warehouse in a Qlik Compose project, make
sure that the following prerequisites have been met:
Install the Required Client
Install SQL Server Native Client 11 (for connecting to Microsoft Azure Synapse Analytics) on the Compose
machine.
Permissions
The user specified in the Microsoft Azure Synapse Analytics connection settings must be granted the following
permissions.
Permission required for the specified target database:
The Compose must be granted the db_owner user role on the specified target database.
Permission required for the master database:
The Compose must be granted SELECT access (by adding the user to the master database and then to the db_
readers role, for example).
Open the Required Firewall Port(s)
l
When Compose runs on a machine outside Azure - Open port 1433 for outbound traffic.
l
When Compose runs on an AzureVM - Open the following ports for outbound traffic:
l
1433
l
11000-11999
l
14000-14999
Microsoft Azure Synapse Analytics data types
The following table shows the Microsoft Azure Synapse Analytics data warehouse data types that are
supported when using Qlik Compose and the default mapping from Qlik Compose data types.
For information on how to view the data type that is mapped from the source, see the section for the source
database you are using.
Qlik Compose data types Microsoft Azure Synapse Analytics data types
BIGINT BIGINT
DECIMAL DECIMAL (p,s)
INTEGER INTEGER
DATE DATE
DATETIME DATETIME2 (s)
Data type mappings
Setup and User Guide - Qlik Compose, May 2022 125
5 Data Warehouse projects
Qlik Compose data types Microsoft Azure Synapse Analytics data types
TIME TIME
GUID VARCHAR (38)
BIGINTAUTOINC BIGINT
BYTE VARBINARY (Length)
VARCHAR (Length) VARCHAR (Length)
NVARCHAR (Length) NVARCHAR (Length)
Defining the connection parameters
This section describes how to use a Microsoft Azure Synapse Analytics database as a data warehouse in a Qlik
Compose project.
When using Microsoft Azure Synapse Analytics as the data warehouse, the data warehouse database
must be the same as the database that you will later define for the landing zone, although it should
use a different schema.
To define Microsoft Azure Synapse Analytics as a data warehouse:
1. Open your project and click Manage in the bottom left of the Databases panel.
The Manage Databases window opens.
2. Click the New toolbar button or click the Add new database link in the middle of the window.
The New Data Warehouse dialog box opens.
3. From the Type drop-down list, select the desired data warehouse.
4. Enter the information as described below:
l
Connection input mode: Select Standard or Advanced.
If you selected Standard connection input mode, specify the following:
l
Server Name: The name of the Microsoft Azure Synapse Analytics server you are using.
l
Port: The port number for the Microsoft Azure Synapse Analytics.
l
User Name: The user name of a registered Microsoft Azure Synapse Analytics user.
l
Password: The password for the user entered in the User name field.
If you selected Advanced connection input mode, specify the following:
l
Password: The password for the user entered in the User name field.
l
ODBCConnection String: The string of parameters required to connect to the Microsoft
Azure SQL ODBCDriver.
l
JDBCConnection String: The string of parameters required to connect to the Microsoft
Azure SQL JDBCDriver.
Setup and User Guide - Qlik Compose, May 2022 126
5 Data Warehouse projects
Compose will concatenate the database name to the ODBC/JDBC connection
string.
l
Warehouse Properties: Specify the following:
l
Database Name: The name of the target database. This must be the same as the target
endpoint defined in the Qlik Replicate task. For more information, see Defining a Qlik
Replicate task (page 36).
l
Data Warehouse Schema: The schema in which to create the data warehouse tables.
l
Data Mart Schema: The schema in which to create the data mart.
l
More Options: Click to see or hide the following advanced options:
l
Additional JDBC Parameters: Any additional parameters you need to add to the default
JDBC connection string. The parameters should be separated by a semi-colon.
Format:PARAM1=VALUE1;PARAM2=VALUE2
l
Additional ODBC Parameters: Any additional parameters you need to add to the
default ODBC connection string. The parameters should be separated by a semi-colon.
Format:PARAM1=VALUE1;PARAM2=VALUE2
5. Click Test Connection to verify that Compose is able to establish a connection with the specified data
warehouse.
6. Click OK to save your settings.
The database is added to the list on the left side of the Manage Databases window.
Identifier labels
Several statements are tagged with an identifier label for troubleshooting 'problem queries' and identifying
possible ways to optimize database settings. The addition of labels to ELT queries enables fine-grained
workload management and workload isolation via Synapse WORKLOAD GROUPS and CLASSIFIERS.
The identifier labels are as follows:
Table type Tag
Hubs CMPS_HubIns
Satellites CMPS_SatIns
Type1 dimensions CMPS_<data mart name>_DimT1_Init/CMPS_<data mart
name>_DimT1_Incr
Type2 dimensions CMPS_<data mart name>_DimT2_Init/CMPS_<data mart
name>_DimT2_Incr
Transactional facts CMPS_<data mart name>_FctTra_Init/CMPS_<data mart
name>_FctTra_Incr
State-oriented facts CMPS_<data mart name>_FctStO_Init
Aggregated facts CMPS_<data mart name>_FctAgg_Init
Setup and User Guide - Qlik Compose, May 2022 127

5 Data Warehouse projects
Using Google Cloud BigQuery as a Data Warehouse
This section describes how to set up Google Cloud BigQuery as a data warehouse in a Compose project.
It contains the following topics:
l
Prerequisites (page 128)
l
Limitations and Considerations (page 128)
l
Supported Data Types (page 129)
l
Setting General Connection Properties (page 130)
Prerequisites
Before you can use Google Cloud BigQuery as a data warehouse in a Qlik Compose project, make sure the
prerequisites described below have been met.
Permissions
When you create your Service Account Key for Google Cloud, make sure to select BigQuery > BigQuery Data
Owner as the Role. Leave the default key type (JSON) unchanged.
As part of the Service Account Key creation process, a JSON file containing the connection information will be
downloaded to your computer. You will need to copy the contents of this file to the Service account key field
in the Data Warehouse settings.
Client Prerequisites
Both the Simba ODBC driver and the Simba JDBC driver need to be installed on the Compose machine.
To do this:
1. Download the following drivers from https://cloud.google.com/bigquery/providers/simba-drivers:
l
Simba ODBC driver 2.3.0 or later (MSI file)
l
Simba JDBC driver 1.2.2 or later (Zip file)
2. To install the ODBC driver, simply run the installer on the Compose machine.
3. To install the JBDC driver, extract all of the files to the <COMPOSE_INSTALL_DIR>\java\jdbc folder on
the Compose machine.
When installing driver versions later than 1.2.22.1026, after extracting the files to the jdbc
folder, you must delete the gson-<version>.jar file from the folder. Otherwise, an error will
occur.
4. Restart the Compose service.
Limitations and Considerations
The following limitations apply when using Google Cloud BigQuery as a data warehouse in a Compose project.
l
The dataset(s) specified in the connection settings must already exist before loading data into Google
Cloud BigQuery.
Setup and User Guide - Qlik Compose, May 2022 128

5 Data Warehouse projects
l
When ingesting data from a Replicate source that may have BIT columns (such as Microsoft SQL
Server), it is recommended to define a global data type transformation in Replicate to convert BIT to
STRING (1). Otherwise, Compose will convert BIT to VARCHAR (1) (as it does not support BOOLEAN),
which may cause a data type mismatch in the Landing Zone.
l
When discovering from a BigQuery landing database, BOOLEAN and FLOAT columns are not supported
and will be ignored. If you need such columns to be ingested to the data warehouse, the following
workarounds are available:
l
Discover from the source database
l
Convert these data types (which are not supported in Compose) to another type such as
VARCHAR (1) or INT
l
The data warehouse data set and landing data set must be in the same region.
l
As strings do not have length in BigQuery, when discovering from the Landing Zone, Compose will
assume a default length of VARCHAR(32767). From a practical perspective, since these strings will also
be created on BigQuery, they will have no runtime length either. To keep things orderly however, best
practice is to change strings of known length to their actual expected length.
l
Commonly used BigQuery functions were added to the Compose Expression Builder. BigQuery SQL
commands that are not listed in the Compose Expression Builder can be entered manually if required.
l
BigQuery does not support altering tables via standard DDL operations. To work around this limitation,
Compose creates a script that copies the data to a new table. After the data is copied to the new table,
make sure to delete the old table.
l
Aggregated fact and state oriented data mart are not supported.
l
Stored procedures in custom ETLs are not supported.
l
Clustering keys are not supported.
Supported Data Types
The following table shows the Google Cloud BigQuery data warehouse data types that are supported when
using Qlik Compose and the default mapping from Qlik Compose data types.
For information on how to view the data type that is mapped from the source, see the section for the source
database you are using.
Compose Data Type BigQuery Data Type
BYTES BYTES
DATE DATE
TIME TIME
DATETIME If scale <=6:
TIMESTAMP If scale >6:
STRING
BIGINT INTEGER
Setup and User Guide - Qlik Compose, May 2022 129
5 Data Warehouse projects
DECIMAL If the data can be stored in 38,9, then:
NUMERIC
If not, then:
STRING with length of original precision +2
VARCHAR STRING
INTEGER INTEGER
Unsupported Data Types
The following Google Cloud BigQuery data types are not supported:
GEOGRAPHY, STRUCT, and ARRAY.
Setting General Connection Properties
This section describes how to use a Google Cloud BigQuery database as a data warehouse in a Qlik Compose
project.
To define Google Cloud BigQuery as a data warehouse:
1. Open your project and click Manage in the bottom left of the Databases panel.
The Manage Databases window opens.
2. Click the New toolbar button or click the Add new database link in the middle of the window.
The New Data Warehouse dialog box opens.
3. From the Type drop-down list, select the desired data warehouse.
4. Enter the information as described in the table below.
l
Connection input mode: Select Standard or Advanced.
If you selected Standard:
l
Paste the contents of the JSON file (including curly brackets) that was downloaded
when you created your BigQuery service account key, into the Service account key
field.
If you selected Advanced, specify the following:
l
ODBCConnection String: Enter a string of parameters required to connect to BigQuery
via the Simba ODBCDriver.
l
JDBCConnection String: Enter a string of parameters required to connect to BigQuery
via the Simba JDBCDriver.
Compose will concatenate the dataset name to the ODBC/JDBC connection
string.
l
Region: Where to upload the dataset created by Compose.
l
Data Warehouse dataset: Specify the dataset in which to create the data warehouse tables.
Setup and User Guide - Qlik Compose, May 2022 130

5 Data Warehouse projects
l
Data mart dataset: Specify the dataset in which to create the data mart.
5. Click Test Connection to verify that Compose is able to establish a connection with the specified data
warehouse.
6. Click OK to save your settings.
The database is added to the list on the left side of the Manage Databases window.
Managing databases
You can edit and delete databases as required. The table below describes the available options.
To Do this
Edit a
database
In the left side of the Manage Databases window, select the database that you want to edit
and then click the Edit toolbar button.
Delete a
database
In the left side of the Manage Databases window, select the database that you want to
delete and then click the Delete toolbar button.
Click Yes when prompted to confirm the deletion.
Database management options
5.5 Setting up Landing Zone and Data Source connections
This section explains how to set up landing zone and data source connectivity in a Qlik Compose project. Note
that although you must configure landing zone connectivity, data source connectivity is only required if you
want to discover the source database defined in the Replicate task.
For a list of the pros and cons of discovering the source database as opposed to the landing zone, see
Discovering the Source Database or Landing Zone (page 156).
Reserved column names and suffixes
The following section lists the reserved column names and suffixes. If the any of the discovered tables contain
columns with these names or suffixes, you need to rename them in Compose. For information on renaming
columns, see Managing attributes (page 168).
Reserved column names:
l
ID
l
BIR_MAPPING_NR - internal mapping identifier used in staging tables for ETL
l
ROWNR - internal row identifier used in staging tables for ETL
l
RUNNO_INSERT - The task run number for INSERT operations.
l
RUNNO_UPDATE - The task run number for UPDATE operations.
l
OBSOLETE__INDICATION - Used to mark OBSOLETE records in data mart objects. See also: The
"Obsolete" indicator (page 257)
l
TR_ID - The unique Transaction ID for a fact table record.
l
BID_OCCS - Internal column used in ETL processing.
Setup and User Guide - Qlik Compose, May 2022 131
5 Data Warehouse projects
l
FD - This column is added to tables that contain attributes (columns) with a History Type 2. The
column is used to delimit the range of dates for a given record version. The column name can be
changed in the project settings.
If you change the "From Date" name in the project settings, the new name will become a
reserved word.
l
TD - This column is added to tables that contain attributes (columns) with a History Type 2. The
column is used to delimit the range of dates for a given record version. The column name can be
changed in the project settings.
If you change the "To Date" name in the project settings, the new name will become a
reserved word.
l
FKNR - Foreign key number column used in logging tables to report missing references captured via
the data warehouse ETL
Reserved suffixes in data darts:
l
_OID
l
_VID
Permissions
This section lists the required permissions for the source landing zone and the source database defined in a
Qlik Replicate task.
l
Landing Zone permissions (page 132)
l
Source database permissions (page 132)
Landing Zone permissions
For proper operation, the user specified in the landing zone database connection settings must be granted the
following permissions:
l
Read metadata
l
Select from tables
l
Create tables (for error marts)
l
Insert to tables (error marts)
For information on the landing zone, see Landing Zone settings.
Source database permissions
To generate the model by discovering the source database in the Replicate task, you need to define a
connection to the source database used in the Replicate task. The user defined in the Source database
connection settings must be granted the following permissions:
Setup and User Guide - Qlik Compose, May 2022 132

5 Data Warehouse projects
l
Read metadata (Columns, Primary Keys and Foreign Keys)
l
Select from tables
For more information, see Source Database Connection.
Data type mappings
This topic lists the data type mappings from the supported source databases or the supported landing zone
databases (where applicable) to the Qlik Compose data types. Note that as MySQL and IBM DB2 for LUW are
not supported as data warehouses in Compose, the mappings in those sections are applicable to their role as
source databases only.
In this topic:
l
Oracle data types (page 133)
l
Microsoft SQL Server data types (page 134)
l
MySQL data types (page 135)
l
Amazon Redshift data types (page 138)
l
IBM DB2 for LUW data types (page 138)
l
Microsoft Azure Synapse Analytics data types (page 139)
l
Google Cloud BigQuery data types (page 140)
Oracle data types
The Oracle database for Qlik Compose supports most Oracle data types. The following table shows the Oracle
source data types that are supported when using Qlik Compose and the default mapping to Qlik Compose
data types.
For information on how to view the data type that is mapped in the data warehouse, see the section for the
data warehouse database you are using.
Oracle data types Qlik Compose data types
CHAR Varchar
NCHAR(40) Varchar(80)
VARCHAR(2) VARCHAR
NUMBER Decimal
FLOAT Decimal(38,12)
REAL Decimal(38,12)
DATE Date
TIMESTAMP(6) Date
TIMESTAMP(6) WITH LOCAL TIME ZONE Date
TIMESTAMP(6) WITH TIME ZONE Date
DOUBLE PRECISION Decimal(38,12)
Data type mappings
Setup and User Guide - Qlik Compose, May 2022 133

5 Data Warehouse projects
Non-supported data types
Source Oracle tables with columns of the following Oracle data types are not supported and will be ignored.
l
BLOB
l
CLOB
l
NCLOB
l
BFILE
l
BINARY_FLOAT
l
BINARY_DOUBLE
l
INTERVAL YEAR (2) TO MONTH
l
INTERVAL DAY (6) TO SECOND (5)
l
RAW
l
ROWID
l
UROWID
l
LONG
Microsoft SQL Server data types
The following table shows the Microsoft SQL Server source data types that are supported when using Qlik
Compose and the default mapping to Qlik Compose data types.
For information on how to view the data type that is mapped in the data warehouse, see the section for the
data warehouse database you are using.
Microsoft SQL Server data types Qlik Compose data types
char Varchar
nchar Varchar
bit Integer
tinyint Integer
smallint Integer
INT Integer
BIGINT Bigint
decimal Decimal
numeric Decimal
smallmoney Decimal(11,4)
money Decimal(20,4)
float Decimal(38,12)
real Decimal(18,6)
Data type mappings
Setup and User Guide - Qlik Compose, May 2022 134

5 Data Warehouse projects
Microsoft SQL Server data types Qlik Compose data types
datetime Date
datetime2 Date
smalldatetime Date
BINARY BYTE
date Date
time Varchar(16)
uniqueidentifier GUID
Non-supported data types
Source Microsoft SQL Server tables with columns of the following Microsoft SQL Server data types are not
supported and will be ignored:
l
BLOB
l
CLOB
l
NCLOB
l
VARCHAR(MAX)
l
TEXT
l
NVARCHAR(MAX)
l
NVARCHAR (LENGTH)
l
NTEXT
l
VARBINARY
l
IMAGE
l
DATETIMEOFFSET
l
TIMESTAMP
l
SQL_VARIANT
l
XML
MySQL data types
The following table shows the MySQL source data types that are supported when using Qlik Compose and the
default mapping to Qlik Compose data types.
For information on how to view the data type that is mapped in the data warehouse, see the section for the
data warehouse database you are using.
MySQL data types Qlik Compose data types
BIGINT Bigint
binary BYTE
Data type mappings
Setup and User Guide - Qlik Compose, May 2022 135

5 Data Warehouse projects
MySQL data types Qlik Compose data types
bit bigint
char Varchar
date Date
datetime Date
DECIMAL Decimal
double Decimal(38,12)
ENUM('x-small', 'small', 'medium', 'large', 'x-large') Varchar(7)
FLOAT Decimal(38,12)
int integer
MEDIUMINT integer
MEDIUMTEXT Varchar(16777215)
nchar(36) Varchar(36)
NUMERIC Decimal
REAL Decimal(38,12)
set('a','b','c','d') Varchar(7)
SMALLINT integer
TEXT Varchar(65535)
time Date
timestamp Date
TINYINT integer
TINYTEXT Varchar(255)
year integer
Non-supported data types
Source MySQL tables with columns of the following MySQL data types are not supported and will be ignored:
l
GEOMETRY
l
GEOMETRYCOLLECTION
l
JSON
l
linestring
l
LONGblob
l
LONGTEXT
l
mediumblob
l
MULTILINESTRING
Setup and User Guide - Qlik Compose, May 2022 136
5 Data Warehouse projects
l
MULTIPOINT
l
MULTIPOLYGON
l
point
l
polygon
l
tinyblob
l
BIT(64)
l
BLOB()
l
BIGBLOB
l
MEDIUMBLOB
l
TINYBLOB
l
BLOB
l
varbinary (20)
Snowflake data types
The following table shows the Snowflake data types that are supported when using Qlik Compose and the
default mapping to Qlik Compose data types.
For information on how to view the data type that is mapped in the data warehouse, see the section for the
data warehouse database you are using.
Snowflake data types Qlik Compose data types
NUMBER DECIMAL
FLOAT DECIMAL
VARCHAR VARCHAR
BINARY BYTE
BOOLEAN VARCHAR (5)
DATE DATE
TIME TIME
TIMESTAMP_NTZ DATETIME(9)
TIMESTAMP_LTZ DATETIME(9)
TIMESTAMP_TZ DATETIME(9)
VARIANT JSON or XML as determined by the data source settings.
OBJECT N/A
ARRAY N/A
Data type mappings
Setup and User Guide - Qlik Compose, May 2022 137

5 Data Warehouse projects
Amazon Redshift data types
The following table shows the Amazon Redshift data warehouse data types that are supported when using
Qlik Compose and the default mapping to Qlik Compose data types.
For information on how to view the data type that is mapped in the data warehouse, see the section for the
data warehouse database you are using.
Amazon Redshift data types Qlik Compose data types
SMALLINT INTEGER
INTEGER INTEGER
BIGINT BIGINT
DECIMAL DECIMAL
REAL DECIMAL (18,6)
DOUBLE PRECISION DECIMAL (38,12)
BOOLEAN INTEGER
CHAR VARCHAR
DATE DATE
TIMESTAMP DATETIME
Data type mappings
IBM DB2 for LUW data types
The following table shows the IBM DB2 for LUW source data types that are supported when using Qlik
Compose and the default mapping to Qlik Compose data types.
For information on how to view the data type that is mapped in the data warehouse, see the section for the
data warehouse database you are using.
IBM DB2 for LUW data types Qlik Compose data types
DATE DATE
TYPE_TIMESTAMP DATE
TIMESTAMP DATE
TYPE_TIME DATE
TYPE_DATE DATE
REAL DECIMAL (18,6)
DOUBLE DECIMAL (18,6)
DECIMAL DECIMAL
Data type mappings
Setup and User Guide - Qlik Compose, May 2022 138

5 Data Warehouse projects
IBM DB2 for LUW data types Qlik Compose data types
SMALLINT INTEGER
INTEGER INTEGER
BIGINT BIGINT
WVARCHAR VARCHAR
CHAR VARCHAR (4000)
WCHAR VARCHAR (4000)
BINARY BYTE
Microsoft Azure Synapse Analytics data types
The following table shows the Microsoft Azure Synapse Analytics data warehouse data types that are
supported when using Qlik Compose and the default mapping to Qlik Compose data types.
For information on how to view the data type that is mapped to the data warehouse, see the section for the
data warehouse you are using.
Microsoft Azure Synapse Analytics data types Qlik Compose data types
DATE DATE
DATETIME DATETIME
DATETIME2 DATETIME
SMALLDATETIME DATETIME
TIME TIME
CHAR VARCHAR
NCHAR VARCHAR
REAL DECIMAL (18,6)
FLOAT DECIMAL (38,12)
DECIMAL DECIMAL
MONEY DECIMAL (20,4)
SMALLMONEY DECIMAL (11,4)
BIT INTEGER
TINYINT INTEGER
SMALLINT INTEGER
INT INTEGER
Data type mappings
Setup and User Guide - Qlik Compose, May 2022 139
5 Data Warehouse projects
Microsoft Azure Synapse Analytics data types Qlik Compose data types
BIGINT BIGINT
VARBINARY BYTE
BINARY BYTE
Google Cloud BigQuery data types
The following table shows the Google Cloud BigQuery data types that are supported when ingesting data from
Google Cloud BigQuery and the default mapping to Qlik Compose data types.
For information on how to view the data type that is mapped in the data warehouse, see the section for the
data warehouse database you are using.
Google Cloud BigQuery data types Qlik Compose data types
DATE Date
TIME Time
TIMESTAMP Datetime
INT64 BigInt
NUMERIC(p,s) Decimal(p,s)
FLOAT64 Decimal(38,12)
STRING Varchar
BOOLEAN Varchar(5) - True or False
Data type mappings
Defining landing zones
In a Compose project, you can define any number of landing zones. Defining multiple landing zones is
necessary if the data that you eventually want to be available in your data mart(s) is located in several
different landing zones.
Before you can define a landing zone in Qlik Compose, you first need to define a data warehouse.
For more information on adding data warehouses, see Setting up a data warehouse connection (page 111).
To add a landing zone:
1. Open your project and click Manage in the Databases panel.
The Manage Databases window opens.
2. Click the New toolbar button.
The New Data Source window opens.
3. Provide the following information:
Setup and User Guide - Qlik Compose, May 2022 140

5 Data Warehouse projects
Field Description
Content Type Choose whether the content in the landing zone is Full Load, Change Processing
or Full Load and Change Processing (according to the Qlik Replicate task
definition).
See also After applying changes below.
Designated
By
Select whether the landing zone is a Database or a Schema. This should reflect the
target endpoint settings in the Qlik Replicate task.
When Oracle is the Data Warehouse, this field is read-only since the Oracle landing
zone is always designated by Schema.
For more information, see Defining a Qlik Replicate task (page 36).
Database
Name
This field is not applicable when Oracle is the Data Warehouse.
If the landing zone is designated by a Database, specify the database name. This
must be the same as the target database defined in the Qlik Replicate task.
When Microsoft Azure Synapse Analytics is the data warehouse, the landing zone
database must be the same as the database defined for the data warehouse,
although it should use a different schema.
For more information, see Defining a Qlik Replicate task (page 36).
Schema
Name
If a schema name was specified in the Qlik Replicate task settings, specify the same
schema name here.
When Oracle is the Data Warehouse, this must be the same as the schema defined
in the Oracle target connection string in the Qlik Replicate task.
For more information, see Defining a Qlik Replicate task (page 36).
Error Mart
Schema
Name
Specify the schema where you want the data mart exception tables to be created.
Data that is rejected by data quality rules will be copied to tables in the specified
schema.
For more information on error marts, see Defining and managing data quality rules
(page 211).
Data source fields
Setup and User Guide - Qlik Compose, May 2022 141
5 Data Warehouse projects
Field Description
After
applying
changes
Replicate creates Change Tables in the landing zone in which subsequent changes
to the original Full Load data are stored. If you selected Change Processing or Full
Load and Change Processing as the Content Type, you can determine what to do
with the Change Tables after the changes have been applied to the data warehouse
tables:
Choose one of the following:
l
Delete from Change Tables - Deletes the changes from the Change Tables
l
Keep in Change Tables - Keeps the changes in the Change Tables. This is
useful if you do not want all of the changes to be applied at the same time.
For more information, see Working with the Keep in Change Tables option
(page 143).
l
Archive the Change Tables - If you select Archive the Change Tables, you
also need to specify a Database name and Schema name in the relevant
fields.
Archived Change Tables do not contain a record of DDL changes. If DDL
changes were applied, you will need to update the archived tables
manually.
Discover the
VARIANT data
type as
(applies to
Snowflake
only)
As Compose does not support mapping directly to the Snowflake VARIANT data
type, you need to choose whether VARIANT columns will be created as JSON (the
default) or XML in the Snowflake database.
Setup and User Guide - Qlik Compose, May 2022 142

5 Data Warehouse projects
Field Description
Associate
with
Replicate
Task
Select this to associate your Compose project with the related Replicate task.
Replicate tasks replicate the relevant tables from the source database to the
landing zone in your data warehouse. Specifying the Replicate task name will
enable you to both discover the source tables' primary keys, and monitor and
control that task from within Compose.
However, before you can specify a Replicate task name, you first need to define the
connection settings to at least one Replicate Server machine. To do this, click the
Replicate Server Settings link below the Associate with Replicate task field and
then configure the settings as described in Replicate Server settings (page 370).
Once you have configured connectivity to at least one Replicate Server, you can
then proceed to select a Replicate task.
To select a Replicate task:
1. Click the browse button to the right of the Associate with Replicate task
field.
The Select Replicate Task window opens.
2. Select a Replicate Server from the Server drop-down list.
The Replicate Tasks list is populated with all tasks defined on the selected
server.
3. Select the task that is replicating the source tables to the landing zone and
then click OK.
The name of the selected task is shown as read-only in the Associate with
Replicate task field.
4. If you want to generate the model by discovering the source database in the Replicate task, leave the
New Data Source window open for now as you will need to define connectivity to the source database
in the Replicate task.
For instructions on how to do this, see Defining Replicate data source connections (page 147).
Otherwise, click OK to save your settings.
Working with the Keep in Change Tables option
When you select the Keep in Change Tables option described earlier, the changes are kept in the Change
Tables after they are applied (instead of being deleted or archived). This is useful as it allows you to:
l
Use the changes in multiple Compose projects that share the same landing
l
Leverage Change Table data across multiple mappings and/or tasks in the same project
l
Preserve the Replicate data for auditing purposes or reprocessing in case of error
l
Reduce cloud data warehouse costs by eliminating the need to delete changes after every ETL
execution
To facilitate this functionality, Compose keeps a "watermark" per table as a way of tracking which data has
been consumed and which data is yet to be consumed. The watermarks can be reset if needed, as described
in Deleting changes and resetting watermarks (page 146) below.
Setup and User Guide - Qlik Compose, May 2022 143
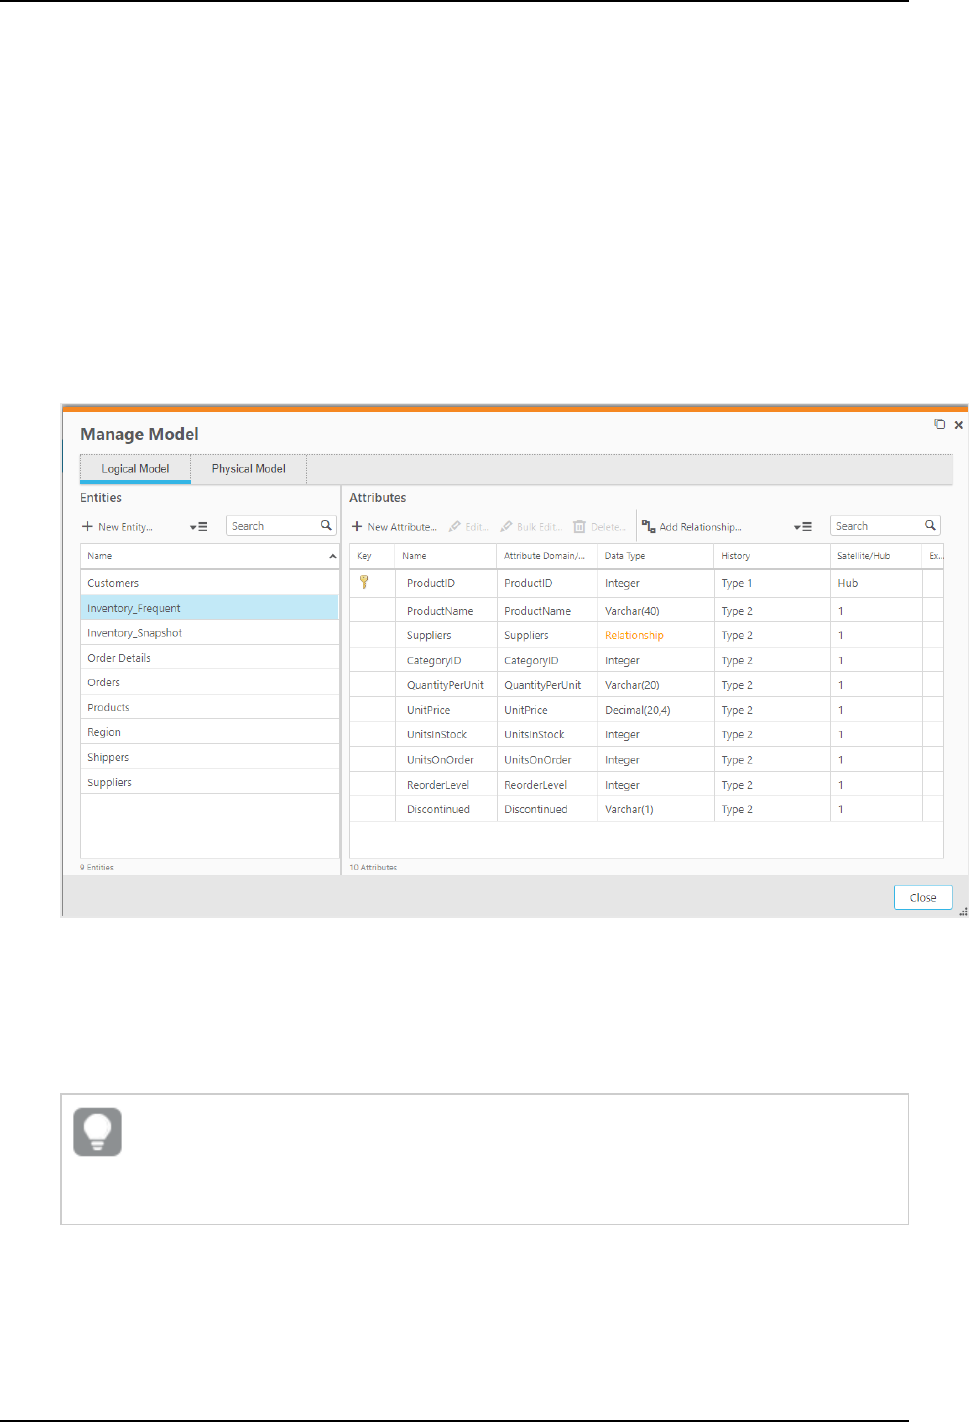
5 Data Warehouse projects
Use case
I have a table named Inventory in my landing that I would like to load into two separate tables in my data
warehouse for the purpose of tracking and analyzing changes. The tracking table needs to be updated every
15 minutes while the analysis table needs to be updated once a day.
To accomplish this, I do the following:
1. Set up a connection to my landing zone making sure to select the Keep in Change Tables option.
2. Discover the source tables from the landing zone as described in Discovering the Source Database or
Landing Zone (page 156).
3. Duplicate the Inventory table in my model so that I have two tables, and then rename the tables as
follows: Inventory_Frequent (for tracking) and Inventory_Snapshot (for analytics).
For instructions on how to duplicate entities, see Managing entities (page 167)
4. Validate the model as described in Validating the model (page 163).
5. Create the data warehouse tables as described in Creating the data warehouse tables (page 192).
6. Duplicate the Full Load and CDC tasks so that I have one set of tasks that populate and update the
Inventory_Frequent table, and another set of tasks that populate and update the Inventory_
Snapshot table.
Make sure when duplicating the tasks to select Full Load Only as the task type for Full Load
tasks and Change Tables Only as the task type for CDC tasks. See also Adding and
duplicating tasks (page 201).
7. Verify the correct mappings are selected and delete any redundant mappings that were created when
the tasks were duplicated.
Setup and User Guide - Qlik Compose, May 2022 144
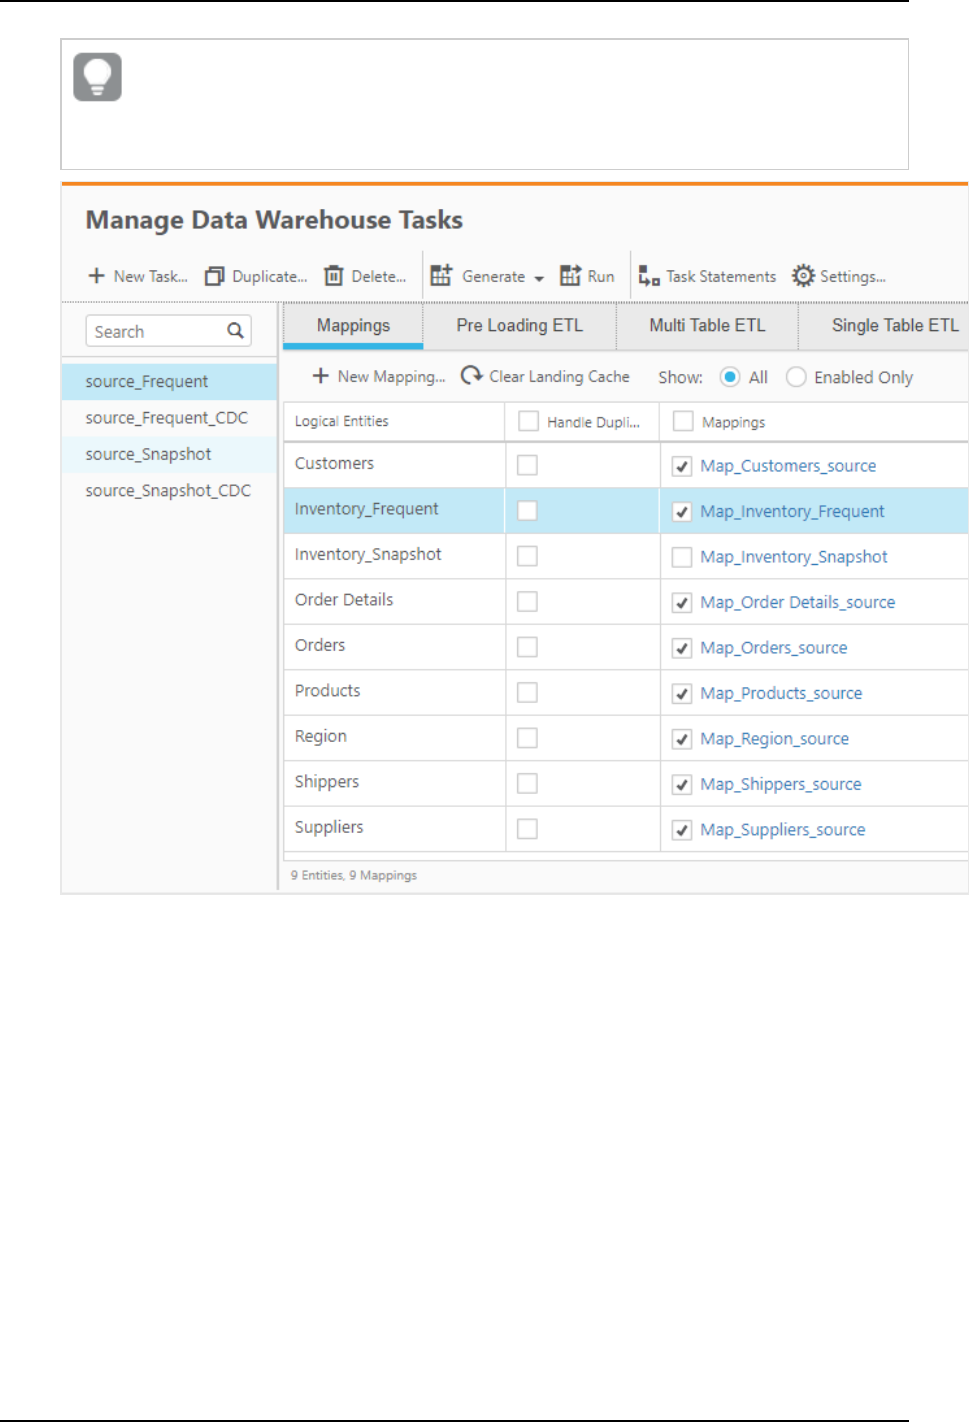
5 Data Warehouse projects
For the source_Frequent and source_Frequent_CDC tasks, the Map_Inventory_Snapshot
mapping should not be selected. Conversely, for the source_Snapshot and source_
Snapshot_CDC tasks, the Map_Inventory_Frequent mapping should not be selected.
8. Generate and run the source_Frequent and source_Snapshot Full Load tasks.
9. Generate the source_Frequent_cdc and source_Snapshot_cdc tasks.
10. Schedule the source_Frequent_cdc task to run every 15 minutes and schedule the source_Snapshot_
cdc task to run at 20:00 every day.
Setup and User Guide - Qlik Compose, May 2022 145
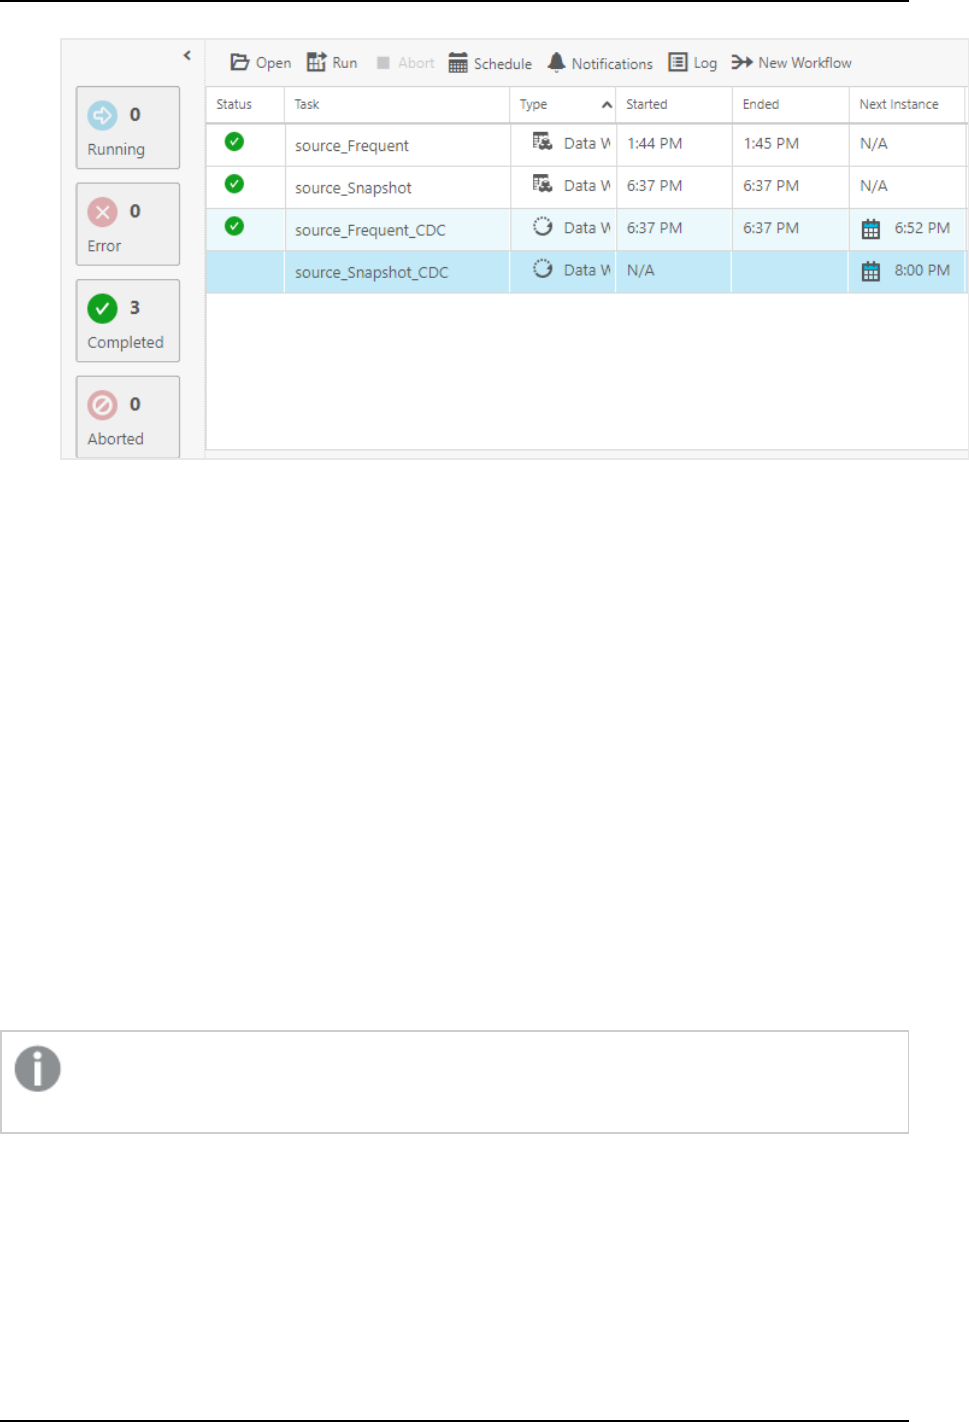
5 Data Warehouse projects
Deleting changes and resetting watermarks
The following CLIoptions are available for managing watermarks.
Deleting changes from the Change Tables
You can delete the changes from the Change Tables if they are no longer required. Although this is not
required, you might want to incorporate this into your database maintenance plan.
Command syntax
ComposeCli.exe generate_watermark_scripts --project
project_name
Where:
--project is the name of the project.
Example
ComposeCli.exe generate_watermark_script --project MyProject
Resetting the watermark
Resetting the watermark might be required if you need to reapply changes from an earlier time period, for
example.
After resetting the watermark, on the next CDC run all of the Change Table records will be processed
again.
Command syntax
ComposeCli.exe reset_watermark --project
project_name
--landing
landing_name
[--table
table_
name
]
Parameters
Setup and User Guide - Qlik Compose, May 2022 146

5 Data Warehouse projects
Parameter Description
--project The name of the project.
--landing The name of the landing in Compose containing the Change Tables whose
watermarks you want to reset.
--table The logical name (i.e. without the_ct suffix) of a specific Change Table
whose watermark you want to reset. When omitted, watermarks for all
Change Tables will be reset.
Example
ComposeCli.exe reset_watermark --project MyProject --landing northwind_Landing
Limitations and considerations
Switching from Keep in Change Tables to Delete from Change Tables/Archive the Change Tables or vice
versa, requires you to regenerate the affected tasks. If you switch from Keep in Change Tables to Delete
from Change Tables/Archive the Change Tables, Compose need to re-read the changes and delete/archive
the older changes. In such a case, running the CDC tasks might take longer than usual, depending on the
amount of changes.
Defining Replicate data source connections
You can also generate the model by discovering the source database in the Replicate task. In this case, you
will also need to define connectivity to that database.
To define connectivity settings:
1. Open your project and click Manage in the Databases panel. The Manage Databases window opens.
2. Click the New toolbar button. The New Data Source window opens.
3. In the New Data Source window, select the Source database connection option.
4. Continue from one of the following topics as appropriate:
l
Using Oracle as a source (page 147)
l
Using Microsoft SQL Server as a source (page 149)
l
Using MySQL as a source (page 151)
l
Using IBM DB2 for LUW as a source (page 153)
Using Oracle as a source
This section describes how to set up connectivity to the Oracle database defined for the Replicate task. This is
required if you want to discover the tables and/or views from the source database as opposed to the landing
zone. For a list of the pros and cons of each method, see Discovering the Source Database or Landing Zone
(page 156).
It contains the following topics:
l
Prerequisites (page 148)
l
Oracle data types (page 133)
Setup and User Guide - Qlik Compose, May 2022 147
5 Data Warehouse projects
l
Defining the connection parameters (page 148)
Prerequisites
Before you can use Oracle as a source in a Qlik Compose project, make sure that the following prerequisites
have been met:
l
The Oracle database should be configured with the required Permissions (page 132) and accessible
from the Compose machine.
l
Install Oracle Data Access Components (x64) on the computer where Qlik Compose is located. Then,
add the full path of the Oracle Data Access DLL to the system environment variables.
The default path should be: <ORACLE_PRODUCT_CLIENT_DIR>\ODP.NET\bin\4\
The path to the Oracle Data Access DLL also needs to be specified in both the machine.conf
file and the Global Assembly Cache (GAC). In addition, make sure that the
Oracle.DataAccess.dll file exists in the following location:
C:\Windows\Microsoft.NET\assembly\GAC_64.
The Qlik Compose service needs to be restarted after installing the required components.
l
Install Oracle Instant Client 11.2.0.3.0 or later (Windows x64) on the computer where Qlik Compose is
located.
l
If you want to use an Oracle TNS name in the connection settings, you first need to set the ORACLE_
HOME environment variable.
Example:
<ORACLE_PRODUCT_CLIENT_DIR>\product\12.1.0\client_1
Defining the connection parameters
You can add an Oracle database to Qlik Compose to use as a source.
Setup and User Guide - Qlik Compose, May 2022 148

5 Data Warehouse projects
To add an Oracle source database to Qlik Compose:
1. In the New Data Source window, enter the information as described in the table below.
Field Description
Type Select Oracle.
Server
Name
Specify the name or IP address of the Oracle server machine.
OR
Specify the TNS name.
Port If you specified a TNS name in the Server Name field, make sure that this field is
empty. Optionally, change the default port.
User Name Specify your user name for accessing the Oracle database.
The specified user must have read/write privileges on the Oracle database.
Password Specify your password for accessing the Oracle database.
SID If you specified a TNS name in the Server Name field, make sure that this field is
empty. Otherwise, specify the Oracle SID.
Schema Specify the schema containing the source tables.
Data source fields
2. Click Test Connection to verify that Compose is able to establish a connection with the specified
database.
3. Click OK to save your settings.
The database is added to the list on the left side of the Manage Databases window.
Using Microsoft SQL Server as a source
This section describes how to set up connectivity to the Microsoft SQL Server database defined as the source
endpoint for the Replicate task. This is required if you want to discover the tables and/or views from the
source database as opposed to the landing zone. For a list of the pros and cons of each method, see
Discovering the Source Database or Landing Zone (page 156).
It contains the following topics:
l
Prerequisites (page 149)
l
Working with Windows authentication (page 150)
l
Microsoft SQL Server data types (page 134)
l
Defining the connection parameters (page 152)
Prerequisites
Before you can use Microsoft SQL Server as a source in a Qlik Compose project, make sure that the following
prerequisites have been met:
Setup and User Guide - Qlik Compose, May 2022 149

5 Data Warehouse projects
l
Microsoft SQL Server should be configured with the required Permissions (page 132) and accessible
from the Compose machine.
l
Microsoft SQL Server Native Client must be installed on the Qlik Compose machine.
l
Qlik Compose supports the following Microsoft SQL Server editions.
l
Enterprise Edition
l
Standard Edition
l
Workgroup Edition
l
Developer Edition
Working with Windows authentication
You can configure the Qlik Compose Microsoft SQL Server source to log in to Microsoft SQL Server using
Windows authentication. If you choose this option, you also need to make sure that:
l
The Microsoft SQL Server instance is set up to allow Windows log on.
l
The Compose user is specified as the "Log on as" user for the Qlik Compose Server service account.
OR
Microsoft SQL Server is configured to allow login for the Qlik Compose Server service account.
Defining the connection parameters
You can add a Microsoft SQL Server database to Qlik Compose to use as a source. You can also use the
Microsoft SQL Server source to specify connection details to a Microsoft Azure SQL Database.
When using Microsoft Azure SQL Database as the data warehouse, the data warehouse database must be the
same as the database that you will later define for the landing zone, although it should use a different
schema.
Setup and User Guide - Qlik Compose, May 2022 150

5 Data Warehouse projects
To add a Microsoft SQL Server source database to Qlik Compose:
1. In the New Data Source window, enter the information as described in the table below.
Field Description
Type Select Microsoft SQL Server.
Server Name Specify the name or IP address of the Microsoft SQL Server machine.
Port Optionally, change the default port.
Windows
authentication
SQL Server
authentication
Choose how you want Compose to log in to the Microsoft SQL Server database.
If you choose Windows authentication, see Working with Windows
authentication below.
User Name Specify your user name for accessing the Microsoft SQL Server database.
The specified user must have read/write privileges on the Microsoft SQL Server
database.
Password Specify your password for accessing the Microsoft SQL Server database.
Database Name Specify the name of the Microsoft SQL Server database.
Schema Specify the schema containing the source tables.
Data source fields
2. Click Test Connection to verify that Compose is able to establish a connection with the specified
database and/or landing zone.
3. Click OK to save your settings.
The database is added to the list on the left side of the Manage Databases window.
Working with Windows authentication
You can configure Qlik Compose for Data Warehouses to log in to Microsoft SQL Server using Windows
authentication.
If you choose this option, you also need to make sure that:
l
The Microsoft SQL Server instance is set up to allow Windows log on.
l
The Qlik Compose for Data Warehouses user is specified as the "Log on as" user for the Qlik Compose
for Data Warehouses service account.
-OR-
l
Microsoft SQL Server is configured to allow login for the Qlik Compose for Data Warehouses service
account.
Using MySQL as a source
This section describes how to set up connectivity to the MySQL database defined as the source endpoint for
the Replicate task. This is required if you want to discover the tables and/or views from the source database
as opposed to the landing zone. For a list of the pros and cons of each method, see Discovering the Source
Database or Landing Zone (page 156).
It contains the following topics:
Setup and User Guide - Qlik Compose, May 2022 151

5 Data Warehouse projects
l
Prerequisites (page 152)
l
MySQL data types (page 135)
l
Defining the connection parameters (page 152)
Prerequisites
Before you can use MySQL as a source in a Qlik Compose project, make sure that the following prerequisites
have been met:
l
The MySQL database should be configured with the required Permissions (page 132) and accessible
from the Compose machine.
The following MySQL editions are supported:
l
MySQL Community Edition
l
MySQL Standard Edition
l
MySQL Enterprise Edition
l
MySQL Cluster Carrier Grade Edition
l
MySQL ODBC 64-bit client must be installed on the same computer as Qlik Compose.
Cluster prerequisites
To be able to discover clustered (NDB) tables, the following parameters must be configured in the MySQL
my.ini (Windows) file.
Parameter Value
ndb_log_bin Must be:
ndb_log_bin=on
This ensures that changes in clustered tables will be logged to the binary log.
ndb_log_update_as_
write
Must be:
ndb_log_update_as_write=OFF
This prevents writing UPDATEs as INSERTs in the binary log.
ndb_log_updated_only Must be:
ndb_log_updated_only=OFF
Ensures that the binary log will contain the entire row and not just the changed
columns.
Cluster parameters
Defining the connection parameters
You can add a MySQL database to Qlik Compose to use as a source.
Setup and User Guide - Qlik Compose, May 2022 152

5 Data Warehouse projects
To add a MySQL source database to Qlik Compose:
1. In the New Data Source window, enter the information as described in the table below.
Field Description
Type Select MySQL.
Server Name Specify the name or IP address of the MySQL server machine.
Port Optionally, change the default port.
User Name Specify your username for accessing the MySQL database.
The specified user must have read/write privileges on the MySQL database.
Password Specify your password for accessing the MySQL database.
Database Name Specify the name of the MySQL database.
Schema Specify the schema containing the source tables.
Data source fields
2. Click Test Connection to verify that Compose is able to establish a connection with the specified
database and/or landing zone.
3. Click OK to save your settings.
The database is added to the list on the left side of the Manage Databases window.
Using IBM DB2 for LUW as a source
This section describes how to set up connectivity to the IBM DB2 for LUW database defined as the source
endpoint for the Replicate task. This is required if you want to discover the tables and/or views from the
source database as opposed to the landing zone. For a list of the pros and cons of each method, see
Discovering the Source Database or Landing Zone (page 156).
It contains the following topics:
l
Prerequisites (page 153)
l
IBM DB2 for LUW data types (page 138)
l
Defining the connection parameters (page 153)
Prerequisites
Before you begin to work with an IBM DB2 for LUW database as a source in Qlik Compose, make sure the
following prerequisites have been met:
l
The IBM DB2 for LUW database should be configured with the required Permissions (page 132) and
accessible from the Compose machine.
l
The IBM Data Server Driver for ODBC and CLI version 10.5 must be installed on the Qlik Compose
machine.
Defining the connection parameters
You can add an IBM DB2 for LUW database to Qlik Compose to use as a source.
Setup and User Guide - Qlik Compose, May 2022 153

5 Data Warehouse projects
To add an IBM DB2 for LUW source database to Qlik Compose:
1. In the New Data Source window, enter the information as described in the table below.
Field Description
Type Select IBM DB2 for LUW.
Server Name Specify the name or IP address of the IBM DB2 for LUW server machine.
Port Optionally, change the default port.
User Name Specify your username for accessing the IBM DB2 for LUW database.
The specified user must have read/write privileges on the IBM DB2 for LUW
database.
Password Specify your password for accessing the IBM DB2 for LUW database.
Database
Name
Specify the name of the IBM DB2 for LUW database.
Schema Specify the schema containing the source tables.
Data source fields
2. Click Test Connection to verify that Compose is able to establish a connection with the specified
database and/or landing zone.
3. Click OK to save your settings.
The database is added to the list on the left side of the Manage Databases window.
Managing databases
You can edit and delete databases as required. The table below describes the available options:
To Do This
Edit a
database
In the left side of the Manage Databases window, select the database that you want to edit
and then click the Edit toolbar button.
Delete a
database
In the left side of the Manage Databases window, select the database that you want to
delete and then click the Delete toolbar button.
Database management options
5.6 Creating and managing the model
This section describes how to create, import and manage the model.
The model serves as the basis for data warehouse generation in Compose. There are three way of creating the
model: Use Compose to derive a tentative model by reverse engineering the source database(s) (a process
also known as "discovering"); Import a model created in ERwin or create the model manually in Compose.
In this section:
Setup and User Guide - Qlik Compose, May 2022 154
5 Data Warehouse projects
l
Reserved column names (page 155)
l
Generating the model (page 155)
l
Model limitations (page 162)
l
Validating the model (page 163)
l
Displaying the model (page 163)
l
Managing the model (page 166)
l
Creating expressions (page 181)
l
Opening the expression builder (page 182)
l
Defining reusable transformations (page 188)
Reserved column names
The following section lists the reserved column names. If the any of the discovered tables contain columns
with these names, you need to rename them in Compose. For information on renaming columns, see
Managing attributes (page 323).
l
BIR_MAPPING_NR - internal mapping identifier used in staging tables for ETL
l
ROWNR - internal row identifier used in staging tables for ETL
l
RUNNO_INSERT - The task run number for INSERT operations.
l
RUNNO_UPDATE - The task run number for UPDATE operations.
l
OBSOLETE__INDICATION - Used to mark OBSOLETE records in data mart objects. See also: The
"Obsolete" indicator (page 257)
l
TR_ID - The unique Transaction ID for a fact table record.
l
BID_OCCS - Internal column used in ETL processing.
l
FD - This column is added to tables that contain attributes (columns) with a History Type 2. The
column is used to delimit the range of dates for a given record version. The column name can be
changed in the project settings.
If you change the "From Date" name in the project settings, the new name will become a
reserved word.
l
TD - This column is added to tables that contain attributes (columns) with a History Type 2. The
column is used to delimit the range of dates for a given record version. The column name can be
changed in the project settings.
If you change the "To Date" name in the project settings, the new name will become a
reserved word.
l
FKNR - Foreign key number column used in logging tables to report missing references captured via
the data warehouse ETL
Generating the model
This section explains how to generate a Business Model from a source database. You can generate the model
using any of the following methods:
Setup and User Guide - Qlik Compose, May 2022 155
5 Data Warehouse projects
l
Use Compose to discover the source database or landing zone
l
Import an ERwin model into Compose
l
Create the model manually in Compose
For information about importing a model created in ERwin, see Importing the model from ERwin (page 160).
Discovering the Source Database or Landing Zone
Discovery can either be performed on the source database defined for the Qlik Replicate task or in the landing
zone. The decision where to perform the discovery is determined by several factors, as explained in the
following table:
Factor
Discover the
Landing Zone
Discover the Source
Database defined for
the Qlik Replicate
task
The source tables selected in the Qlik Replicate task contain
foreign keys that you want to maintain in the Compose
project.
Qlik Replicate does not support foreign key
replication.
- ✔
The source database defined for the Qlik Replicate task is not
natively supported by Qlik Compose.
✔ -
The selected source tables contain keys that are not relevant
to the data warehouse (e.g. surrogate keys and business keys)
✔ -
A transformation defined for the Qlik Replicate task means
that not all of the columns will be replicated to the landing
zone. In this case, you should discover the landing zone since
this is the data that you eventually want to appear in your
data warehouse.
✔ -
Discovery factors
To generate the model by discovery:
1. Open your project.
2. To generate the model from within Compose:
1. In the Model panel, select Discover from the drop-down menu in the top right corner.
OR
In the Manage Model window, click the Discover toolbar button.
The Discover window opens.
2. Select whether to discover the source database or the landing zone and then click OK.
Setup and User Guide - Qlik Compose, May 2022 156
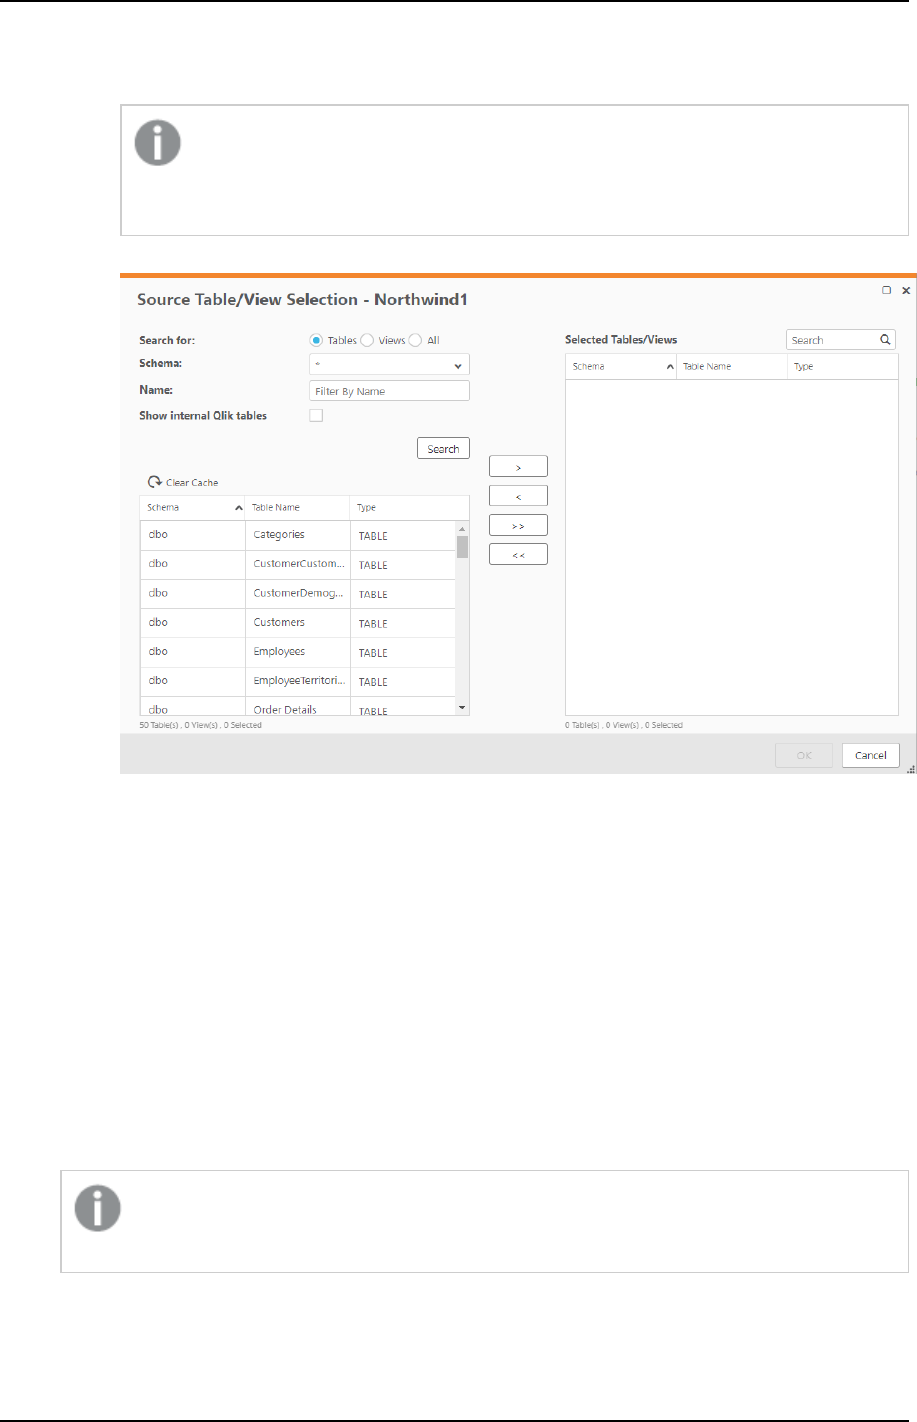
5 Data Warehouse projects
Note that the suffix "_landing" denotes the landing zone whereas the actual source database
appears without the suffix.
When discovering directly from Microsoft SQL Server source, TIME will be discovered
as STRING(16). As well as being mapped this way in Replicate, this will also maintain
accuracy when a TIME column is defined with high precision.
The Source Tables/Views Selection - Name window opens.
3. Choose one of the following Search for options:
l
To list tables only, select Tables.
l
To list views only, select Views.
l
To list tables and views, select All.
4. If you also want the internal Qlik tables to be included in the search results, select the Show Internal
Qlik Tables check box. This may be useful for debugging, but is not usually not necessary.
5. To display all tables/views, click Search.
6. To only display tables/views whose names contain a specific string, type the string in the Name field
and then click Search.
The tables/views will be displayed in the Results list.
7. In the Results list, select the source tables and/or views on which to base the model or click the >>
button (Add All) to add all of the tables in the schema.
You can select multiple tables/views by holding down the [Shift] (sequential selection) or
{Ctrl] (non-sequential selection) button.
8. To add the selected tables/views, click the > (Add) button.
Setup and User Guide - Qlik Compose, May 2022 157

5 Data Warehouse projects
If you add a table that already exists in the model with the same name, then the new table is
added with the name: source_table_name_01 (or source_table_name_02 if the name
source_table_name_01 already exists, and so on).
If the table contains attribute domains that differ from existing ones but have the same
name, they will also be appended with the _01 suffix.
9. Click OK to generate the model from the selected tables/views.
The Generating Model from [model name] window opens.
A progress bar indicates the current model generation progress. For each stage of the model
generation process, a corresponding message appears in the Messages list.
10. After the model has been generated, click Close.
11. Repeat Steps 2-9 to discover additional sources.
Clearing the Landing Zone metadata cache
To improve performance when reading from the Landing Zone or from the Data Warehouse tables, Compose
caches the metadata from both the Landing Zone and the Data Warehouse tables. However, synchronization
issues may sometimes occur if the metadata structure of the Landing Zone or the Data Warehouse tables is
altered outside of the Compose project.
If you aware of external changes to the metadata or if you notice any data synchronization anomalies,
Compose enables you to clear the metadata cache, either using the UI or using the CLI.
You can clear the Landing Zone metadata cache using either the Compose web console or the Compose CLI.
Clearing the metadata cache using the web console
When using the web console to clear the metadata cache, the following methods are available:
Method 1:
1. Open the Source Table/View Selection - <Landing_Zone_Name> window as described in Discovering
the Source Database or Landing Zone (page 156).
2. Click the Clear Cache button located below the Show internal Qlik tables option.
Method 2:
1. Click the Manage button at the bottom left of the Data Warehouse panel.
The Manage Data Warehouse Tasks window opens.
2. In the Mappings tab, click Clear Landing Cache.
For information on clearing the Data Warehouse cache, see Clearing the data warehouse metadata cache
(page 224).
Clearing the metadata cache using the CLI
You can also clear the metadata cache using the CLI.
Setup and User Guide - Qlik Compose, May 2022 158

5 Data Warehouse projects
Command syntax:
ComposeCli.exe clear_cache --project
project_name
[--type landing|storage] [--landing_zone
source_name]
Parameters
Parameter Description
--project The name of the project.
--type Which type of metadata cache to clear. Possible values are:
l
landing
l
storage
If --type
landing
and you want to clear a specific landing zone,
you must set the --landing_zone parameter as well. To clear the
metadata cache in all landing zones, specify --type
landing
and
omit the --landing_zone parameter.
--landing_zone the name of the landing zone when --type landing_zone
Example
ComposeCli.exe clear_cache --project MyProject --type landing --landing_zone MySource1
Importing entities and mappings from another project
You can import entities and mappings from another project with the same data warehouse type. This is
especially useful within a development environment if you need to integrate a private developer's project with
the main project.
To import entities and mappings:
1. Open the Manage Model window as described in Managing the model (page 166).
2. In the Entities toolbar, click the Import from Project button.
3. The Import from Project wizard opens.
4. In the Entities tab:
a. Select a project from the Import from Project drop-down list.
b. Optionally, search for specific entities.
c. Select which entities to import or select Select All to import all entities.
5. Click Next to select which mappings to import.
To create new entities and mappings if the selected entities and mappings already exist,
clear the Replace existing entities and mappings check box.
The new entities/mappings will be named
<existing_name>_IMPORTED
(or
<existing_
name>_IMPORTED_<n+>
if the entity/mapping is imported more than once).
6. In the Mappings tab:
Setup and User Guide - Qlik Compose, May 2022 159

5 Data Warehouse projects
Either click Finish to import all mappings for the selected entities (the default).
OR
Select which mappings you want to import and then click Finish to import the selected entities and
mappings.
If you do not wish to import any mappings, clear the Mappings check box before clicking
Finish.
Importing the model from ERwin
In order to import a model created in ERwin, you first need to export the model from ERwin to an XML file and
then copy the XML file to the Compose Server machine. Note that when you import a model from ERwin, you
need to create the Mappings ETL scripts manually. You can either do this by creating global mapping as
described in Managing global mappings (page 160) below or you can create the mapping ETL directly in the
Data Warehouse panel.
For more information on creating the ETL mapping(s) in the Data Warehouse panel, see Creating and
managing the data warehouse (page 190).
To import the model from ERwin:
1. Open your project.
2. To import a model created in ERwin, in the Model panel, select Import from ERwin from the drop-
down menu in the top right corner.
OR
In the Manage Model window, select Import from ERwin from the Entities drop-down menu.
The Import from ERwin window opens.
3. Specify the full path to the ERwin XML file.
4. If you have set up global mappings, select the Use Global Mappings check box. For details, see
Managing global mappings (page 160).
5. Select one of the following Read entities from options:
l
Logical model - Allows you to import logical entities and attributes.
l
Physical model - Allows you to import physical entities and attributes, exactly as they appear
in the source database.
6. Select a source database and then click OK.
The Select Tables/Views window opens.
7. Continue from Step 4 in Generating the model (page 155).
Managing global mappings
Before you import a data model from ERwin, you can set up the global mappings from the logical ERwin
model (the entities and attributes) to the physical source database (the tables and columns). This is useful if
numerous entities in your model contain the same attribute. For example, lets assume that twenty source
entities contain an attribute called "BusinessKey". In the physical source tables however, this column (which
also appears in twenty tables) is called "Key". Using the Global Mappings feature, you only need to define the
"Key-to-BusinessKey" mapping once instead of twenty different times.
Setup and User Guide - Qlik Compose, May 2022 160

5 Data Warehouse projects
When you import from ERwin, you can then select the Use Global Mappings check box to apply these
mappings. See also Importing the model from ERwin (page 160).
You can add, edit, and remove entity and attribute mappings. If needed, you can also change the source
database referenced for the tables (if you have several different sources defined).
To manage global mappings:
1. In the Model panel, from the drop-down menu in the top right, select Global Mappings.
The Global Mappings window opens in the Tables to Entities tab.
2. Import the ERwin entities:
1. Click Import Entities to Mappings toolbar button.
The Import Entities window opens.
2. In the File Path field, enter the full path to the ERwin.xml file (on the Compose Server machine)
that includes the entities you want to import.
3. Click OK.
3. Verify that Qlik Compose is using the desired source database. The database name is displayed in
green at the bottom right of the toolbar.
To select a different source database:
1. Click Change Source Database.
2. In the Set Source Database window, select a different database and then click OK.
4. Add new entities, edit existing entities, or remove entities as described in the following table:
To Do This
Add a new
entity
1. In the Tables to Entities tab, click the New toolbar button.
2. Next to the Entity Name field, click the browse button.
The Unmapped Entities window opens, listing only entities that have not
yet been mapped.
3. Select an entity and click OK.
4. Next to the Table Name field, click the magnifying glass icon.
The Find Table for [Entity Name] window opens for the selected entity.
5. From the Tables drop-down list on the left, select the table to map to.
6. Click OK. Qlik Compose populates the Table Schema field automatically,
based on the table you selected.
7. Repeat these steps for all unmapped entities.
Edit an entity 1. Move the mouse cursor over the entity and click the Edit button (pencil
icon) that appears on the right.
2. Make the required changes and click OK.
Delete an
entity
1. Select the entity.
2. In the Entities toolbar, click Delete.
3. When prompted to confirm the deletion, click Yes.
Entity management options
Setup and User Guide - Qlik Compose, May 2022 161
5 Data Warehouse projects
To Do This
Search for an
entity
In the Search look-up field, start typing. Qlik Compose only displays entities that
match the search string.
5. Add, edit, or remove attributes as described in the table below:
To Do This
Add a new
attribute
1. In the Columns to Attributes tab, click the New toolbar button.
2. Provide a name and description (optional) for the attribute and the column.
3. Click OK.
Search for
an
attribute
In the Search look-up field, start typing. Only attributes that match the search string
will be displayed.
When searching for an attribute based on the attribute name, you must add
the prefix "
name:
". For example, if you want to search for an attribute that
contains “ar” in its name, type “
name: ar
” in the Search look-up field.
Edit an
attribute
1. Move the mouse cursor over the attribute and click the Edit button (pencil
icon) that appears on the right.
2. Make the required changes and click OK.
Remove an
attribute
1. Select the attribute.
2. Click the Delete toolbar button.
3. When prompted to confirm the deletion, click Yes.
Attribute management options
6. Click Close.
Model limitations
l
When Amazon Redshift is the data warehouse type, attribute names that contain the open parenthesis
character "(" are not supported. If any of your attribute names contain the "(" character, you should
remove it before creating the data warehouse tables.
For information on renaming attribute names, see Add an attribute to all Satellite tables and the Hub
table (page 170).
l
Discovering new tables does not affect existing entities in the model, even if there is a relationship
between the new entity and one of the existing entities. For example, in the source database, Table 1
has a Foreign Key that points to Table 2. If Table 1 is added to the model and then Table 2 is added
later, Table 1 will not be updated to contain the required Foreign Key.
l
The data warehouse needs to be "adjusted" when deleting a relationship/attribute from the model and
then adding the same relationship/attribute back to the model. However, the "Adjust" operation
deletes the data from the corresponding data warehouse column.
Setup and User Guide - Qlik Compose, May 2022 162

5 Data Warehouse projects
Validating the model
Once you have generated the model, you can easily check that it is valid. For example, for a model to be valid,
each of the tables must have a Business Key.
Validating the model does not recalculate expressions for historical data that has changed. Changes
in a dimension expression or lookup of a column in a dimension are not updated retroactively. In
order to update historical data, you would need to reload the data which could take a long time
depending on the number of records and their history.
To validate the model:
1. Either click the Validate button in the bottom right of the Model panel.
OR
Select Validate from the drop-down menu in the top right of the Model panel.
The Validate Model window opens.
a. If the model is valid, a message will confirm the model’s validity. If the model is not valid, a list
of invalid tables/views will be displayed.
A message indicating why the entity is invalid will be displayed in the Message column.
b. To resolve the issue, click the Edit Entities button to the right of the entity.
The Edit Model window opens showing the invalid entity.
2. Resolve the issue (in this case, by adding a Business Key) and then click Close.
A message will confirm the model’s validity.
3. Click Close to close the Validate Model window.
Displaying the model
Displaying the model is a good way to see the relationships between the various tables and/or views in your
model.
To display the model:
Either click the Display button in the bottom right of the Model panel.
-OR-
Select Display from the drop-down menu in the top right of the Model panel.
The Display Model window opens showing the Diagram tab.
Setup and User Guide - Qlik Compose, May 2022 163
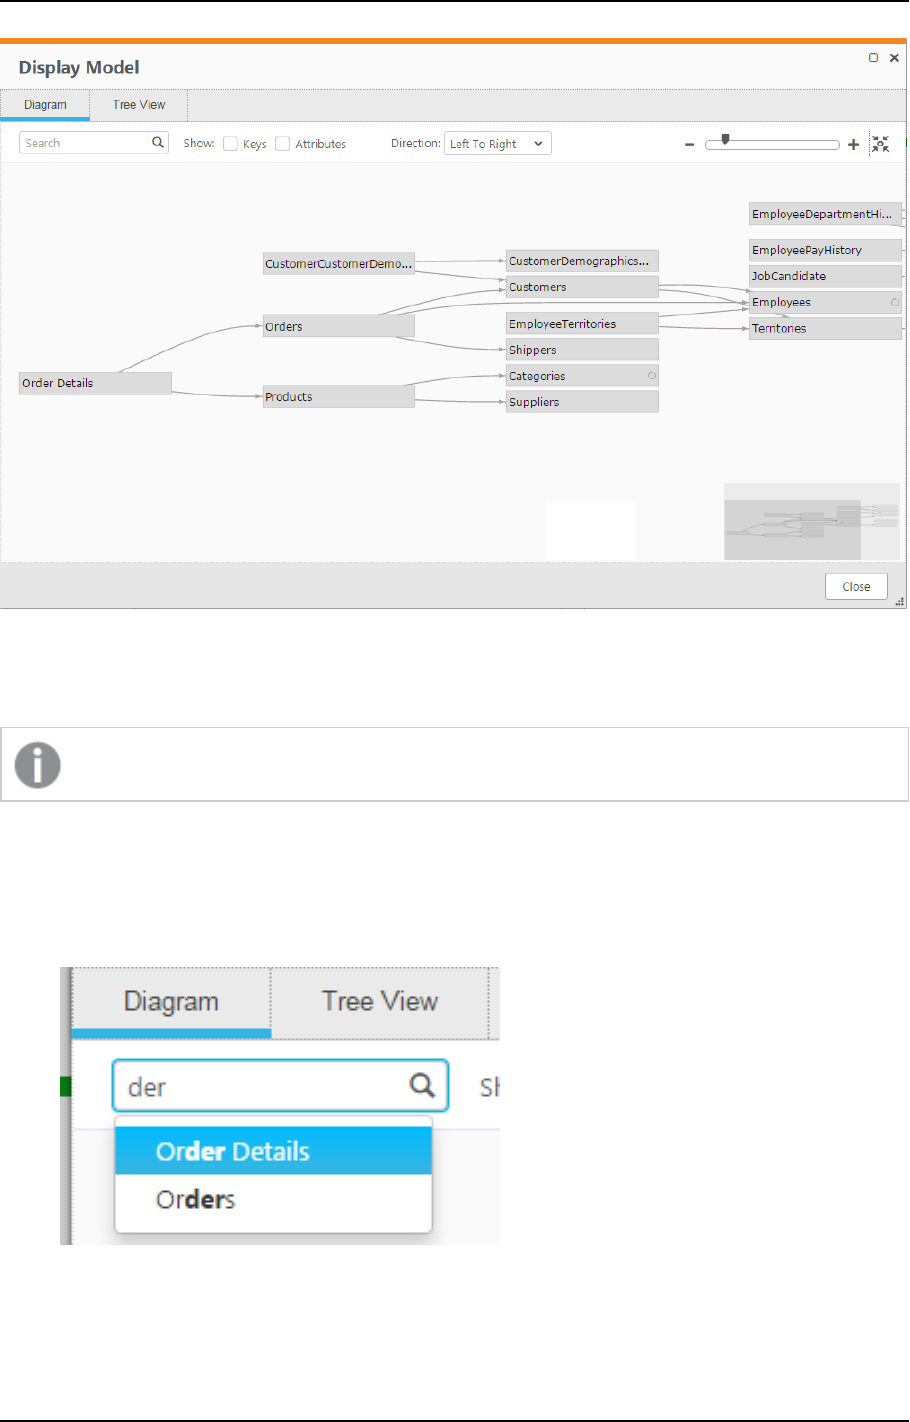
5 Data Warehouse projects
Diagram tab
In the Diagram tab, the following options are available:
You can select multiple entities by clicking them while holding down the [Ctrl] keyboard button.
l
Zoom - Increase or decrease the magnification using the slider at the top right of the screen. Click the
button to the right of the slider to restore the default size.
l
Search - The ability to search for entities is particularly useful in a large model. To search for an entity,
type a search string in the Search box. Compose lists the names of entities that match the search
string. Select the desired entity.
l
Drag the diagram - In addition to zooming, you can also drag the diagram by clicking the space
around the diagram and dragging. This is useful for very large diagrams where zooming out would
Setup and User Guide - Qlik Compose, May 2022 164

5 Data Warehouse projects
render the text unreadable. The guide at the bottom right of the window shows you which part of the
diagram is currently displayed.
l
Show/Hide all attributes for a selected entity - Select an entity and then select/clear the Attributes
check box in the top left of the window.
l
Show/Hide all business keys in the model - Select/Clear the Keys check box in the top left of the
window.
l
Show/Hide relationship attributes - Right-click an entity and select this option to to show/hide the
entity's relationship attributes.
l
Show/Hide business keys - Right-click an entity and select this option to to show/hide the entity's
business keys.
l
Change the Diagram Direction - Select one of the available options from the Direction drop-down list
at the top of the window.
l
Set as relationship source - See Creating and managing relationships (page 174).
l
Hide this node - Right-click an entity and select this option to show/hide the entity. To show the
entity, click the Hidden Nodes box in the left of the window.
l
Hide selected nodes - Right-click an entity and select this option to show/hide selected entities. To
show the hidden entities, click the Hidden Nodes box in the left of the window.
l
Hide non-selected nodes - Right-click an entity and select this option to show/hide non-selected
entities. To show the hidden entities, click the Hidden Nodes box in the left of the window.
l
Invert selection - Right-click an entity and select this option to highlight all entities except the
selected entity.
l
Select all - Right-click an entity and select this option to highlight all entities in the model.
l
Select path - To highlight the path to which an entity belongs, either hover your mouse cursor over
the entity or right-click the entity and select Select Path.
l
Select path and hide all other nodes - Right-click an entity and select this option to highlight the
entity’s neighbors.
l
Edit - Either double-click the entity or right-click an entity and select the Edit option to edit the
entity’s attributes.
l
Lineage - Right-click an entity and select this option to show/hide the entity’s lineage. For more
information on lineages, see Lineage and impact analysis (page 177).
Tree View tab
In the Tree View tab, the following options are available:
l
Search for an entity or attribute - To search for a specific entity or attribute, enter a part of the name
in the Search box. Entities that match the search string will be highlighted.
l
Expand/Collapse - Click the arrow to the left of a table to see its attributes or related tables. To show
or hide all sub-tables and table attributes, click the Expand All/Collapse All buttons at the top of the
Tree View tab.
l
Lineage - To see an entity or attribute's lineage, hover your mouse over a table or attribute and then
click the button that appears to its right.
Setup and User Guide - Qlik Compose, May 2022 165
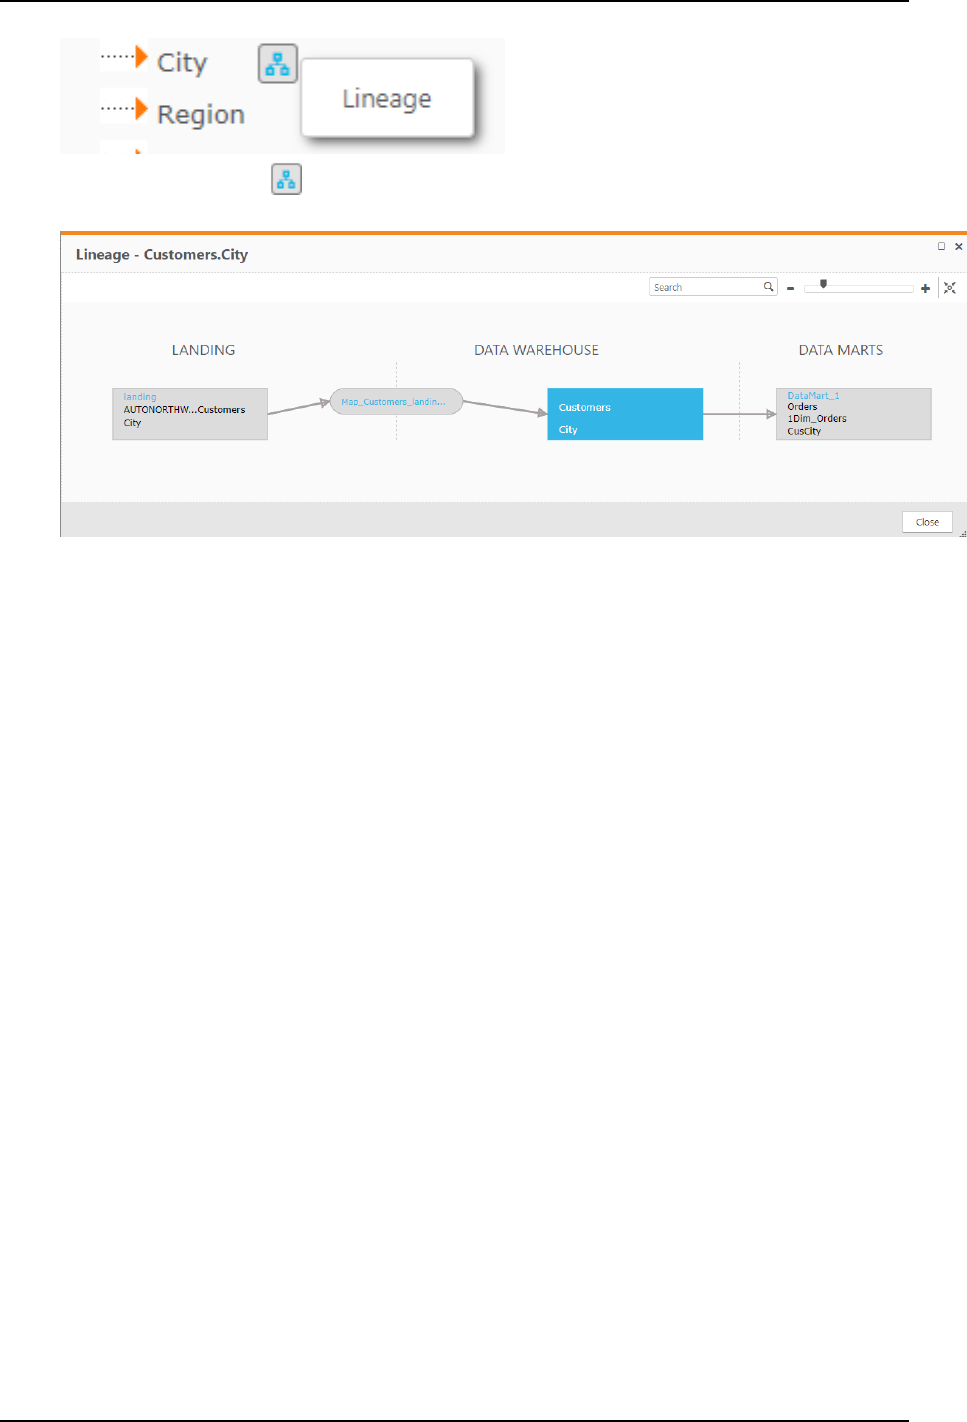
5 Data Warehouse projects
For example, clicking the button next to the City attribute (shown in the image above) will open
the following window:
For more information on lineages, see Lineage and impact analysis (page 177).
Managing the model
You can manage the model according to your needs, as described in the following topics:
l
The Manage Model window (page 167)
l
Managing entities (page 167)
l
Creating and managing relationships (page 174)
l
Managing attributes (page 168)
l
Bulk Editing History types and Satellite numbers (page 177)
l
Lineage and impact analysis (page 177)
There are two ways of editing a model in Compose:
l
In the Manage Model window - Editing the model in the Manage Model window is preferable if you
need to make several changes to the model as it provides access to all of the model’s entities and
attributes. To display the results of your changes, open the Model Display window as described in
Displaying the model (page 163).
l
From the Model Display - Editing the model from the Model Display window is convenient if you only
need to edit one or two entities. Another advantage of this method is that it allows you to see the
result of your changes (in the entity relationship diagram) immediately.
To open the Manage Model window from the Model panel:
1. Click the Manage button at the bottom left of the Model panel or click the Entities link in the Model
panel.
The Manage Model window opens.
2. Edit the model according to the descriptions below.
Setup and User Guide - Qlik Compose, May 2022 166
5 Data Warehouse projects
To open the Manage Model window from the Model Display window:
1. Open the Model Display window as described in Displaying the model (page 163).
2. Double-click the entity you want to edit.
The Manage Model window opens.
3. Edit the model according to the descriptions below.
The Manage Model window
The Manage Model window is split into two tabs: The Logical Model tab and the Physical Model tab. The
Logical Model tab shows the entities and attributes as they appear in the model whereas the Physical Model
tab provides a preview of the actual tables (and columns) that will be created in the data warehouse. So, for
example, although the Categories table appears as a single entity in the Logical Model tab, it will appear as
two tables (TDWH_Categories_HUB and TDWH_Categories_S01) in the Physical Model tab. The reason for
this is because the logical Categories entity contains both Type 1 and Type 2 attributes. Type 1 attributes will
be created as columns in the HUB table while Type 2 attributes will be created as columns in the Satellite
table (S01). For more information on Type 1 and Type 2 attributes, see History.
All editing tasks are performed in the Logical Model tab, except for the following tasks which are performed in
the Physical Model tab:
l
Designate a Distribution Key Column (Amazon Redshift data warehouse only)
l
Designate a Distribution Method (Microsoft Azure Synapse Analytics only)
For more information, see Defining Table Creation Modifiers (page 179).
Managing entities
You can add, edit and remove entities from your model as described in the table below.
All of the options available in the toolbar are also available from the drop-down menu in the toolbar.
This is useful when you reduce the window size, since some of the toolbar buttons - or all of them
depending on how small you make the window - will be hidden. The only button that will not be
hidden regardless of the eventual window size is the drop-down menu button.
To Do This
Add an entity 1. Click the New Entity button in the Entities toolbar.
2. Provide a name and description (optional) for the entity and then click
OK.
Edit an entity 1. Select the entity you want to edit and then click the Edit button in the
Entities toolbar.
2. Edit the entity’s name and description (optional) and then click OK.
Entity management options
Setup and User Guide - Qlik Compose, May 2022 167

5 Data Warehouse projects
To Do This
Remove an entity 1. Click the Delete button in the Entities toolbar.
2. When prompted to confirm the deletion, click Yes.
Duplicate an entity 1. Select the entity you want to duplicate and then select Duplicate from
the drop-down menu in the Entities toolbar.
2. Edit the entity’s name and description (optional) and then click OK.
The duplicated entity is added to the Entities list.
Import entities from
another project
See Importing entities and mappings from another project (page 159).
Import entities from
ERwin
See Importing the model from ERwin (page 160).
Managing attributes
You can add, edit and remove attributes as required. All attributes in the model belong to the Attributes
Domain. When adding a new attribute, you can either select an existing attribute from the Attributes Domain
or create a new Attributes Domain. Both of these options are described in the table below.
Setup and User Guide - Qlik Compose, May 2022 168

5 Data Warehouse projects
To Do This
Add an
attribute from
the attributes
domain
1. Click the New Attribute button in the Attributes toolbar.
The New Attribute window opens.
2. To designate the attribute as a business key, select the Key check box.
3. From the Attribute domain drop-down list, select the attribute domain you wish
to add.
4. To edit the selected attribute domain on-the-fly, click the edit button located after
the Attribute domain drop-down list. This will open the Edit -
AttributeDomainName window. Then, continue from Step 2 in Edit an attribute
domain.
5. In the Attribute name field, optionally change the default instance name for the
attribute domain.
You can create multiple instances of a single Attribute Domain. This is especially
useful if you want to use the same Attribute Domain across multiple tables, with
each "instance" having its own unique name. This also allows you to edit the
properties of each attribute without affecting the other attributes, despite all the
Attribute Domain instances sharing a common Attribute Domain. For example, if
the Attribute Domain name is "ID", you could create one instance for it in the
"Categories" entity named "CategoryID" and another instance in the "Employees"
entity named "EmployeeID". If, however, you edit the parent Attribute Domain
attribute, all instances of that attribute will be updated as well.
6. To add a prefix to the attribute name, enter the desired prefix in the Prefix field.
Adding a prefix to an attribute name allows you to add multiple instances of the
same attribute domain. For example, the attribute "Employee" could become two
different attributes: "ReportsTo_Employee" and "HiredBy_Employee".
7. Set the History Type and Satellite number. When the History Type is set to 2, a
new record will be created in the data warehouse each time an attribute value
changes.
8. In the Satellite/Hub field, optionally change the satellite number. Note that the
satellite number can only be changed when the History Type is set to 2. For an
explanation of why this is so, see The Manage Model window (page 167).
9. To add an expression, click the fx button located after the Expression field and
then continue from Creating expressions (page 181).
10. Click OK to save your settings.
Attribute management options
Setup and User Guide - Qlik Compose, May 2022 169

5 Data Warehouse projects
To Do This
Create a new
attribute
domain and
add it to the
model
1. Click the New Attribute button in the Attributes toolbar.
The New Attribute window opens.
2. To designate the attribute as a business key, select the Key check box.
3. Click the plus sign to the right of the Attribute domain drop-down list.
The New Attribute Domain window opens.
a. Specify a Name for the attributes domain.
b. From the Type drop-down list, select one of the available data types.
c. If the selected data type requires further configuration, additional fields will
be displayed. For example, when Decimal is selected, the Length and Scale
fields will be displayed. Set the values as desired.
d. Optionally, specify a Description.
e. Click OK to add the newly created attribute domain to the Attribute
domain field and close the New Attribute Domain window.
4. Continue from Step 5 in Add an existing attribute domain above.
You can also add new attribute domains via the Manage Attribute
Domains window. For more information, see Managing the Attributes
Domain (page 173)
Add a
relationship
See Creating and managing relationships (page 174).
Add an
attribute to all
Satellite
tables and the
Hub table
You can use the Add to all Satellites and Hub option to define the same Primary Index
for the Hub table and all Satellite tables.
Select the desired attribute and then click the Add to all Satellites and Hub toolbar
button. The attribute is added to the Hub table and to all the Satellite tables.
Edit an
attribute
Method 1:
1. Select the attribute you want to edit and then click the Edit button in the
Attributes toolbar.
The Edit - AttributeName window opens
2. Continue from Step 2 of Add an attribute from the attributes domain above.
Method 2:
1. Double-click the attribute you want to edit.
The values in the attribute row become editable.
2. Continue from Step 2 of Add an attribute from the attributes domain above.
Setup and User Guide - Qlik Compose, May 2022 170
5 Data Warehouse projects
To Do This
Bulk edit
history types
and satellite
numbers
See Bulk Editing History types and Satellite numbers (page 177).
Show an
attribute's
lineage
See Lineage and impact analysis (page 177).
Remove an
attribute
1. Select the attribute(s) you want to delete.
2. Click the Delete button in the Attributes toolbar.
3. When prompted to confirm the deletion, click Yes.
Change the
attribute
order
Select the attribute you want to move and use the Move Up/Move to Top and Move
Down /Move to Bottom toolbar buttons to move the attribute.
Search for an
attribute
In the Search lookup field, start typing. Only attributes that match the search string will
be displayed.
When searching for an attribute based on the attribute name, you must add the
prefix "
name:
". For example, if you want to search for an attribute that contains
“ar” in its name, type “
name: ar
” in the Search look-up field.
Manage the
Attributes
Domain
See Managing the Attributes Domain (page 173).
Create an
expression for
an attribute
See Add an attribute from the attributes domain or Edit an attribute above.
Export the
attributes to a
CSV file
Select an entity from the Entities list on the left of the Manage Model window and then
select Export to CSV from the drop-down menu in the Attributes toolbar. Depending on
your browser settings, you will either be prompted to download the <entityname>_
Attributes.csv file or it will be downloaded to your default Downloads location.
The CSV format differs slightly from the CSV format when Exporting and
importing projects using the CLI (page 78).
Setting up derived attributes
Derived attributes are attributes whose data is "derived" from other attributes. For example, lets assume that
the OrderDetails entity contains the attributes Quantity and UnitPrice but does not contain the attribute
TotalPrice. To gain better insight into the annual sales figures, the organization would like to add the
TotalPrice attribute to the model and derive its data from the Quantity and UnitPrice attributes.
Setup and User Guide - Qlik Compose, May 2022 171
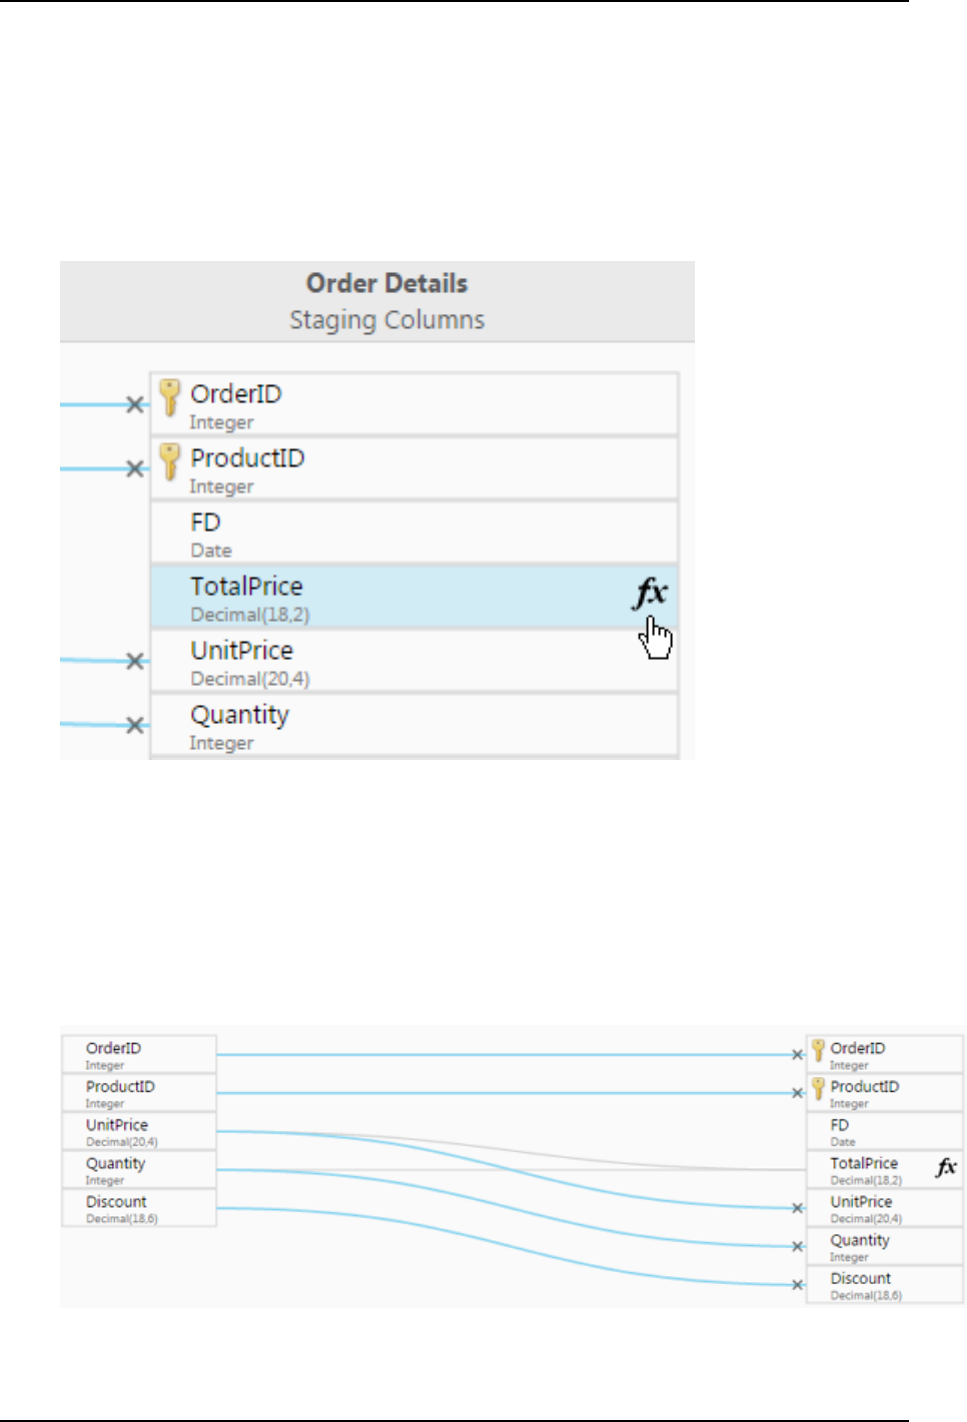
5 Data Warehouse projects
Assuming that the Northwind sample database is the model’s source, this could easily be done as follows:
1. Add the TotalPrice attribute domain to the model as described in Managing attributes (page 168).
2. After finalizing the model, create the data warehouse tables as described in Creating the data
warehouse tables (page 192).
3. Click the OrderDetails mapping as described in Editing column mappings (page 202).
Note that the TotalPrice attribute has no mapping as it was added after the Northwind source was
discovered:
4. Open the Expression Builder by clicking the fx icon to the right of the TotalPrice column name. Then,
in the Expression Builder, add the Quantity and UnitPrice columns to create the following
expression:
Quantity*UnitPrice
For more information on creating expressions, see Creating expressions (page 181).
5. Click OK to close the Expression Builder and save the expression.
The Quantity and UnitPrice landing zone columns are now mapped to the TotalPrice data
warehouse column. Notice that the mapping lines are gray, indicating that the mapping is the result of
an expression.
Setup and User Guide - Qlik Compose, May 2022 172
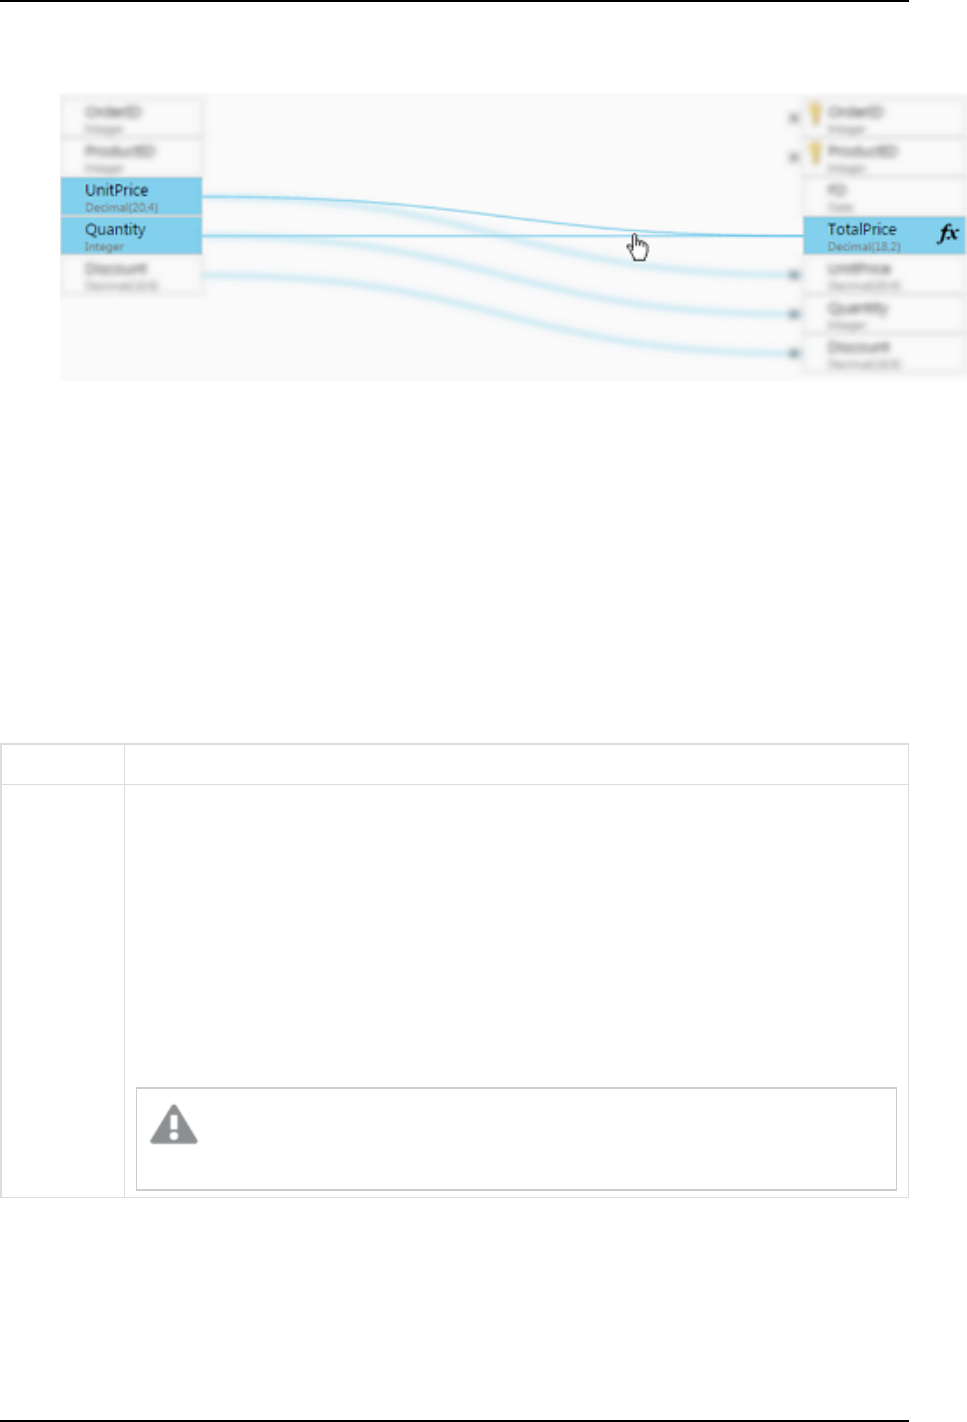
5 Data Warehouse projects
Hovering the mouse cursor over the gray lines highlights the derived column (TotalPrice) and the
columns from which its data is derived (Quantity and UnitPrice).
Managing the Attributes Domain
The Attributes Domain provides a list of all the attributes available in the Compose model, as well as their
data type. You can add, edit and delete attributes according to your data warehousing needs. The Attributes
Domain also allows you to see which entities each attribute belongs to, as a single attribute may be present in
several entities.
To manage the Attributes Domain
1. From the drop-down menu in the top right of the Model panel, select Attributes Domain.
2. Add, delete and edit attributes as describe in the table below.
To Do This
Add an
attributes
domain
1. Click the New Attributes Domain toolbar button.
The New Attribute Domain window opens.
2. In the Name field, specify a name for the attribute.
3. From the Type drop-down list, select one of the available data types.
4. If the selected data type requires further configuration, additional fields will be
displayed. For example, when Decimal is selected, the Length and Scale fields will
be displayed. Set the values as desired.
5. Optionally specify a Description.
6. Click OK to add the attribute and close the New Attribute Domain window.
Attribute domains names are case insensitive. For example, a project cannot
contain one attribute domain called date and another called DATE.
Attribute Domain management options
Setup and User Guide - Qlik Compose, May 2022 173
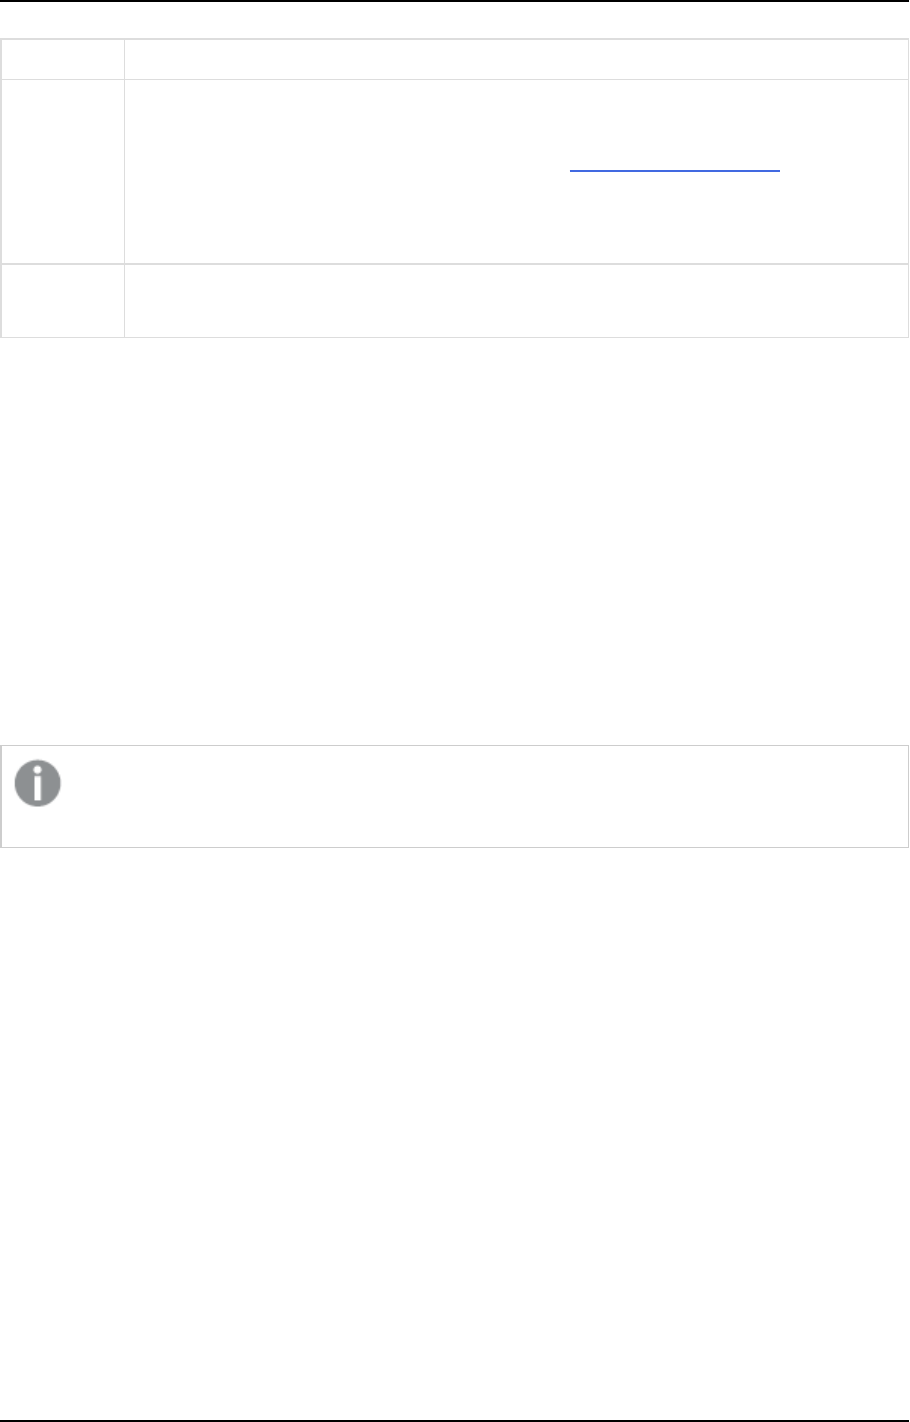
5 Data Warehouse projects
To Do This
Edit an
attribute
domain
1. Select the desired attribute and then click the Edit toolbar button.
The Edit: Name window opens.
2. Edit the attribute as described in steps 2-6 of Add an attributes domain above.
Note that the Edit: Name window also contains a Used in Entities list. Knowing
which entities the attribute is used in may affect the type of changes you make, as
the planned changes may not be appropriate for all entities.
Remove an
attribute
1. Select the attribute you want to delete and then click the Delete toolbar button.
2. When prompted to confirm the deletion, click Yes.
Creating and managing relationships
Similar to a foreign key, a relationship "attribute" is a special type of attribute that points to another entity in
the same model. Typically, the relationship replaces the key attributes that connect an entity to a related
entity. You can add, edit and delete relationships as required.
Possible reason for creating relationships are as follows:
l
If your model is derived from the landing zone (as opposed to the source database(s)), the model will
be created without any relationships
l
Ensure data integrity between related entities
You can create relationship from the Manage Model window or from the Display Model window. Both of
these methods are described below.
When converting existing columns in a table with a relationship to another table, historical values
may be lost and need to be loaded again or reinserted manually.
Adding relationships via the Manage Model window
1. Click the Manage button in the bottom left of the Model panel.
The Manage Model window opens.
2. Select an Entity in the Entities list.
3. Click the Add Relationship button in the Attributes toolbar.
The Add Relationship From: Name window opens.
4. From the Add Relationship to Entity drop-down list, select the entity to which you want to create a
relationship.
5. If the originating entity contains attributes that were foreign keys in the source database, you can
replace these attributes with Business Key attributes of the associated entity.
To do this:
a. Select the Replace Existing Attribute(s) check box.
The left column shows the Business Key Attributes of the Associated Entity.
b. From the Attributes of Originating Entity drop-down list on the right, select an attribute from
the originating entity that was meant to be a foreign key.
Setup and User Guide - Qlik Compose, May 2022 174
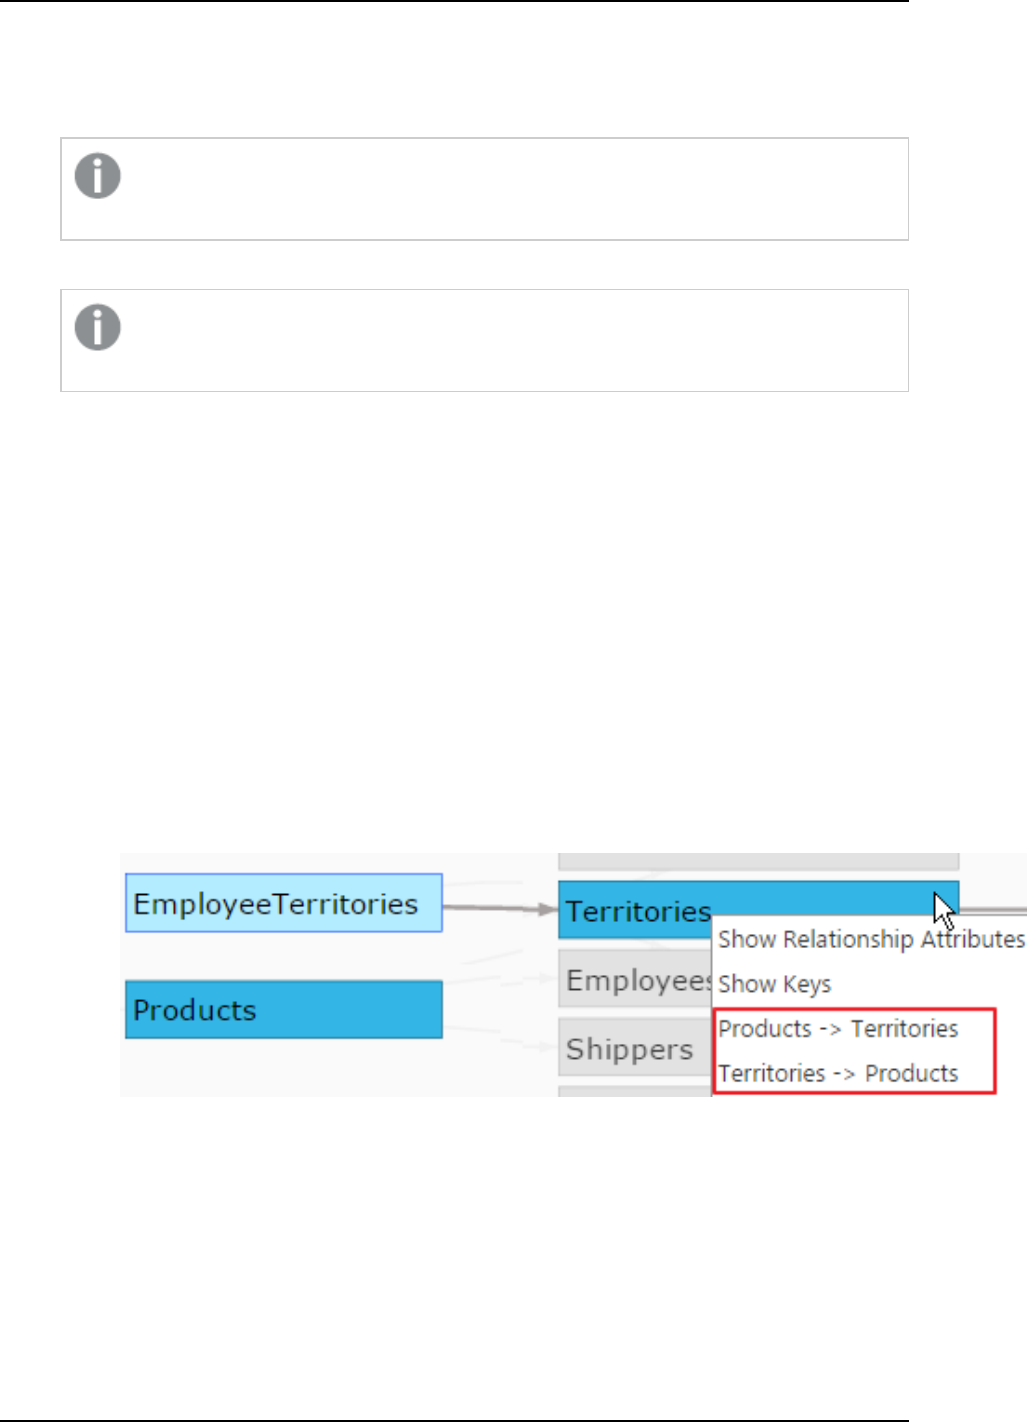
5 Data Warehouse projects
6. If you want the relationship attribute to be a Business Key, select the Business Key check box. This
option will only be displayed if the entity target can be designated as a Business Key.
7. Set the History Type.
Since the history type for Business Keys must be type 1, the option to change the history type
is unavailable when the Business Key check box is selected.
8. Set a Satellite Number.
Since the satellite number for Business Keys must be "0", the option to change the satellite
number is unavailable when the Business Key check box is selected.
9. Optionally, specify a prefix.
10. Optionally, enter a description.
11. Click OK to save your settings.
Adding relationships via the Display Model window
1. Click the Display button in the bottom left of the Model panel. The Display Model window opens.
2. Select one of the following methods:
l
Method 1: Right-click an entity and select Add Relationship.
The Add Relationship From: Name window opens.
l
Method 2: Right-click an entity and select Set as Relationship Source. This method is useful if
you need to search your model for the relationship target entity (since the source entity
remains selected while you search).
l
Method 3: Select two entities by clicking them while holding down the [Ctrl] key. Then, right-
click one of the entities and select the desired relationship from the context menu (according to
the entity that you want to be the relationship source), as shown in the following example:
3. If you selected Method 2, continue below. If you selected Method 1, continue from Step 4 in Adding
Relationships via the Manage Model window above. If you selected Method 3, continue from Step 5
in Adding Relationships via the Manage Model window above.
4. Right-click the relationship target entity and select Relationship Target for Relationship Source
Name.
The Add Relationship: Name window opens with the relationship target entity already selected.
Setup and User Guide - Qlik Compose, May 2022 175
5 Data Warehouse projects
5. If the originating entity contains attributes that were foreign keys in the source database, you can
replace these attributes with Business Key attributes of the associated entity.
To do this:
a. Select the Replace Existing Attribute(s) check box.
The left column shows the Business Key Attributes of the Associated Entity.
b. From the Attributes of Originating Entity drop-down list on the right, select an attribute from
the originating entity that was meant to be a foreign key.
6. If you want the relationship attribute to be a Business Key, select the Business Key check box. This
option will only be displayed if the entity target can be designated as a Business Key.
7. Set the History Type.
Since the history type for Business Keys must be type 1, the option to change the history type
is unavailable when the Business Key check box is selected.
8. Set a Satellite Number.
Since the satellite number for Business Keys must be "0", the option to change the satellite
number is unavailable when the Business Key check box is selected.
9. Optionally, specify a prefix.
10. Optionally, enter a description.
11. Click OK to save your settings.
Preventing naming conflicts
When a relationship from entity A to entity B is created, Compose implicitly adds entity B’s primary key
columns to table A. This means that if there are two or more relationships from entity A to entity B, a column
naming conflict will arise (as entity B’s primary key columns will be added to table A multiple times). Such
conflicts can easily be avoided by adding a meaningful prefix to the relationship attributes in entity A, which
will result in the prefix being added to the physical columns as well.
Example:
The Orders entity contains two attributes that are related to the People entity: the Customer and Seller
attributes. Therefore, Mike wants to create two relationships from the Orders entity to the People entity. The
primary key of the People table consists of the FirstName and LastName attributes. As there are two
relationships, the primary key columns of the People entity will be added twice to the Orders entity. To
prevent duplication errors, Mike adds the Customer_ and Seller_ prefixes to the relationship attributes in the
Orders entity, which results in the physical columns Customer_FirstName, Seller_FirstName, Customer_
LastName, and Seller_LastName.
Deleting relationships
1. Click the Manage button in the bottom left of the Model panel.
The Manage Model window opens.
2. Select the relationship attribute you want to delete.
3. Click the Delete button in the Attributes toolbar.
Setup and User Guide - Qlik Compose, May 2022 176
5 Data Warehouse projects
The Delete Relationship window opens.
4. To restore an attribute that was replaced when the relationship was created, select the Restore
original attribute(s) check box. For more information about replacing attributes, see Step 5 in Adding
relationships via the Manage Model window above.
5. Click Yes to delete the relationship attribute.
Bulk Editing History types and Satellite numbers
Use the Bulk Edit feature to edit the History type and Satellite number of multiple attributes.
To bulk edit history types and satellite numbers:
1. Select the attributes whose History type and/or Satellite number you want to change and click the
Bulk Edit toolbar button.
2. In the Bulk Edit window, change the History type and/or Satellite number as required.
3. Click OK close the Bulk Edit window and save your settings.
Lineage and impact analysis
Before editing an entity or attribute, you may want to see which other entities/attributes in the
entity’s/attribute’s lineage will be impacted by the change. For example, removing the "Discount" attribute
from a table will affect the "Total Price". Additionally, a single attribute may have different names depending
on its location.
Places where you can view lineage in Compose:
l
The Manage Model window described below.
l
The Display Model window described in Displaying the model (page 163).
l
When editing a data mart. For more information, see Managing data marts (page 234).
Top-level entities in the data mart fact will not be shown in the lineage. For example, if both the
Orders and Order Details entities are used in a Fact, the Model lineage for Orders will show Order
Details but not Orders.
To view the lineage of an entity or attribute:
1. Click the Manage button in the bottom left of the Model panel.
The Manage Model window opens.
2. Display the lineage as described below:
To Do This
Show an entity’s
lineage
Select the entity and select Show Lineage from the drop-down menu in the
Entity toolbar.
Show an attribute’s
lineage
Select the attribute and click the Show Lineage button in the Attribute toolbar.
Lineage procedures
Setup and User Guide - Qlik Compose, May 2022 177

5 Data Warehouse projects
Adding Date and Time entities to your model
Compose provides built-in Date and Time entities that you can add to your model. This facilitates access to all
attributes of date and time (such as day of the week, quarter, and so on) both in the BI reports and when
creating transformations in the data mart.
The Date entity contains a record for every day. Dates in the Date entity range from January 1st 1900 to
December 31st 2099.
The Time entity contains all the hours and minutes in a 24 hour period. When you create the data warehouse
tables, the Date and Time entities are automatically populated with relevant data. You can view this data as
described in Viewing the data warehouse tables (page 193).
Both the date and the time values are presented in multiple formats (e.g. 12 hour format or 24 hour format),
allowing you to choose which format will be displayed in your BI reports. Other format include abbreviated
forms of date and time, different month/year/day formats (e.g. 12/31/2017 as opposed to 2017-12-31), and so
on.
You can either add the entities to a new project (before you create the Data Warehouse tables) or to an
existing project. If you add them to an existing project’s model, you will also need to validate and adjust the
Data Warehouse as described in Validating the data warehouse (page 222).
You can even add custom date and time attributes to the entities from the tables in your landing zone. For
example, if one of your source tables lists all the working days and non-working days, you can add an "Is
Working Day" attribute to the Date entity and then load it from the relevant source table. Just like regular
entities, Compose knows how to merge the incoming data of working and non-working days into the existing
Date entity.
For an explanation of how to add attributes to an entity, see Managing attributes (page 168).
You cannot add relationships to the Date and Time entities. However, every date and time attribute has an
implicit relationship to the Date and Time dimensions, which allows you to select the relevant dimension
when creating your star schema in the data mart.
For information on working with Date and Time dimensions in the data mart, see Creating and managing data
marts (page 225).
For all of the supported data sources except Oracle, you can add both Date and Time entities to your
model. If you are using Oracle as your data source, you can only add the Date entity to you model.
This is because Oracle does not have a data type specifically for Time.
To add Date and Time entities to your model:
1. Open the desired Compose project.
2. From the drop-down menu in the top right of the Model panel, select Add Date and Time entities or
Add Date Entity if you data source is Oracle (see Note above).
Setup and User Guide - Qlik Compose, May 2022 178
5 Data Warehouse projects
3. When prompted to confirm the action, click Yes.
4. The Date and Time entities will be added to your model. By default, the Date and Time entities are
hidden from the model display (as they are not related to other entities in your model). If you want to
show them anyway, select the Date and Time model check box in the Data Warehouse Model window.
5. For information about displaying the model, see Displaying the model (page 163).
You can also delete the Date and/or Time entities if you no longer require them and add
them again later.
Defining Table Creation Modifiers
You can set table modifiers for individual entities in the Physical Model tab, thereby overriding the default
settings in the project settings'Table creation modifiers tab (page 45) Table modifiers allow you to append
additional table properties to the default Compose CREATETABLE statement.
The available options are located below the Columns list on the right of the tab, and are as follows:
l
Project settings default - When this option is selected (the default), the settings from the project
settings' Table creation modifiers tab (page 45) will be used.
l
Custom - This option is useful for appending additional table properties to the default Compose
CREATETABLE statement. Leveraging this option requires SQLcoding knowledge.
l
Custom distribution keys - This option is useful if you only need to define custom distribution keys
for individual entities. Although this can also be done using the Custom option (see below), the
Custom distribution keys option is more convenient as it does not require any prior SQL knowledge.
l
Supported with Microsoft Azure Synapse Analytics and Amazon Redshift only.
l
The default distribution key for all data warehouse tables is the ID column.
Setting table creation modifiers
By default, Compose creates tables in the data warehouse using the standard CREATE TABLE statement.
However, organizations often need tables to be created with custom properties for better performance,
special permissions, custom collation, and so on. For example, in Microsoft Azure Synapse Analytics, it’s
possible to create a table as a HEAP, which is optimized for smaller tables. By default, Compose creates tables
in Microsoft Azure Synapse Analytics as a CLUSTERED COLUMNSTORE INDEX, which offers the best overall
query performance for large tables.
The procedure for settings table modifiers is as follows:
1. In the Physical Model tab, select the desired entity.
2. Select the Custom option.
3. Click the Edit button to open the Table Creation Modifier editor.
4. Enter the SQL parts you wish to append to the CREATE TABLE statement.
5. Optionally, but strongly recommended, validate the SQL in an external validation tool that supports
your specific database and version. For instance, if you are validating
Setup and User Guide - Qlik Compose, May 2022 179
5 Data Warehouse projects
Compose does not provide any way of validating your SQL. Therefore, make sure to validate
the SQL before deploying in a production environment.
6. Click OK to close the editor and save your SQL parts.
Example of a Valid Table Creation Modifier
In the following example, the Compose CREATE TABLE statement (rows 1-5) is appended with an SQL part
instructing Compose to create the table as a HEAP (row 6).
CREATE TABLE MyTable
(
column1 integer,
column2 varchar(50),
)
WITH (HEAP)
Setting Custom Distribution Keys
This section describes how to set a custom distribution key for tables created in Amazon Redshift and
Microsoft Azure Synapse Analytics. Note that depending on the selected Distribution Style (Amazon Redshift)
or Distribution Method (Microsoft Azure Synapse Analytics), some of the options may not be available.
Setting a distribution key for Amazon Redshift Data Warehouse
Select and entity and then set a distribution key for Amazon Redshift Data Warehouse according to the table
below.
To Do This
Set a distribution style From the Distribution Style drop-down, select Even, Key or All.
For more information on distribution styles, see:
Distribution styles - Amazon Redshift
Add a distribution key 1. Click the Add Distribution Key button.
A row is added to the table displaying a drop-down list.
2. Select one of the available columns.
Edit a distribution key 1. Double-click the row.
A drop-down list will be shown in the Column column.
2. Select one of the available columns.
Delete a distribution key Select the distribution key and then click the Delete button. The key is
deleted.
Change the position of a
distribution key
Select the distribution key and then click the "Up" or "Down" buttons to
move the key to the desired position.
Distribution key procedures
Setup and User Guide - Qlik Compose, May 2022 180
5 Data Warehouse projects
Setting a distribution key for Microsoft Azure Synapse Analytics
Select and entity and then set a distribution key for Microsoft Azure Synapse Analytics according to the table
below.
To Do This
Set a distribution method From the Distribution Method drop-down, select Hash, Round Robin or
Replicate.
For more information on the distributions options, see:
Guidance for designing distributed tables in Synapse SQL pool - Microsoft
Azure
Add a distribution key 1. Click the Add Distribution Key button.
A row is added to the table displaying a drop-down list.
2. Select one of the available columns.
Edit a distribution key 1. Double-click the row.
A drop-down list will be shown in the Column column.
2. Select one of the available columns.
Delete a distribution key Select the distribution key and then click the Delete button. The key is
deleted.
Change the position of a
distribution key
Select the distribution key and then click the "Up" or "Down" buttons to
move the key to the desired position.
Distribution key procedures
Creating expressions
Compose allows you to create data transformations in several different places according to your needs. A
transformation can either be a filter (i.e. excluding certain data) or an expression (i.e. manipulating a single
record). The table below lists the places where transformations can be created and provides reasons for
creating the transformation in each of the specified places.
Changes in a dimension expression or lookup of a column in a dimension are not updated
retroactively. In order to update historical data, you would need to reload the data which could take
a long time depending on the number of records and their history.
Setup and User Guide - Qlik Compose, May 2022 181
5 Data Warehouse projects
Where the
Transformation is
Created
Reasons to Create a Transformation There
When the Transformation is
Applied
Replicate
l
Filtering large amounts of data that is not
needed for the data warehouse (in the
present or the future)
l
Obfuscation due to regulatory reasons or
internal policies
l
Data type conversion (e.g. converting a
source data type that is not supported on
the data warehouse platform)
Before the data reaches the
landing zone.
Model
l
The default location if you are not sure
where to put it
l
General business logic
l
Needed for several sources or several data
marts
Applied as an update to the
staging tables after creating the
mappings.
Data Warehouse
l
Specific source preparation
l
Needed for merging several sources
Between the landing zone and
the staging zone.
Data Mart
l
Specific to a data mart
l
Managed by a data mart data specialist
Between the data warehouse
and the data mart.
Data transformation location comparison
See also Defining reusable transformations (page 188).
The following topics describe the Expression Builder:
l
Opening the expression builder (page 182)
l
Expression builder overview (page 183)
l
Building expressions (page 184)
l
Testing expressions (page 185)
Opening the expression builder
The Expression Builder enables you to create a transformation without needing to type anything manually.
The Expression Builder can be opened in several places, depending on your needs. For more information
about where to create a transformation, see the table in Creating expressions (page 181).
Setup and User Guide - Qlik Compose, May 2022 182
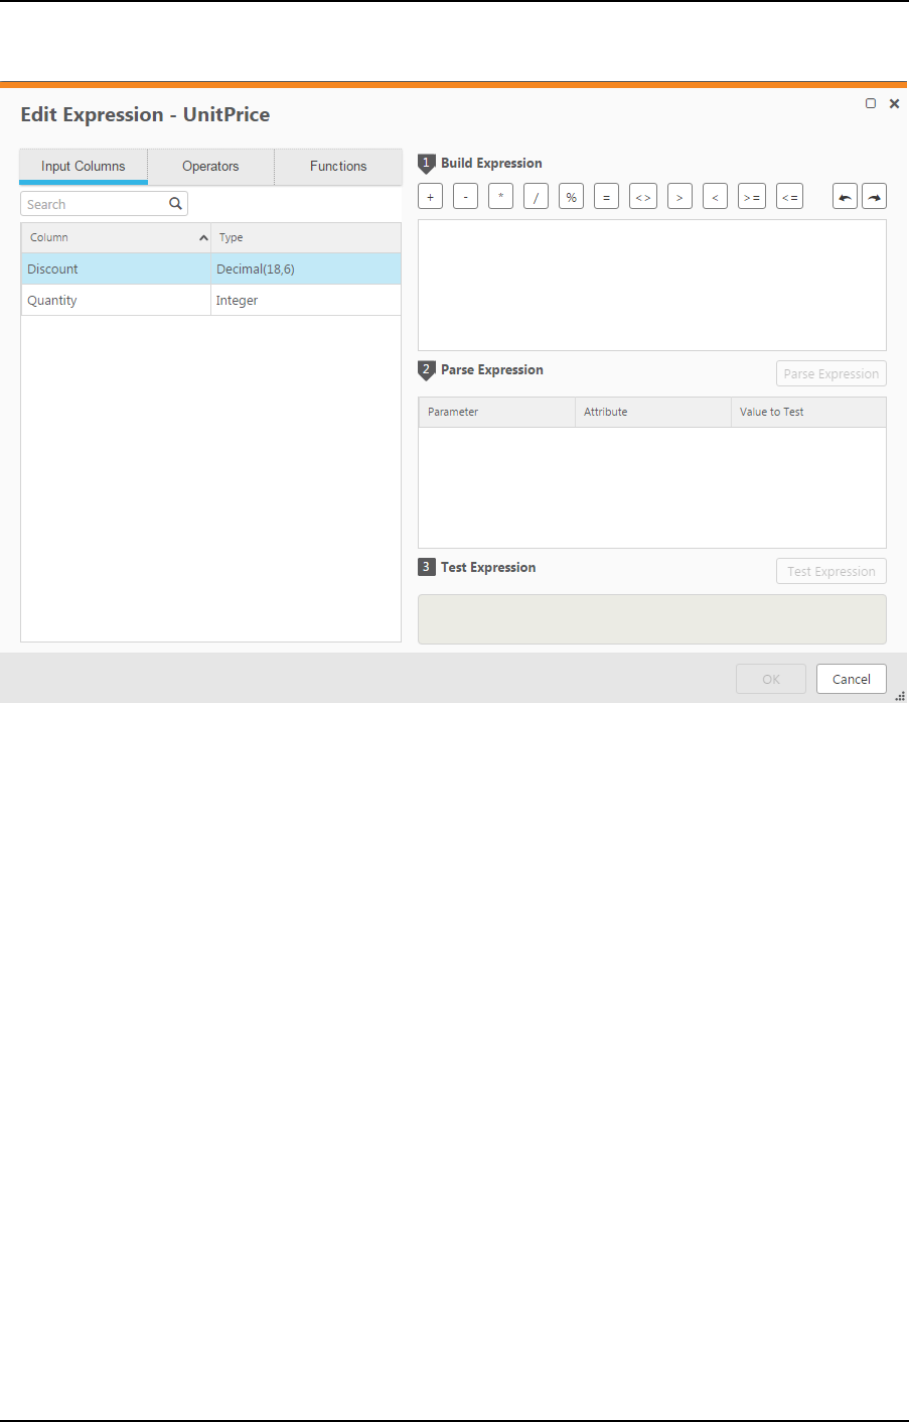
5 Data Warehouse projects
Expression builder
Expression builder overview
The following section provides an overview of the Expression Builder functionality.
The Expression Builder consists of the following panels:
l
Tabs on the left of the Expression Builder: These tabs contains elements that you can add to an
expression. Select elements and add them to the Build Expression pane to create an expression. For
more information, see Building expressions (page 184).
The following tabs are available:
l
Parameters - Only displayed when opening the Expression Builder from within the Reusable
Transformations > Edit Transformation window.
For information on reusable transformations, see Defining reusable transformations (page 188)
below.
l
Input Columns/Input Attributes - Columns/attributes that can be used to build your
expression.
l
Transformations - Contains a list of reusable transformations. The tab is not displayed if no
reusable transformations have been defined.
For information on reusable transformations, see Defining reusable transformations (page 188)
below.
l
Operators - Operators that can be used to build your expression.
l
Functions - Functions that can be used to build your expression.
Setup and User Guide - Qlik Compose, May 2022 183
5 Data Warehouse projects
The Operators and Functions displayed in the Expression Builder use SQL format. As
SQL support and implementation is different for each data warehouse (i.e. database)
type and version, the data warehouse being used in your Compose project will
determine which Operators and Functions will be available. For example, functions
introduced with Microsoft SQL Server 2017 will not work if the database being used
for the data warehouse is Microsoft SQL Server 2015.
Additionally, the list of Operators and Functions displayed in the Expression Builder is
not comprehensive. However, you can use any Operators and Functions supported by
the data warehouse, even if they are not included in the list.
For an explanation of the available Operators and Functions, refer to the Help for
your data warehouse.
l
Build Expression Pane: The Build Expression pane is where you build your expression. You can add
elements, such as columns or operators to the panel as well as type all or part of the expression. For
more information, see Building expressions (page 184).
l
Parse Expression Pane: This pane displays the parameters for the expression. After you build the
expression, click Parse Parameters to list the expression parameters. You can then edit the
parameters, enter a value for each of the parameters and associate attributes with them. For more
information, see Parsing expressions (page 185).
l
Test Expression Pane: This panel displays the results of a test that you can run after you provide
values to each of the parameters in your expression. For more information, see Testing expressions
(page 185).
Building expressions
The first step in using the Expression Builder is to build an expression in the Build Expression pane.
To add operators to your expression, you can use the Operator tab on the left or the Operator
buttons located above the Build Expression pane or any combination of these.
To build an expression:
1. Hover the mouse cursor over the element that you want to add to your expression (expressions usually
start with an Input Column) and click the arrow that appears to its right.
2. Add Operators additional Input Columns and Functions as required.
To add operators to your expression, you can use the Operator tab on the left or the Operator
buttons located above the Build Expression pane or any combination of these.
Example:
To create an expression that combines the FirstName name and LastName columns, do the following:
Setup and User Guide - Qlik Compose, May 2022 184
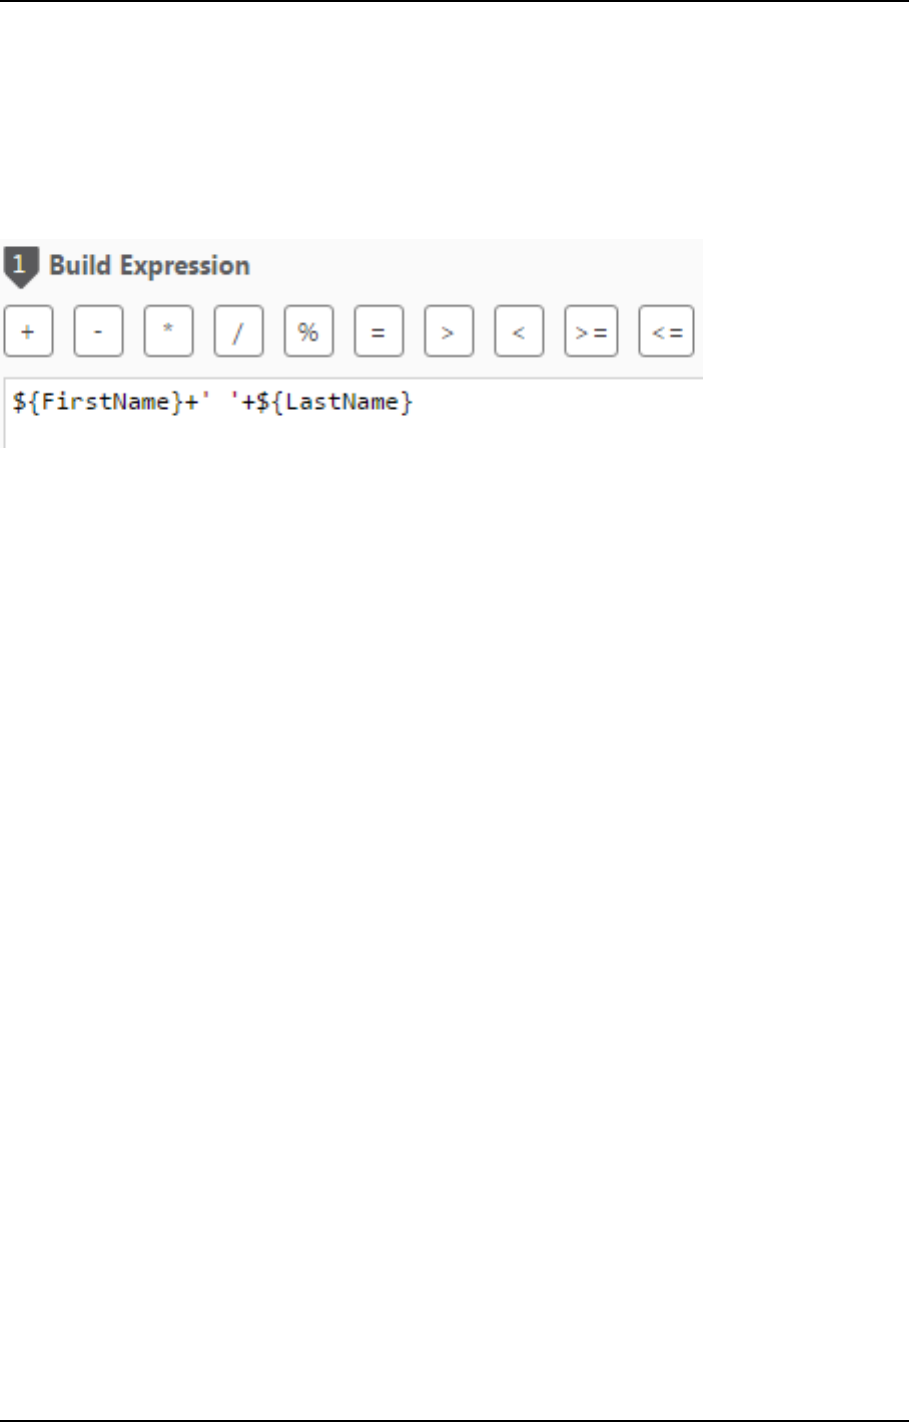
5 Data Warehouse projects
1. Add the FirstName Input Column to the Build Expression pane.
2. Assuming that Microsoft SQL Server is the data warehouse, in the Operator toolbar above the Build
Expression pane, click the concatenate (+) operator.
3. Then add a space between single quote characters and click the concatenate (+) operator again.
4. Add the LastName Input Column to the Build Expression pane.
The expression would look like this:
Parsing expressions
When you add operators to the expression, the expression’s parameters are usually added automatically to
the Parse Expression pane. However, when you complete your expression or edit it, you may need to parse
the expression see all of the parameters.
To parse the expression parameters:
l
Click the Parse Expression button below the Build Expression pane.
If the expression is not valid, a red error message will appear at the bottom of the Expression Builder window.
If the expression is valid, the expression parameters and attributes (Input Columns) will be displayed in the in
the Parse Expression pane. See Testing an expression (page 187).
Editing parameter names
By default, the parameter name is the same as the input column name. However, you can change the
parameter name as needed and then associate it with an input column. This is useful, for instance, when you
need to shorten attribute names. For example, EstimatedTimeOfArrival can be abbreviated to ETA.
To edit a parameter and associate it with an input column:
1. In the Parse Expression pane, edit the parameter name as required.
2. From the Attribute drop-down list, select the desired input column.
Testing expressions
You test your expression to check that results are as expected. The following figure is an example of an
expression that has been evaluated and tested.
Setup and User Guide - Qlik Compose, May 2022 185
5 Data Warehouse projects
Certain expressions may fail during runtime, even though clicking Test Expression in the Expression
Builder indicated that they were valid.
This is because clicking Test Expression runs a query whereas during runtime, the expression is run
as a sub-query. This issue arises partly because the rules that govern queries are slightly different
from the rules that govern sub-queries.
For example, a semi-colon (;) is allowed in a query but not in a sub-query.
Testing an expression that contains an analytic function will validate the syntax without actually
executing the function. Additionally, the test will only be performed on a single record.
Compose does not check the data types of columns used in an expression for compatibility. For
example, if a column of type integer is used in an expression for a column of type varchar, the
expression will not be executed successfully.
Setup and User Guide - Qlik Compose, May 2022 186
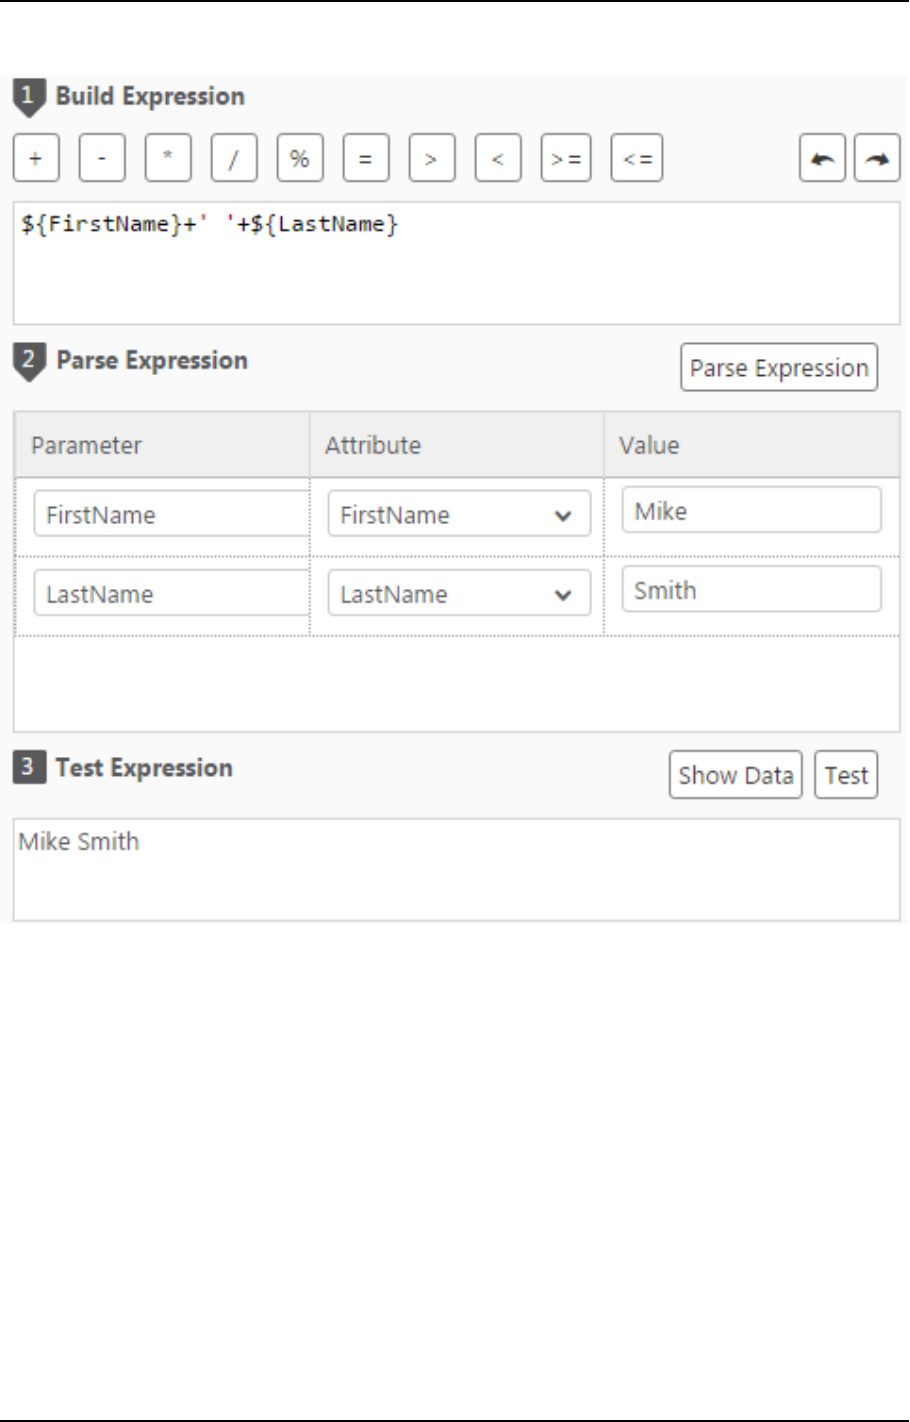
5 Data Warehouse projects
Testing an expression
To test an expression:
1. In the Expression Builder window, build an expression as described in Building expressions (page 184).
2. Click Parse Expression as described in Parsing expressions (page 185).
3. View the parameters that are displayed. If your expression is not valid, an error message is displayed.
4. Optionally edit the parameters name(s) as described in Editing parameter names (page 185).
5. Type values for each parameter and then click Test Expression to see the expression result.
For example, using the expression in Testing an expression (page 187), type Mike for FirstName and
Smith for LastName. The result displayed is Mike Smith.
6. This step is only available for transformations created in the Edit Mappings window. When you create
a transformation in the Edit Mappings window, an additional button called Show Data appears to the
left of the Test Expression button. You can click this button to see how your expression translates into
actual data.
Setup and User Guide - Qlik Compose, May 2022 187
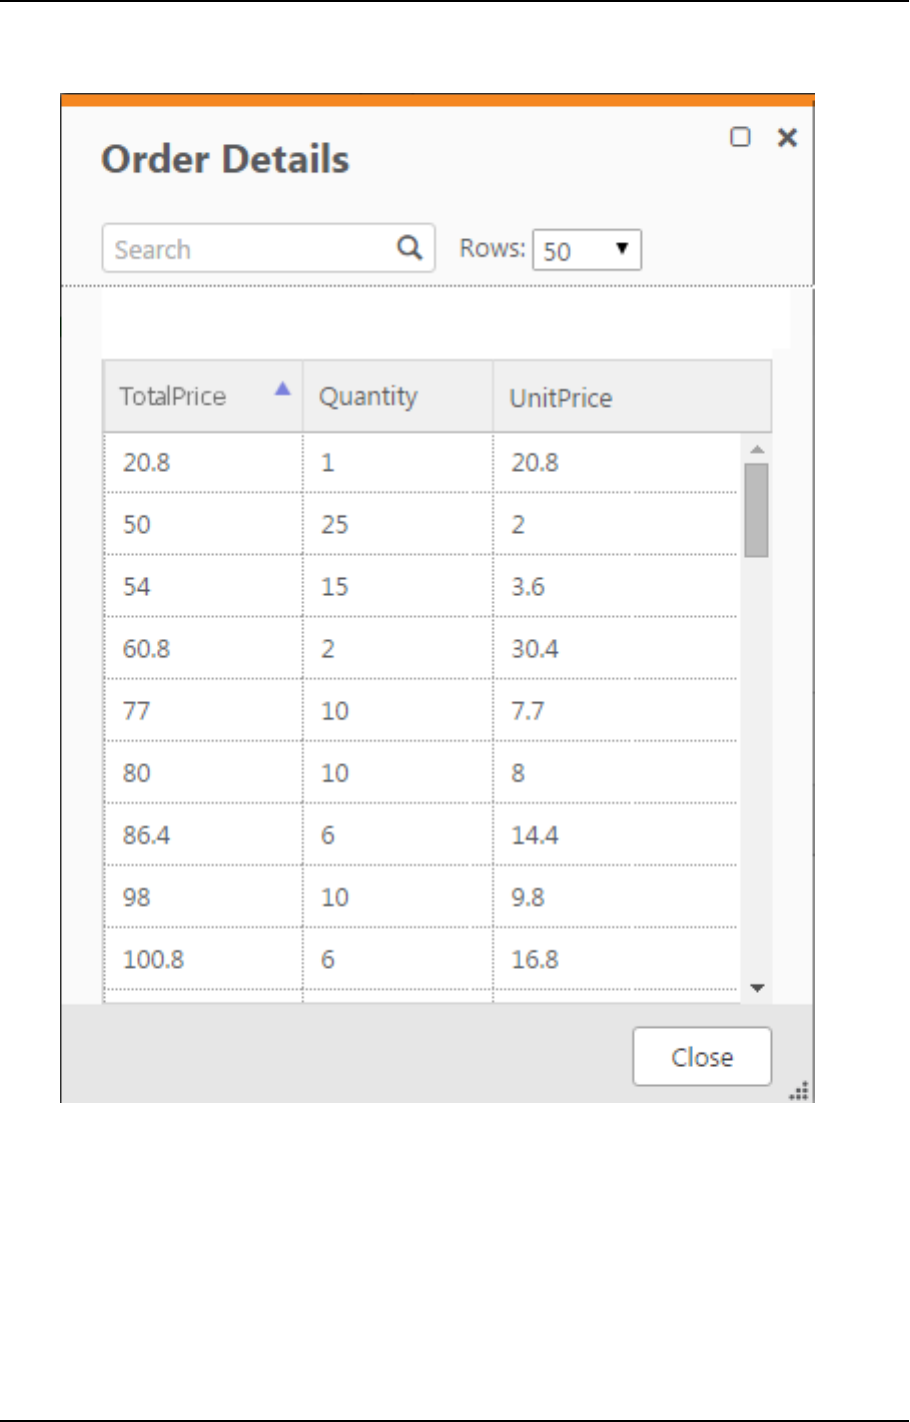
5 Data Warehouse projects
For example, clicking the Show Data button for the expression UnitPrice*Quantity will open the
following window.
For more information on the Edit Mappings window, see Editing column mappings (page 202) in
Creating and managing the data warehouse (page 190).
Defining reusable transformations
In a single Compose project there may be several processes that require similar data transformations. For
example a reusable transformation can be defined that concatenates first and last names. This transformation
could then be used both in the Customers mapping and in the Employees mapping.
Setup and User Guide - Qlik Compose, May 2022 188

5 Data Warehouse projects
As opposed to stored functions or procedures which are environment dependent, reusable transformations
are environment agnostic, meaning that not only can they be used as required within a Compose project, but
they can also be used across different environments (using Compose’s export/import function).
Centrally managed transformations increase efficiency by eliminating unnecessary duplication, while at the
same time, enabling the seamless propagation of changes to all transformation instances.
To define a reusable transformation:
1. From the drop-down menu in the top right of the Model panel, select Reusable Transformations.
The Reusable Transformations window opens.
The window is split into the following panes:
l
Upper pane - Lists the reusable transformations that have been defined.
l
Lower pane - Provides additional information about transformation instances such as where
they are in use (e.g. mappings, model, etc.) and the expression that was created using the
transformation.
Select a transformation to see the additional information.
2. Click the New Transformation toolbar button.
The New Transformation window opens.
1. In the Name field, specify a name for the transformation.
2. In the Category field, specify a category name. If the category name already exists it will be
displayed below the field when you start to type the name. To group the new transformation in
the same category, simply select the existing name (unless of course you wish to create a new
category with a similar name).
In the Expression Builder, transformations are grouped according to their category name,
making it easier to find the transformation you want to use. Therefore, when specifying a
category name, it is recommended to choose a name that reflects the purpose of the
transformation. For example, if you create several transformations that concatenate data, it
would make sense to group those transformations under a category called "Join".
3. To add a parameter to the transformation, click the New button to the right of the Parameters
heading.
A new row is added to the Parameters list.
4. Specify a name for the parameter, select an appropriate data type, and optionally provide a
description.
If you add multiple parameters, you can change a parameter’s position by selecting
the parameter and then using the Up/Down arrows (above the Parameters list) to
reposition it.
5. Click the Create Expression button below the Parameters list.
The Edit Transformation window opens.
6. In the Edit Transformation window, create an expression using the parameters you defined
earlier.
For information on creating expressions, see Creating expressions (page 181).
Setup and User Guide - Qlik Compose, May 2022 189
5 Data Warehouse projects
7. Click OK to save the transformation.
The transformation is added to the list in the upper pane.
Once a transformation has been defined, it will be available for selection as needed in the Expression Builder’s
Transformations tab.
For information on creating expressions, see Creating expressions (page 181).
Managing reusable transformations
You can manage reusable transformation as described in the table below.
To Do This
Delete a
transformation
Select the transformation and then click the Delete toolbar button. When prompted to
confirm the action, click OK.
If the transformation is in use, you first need to delete the transformation
instances.
Edit a
transformation
Double-click the transformation or select the transformation and then click the Edit
toolbar button. Continue as described in Defining reusable transformations (page 188).
Any changes you make to a transformation will be propagated to all
instances of that transformation.
Edit a parameter Open the Edit Transformation window as described in Defining reusable
transformations (page 188). Then, select the parameter you want to delete and click the
Delete button above the Parameters list.
Reusable transformation management options
5.7 Creating and managing the data warehouse
Once your model is set up properly, the next step in the Compose workflow is to create the data warehouse
tables, generate the task(s) and run the data warehouse task.
In this section:
l
Data warehouse tasks (page 191)
l
Managing tasks (page 201)
l
Viewing and exporting task statements (page 216)
l
Modifying task settings (page 217)
l
Validating the data warehouse (page 222)
l
Clearing the data warehouse metadata cache (page 224)
Setup and User Guide - Qlik Compose, May 2022 190

5 Data Warehouse projects
Data warehouse tasks
This section, describes how to create the data warehouse tables, generate the task and run a data warehouse
task. It contains he following topics:
l
How Compose handles missing references in the data warehouse (page 191)
l
Creating the data warehouse tables (page 192)
l
Generating the task (page 195)
l
Controlling data warehouse tasks (page 196)
How Compose handles missing references in the data warehouse
Before running a data warehouse task, it is important to understand how Compose handles missing
references. Missing references may be involve records that are simply missing or records whose arrival has
been delayed. The latter might occur if data is ingested from two different systems (for example, an ERP
system and a CRM system), with each system having its own task.
Handling an early-arriving fact:
If a record references another record which does not exist yet, then Compose will do the following:
l
Insert a placeholder for the missing reference record. The placeholder record will only include the
business key and surrogate key. The rest of the columns will be set to NULL.
The fact being processed can already include a valid reference to the surrogate key of the
reference record.
l
Document the missing record in the TLOG_REF_ERRORS_VALUES table. The TLOG_REF_ERRORS_VALUES
table contains the following columns:
l
RUNNO - The task run number.
l
RELATIONNR - An internal number that can be used by Qlik Support to determine the source
entity.
l
NO_RELATIONS - The number of missing references. For example, if Customer A ordered three
different items (from the Orders table) and Customer A is missing, this number will be three.
l
KEYVALUE1-20 - The missing record. Since the missing record is a Primary Key, which may
consist of several columns, there are 20 KEYVALUE columns.
Example:
If the "Orders" table references "SuperGlue" in the "Products" table, but "SuperGlue" does not exist in that
table, Compose will mark "SuperGlue" as a missing reference, insert a record with the key value "SuperGlue"
(assuming that the product name is the business key) to the "Products" table, and insert NULL values in the
remaining "Products" table columns.
When the missing reference eventually arrives, it will be mapped to the record created for it and the NULL
values will be replaced by the actual values.
Setup and User Guide - Qlik Compose, May 2022 191
5 Data Warehouse projects
If the record is defined as history type 2, the record with the NULL values will remain as a historical
record.
See also: Viewing missing references (page 262).
Creating the data warehouse tables
Compose create two types of data warehouse tables: staging tables (indicated by the TSTG prefix) and the
actual data warehouse tables (indicated by the TDWH prefix).
In addition, Compose automatically creates views for the TDWH tables in the following format:
<schema_name>.VDWH_<entity_name>[satellite_number_if_several]
Example:
dbo.VDWH_Customers02
For each entity, Compose creates a single view containing both the satellite data and the associated hub data
(or only the hub data if the entity has no satellites). If an entity has several satellites, then Compose will create
a view for each of the satellite tables. In such a case, the view name will be suffixed with the user-defined
satellite number as in the example above.
Compose for Data Warehouses adds RUNNO_INSERT and RUNNO_UPDATE columns to both the Data
Warehouse tables and the data mart tables. These columns contains the ETL task run number, which can be
used (in the Run Details window or in the Details tab) to find out more information about the task (e.g. the
number of rows updated or inserted per table). Note that in hub tables and type 1 dimensions, the RUNNO_
UPDATE number will usually be higher than the RUNNO_INSERT number as these tables do not contain any
history. In satellite tables or type 2 dimension tables however, the RUNNO_INSERT number and the RUNNO_
UPDATE number will always be the same as a new row is inserted for each update (i.e. history is retained).
Data Warehouse views that contain both hub and satellite data will contain two RUNNO_INSERT
and two RUNNO_UPDATE columns. The hub table RUNNO columns are appended with an "_H" (e.g.
RUNNO_INSERT_H) while the satellite table table RUNNO columns are appended with an "_S" e.g.
RUNNO_UPDATE_S).
To create the data warehouse tables:
1. Click the Create button in the bottom right of the Data Warehouse panel. The Creating Data
Warehouse window opens.
A progress bar indicates the current progress. For each stage of the Data Warehouse generation
process, a corresponding message appears in the Messages list.
Setup and User Guide - Qlik Compose, May 2022 192
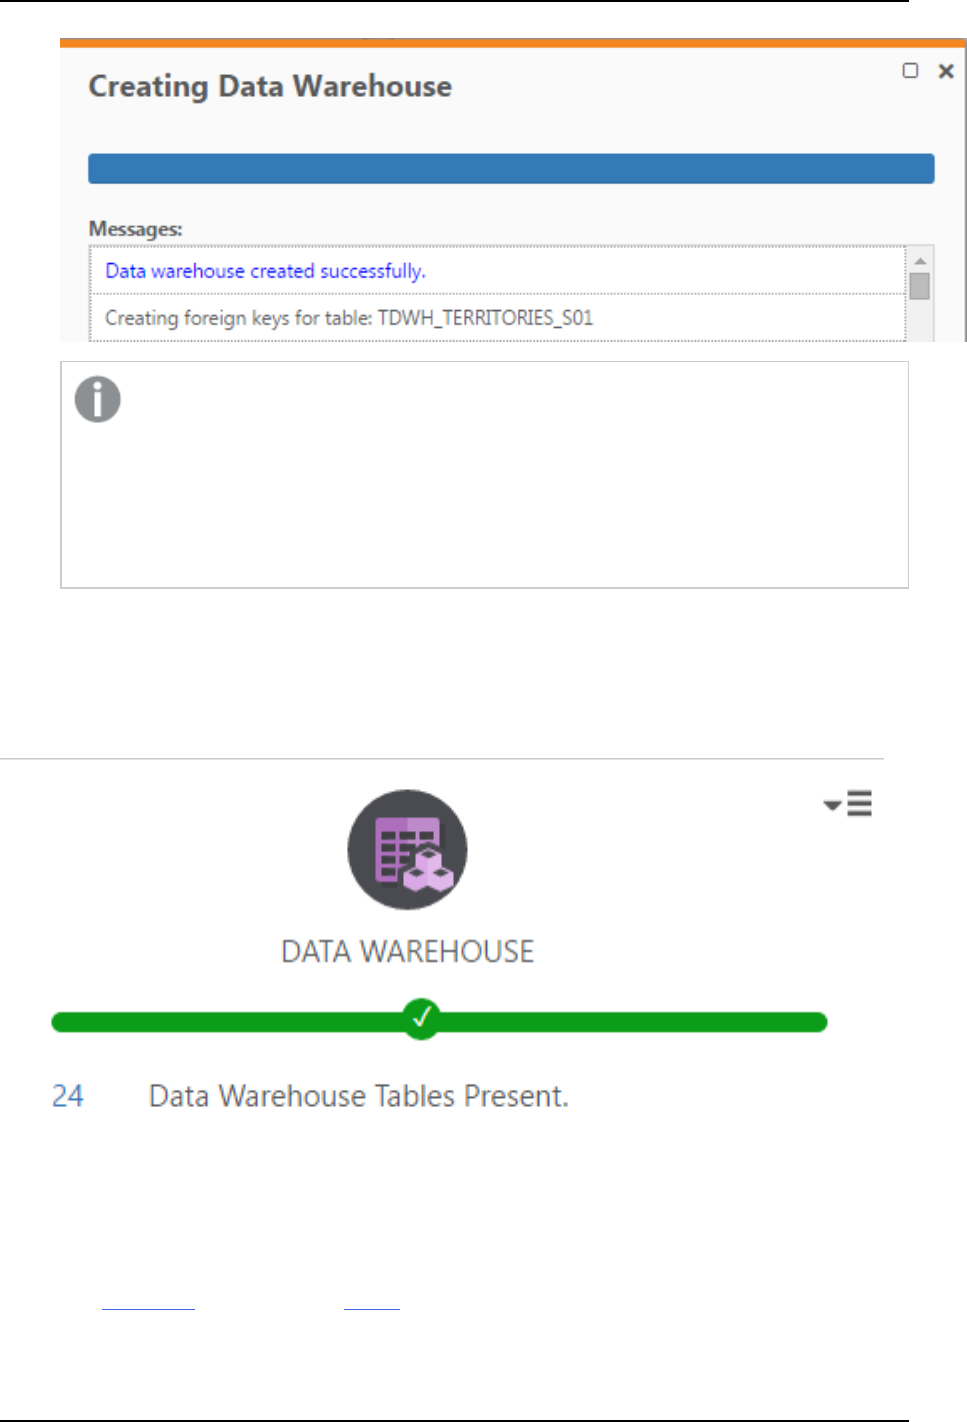
5 Data Warehouse projects
When creating table in a Microsoft SQL Server data warehouse, you may encounter the
following error:
Data warehouse creation failed. Error: Cannot create a row of size 11272
which is greater than the allowable maximum row size of 8060.
The statement has been terminated.
This is a well-documented Microsoft SQL Server limitation. To work around this limitation you
need to split the offending table(s) into smaller tables.
2. When the "Data warehouse created successfully" message appears, click Close.
Viewing the data warehouse tables
After the data warehouse tables are created, you can view them by clicking the number to the left of the Data
Warehouse Tables Present text in the Data Warehouse panel.
When you click the link, the Data Warehouse Tables window opens showing a list of all the tables in your
data warehouse.
Compose for Data Warehouses adds RUNNO_INSERT and RUNNO_UPDATE columns to both the Data
Warehouse tables and the data mart tables. These columns contains the ETL task run number, which can be
used (in the Run Details window or in the Details tab) to find out more information about the task (e.g. the
number of rows updated or inserted per table). Note that in hub tables and type 1 dimensions, the RUNNO_
Setup and User Guide - Qlik Compose, May 2022 193
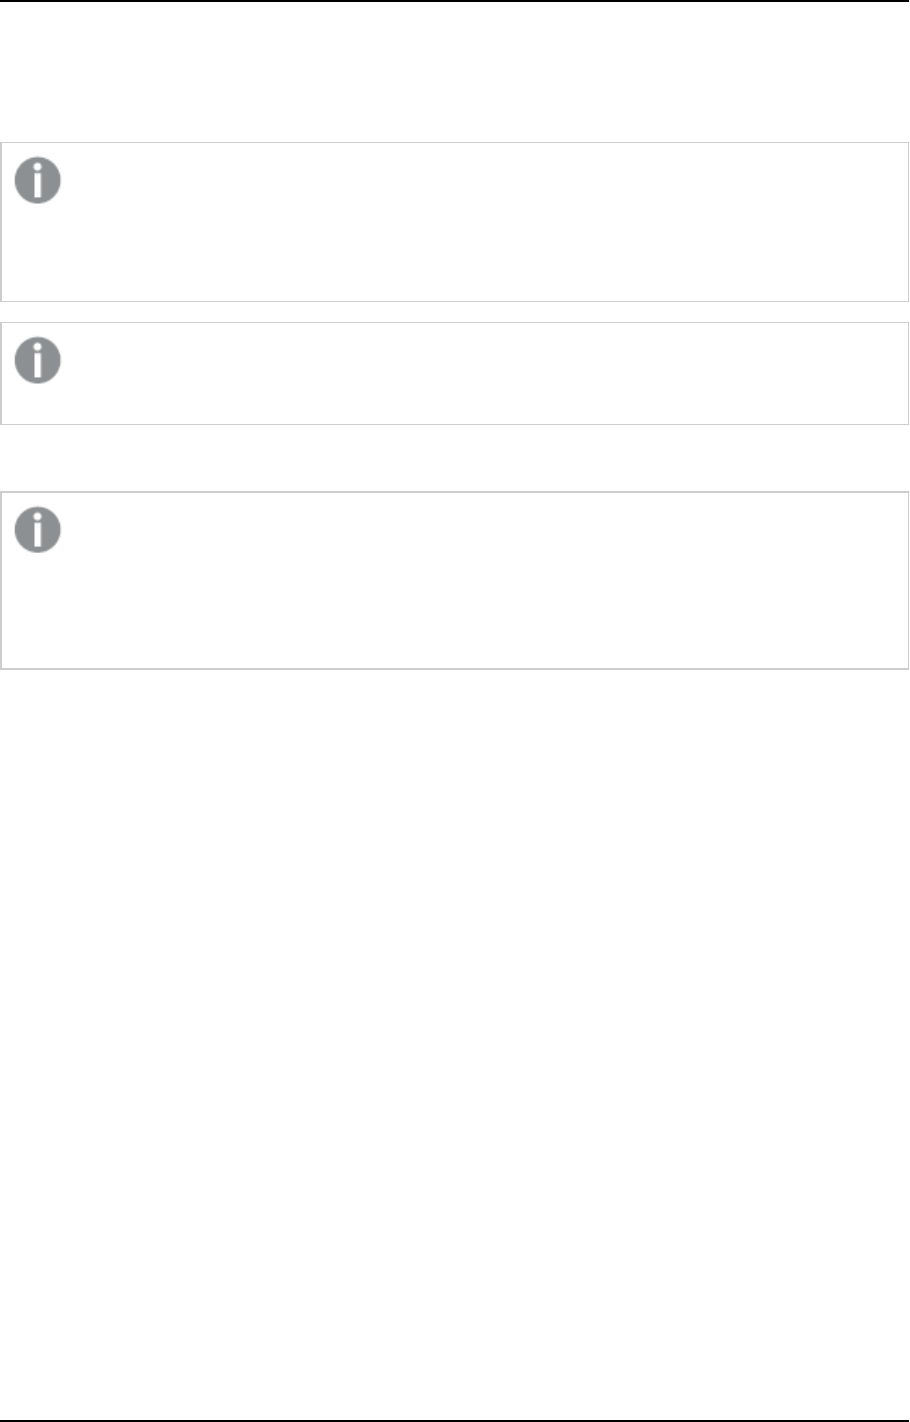
5 Data Warehouse projects
UPDATE number will usually be higher than the RUNNO_INSERT number as these tables do not contain any
history. In satellite tables or type 2 dimension tables however, the RUNNO_INSERT number and the RUNNO_
UPDATE number will always be the same as a new row is inserted for each update (i.e. history is retained).
Data Warehouse views that contain both hub and satellite data will contain two RUNNO_INSERT
and two RUNNO_UPDATE columns. The hub table RUNNO columns are appended with an "_H" (e.g.
RUNNO_INSERT_H) while the satellite table table RUNNO columns are appended with an "_S" e.g.
RUNNO_UPDATE_S).
In the data mart tables, the RUNNO_INSERT/RUNNO_UPDATE column names are prefixed by the
table name e.g. ORDERS_RUNNO_UPDATE.
To view a specific table, simply double-click the table.
Apart from the Date and Time tables which are automatically populated on creation, the other
tables will be empty until you run the data warehouse task.
See Controlling data warehouse tasks (page 196) below for information on running a data
warehouser task.
In the <Table Name> window, you can perform the following tasks:
l
Choose how many rows to display from the Rows drop-down list.
l
Click the Column Settings button to choose to choose which columns will be displayed and the order
in which they will be displayed.
Creating a Change Processing task
You can create a CDC task by duplicating the Full Load task. This is useful if you currently have a Full Load
task only and the need (which wasn't previously anticipated) arises to capture changes from all of the tables
or only from certain tables.
To do this:
1. Select the Full Load task in the left pane of the Manage Data Warehouse Tasks window and click the
Duplicate toolbar button.
2. In the Duplicate <ETL_Set_Name> window, set the following properties:
l
Task name - The name for the task (e.g. employees_changes).
l
Select a landing zone - Select the same landing zone as the Full Load task.
l
Schemas - Select the same schema as the Full Load task.
l
Task type - Select Change Tables.
3. To only apply changes to selected tables, in the Mappings column, select the tables whose changes
you want to apply to the data warehouse.
Setup and User Guide - Qlik Compose, May 2022 194
5 Data Warehouse projects
If you want to modify a column's mapping, the table name displayed in the left pane of the
Edit Mappings window will not be appended with the "__ct" suffix (which is the default
naming format for Replicate Change Tables). However, the changes will still be taken from
the associated Change Table.
For each Primary Key there is one record. Changing a Primary Key on the source record will
cause a new record to be inserted in the data warehouse.
4. Click Generate and wait for the task statements to be generated.
5. To capture the changes and apply them to the data warehouse, click Run.
Reloading data from the source tables to the Landing Zone
In cases of inconsistencies or when metadata from the source tables is not replicated to the Landing Zone,
you may need to reload the data.
To reload data from the source tables:
1. Run the Qlik Replicate Full Load replication task again.
2. Run the Compose for Data Warehouses Full Load storage task.
3. Continue running the existing Compose Change Processing task.
No duplicates are created, as Compose compares the records before adding them to the
Data Warehouse.
Records that should be deleted in the new Full Load task are not deleted nor marked for
deletion (soft delete).
Generating the task
After the data warehouse tables have been created, you then need to generate the task that will be used in
the data warehouse task. The task contains the Mappings ETL (which is automatically created) and any
custom ETLs that you have defined. If you need to make changes to the Mappings or define custom ETLs,
continue from Managing tasks (page 201) and Creating and managing custom ETLs (page 197) respectively.
To generate the data warehouse task:
1. Click the Manage button in the bottom left of the Data Warehouse panel. The Manage Data
Warehouse Tasks window opens.
2. If you have more than one task, in the left pane, select the task that you want to generate.
3. Do one of the following:
Setup and User Guide - Qlik Compose, May 2022 195
5 Data Warehouse projects
l
To generate the task with all validations, click the Generate toolbar button .
l
To generate the task with basic validations, click the inverted triangle to the right of the
Generate button and select Basic validations from the drop-down menu.
By default, Compose generates the task with all validations. However, when many expressions and
lookups are defined, generating with all validations may take a long time. In such a case, you can try
generating with basic validations instead. With basic validations, validations that may take a while
(such as those that access databases to verify the existence of columns used in expressions and
lookups), will be skipped.
The Generating task for <Name> progress window opens. When the "Generate task finished
successfully" message is displayed, close the window.
Only mappings selected in the Manage Data Warehouse Tasks window will be generated.
Controlling data warehouse tasks
Once the data warehouse tables have been created and the task has been generated, you can then proceed to
run the data warehouse task. The data warehouse task extracts data from the landing tables, loads it into the
staging tables, and finally loads the data into the data warehouse tables.
Ingesting a historical record deletes any history that is later than the ingested record. For example, if
a data warehouse contains the following historical records:
2012 - Boston
2014 - Chicago
2015 - New Jersey
Ingesting the record
2013 - New York
will delete the
2014
and
2015
records.
Data warehouse tasks can be run manually, scheduled to run periodically or run as part of a workflow. The
section below describes how to run a data warehouse task manually. For information on scheduling data
warehouse tasks or including them in a workflow, see Controlling and monitoring tasks and workflows (page
260).
Data warehouse tasks cannot run in parallel with data mart tasks. Data warehouse tasks that
update the same tables cannot run in parallel.
To run a data warehouse task:
1. Click the Manage button in the bottom right of the Data Warehouse panel. The Manage Data
Warehouse Tasks window opens.
2. If you have more than one task, in the left pane, select the task that you want to generate.
3. Click the Run toolbar button. The window switches to Monitor view and a progress bar shows the
current progress in terms of percentage.
Setup and User Guide - Qlik Compose, May 2022 196
5 Data Warehouse projects
You can stop the task at any time by clicking the Abort toolbar button. This may be necessary if you
need to urgently edit the task settings due to some unforeseen development. After editing the task
settings, simply click the Run button again to restart the task.
Aborting a task may leave the data warehouse tables in an inconsistent state. Consistency
will be restored the next time the task is run.
4. When the progress reaches 100% completed, close the Manage Data Warehouse Tasks window.
Other monitoring information such as the task details (i.e. the number of rows inserted/updated) and the task
log files can be accessed by clicking the Run Details and Log buttons respectively.
Once the data warehouse has been successfully loaded into the data warehouse tables, you can then proceed
to the final part of the Compose workflow - defining and populating data marts. For more information, see
Creating and managing data marts (page 225).
Creating and managing custom ETLs
In addition to the Mappings ETL, you can define custom ETLs as required. User-defined ETLs can perform a
number of useful operations such as defining specific transformations, gathering statistics, performing
cleansing, and filtering data.
Common Table Expressions (CTEs) are not supported as well as some special clauses.
To create a custom ETL:
1. Click the Manage button in the bottom left of the Data Warehouse panel. The Manage Data
Warehouse Tasks window opens.
2. Select one of the following tabs according to your needs:
l
Pre Loading ETL - to define an ETL that will manipulate the data before it is loaded from the
landing tables to the data warehouse staging tables. When enabled, the Pre-loading ETL will be
run even if there are no mappings or Replicate-generated source data associated with it, which
is particularly useful for customer wanting to perform transformations on data generated by
third-party tools.
l
Multi Table ETL - to define an ETL for multiple tables.
l
Single Table ETL - to define an ETL for a single table.
l
Post Loading ETL - to define an ETL that will be executed after the data has been loaded from
the staging tables to the data warehouse.
3. If you selected Single Table ETL, select an entity in the Entity column and then click the New button
above the Entity list. For Multi Table and Post Loading ETLs, just click the New button.
4. Specify a name for your ETL and then click OK.
If you selected Single Table ETL, the ETL is added as a link to the User Defined ETL column. If you
selected Multi Table ETL or Post Loading ETL, the ETL is added as a link in their respective tabs.
5. Click the link to open the Edit ETL Instructions window.
Setup and User Guide - Qlik Compose, May 2022 197
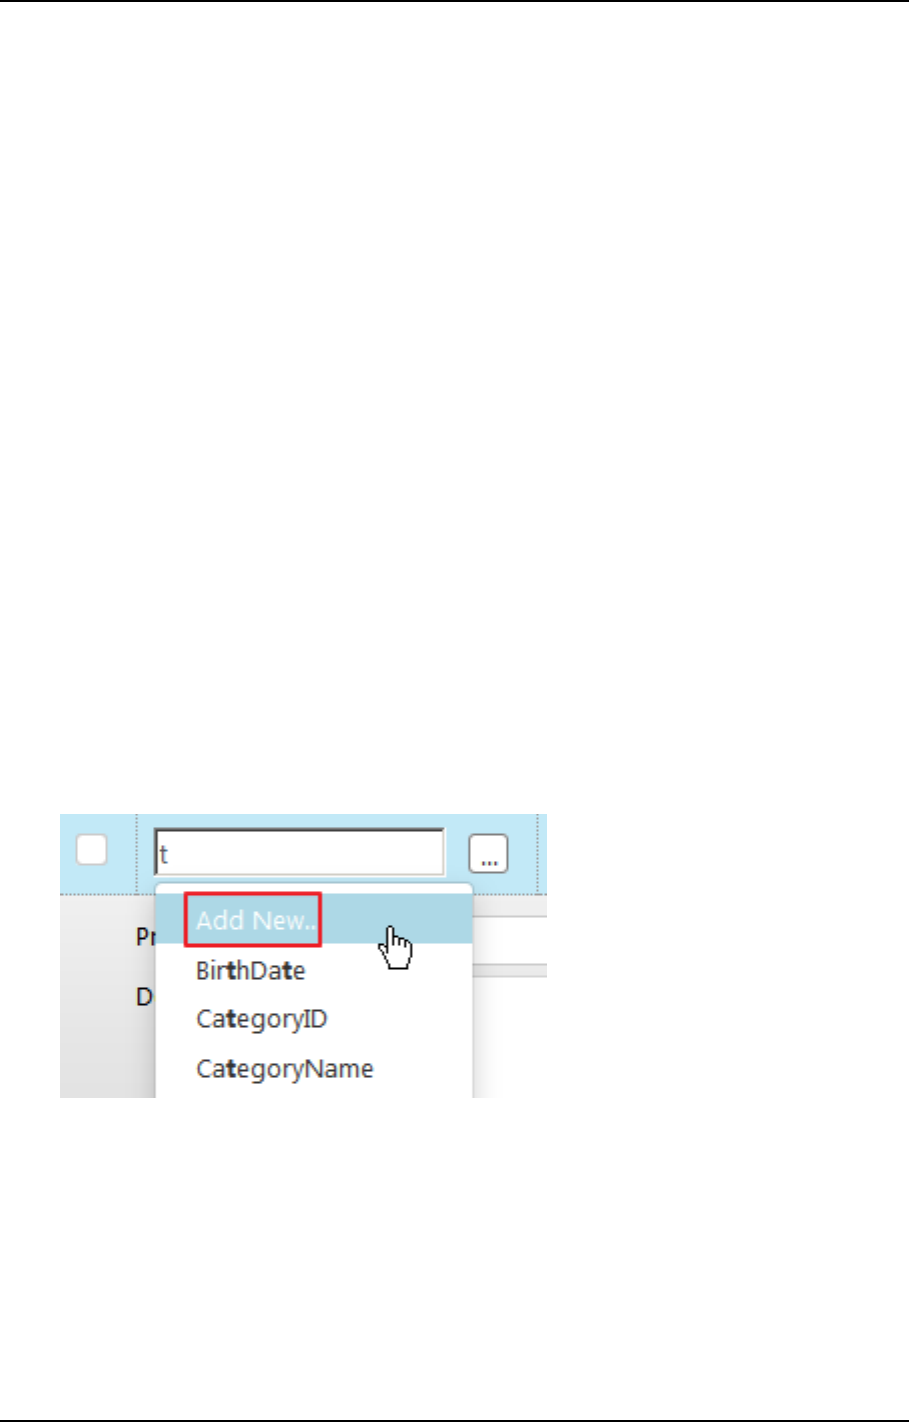
5 Data Warehouse projects
6. If you selected Single Table ETL, select a column and click the arrow to the right of the selected
column to add it to the ETL.
If you selected Multi Table ETL or Post Loading ETL, select a table and a column and then click the
arrow to the right of the selected table/column to add it to the ETL. Repeat as necessary.
7. Use the Select, Delete, Insert and Update toolbar buttons at the top of the window to add SQL
statements to your ETL.
8. To run the ETL as a stored procedure (that already exists in the data warehouse):
a. Select the Execute as Stored Procedure check box.
b. Click the Stored Procedure toolbar button.
c. Replace STORED_PROCEDURE with the name of your stored procedure and replace(PARAM1,
PARAM2) with any parameters that it needs. Note that parameters must be separated by a
comma. If no parameters are required, use empty parenthesis or drop them altogether.
9. Use the Undo, Redo and Reset buttons at the bottom of the window if needed.
10. Optionally, specify a description in the Description box at the bottom of the window.
11. To save your ETL, click OK.
Single table example
The following example, based on the Data warehouse project tutorial (page 107) in Getting started with Data
Warehouse projects (page 104), demonstrates how to concatenate two columns called "First Name" and "Last
Name" into a single column called "FullName".
1. Click the Manage button in the Model panel. The Manage Model window opens.
2. Select Employees from the Entities list on the left.
3. Click the + (plus) toolbar button to add a new Attribute. A new row is added to the Attributes table.
4. Type any letter in the Column Name column to bring up the "Add New" option. Click the "Add New"
option when it appears.
The New Attribute Domain window opens.
5. In the Name field, type FullName. From the Type drop-down list, select Varchar. In the Length field,
enter 100.
6. In the History column, select Type 1 from the drop-down list.
7. Click OK to close the New Attribute Domain window and add the attribute to the Attributes table.
8. Then click OK again (below the newly added attribute) to exit edit mode.
Setup and User Guide - Qlik Compose, May 2022 198
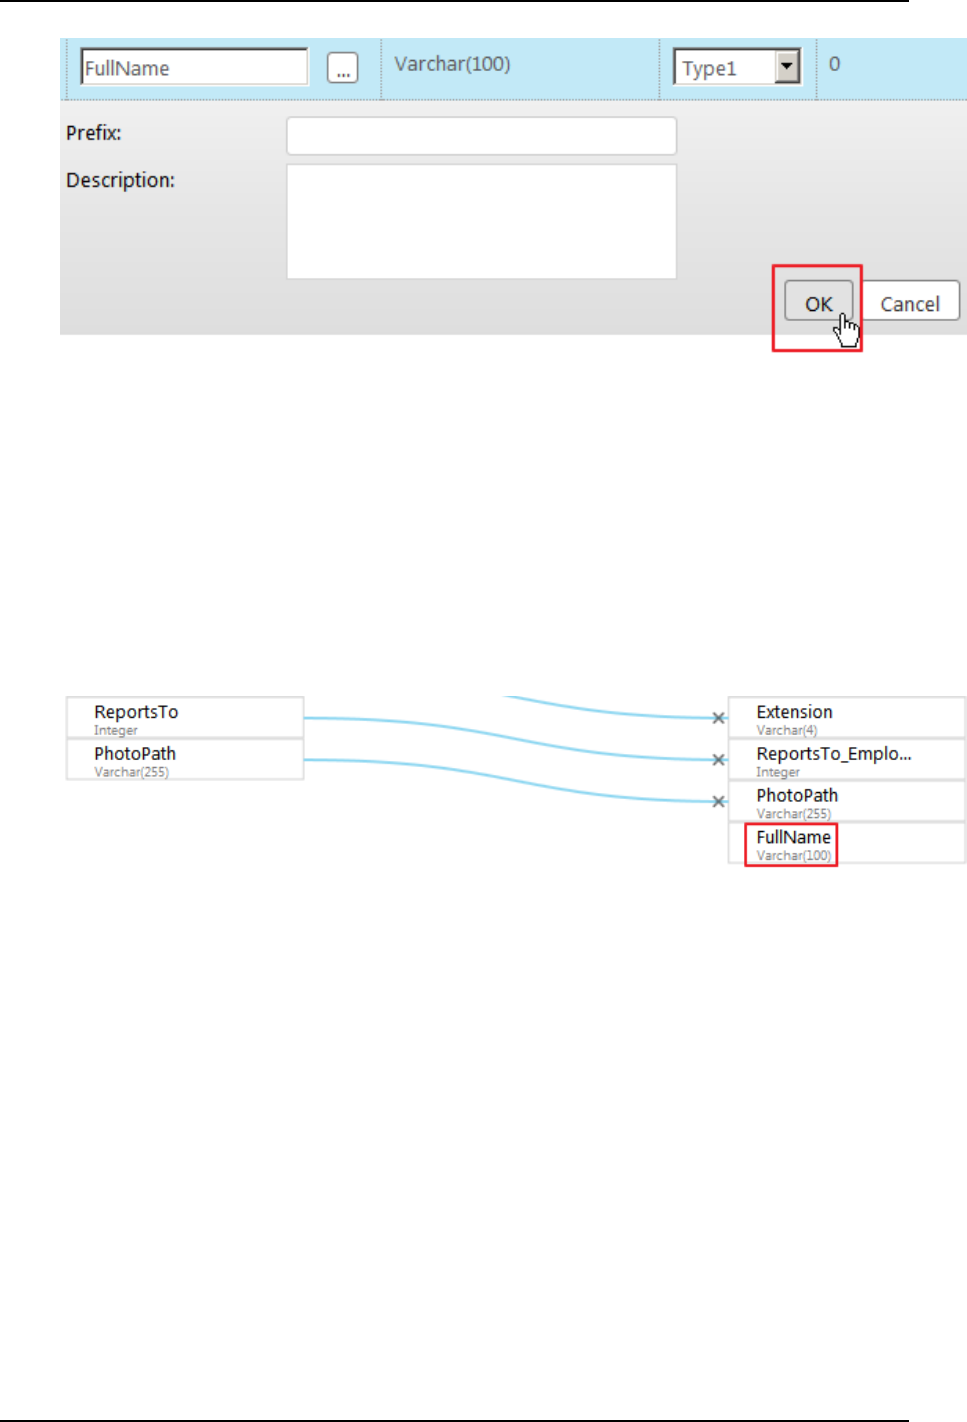
5 Data Warehouse projects
9. Close the Edit Model window.
10. In the Data Warehouse panel, click the Create button.
11. After the Data Warehouse tables have been created, close the Creating Data Warehouse window.
12. Click the Manage button in the bottom left corner of the Data Warehouse panel. The Manage Data
Warehouse Tasks window opens.
13. To view the current mappings between the source columns and data warehouse columns, click the
Map_Employees_1 link in the Mappings column. A "Processing" icon is displayed while the mappings
are generated. After the mappings are generated, the Edit Mappings - Map_Employees_1 window
opens automatically.
Note that the FullName column has been added to the data warehouse columns, but is currently not
mapped to the source columns.
14. The next stage is to define an ETL that will map the First Name and Last Name source columns to the
Full Name data warehouse column.
15. Close the Edit Mappings - Map_Employees_1 window and then select the Single Table ETL tab on
the left.
16. Select Employees in the Entity column and then click the New button above the column. The Add
New Single Table ETL window opens.
17. Specify a name or leave the default name and then click OK.
18. Click the Edit button (represented by a pencil icon) at the end of the Employees row. The Edit Single
Table ETL: <Name> window opens.
19. In the editing pane on the right, enter the following instruction:
UPDATE dbo.TSTG_EMPLOYEES set
FullName = LASTNAME + FIRSTNAME
20. Click OK to save the ETL and close the window.
Setup and User Guide - Qlik Compose, May 2022 199
5 Data Warehouse projects
After Compose has finished populating the Data Warehouse, you can open the table in
Microsoft SQL Server Management Studio and verify that the new column has been added
with the correct data.
Updating custom ETLs
Compose CLI requires Administrator permission. To grant Administrator permission, select "Run as
administrator" when opening the command prompt. All commands should be run from the Compose
bin directory (C:\Program Files\Qlik\Compose with a default installation).
You can update custom ETLs using the Compose CLI. This functionality can be incorporated into a script to
easily update Custom ETLs.
Syntax:
composecli update_custom_etls --project name --infolder path
Where:
l
project is the name of the project with the custom ETLs you want to update
l
infolder is the full path to the folder containing the custom ETL files
Example:
composecli update_custom_etls --project my-project --infolder
c:\Compose\CustomETLs
The file names in the input folder must be identical to the custom ETL names in the specified project.
Otherwise, an error will occur. The file extension (for example, .txt) is not important, but the file must
be in SQL format.
ETLexecution sequence
The execution sequence of ETL scripts in Data Warehouse projects should be taken into consideration when
writing and ordering the scripts. A proper understanding of the ETL execution order is important for
preventing errors, such as those resulting from actions being performed on objects that do not yet exist.
ETL scripts are usually executed in the following order:
Custom Pre-Loading (Source of data: landing tables)
↓
Mappings (Source of data: landing table)
↓
Multi Table ETL (Source of data: staging tables)
Setup and User Guide - Qlik Compose, May 2022 200
5 Data Warehouse projects
Whereas it's possible to define a single table ETL in the Multi Table ETL script, the advantage of
defining it as a single table ETL script is that it will be able to run in parallel with other tables.
↓
Single Table ETL (Source of data: staging tables)
↓
Post Loading ETL (Source of data: data warehouse tables)
Within each of the above groups, the scripts are executed according to their numeric order (from lowest to
highest), which is set by the user-defined Sequence Number. The execution order of several scripts in a group
with the same sequence number will be random.
Managing tasks
a task contains the mappings between the columns in the landing zone tables and the columns in the logical
entities. The same mappings can be used by several tasks. You can create new tasks, duplicate tasks and edit
existing tasks as required.
The following options are available:
l
Adding and duplicating tasks (page 201)
l
Editing column mappings (page 202)
l
Creating and managing custom ETLs (page 197)
You must regenerate the task and then run a data warehouse task whenever the mappings are
modified or whenever custom ETLs are added or modified. Populating the data warehouse can
either be done manually as described in Controlling data warehouse tasks (page 196) or
automatically as described in Scheduling tasks (page 264).
If you have already run the data mart tasks, then you also need to regenerate the data mart ETLs
and run the tasks again as described in Creating and managing data marts (page 225).
Adding and duplicating tasks
As the default tasks are generated automatically, there is usually no reason to manually create or duplicate a
task. An exception to this is if you import your model from ERwin without first defining global mappings. In
such a case, you will need to manually add the task and create the mappings.
For more information on global mappings, see Managing global mappings (page 160).
One possible reason to duplicate a task is if your model contains different types of tables and you want to
manage them in separate ETLs.
Setup and User Guide - Qlik Compose, May 2022 201
5 Data Warehouse projects
Adding a new task
To add a new task:
1. Click the Manage button at the bottom left of the Data Warehouse panel. The Manage Data
Warehouse Tasks window opens.
2. Click the New toolbar button. The Add New task window opens.
3. Specify a name for the task and then click OK.
Task names cannot contain the following characters: /\,&#%$@=^*+"'`~?<>:;[]{} as well as all
non-printable characters (below 0x20). The task name can contain a single dot, but it cannot
be the first or last character.
4. Select the task name in the left pane and continue from Editing column mappings (page 202).
Duplicating a task
To duplicate an existing task:
1. Click the Manage button at the bottom left of the Data Warehouse panel. The Manage Data
Warehouse Tasks window opens.
2. Select the task you want to duplicate and then click the Duplicate toolbar button. The Duplicate
window opens.
3. Specify a Name for the new task.
4. Select a Landing Zone.
5. Optionally change the default Schema.
6. Select one of the available task types.
Do not select a task type that conflicts with you Replicate task. For instance, do not select
Change Tables Only if your Replicate task is Full Load only.
7. Click OK.
8. Select the task name in the left pane and continue from Editing column mappings (page 202).
Editing column mappings
The mappings show the current mapping between the landing zone tables and the logical entities. By default,
the columns names and data in the source tables and the logical entities will be identical. However, you can
manually change the mappings according to your needs, either by simply mapping a source column to a
different data warehouse column and/or by using an expression.
Setup and User Guide - Qlik Compose, May 2022 202

5 Data Warehouse projects
To edit column mappings:
1. Click the Manage button in the Data Warehouse panel.
2. In the Manage Data Warehouse Tasks window, select the Mappings tab. Each of the logical entities
has a corresponding mapping name.
3. In the Mappings column, click the mapping that you want to edit. The Edit Mapping: Name window
opens.
4. Edit the mapping as described below.
Mapping a landing zone table column to a staging area table column
The mapping procedure differs depending on whether you are in Standard View or Compact View.
For information on changing the view, see Changing the view (page 204).
In Standard View:
1. Hover the mouse cursor over the source column name as shown in the image below. A gray dot
appears to the right of the column name.
2. Drag the mouse cursor from the gray dot to the desired column in the logical entity.
3. When the dotted line turns green (as shown below), release your mouse button.
Note that if the dotted line turns red (instead of a green), you will not be able to map the source
column with the desired data warehouse column. A red dotted line indicates that the source and data
warehouse column data types are incompatible with each other.
In Compact View:
1. Switch to Compact View as described in Change the view.
2. Drag the source column to the cell located to the left of the target data warehouse column.
Setup and User Guide - Qlik Compose, May 2022 203

5 Data Warehouse projects
Auto-generating mapping
Click the Auto-Map toolbar button.
Removing all mappings
Click the Reset toolbar button.
Changing the view
To change the view, click the Change View toolbar button.
Changing to a more compact view is recommended for sources tables that have numerous columns. In
compact view, the table columns are organized in rows (instead of a single list), making it easier to locate
source columns and map them to the desired data warehouse columns. You can also use the search box to
filter out all columns that do not match the search string.
For information on creating mappings in Compact view, see Map a column in a landing zone table to a column
in a staging area table.
Selecting a different source database
Select a database from the Landing Zone Database drop-down list on the left of the window.
Selecting a different source schema
Select a schema from the Schema drop-down list on the left of the window.
Changing the entity type
Select Table, View or Query on the left of the window. If you choose the Query option, see also Define a
custom query.
Defining a custom query
When the entity type is set to Query, you can set a custom select query instead of using the existing source
tables/views.
To set a query:
1. Click the Set Query button. The Edit Mapping Select Query: <Mapping Name> window opens.
2. Hover the mouse cursor over a table and/or a column and then click the arrow to the right of the
highlighted table/column to add it to the Query.
3. Use the Select button at the top of the window to add select statements to your query.
Optionally use the Undo, Redo and Clear buttons as required.
4. Click OK to save your settings and close the window.
The query results will be displayed on the left of the Edit Mappings: <Name> window.
Selecting a different table
Select a table from the Table Name drop-down list on the left of the window.
Seeing the data of a selected table
Select a source table and then click the Show Source Data button on the left of the window.
Setup and User Guide - Qlik Compose, May 2022 204

5 Data Warehouse projects
Creating a table-level transformation (Filter)
1. Click the Filter toolbar button in the Edit Mappings:Name window. The Expression Builder opens.
2. Continue from Opening the expression builder (page 182).
When creating a filter for a table, the expression should return 1 for data that you want to
include and 0 for data that you want to exclude.
The filter will be applied after any Data Cleansing rules that are defined.
Updates to records excluded by a filter (even for records previously included by the filter) are
not processed while the records are filtered out. Updating of filtered out records would only
resume if the record(s) once again met the filter-in condition, but any changes made while
the records were filtered out would be lost.
Creating a column-level transformation
1. Hover the mouse cursor over the data warehouse column for which you want to create a
transformation and then click the fx button that appears to its right. The Expression Builder opens.
2. Continue from Opening the expression builder (page 182).
Adding, deleting and renaming mappings
You can add, rename and delete mappings as required. For example, if you want one of the logical entities to
contain columns from several tables in the landing zone, then you need to add a new mapping for each of the
landing zone tables.
When mapping "From Date" columns in the Landing Zone to the "FD" Staging column, make sure
that the dates in the Landing Zone columns are not earlier than the "Lowest Date" set in the Project
Settings. Otherwise, any data with a "From Date" earlier than the "Lowest Date" will be ignored.
If some of the dates in the Landing Zone column are earlier than the "Lowest Date" and cannot be
changed in the source, either change the "Lowest Date" set in the Project Settings - or - use a
transformation in Replicate to convert the source dates to dates that are within"Lowest Date" to
"Highest Date" range defined in your project.
To add, delete, and rename mappings:
1. Click the Manage button in the Data Warehouse panel. The Manage Data Warehouse Tasks window
opens.
2. In the left pane, select the task you want to add, delete, or rename.
3. Select the Mappings tab.
Setup and User Guide - Qlik Compose, May 2022 205

5 Data Warehouse projects
Adding a new mapping
To add a new mapping:
1. In the Logical Entities column, select the logical entity that you want to map.
2. Click the New button above the Logical Entities column. The New Mapping window opens.
3. Optionally change the default mapping name.
4. Click OK to save the mapping.
5. Enable the mapping.
Deleting a mapping
To delete a mapping:
1. In the Mappings column, hover the mouse cursor over the mapping you want to delete.
2. Click the Delete (x) button that appears to its right.
3. Click OK when prompted to confirm the deletion.
Renaming a mapping
To rename a mapping:
1. In the Mappings column, hover the mouse cursor over the mapping you want to rename.
2. Click the Rename (A) button that appears to its right. The Rename window opens.
3. Specify a new name for the mapping and then click OK.
Handling duplicate business keys
When two or more records in the data source have the same business key, you can select the Handle
Duplicates check box to prevent an error from occurring when the data warehouse task is run. When this
check box is selected, Compose will only add one of the records to the data warehouse.
Since Compose randomly chooses which record to add to the data warehouse, you may want to run
a data warehouse task first to see if there are any duplicate record errors. In the event that there
are, you can then modify the data source to remove records that have the same business key.
You should also select the Handle Duplicates check box in the following situations:
l
The Data Warehouse task type is either Full Load and Change Tables or Change Tables Only.
This is because the Change Tables may contain two records with the same business key: The old
record and the updated record. When the Handle Duplicates check box is selected, the updated
record will always be inserted/updated to/in the data warehouse.
l
When a single table in the data warehouse is derived from multiple landing zone tables, the same
business key will be set for each of the mappings. To prevent an error for occurring, you need to select
the Handle Duplicates check box.
Setup and User Guide - Qlik Compose, May 2022 206
5 Data Warehouse projects
Handling null updates
The default handling of null updates is set in the Advanced tab of the Settings - <ETL_Set_Name> window.
For each mapping, you can override the specified default.
To do this:
1. In the Manage Data Warehouse Tasks window, select the desired mapping.
2. Click the Null Updates toolbar button.
3. Select one of the available options. For a description of the options, see Handling Null Updates.
Using lookup tables
Lookup tables are useful for replacing source data with the actual data that you want to appear in the data
warehouse. For example, a lookup table could be used to replace a zip code with a full address or, conversely,
to replace a full address with a zip code.
To link a lookup table column to a logical entity column:
1. Click the link to the desired task in the Data Warehouse panel. The Manage Data Warehouse Tasks
window opens.
2. In the Mappings column, click the mapping for the logical entity containing the result column (with the
data that you want to replace). The Edit Mapping - Name window opens.
3. Hover the mouse cursor over the relevant data warehouse column and then click the Lookup button
that appears to the right of the column name. The Select Lookup Table window opens.
a. From the Database drop-down list, select the database containing the lookup table.
The database must reside in your data warehouse.
b. From the Schema drop-down list, select the schema containing your source lookup tables.
c. Select either Table or View according to the lookup table type.
d. From the Table drop-down list, select the lookup table.
The right side of the Select Lookup Table window displays the lookup table columns and their
data types. To view the data in the lookup table, click the Show Lookup Data button.
e. After you have selected the lookup table, click OK.
4. After selecting the lookup table, the Lookup Transformations - Table Name.Column Name window
opens. The window is divided into the following panes:
l
Upper pane: The upper part of the right pane (Condition) displays the condition expression,
which stipulates the condition(s) for performing the lookup.
l
Lower pane: The lower part of the right pane (Result Column) displays the column result
expression, which stipulates what data to replace in the target column.
5. To change the lookup table, click the Change Lookup Table button above the lookup table columns
and then perform steps a. to d. above.
6. To view the lookup table or landing table data, click the Show Lookup Data or Show Landing Data
buttons respectively.
Setup and User Guide - Qlik Compose, May 2022 207
5 Data Warehouse projects
7. To specify condition(s) for performing the lookup, click the Create Expression button (which changes
to Edit Expression after an expression has been created) above the Condition expression. The
Condition Expression - Column Name window opens.
You can create an expression using the landing and lookup table columns on the left.
For an example, see Lookup example (page 209). For information on creating expressions, see Creating
expressions (page 181).
8. To specify what data to replace or add if the lookup conditions are met, click the Create Expression
button (which changes to Edit Expression after an expression has been created) above the Result
Column expression. The Result Expression - Column Name window opens.
You can create an expression using the landing and lookup table columns on the left.
For an example, see Lookup example (page 209). For information on creating expressions, see Creating
expressions (page 181).
9. To preview the results, click the Preview Results button.
10. Click OK to save your settings and close the Lookup Transformations - Table Name.Column Name
window.
Using lookup tables that do not have a task for CDC mapping
When the Store Changes option is enabled in the Replicate task, Replicate creates Change Tables in the
landing zone. These tables contain only the changes to the original data. The Compose task CDC task reads
the changes from Change Tables and applies them to the target tables. However, if the landing zone contains
dedicated lookup tables (i.e. tables that are not associated with any Compose task), Compose will not be able
to apply changes to these tables.
There are two ways of handling such a scenario, both of which are described below.
Method 1
Define another Replicate task with the Apply Changes replication option enabled.
Method 2
1. Discover the landing site and add all the lookup tables to the Compose model without any relation
to/from other entities.
2. Either, define lookups from the data warehouse hub tables to the newly added entities.
OR
Create relationships from the data warehouse hub tables to the newly added entities.
Creating relationships may not be a viable option when the lookup tables are complex.
3. Define a new data warehouse Change Tables Only task that updates the lookup tables.
4. Ensure that the new task runs before the data warehouse task.
The advantage of this method is twofold: a.) All the tables used in the mappings are managed by Compose,
and b.) Only one Replicate task needs to be defined (which also means that the database transaction logs are
read only once). The disadvantage is that you need to ensure that the task that updates the lookup entities
always runs before any data warehouse task.
Setup and User Guide - Qlik Compose, May 2022 208

5 Data Warehouse projects
Lookup example
The following example shows how a lookup table is used to concatenate a Dutch translation of the category
name (located in the lookup table) to the original category name located in the landing table.
The lookup could be defined using the following expressions:
1. Condition expression: ${Lookup.CategoryID}=${Landing.CategoryID}
Meaning: Perform the lookup only if the Category ID in the landing table and the lookup table are the
same.
2. Result column expression: ${Lookup.CategoryName} + ’is’ + ${Landing.CategoryName}
Meaning: Add the data in the CategoryName column in the lookup table to the data in the
CategoryName column in the landing table (separated by the word "is").
Example:
Assuming the result column name is "Split Name", clicking the Preview Results button would display the
following table:
Split Name
Category Name
(Lookup)
Category Name
(Landing)
Category ID
(Lookup)
Category ID
(Landing)
dranken is Beverages dranken Beverages 1 1
Specerijen is
Condiments
Specerijen Condiments 2 2
Gebak is Confectionary Gebak Confectionary 3 3
Zuivelproducten is Dairy
Products
Zuivelproducten Dairy Products 4 4
Grains/Granen is
Grains/Cereal
Grains/Granen Grains/Cereal 5 5
Vlees/Gevolgete is
Meat/Poultry
Vlees/Gevolgete Meat/Poultry 6 6
Example table output
Dropping and recreating tables
You can drop and recreate tables in your data warehouse as required. If you change the model after the data
warehouse tables have already been created and loaded with data, you should adjust the data warehouse to
reflect the modified model (as described in Validating the data warehouse (page 222)). Some changes however
cannot be resolved by adjusting the data warehouse. In such cases, you can either revert the model to its pre-
modified state or drop and (optionally) recreate the data warehouse tables.
Note that dropping and recreating tables will delete all of the data in the tables and should only be performed
in lieu of a better option.
Setup and User Guide - Qlik Compose, May 2022 209
5 Data Warehouse projects
In some scenarios, you need to edit the CREATE table statements before they are run. This can be
done using the Generate DDL scripts but do not run them in Project settings (page 40). For example,
if your data warehouse tables contain partitions, you will need to edit the script to maintain the
partitions.
To drop and recreate tables:
1. In the Data Warehouse panel, select the Drop and Recreate Tables item from the menu in the top
right corner. The Drop and Recreate Tables window opens.
2. You can select to drop and/or recreate one or more of the following tables:
l
Data Warehouse & Data Marts - The data warehouse tables are derived from the model
whereas the data mart tables are derived from the data warehouse tables.
l
Logging - These tables are generated when the task runs and contain logging information. By
default, these tables are prefixed with the string "TLOG".
l
Intermediate - These tables are temporary tables that are created when the task runs. By
default, these tables are prefixed with the string "TTMP".
Intermediate tables are created dynamically and therefore cannot be recreated.
l
Error Mart - These are the data mart exception tables. Data that is rejected by data quality
rules will be copied to tables in the specified error mart schema. See also Error Mart.
l
Archive Tables - These are the tables that are created when the option to archive Change
Tables after the changes have been applied (to the data warehouse tables) is selected. For
more information, see Defining landing zones (page 140)
3. Click OK to perform the drop and/or recreate operation.
Data profiling
Data profiling is an analysis of the candidate data sources for a data warehouse to clarify the structure,
content, relationships and derivation rules of the data. In short, data profiling helps you understand your data
and model it correctly.
Qlik Compose enables you to profile the data in the landing zone tables before it is loaded into the data
warehouse. If you discover a problem with certain data, then you can either manually adjust the source tables
or create a rule for handling the data in question.
To profile the data:
1. Click the Manage button at the bottom of the Data Warehouse panel.
2. In the Manage Data Warehouse Tasks window, click the link in the Mapping column for the table you
want to profile.
3. In the Edit Mappings - <Name> window, click the Data Profiler toolbar button. The Profile <Table
Name> (Landing Zone) window opens. The following columns are displayed:
Setup and User Guide - Qlik Compose, May 2022 210

5 Data Warehouse projects
l
Column Name - The name of the table column
l
Nulls - The number of null values in the column
l
Count - The number of rows in the column.
l
Count Distinct - The number of unique rows in the column.
l
Duplicates - The number of duplicate values in the column.
Note that although Compose calculates the number of duplicate values by subtracting Count
Distinct from Count, the actual number of records displayed when you click the Duplicates
number will be higher. This is because Compose has no way of knowing which of the records
that share the same column value are legitimate duplicates (if any). It therefore displays all
records that share the same value so you can decide which of them to delete (if any).
For example, in the Employees table, there may be several employees that live in London (the
City column). Therefore duplicates of "London" are perfectly acceptable. However, two
employees with the same phone number and a different address, for example, may indicate
that the phone number in one of the records was entered incorrectly.
Duplicate values are quite common and usually do not indicate a problem. Where this feature is
particularly useful however, is for detecting duplicate Primary Key candidate columns.
l
Data Type - The column data type
l
Max - The highest data value
l
Max Length - The longest data value
l
Min - The lowest data value
l
Min Length - The shortest data value
4. For more information about a value, click the link in the column. A window opens showing the record
(s) containing the value. To add a Data Quality rule, click the Data Quality button and continue as
described in Defining and managing data quality rules (page 211).
5. To only show columns that are mapped to a logical entity column, select the Only show mapped
columns check box.
6. To change the number or rows sampled, select a different value from the Rows to sample drop-down
list. Note that the table may contain less rows than the selected value. The Sampled records value is
the actual number of rows sampled.
7. To see all the table data, click the Show Data button.
The table's Full Load data will always be shown, even for a mapping in a Change Processing
(CDC) task.
8. To recalculate the data, click the Recalculate button. This is useful if the data in the landing zone
tables is being constantly updated (for example, due to a Replicate Change Processing task).
9. To search for a particular value, start typing the value in the Search box. Only values that match the
search term will be shown.
Defining and managing data quality rules
There are many definitions of data quality but data is generally considered high quality if, "they are fit for their
intended uses in operations, decision making and planning." (Tom Redman<Redman, T.C. (2008). With
Compose, the data must be "fit" for use in a data mart.
Setup and User Guide - Qlik Compose, May 2022 211

5 Data Warehouse projects
Compose provides two ways of ensuring data quality: Data validation and data cleansing. As opposed to data
validation which usually results in data being rejected, data cleansing provides a means of replacing,
modifying, or deleting incomplete, incorrect or inaccurate data.
Data that is rejected by a rule will be copied to Error Mart tables in the Error Mart schema defined in the
Landing Zone database settings.
Details about rejected data can be viewed in the monitor's Error Mart tab. For more information, see Viewing
information in the monitor (page 260).
Defining data cleansing rules
Qlik Compose enables you to define data cleansing rules for each of a table’s columns. Each rule consists of a
data validation condition and a cleansing process that is performed as required (i.e. if the data is not valid).
Data Cleansing rules will be applied before any filters that are defined.
To add a rule:
1. Click the Manage button at the bottom of the Data Warehouse panel.
2. In the Manage Data Warehouse Tasks window, click the link in the Mapping column for the relevant
table.
3. In the Edit Mappings - <Name> window, click the Data Quality toolbar button. The Data Quality
Rules - <Table Name> window opens.
4. To add a new rule, click the New toolbar button. A row is added to the rules table.
5. In the Name column, specify a name for the rule.
6. From the drop-down list in the Column column, select the column to which the rule will be applied.
7. Hover the mouse-cursor over the Condition column and then click the fx button that appears on the
right.
8. In the Edit Condition Rule window, create a condition (using an expression) that the data in the
column must meet in order to be considered valid. For more information on creating expressions, see
Opening the expression builder (page 182).
See also Simple Example Rule (page 213) below.
9. From the drop-down list in the If Condition is False column, select Cleanse Silently.
10. Hover the mouse-cursor over the Correction column and then click the fx button that appears on the
right.
11. In the Edit Correction Rule window, create an expression to cleanse the data. For more information
on creating expressions, see Opening the expression builder (page 182).
See also Simple Example Rule (page 213) below.
12. In the Description column, enter a description for the rule.
13. In the Enabled column, select or clear the check box to enable (the default) or disable the rule
respectively.
Setup and User Guide - Qlik Compose, May 2022 212

5 Data Warehouse projects
Simple Example Rule
The condition expression on the left stipulates that the product ID number must be less than 100. If it is
greater than or equal to 100, the data will be corrected using the expression on the right.
${ProductID} < 100 ${ProductID} - 100
Defining data validation rules
Qlik Compose enables you to define data validation rules that are applied to the data before it is loaded into
the data warehouse. In addition to defining rules, you can also define what action should be taken when data
is rejected/accepted by Compose.
To add a rule:
1. Click the Manage button at the bottom of the Data Warehouse panel.
2. In the Manage Data Warehouse Tasks window, click the link in the Mapping column for the table you
want to profile.
3. In the Edit Mappings - <Name> window, click the Data Quality toolbar button. The Data Quality
Rules - <Table Name> window opens.
The default rule rejects primary keys that have a null value and reports the rows.
4. To add a new rule, click the New toolbar button. A row is added to the rules table.
5. In the Name column, specify a name for the rule.
6. Hover the mouse-cursor over the Rule column and then click the fx button that appears on the right.
7. In the Edit Data Quality Rule window create a rule using an expression. For more information on
creating expressions, see Opening the expression builder (page 182).
See also Simple Example Rule (page 213) below.
8. From the drop-down list in the Error Action column, select one of the following actions (performed
when the data does not meet the rule conditions):
l
Reject and report - Reject the data and send a report
l
Reject silently - Reject the data without sending a report
l
Reject and abort - Reject the data and abort the data warehouse task
l
Accept and report - Accept the data and send a report
l
When the "report" option is selected, the row is reported to the
<landing_table_
name>__ex
table in the data warehouse error mart.
l
When there are multiple data validation rules, Compose will stop evaluating the data
after the first error (and report only that error). Once the error is fixed, additional data
evaluation errors may be reported for the remaining rules, each time the data is
loaded.
9. In the Description column, enter a description for the rule.
10. In the Enabled column, select or clear the check box to enable (the default) or disable the rule
respectively.
Setup and User Guide - Qlik Compose, May 2022 213

5 Data Warehouse projects
A rule that is defined to reject or accept a non-null value (e.g. 2) in a given column will also
reject/accept NULL values that appear in the same column, but in different records. To
prevent this from happening, add the following condition to the rule: "and column value is
not null"
Example: LEN(${CName})<2 and (${CName} is not null)
Simple Example Rule
The following rule stipulates that the number of units in stock must be greater than 1.
${UnitsInStock}>1
Managing Data Quality rules
The following options are available for managing Data Quality rules.
Enabling/disabling a Data Quality rule
Select or clear the check box in the rule’s Enabled column.
Editing a Data Quality rule
Select the rule and edit it as described in Defining data cleansing rules (page 212) and Defining data validation
rules (page 213) respectively.
Deleting a Data Quality rule
Select the rule and then click the Delete button above the rules list. When prompted to confirm the deletion,
click Yes.
Searching for a Data Quality rule
Enter a search term in the Search box above the rules list.
Changing the order of Data Quality rules
The order of the rules is important since rules are applied in the order that they appear. For example, placing
Reject and abort rules first will prevent other rules from being applied if the data is rejected by the Reject
and abort rule.
To change the order of Data Quality rules, select the rule that you want to move and then use the arrows
above the rules list to change the position of the rule.
Viewing missing references
In some cases, incoming data is dependent on or refers to other data. If the referenced data cannot be loaded
for some reason, you can either decide to add the data manually or continue on the assumption that the data
will arrive before it is needed.
There are two ways you can view missing references in Compose. Either via the Monitor tab in the Manage
Data Warehouse Tasks window or by switching the console to Monitor view and selecting the Missing
References tab. The instructions below cover both of these methods.
Setup and User Guide - Qlik Compose, May 2022 214

5 Data Warehouse projects
To check for missing references in the Manage Data Warehouse Tasks window:
1. Click the Manage button in the lower left corner of the Data Warehouse panel.
2. Select the desired task in the left side of the Manage Data Warehouse Tasks window.
3. Switch to Monitor view by clicking the Monitor tab in the top right of the Manage Data Warehouse
Tasks window.
4. Click the View Missing References toolbar button. The Missing References - <task Name> window
opens.
The following information is displayed:
l
General information: The run number of the task, when it started and ended, the total number
of inserts and updates, and the number of reported rows (if any).
l
Missing references information:
l
Missing Records from Entity - The name of the entity with missing reference and the
number of missing references.
To see the missing record keys for the entity, click the number in parentheses to the
right of the entity name.
The Missing Record Keys for Entity - <Entity Name> window opens showing the list of
missing keys and the number of times each key is referenced per entity.
l
Referenced from Entity - The entities that are referencing the entity with missing
references.
l
Via Relationship - The name of the relationship in the Model.
5. To close the window, click Close.
To check for missing references in the Compose Monitor:
1. Switch the console to Monitor View.
2. Select the desired task.
3. Click the Missing References tab below the task list.
The following information is displayed:
l
General information: The run number of the task, when it started and ended, the total number
of inserts and updates, and the number of reported rows (if any).
l
Missing references information:
l
Missing Records from Entity - The name of the entity with missing reference and the
number of missing references.
To see the missing record keys for the entity, click the number in parentheses to the
right of the entity name.
The Missing Record Keys for Entity - <Entity Name> window opens showing the list of
missing keys and the number of times each key is referenced per entity.
l
Referenced from Entity - The entities that are referencing the entity with missing
references.
l
Via Relationship - The name of the relationship in the Model.
4. To close the window, click Close.
Missing references example
In the following example, Orders and Disputes both reference Customers.
Setup and User Guide - Qlik Compose, May 2022 215
5 Data Warehouse projects
Orders contains seven records pointing to Mr. Brown and one record pointing to Mr. Smith. Disputes contains
four records referencing Mr. Brown. Mr. Brown and Mr. Smith are "missing" from Customers.
The would be reflected as follows:
Missing Records from Entity Referenced from Entity Via Relationship
Customers (2) Orders (8) Customers
- Disputes (4) CustomerDisputes
Example table content
Clicking the number to the right of Customers (in the Missing Records from Entity column) would open the
following window:
Key Referenced from Entity Via Relationship
Mr. Brown Orders (7) Customers
- Disputes (4) CustomerDisputes
Mr. Smith Orders (1) Customers
Example table content
See also: How Compose handles missing references in the data warehouse (page 191).
Viewing and exporting task statements
You can view the task statements that were run during the data warehouse task. You can also export the task
statements to a CSV file for reviewing and sharing.
To view the task statements:
1. Click the Manage button at the bottom left of the DATA WAREHOUSE panel.
The Manage Tasks window open.
2. Click the Task Statements toolbar button.
3. The Task Statements - <Name> window opens in List View. Navigate through the commands using
the scroll bar or find specific commands using the Search box.
OR
Click the Item View button and navigate through the commands using the navigation buttons at the
bottom of the Task Statements - <Name> window.
To jump to a specific command, type the command number in the Go To field at the bottom of the
window and then press [Enter].
Setup and User Guide - Qlik Compose, May 2022 216

5 Data Warehouse projects
To export the task statements to a CSV file:
1. In List View, click the Export to CSV File button located to the left of the search field.
2. A file named "<name>_ETL_Instructions.csv" will be saved to your default Downloads location or you
will be prompted to save it (according to your browser settings).
Modifying task settings
For each task, you can modify the settings according to your needs.
To open the Settings window:
1. Click the Manage button in the bottom left of the DATA WAREHOUSE panel.
2. Select a task in the left panel.
3. Click the Settings toolbar button.
A window opens displaying the following tabs: General, Advanced, and Consolidation.
General Tab
In the General tab, the following settings are available:
l
Log level: Select the log level granularity, which can be any of the following:
l
INFO (default) - Logs informational messages that highlight the progress of the ETL process at a
coarse-grained level.
l
VERBOSE - Logs fine-grained informational events that are most useful to debug the ETL
process.
l
TRACE - Logs finer-grained informational events than the VERBOSE level.
The log levels VERBOSE and TRACE impact performance. Therefore, you should only select them for
troubleshooting if advised by Qlik Support.
l
Default History Resolution: Choose the granularity of the "From Date" column value when a new
history record is inserted:
l
Minutes to update with the date and time. This is the default. When this option is selected, a
new record will be inserted each time the data is updated.
l
Days to update with the date only. When this option is selected, only one record (the most
recently updated) will be inserted at the end of the day.
These settings will be applied, regardless of the original source column (when mapped) or
Change Table [header__] timestamp column (when not mapped) granularity. So, for
instance, if a source column with date and time granularity is mapped to the "From Date"
column and Days is selected, then only one record (the most recently updated) will be
inserted at the end of the day.
Setup and User Guide - Qlik Compose, May 2022 217
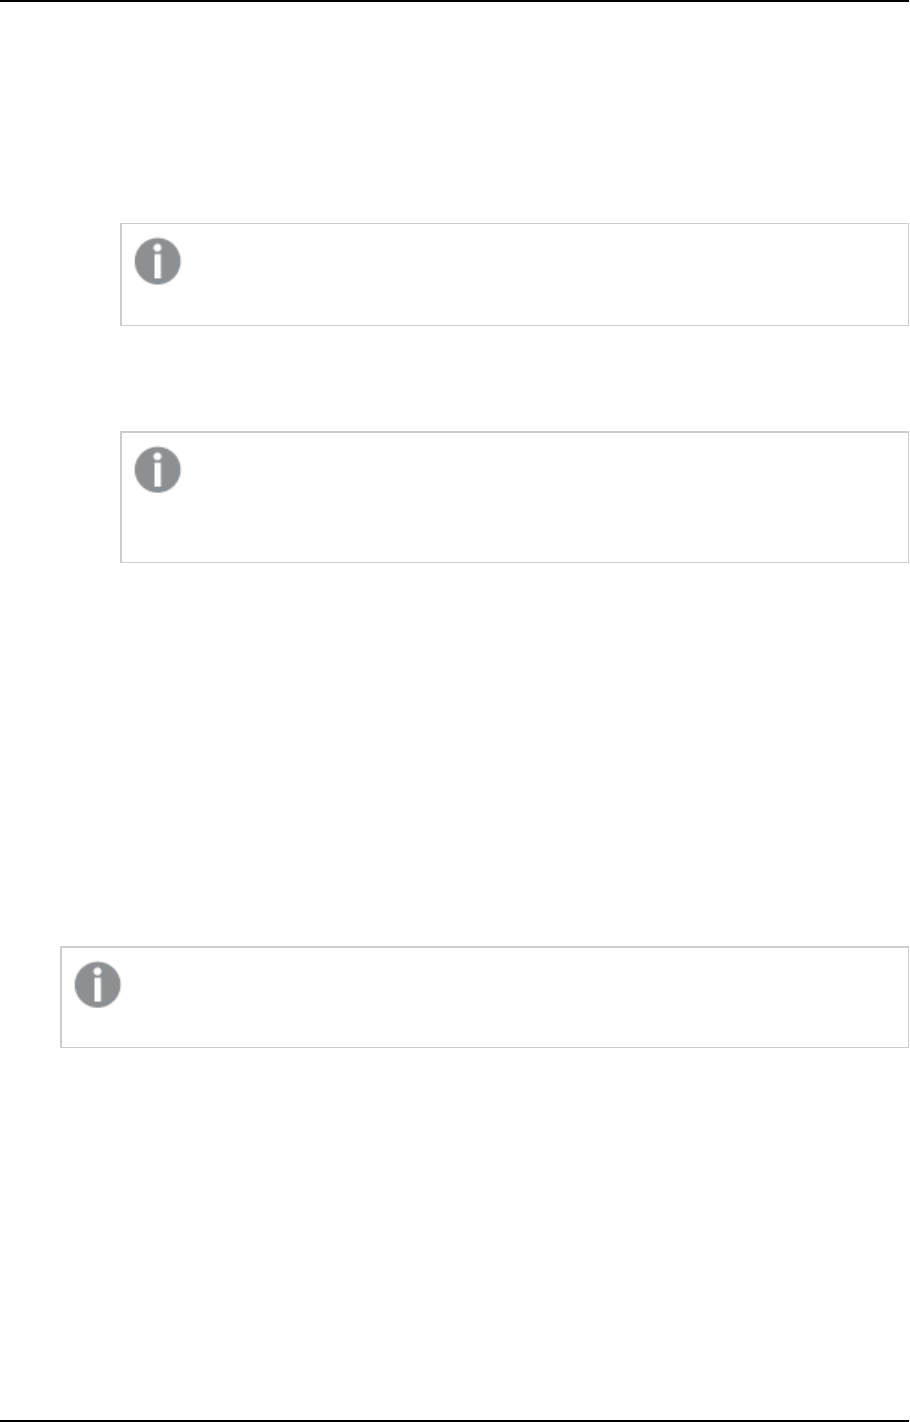
5 Data Warehouse projects
l
When updating a non-null data warehouse column with a null value:
l
Do not change the target value: Select this to keep values unchanged between two mappings
for the same record. For instance, if the same record exists in two different source tables (A and
B), but the record in Table A has a null value for data that is present in Table B (e.g. ZIP Code).
In this case, if the record in Table A arrives after the record in Table B, the target value will be
set to null. Selecting this option will prevent such an occurrence.
When creating a new project, the default behavior is to write NULL instead of keeping
the values unchanged between the two mappings.
l
Set the target value to null: Select this if you want the source and target values to
correspond. This can be useful, for example, when a person moves address and one of the
column values (e.g. "State") changes to null.
When ingesting changes from an Oracle source, this option requires full supplemental
logging for all source table columns that exist on the target and any source columns
referenced in filters, data quality rules, lookups, and expressions.
Advanced Tab
In the Advanced tab, the following settings are available:
l
Sequential Processing: Select this option if you want all the data warehouse tasks to run sequentially,
even if they can be run in parallel. This may be useful for debugging or profiling, but it may also affect
performance.
l
Maximum number of database connections: Enter the maximum number of connections allowed.
The default size is 10.
For more information, see Determining the required number of database connections (page 24).
l
JVM memory settings: Edit the memory for the java virtual machine (JVM) if you experience
performance issues. Xms is the minimum memory; Xmx is the maximum memory. The JVM starts
running with the Xms value and can use up to the Xmx value.
Only the following characters are supported (shown as a regular expression):
/^[-a-zA-Z0-9:]*$/
l
Position in default workflow: Select where you want the data warehouse tasks to appear in the
default workflow. For more information on workflows, see Workflows (page 268).
l
Optimize for initial load: Optimizes initial load in certain cases. Only select this option if the source
tables do not reference missing records, use lookups, map different source records to the same record,
do not contain Type 1 self-references, or contain historical records. Note also that when this option is
selected, the following features are not supported:
l
Data quality rules
l
Derived attributes
Setup and User Guide - Qlik Compose, May 2022 218

5 Data Warehouse projects
l
Consolidation of uniform sources (see Consolidation below)
l
The Handle duplicates option
In the event that the task is used for incremental loading (using query-based change processing), clear
the check box after the initial load task completes and regenerate the task.
l
Write task statement duration to the TLOG_PROCLOG table in the data warehouse: This option is
useful for troubleshooting performance issues with ETL processes as it records the duration of each
task statement in a special table (named TLOG_PROCLOG) in the data warehouse. You can then use
this information to locate task statements with abnormal duration times and modify them accordingly.
l
Do not create indexes for data warehouse tables: During the task, Compose creates an internal
index for each of the Data Warehouse tables (for query optimization). When running several
consecutive tasks (e.g. via a workflow) with a large volume of tables, this process can be extremely
time-consuming. In such a scenario, best practice is to select the check box for each of the tasks,
except the last one.
l
Do not truncate staging tables: Select this option if you want the ETL process to preserve the staging
tables. Only use for debugging.
l
Stop processing after populating the staging tables: Select if you do not want to proceed to
populating the warehouse. Only use for debugging.
l
Do not drop temporary tables: Select this option if you want to keep the temporary tables created
during the ETL process. Only use for debugging.
Consolidation Tab
Requires Compose August 2021 Service Release 03 or later.
When the Consolidate uniform sources option is enabled, Compose will read from the selected data sources
and write the data to one consolidated entity. This is especially useful if your source data is managed across
several databases with the same structure, as instead of having to define multiple data warehouse tasks (one
for each source), you only need to define a single task that consolidates the data from the selected data
sources.
Consolidation tab showing selected data sources
Setup and User Guide - Qlik Compose, May 2022 219
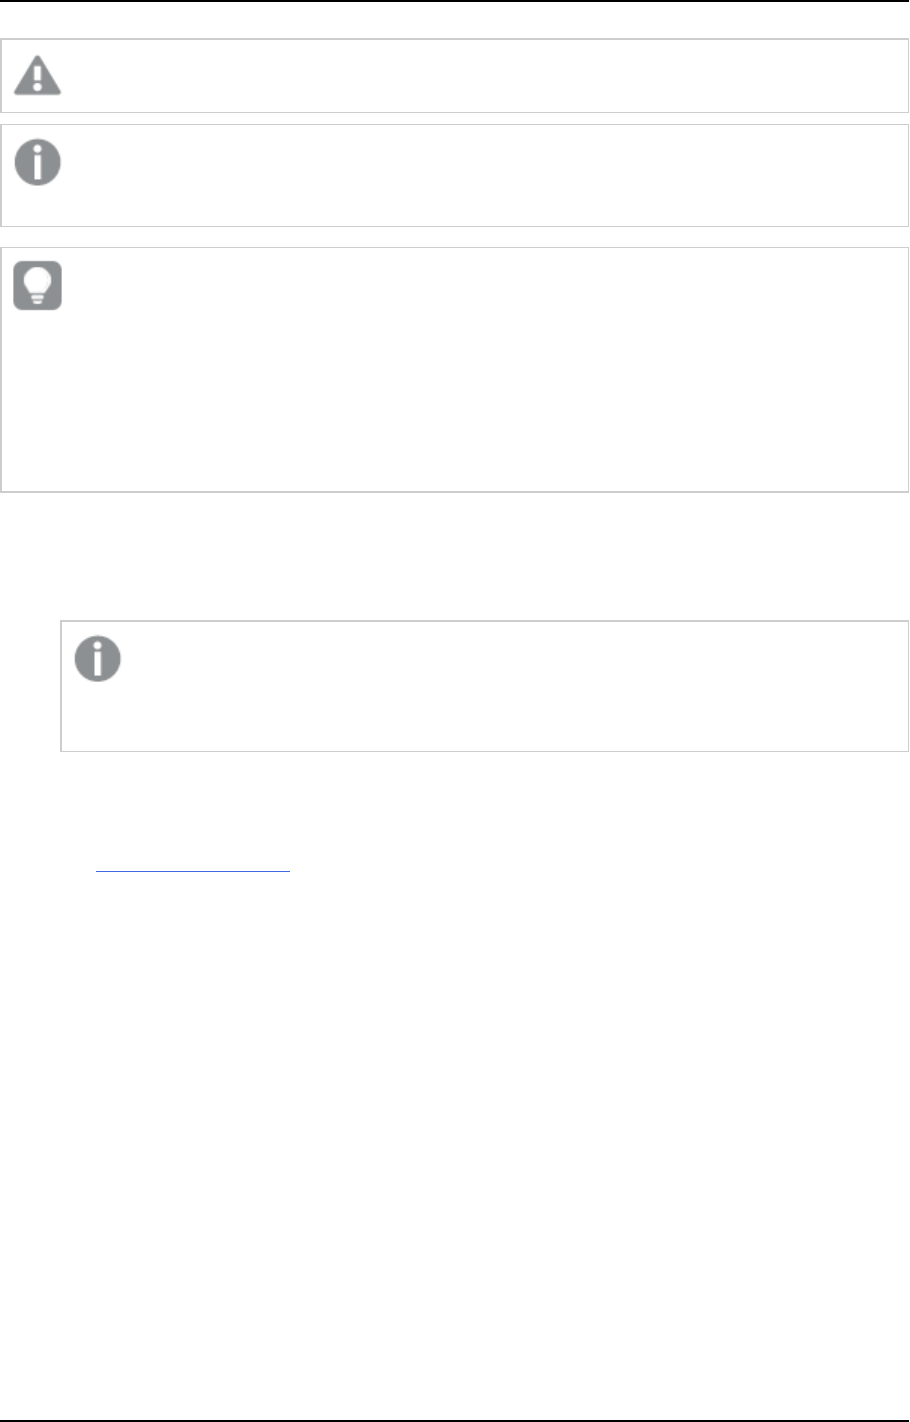
5 Data Warehouse projects
Editing the list of data sources requires you to regenerated the task.
The list of selectable data sources reflects the list of Source Databases that appears in the
Databases panel in Designer view.
To facilitate downstream processing, you might want to add a record identifier column (for example,
SourceID) to the primary key of all your entities. However, if one entity references another (for
example, Orders → Customers), a naming conflict will arise as the new column (SourceID) will then
appear in the referencing entity (Orders) twice. To prevent such conflicts from occurring, you should
add the column to each entity with a unique prefix derived from the entity name. So, continuing with
our Orders → Customers relationship example, the column name in the Orders entity should be
orders_SourceID while the column name in the Customers entity should be customers_SourceID.
Prerequisites
l
The structure of the tables in the selected sources must be identical.
l
Source type can be Table or View, but not Query.
The source data does not have to reside in tables only or in views only; it can be ingested
from a combination of views and tables. For example, the source data might be ingested
from tables A, B, and C in Landing 1, and views A, B, and C in Landing 2.
See also: Editing column mappings (page 202).
Limitations and considerations
l
The Optimize for initial load option is not supported with consolidation.
l
A selected data source cannot contain an asterisk (*) in its specified schema name (asterisks in schema
names are supported with Microsoft SQL Server only).
See also: Using Microsoft SQL Server as a source (page 149)
l
If you have existing Full Load and Change Tables (CDC) tasks, setting the consolidation settings for the
Full Load task will not automatically set the consolidation settings for the Change Tables task as well.
You need to do this manually.
See also:Adding and duplicating tasks (page 201) and Creating a Change Processing task (page 194)
l
Uniform consolidation settings will not be included in task settings that are exported to a CSV file.
See also: Migrating objects as CSV files (page 49)
l
Lineage andproject documentation will not reflect all of the selected sources.
See also: Exporting project documentation (page 99) and Lineage and impact analysis (page 177).
l
Custom ETLs (Pre Loading ETL, Multi Table ETL, Single Table ETL, and Post Loading ETL) will run only
once, regardless of how many sources are selected.
See also: Creating and managing custom ETLs (page 197).
l
Generating the ETLs will only validate the Landing Zone database(s) defined in the mappings, and not
all of the data sources selected in the Consolidation tab.
Setup and User Guide - Qlik Compose, May 2022 220
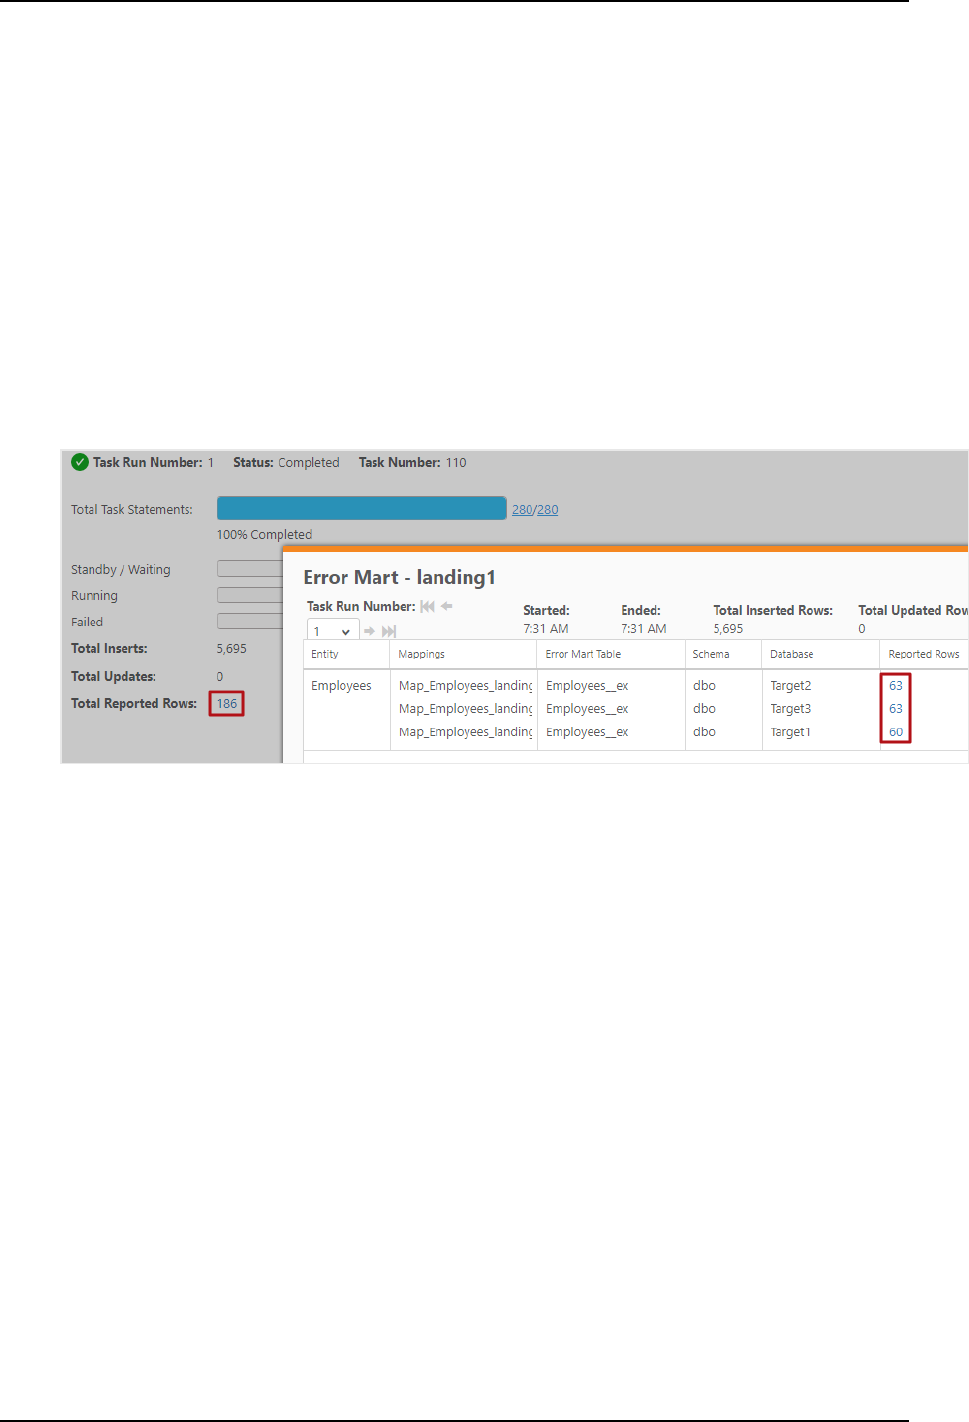
5 Data Warehouse projects
l
Error marts will be created for each Landing Zone database.
To see the number of reported rows in each error mart:
1. Open the Manage Data Warehouse Tasks window, and select the consolidation task in the left
pane.
2. Select the Monitor tab, and click the Total Reported Rows number.
Alternatively:
1. Switch to the main Monitor view and select the consolidation task.
2. In the Progress Status tab (below the tasks list), click the Total Reported Rows number.
The Error Mart - <task-name> window opens.
Error Mart window showing the number of rows reported for each error mart
For more information on error marts, see Viewing information in the monitor (page 260).
Monitoring tasks with consolidates sources
The monitor shows the sum total of all the records (for example, the total number of INSERTs) from all of the
selected sources.
Monitor showing a consolidation task with the total number of rows inserted from all data sources
Setup and User Guide - Qlik Compose, May 2022 221
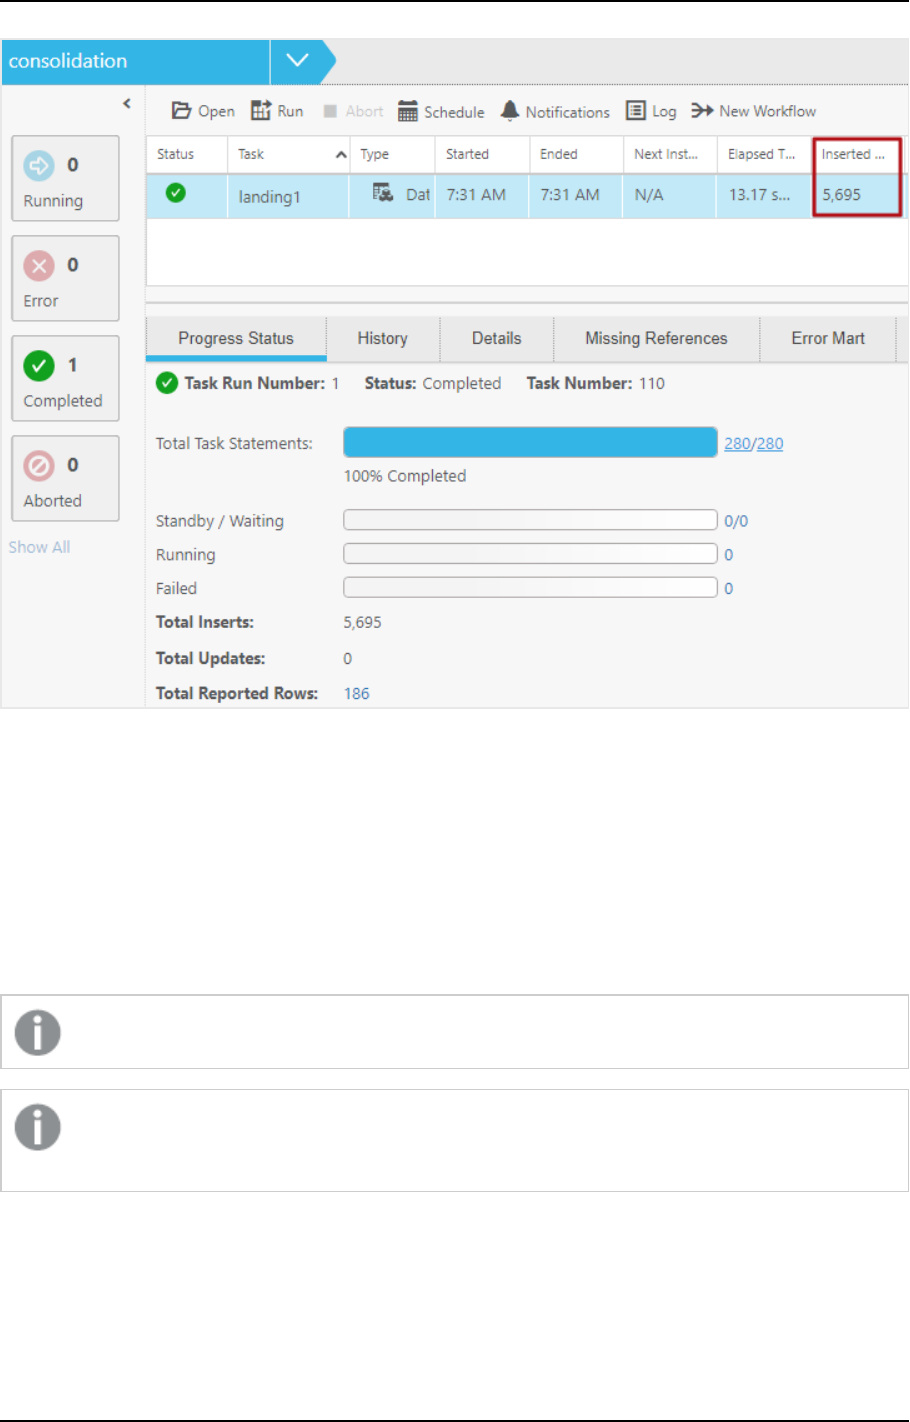
5 Data Warehouse projects
Validating the data warehouse
Data warehouse validation should be performed each time the model is edited (after the data warehouse has
already been created). Validating the data warehouse allows you automatically resolve any differences
between the model and the data warehouse.
For a data warehouse to be considered valid, the tables defined in the data warehouse need to be identical to
the physical tables in terms of metadata. Depending on the change, this may require adjusting the physical
tables or dropping and recreating them (via Compose).
If the data warehouse is not valid, any tasks that you attempt to run will fail.
Changes to Distribution Keys cannot be validated (or adjusted). Such changes need to be applied
manually to the Data Warehouse tables.
Sometimes, however, the differences between the model and the data warehouse cannot be resolved
automatically. In such cases, you need to drop and recreate the tables as described in Dropping and recreating
tables (page 209).
Setup and User Guide - Qlik Compose, May 2022 222
5 Data Warehouse projects
To validate the data warehouse:
1. Click the Validate button at the bottom right of the Data Warehouse panel. The Validating the Data
Warehouse progress window opens.
If any differences are detected, the following message will be displayed: The data warehouse is different
from the model.
2. Click Close. The Model and Data Warehouse Comparison Report window opens.
3. Review the report and then click Adjust Automatically to resolve the differences automatically or
Generate Adjust Script to generate a script with the adjust commands.
l
The Adjust Automatically button will be disabled either if the Generate DDL scripts
but do not run them option is selected or if Compose is unable to automatically
adjust the data warehouse. In such cases, you should click Generate Adjust Script as
described below.
l
Due to Google Cloud BigQuery limitations, if Compose is unable to automatically
adjust the data warehouse, then the generated script may be not valid either.
Consequently, users should review the script carefully and adjust it manually (if
required) before running.
l
If you clicked Adjust Automatically, the Adjust Data Warehouse progress window opens.
When the "The data warehouse was adjusted successfully." message is displayed, you can close
the window. Note that adjusting the data warehouse may require you to update the data mart.
In such a case, an appropriate message will be displayed for each of the data marts that require
updating.
Cases where Compose is unable to automatically adjust the data warehouse are as
follows:
l
A data type change that is not supported by the database or a data type
change that may result in data loss.
l
A change in an entity’s business key or distribution key.
l
An attribute’s history type is Type 2 and the satellite table number in the
attribute’s settings has changed.
l
If you clicked Generate Adjust Script, the Generate DDL Scripts window opens showing the
progress of the script generation.
The generated scripts will be saved to:
<product_dir>\data\projects\<project_name>\ddl-scripts
Once the script(s) have been generated, you can close the Generate DDL Scripts window.
After you close the Generate DDL Scripts window, the DDL Script Files window opens
automatically displaying the generated scripts. The DDL Script Files provides a read-only view
that allows you to review the scripts and download them.
The scripts need to be executed directly in your data warehouse. Make sure that any
modifications that you make to the scripts are done prior to executing them.
Setup and User Guide - Qlik Compose, May 2022 223
5 Data Warehouse projects
When you run the adjust scripts, backup tables are created from the existing tables.
The backup table names are appended with an "_old" suffix and must be deleted
manually after the script completes.
Search for "TODO" in the script to locate the part of the script that needs modifying.
Clearing the data warehouse metadata cache
To improve performance when reading from the Landing Zone or from the Data Warehouse tables, Compose
caches the metadata from both the Landing Zone and the Data Warehouse tables. However, synchronization
issues may sometimes occur if the metadata structure of the Landing Zone or the Data Warehouse tables is
altered outside of the Compose project.
If you aware of external changes to the metadata or if you notice any data synchronization anomalies,
Compose enables you to clear the metadata cache, either using the UI or using the CLI.
Clearing the data warehouse metadata cache with the web console
To clear the metadata cache with the web console:
1. In the Data Warehouse panel, select Clear Metadata Cache from the menu in the top right corner.
A progress window opens.
2. After the metadata cache has been cleared, click Close to exit the progress window.
For information on clearing the Landing Zone metadata cache, see Clearing the Landing Zone metadata cache
(page 158).
Clearing the metadata cache with the CLI
The storage value for the --type parameter described below refers to the data warehouse
metadata cache.
You can also clear the metadata cache using the CLI.
Command syntax:
ComposeCli.exe clear_cache --project
project_name
[--type landing|storage] [--landing_zone
source_name]
Parameters
Parameter Description
--project The name of the project.
Setup and User Guide - Qlik Compose, May 2022 224

5 Data Warehouse projects
Parameter Description
--type Which type of metadata cache to clear. Possible values are:
l
landing
l
storage
If --type
landing
and you want to clear a specific landing zone,
you must set the --landing_zone parameter as well. To clear the
metadata cache in all landing zones, specify --type
landing
and
omit the --landing_zone parameter.
--landing_zone the name of the landing zone when --type landing_zone
Example
ComposeCli.exe clear_cache --project MyProject --type landing --landing_zone MySource1
5.8 Creating and managing data marts
This section explains how to create data marts from your data warehouse tables.
In this section:
l
Adding star schemas and dimensions (page 234)
l
Displaying data in a pivot table (page 231)
l
Managing data marts (page 234)
l
Creating and managing custom ETLs (page 250)
l
Viewing and exporting task statements (page 252)
l
Validating and adjusting the data mart (page 252)
l
Modifying data mart settings (page 255)
l
The "Obsolete" indicator (page 257)
Adding data marts and star schemas
This topic explains how to create and manage data marts and star schemas in Qlik Compose. Since a data
mart is essentially a subset of the data warehouse, you can create any number of data marts according to
your BI needs. You can also create multiple star schemas for a single data mart. Star schemas allow you to
reuse existing dimension tables within the same data mart, thereby saving space in the data warehouse while
at the same time improving query performance. For example, you could create one star schema with an Order
Details fact table and Customers and Products dimensions and another star schema with the same
dimensions but a different fact type (or the same fact type, but different dimensions). This also allows you to
generate BI reports using different facts that share the same dimensions. Additionally, in a star schema,
dimensions are linked with each other through one join path intersecting the fact table, facilitating accurate
and consistent query results.
Setup and User Guide - Qlik Compose, May 2022 225
5 Data Warehouse projects
l
If you edit an expression or a column lookup in a dimension, the changes will not be applied
to existing data. To apply such changes, you need to reload the data (which could take some
time, depending on the number of records and whether there are a lot of historical records).
l
Data warehouse tasks cannot run in parallel with data mart tasks.
A new data mart should be created in the following situations:
l
Setting up a Compose project for the first time.
l
To serve the needs of each individual business unit (different data marts can be used to obtain specific
information for various enterprise departments, such as accounting, marketing, sales, and so on).
To create a data mart with a star schema:
1. Click the New button located at the bottom of the Data Mart panel.
OR
Click the Manage button and then click the New button located at the top of the Manage Data Marts
window. The New Data Mart window opens.
2. Optionally change the default name and provide a description.
Data mart names cannot contain the following characters: /\,&#%$@=^*+"'`~?<>:;[]{} as well
as all non-printable characters (below 0x20). The data mart name can contain a single dot,
but it cannot be the first or last character.
3. Make sure that the Start New Star Schema Wizard check box is selected (the default) and then click
OK. The New Star Schema wizard opens.
4. Provide a name and description (optional) for the star schema.
5. Select one of the available fact types:
l
Transactional - A star schema with a transactional fact table allows you to retrieve the desired
data, even if a dimension table contains multiple versions of the same record. To use an
example from the automotive industry, selecting "OrderDate" as the Transaction Date would
allow you to generate a report for the number of customers who bought cars in New York
between 2013 and 2016, even if a customer moved to a different city (which would also result in
a new record being added to the Customers dimension).
l
Aggregated - A star schema with an aggregated fact table allows you to make aggregate
calculations based on the fact table attributes. For instance, you could create an aggregated
fact that shows the total freight costs per shipping region and product category. Additionally,
the presence of a transaction date in the fact table makes it possible to retrieve the desired
data, even if a dimension contains multiple versions of the same record. To use an example
from the shipping industry, a shipper could use an aggregated fact to generate a report for the
total cost of shipping rice to Australia from 2015-2016.
l
State Oriented - A star schema with a state oriented fact supports Type 2 columns in the fact
table. This is useful in cases where the fact is not a singular event in time, but rather, consists of
multiple "states" or events that occur over time. Typical example of facts with multiple states
are insurance claims or flight reservations. There are also cases when the same entity is treated
Setup and User Guide - Qlik Compose, May 2022 226
5 Data Warehouse projects
as both a fact and a dimension - for example, Customers. In such cases, a report could be
generated that relates to the state of the fact, such as the time a claim was submitted to the
time it was approved.
6. Click Next.
7. In the Facts screen, choose one fact for the star schema and then click Next. The Dimensions screen is
displayed. The left pane lists the dimensions that can be selected while the right pane displays a
diagram of the star schema with the selected dimensions. You can view a dimension’s lineage by
selecting the desired dimension and then clicking the Lineage button. For more information on
lineage, see Lineage and impact analysis (page 177).
The left pane of the Dimensions screen contains the following areas:
l
Existing Dimensions - Lists the dimensions that already exist in your data mart. Note that only
dimensions that are relevant to the selected fact table will be displayed.
l
Create New Dimensions - Lists all of the dimensions that can be added to the star schema.
l
Date Dimensions - Lists all of the Date dimensions that can be added to the star schema. Note
that these dimensions will only be available for selection if you added the Date and Time
entities to your model. For an explanation of how to do this, see Adding Date and Time entities
to your model (page 178).
l
Time Dimensions - Lists all of the Time dimensions that can be added to the star schema. Note
that these dimensions will only be available for selection if you added the Date and Time
entities to your model. For an explanation of how to do this, see Adding Date and Time entities
to your model (page 178).
When adding dimensions using the wizard, if a root dimension already exists in the data
mart, any dimensions selected under the root dimension will be ignored.
Workaround: Edit the dimension and delete or add columns as required.
8. Choose which dimensions to include in the star schema and then click Next.
9. If you chose Star Schema with State Orientation as your star schema type, click Finish. Otherwise,
continue from Step Adding data marts and star schemas (page 225) below.
10. In the Transaction Date screen, choose which Transaction Date to include in the data mart fact table.
Selecting a Transaction Date enables you to retrieve the required data, even if the Dimension table
contains multiple versions of the same record.
For example, a car salesman wants to know how many customers bought cars in New York between
2013 and 2015. Selecting OrderDate as the Transaction Date for the Customers Dimension would make
it possible to retrieve this information, even if a customer moved to a different city (which would also
result in a new record being added to the data mart).
11. If you chose Transactional as your star schema fact type, click Finish. If you chose Aggregated as your
star schema fact type, continue from Step Adding data marts and star schemas (page 225) below.
12. In the Aggregated Fact screen:
a. Select one or more columns from the Fact table on the left of the screen.
You can select multiple columns by holding down the [Shift] (sequential selection) or
[Ctrl] (non-sequential selection) buttons while selecting the columns.
Setup and User Guide - Qlik Compose, May 2022 227
5 Data Warehouse projects
b. To add the column(s) to the Group By list on the right, either drag the columns to the list or
click the arrowhead button to the left of the Group By list. Note that each dimension has a
default "Group By" column that cannot be deleted.
c. To add the column(s) to the Aggregations list on the right, either drag the columns to the list
or click the arrowhead button to the left of the Aggregations list.
d. To add new columns to the Group By or Aggregations list, click the New button above the list.
In the New column window, specify a Name, Type, Description and Aggregation (when
adding a new aggregation column) and then click OK. The column is added to the list.
e. To add an expression, hover the mouse cursor over the table cell in the Expression column and
then click the fx button that appears on the right. The Edit Expression: <Name> window
opens.
For more information on creating expressions, see Creating expressions (page 181).
f. To delete a column, select the column in the list and then click the Delete button above the list.
You can select multiple columns for deletion by holding down the [Shift] (sequential
selection) or [Ctrl] (non-sequential selection) buttons while selecting the columns.
See also Aggregation example (page 231).
13. Click Finish. The newly created star schema is displayed below the Star Schemas heading, as shown
below.
Setup and User Guide - Qlik Compose, May 2022 228
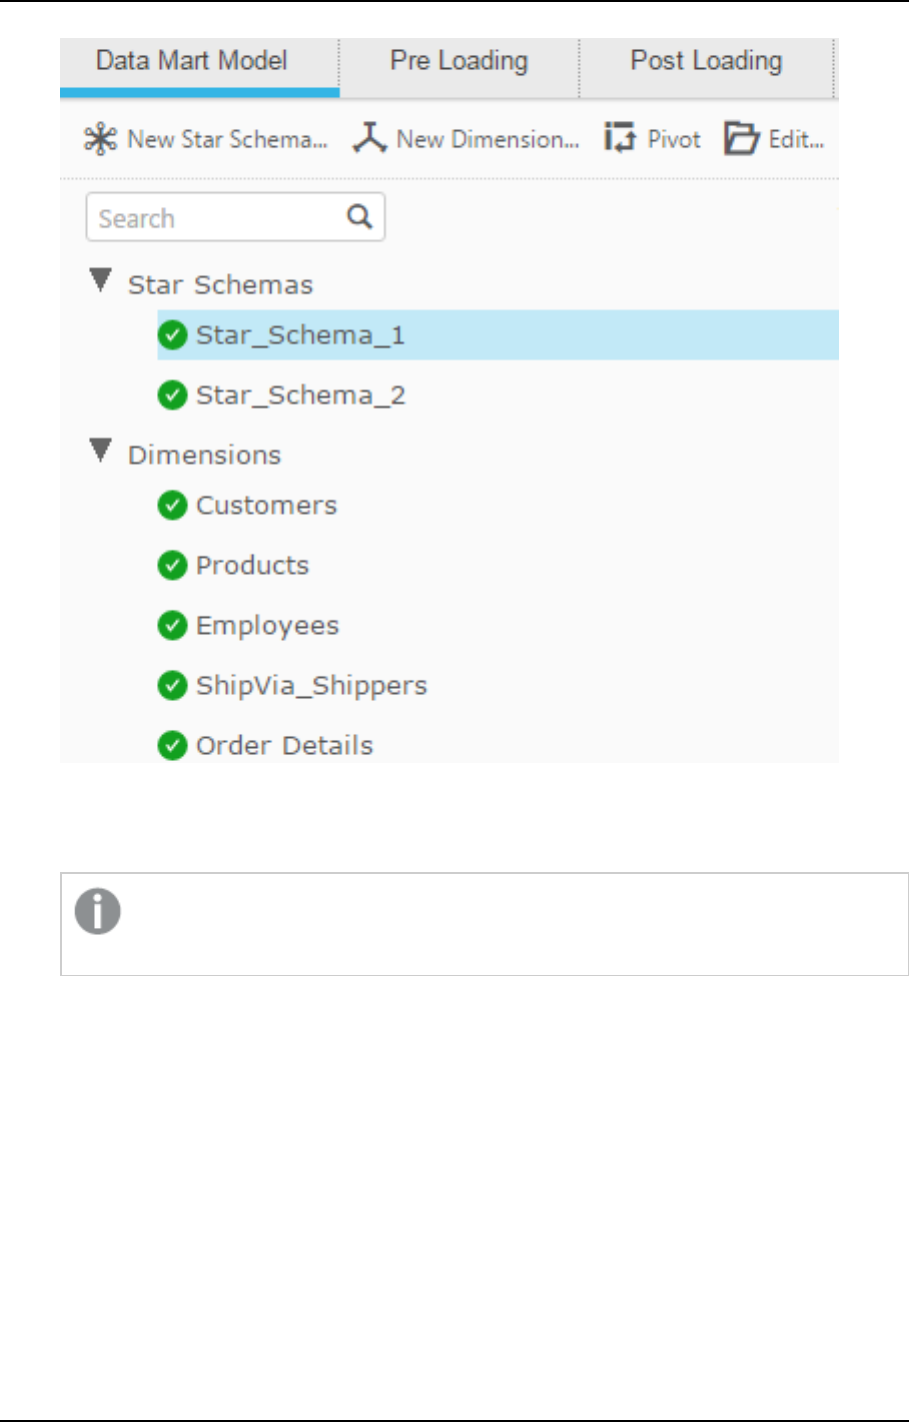
5 Data Warehouse projects
14. Click the Create Tables toolbar button. The Creating Data Mart: Data Mart Name in Target progress
window opens. Wait for the "Create Data Mart tables finished successfully." message to be displayed
and then click Close.
After the data mart tables are created, the Create Tables button changes to Drop and
Recreate tables.
15. Click the Generate toolbar button. The Generating Statements for Task: Data Mart Name window
opens. Wait for the "Generating Statement for Data Mart No. <number> finished successfully." message
to be displayed and then click Close.
16. Click the Run toolbar button.The window switches to Monitor view and a progress bar shows the
current progress in terms of percentage.
Setup and User Guide - Qlik Compose, May 2022 229
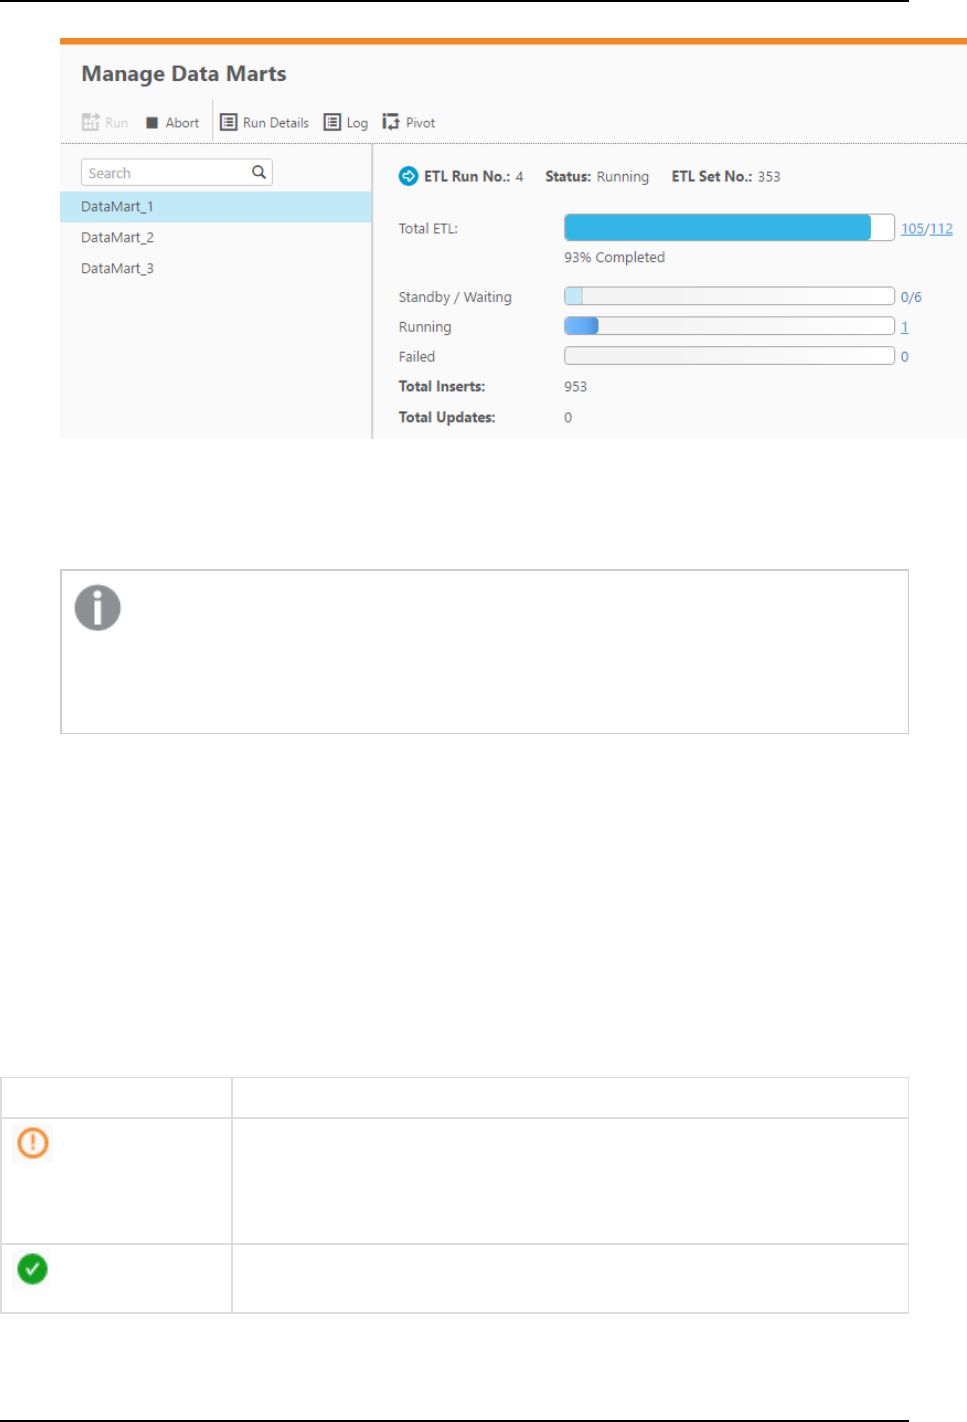
5 Data Warehouse projects
When the Total ETL reaches 100 percent, data mart population is complete.
You can stop the task at any time by clicking the Abort toolbar button. This may be necessary if you
need to urgently edit the task settings due to some unforeseen development. After editing the task
settings, simply click the Run button again to restart the task.
l
Aborting a task may leave the data warehouse tables in an inconsistent state.
Consistency will be restored the next time the task is run.
l
In rare situations, the Monitor view in the Manage Data Marts window may not show
any tasks initially. To remedy this, refresh the browser window.
Other monitoring information such as the run details (i.e. the number of rows inserted/updated) and
the task log files can be accessed by clicking the Run Details and Log buttons respectively.
Should any errors occur, you can click the link at the end of the Failed bar for additional information
that may help you troubleshoot the problem.
Once your data mart has been loaded with data, you can check that the required data is available for
your BI tools. For more information, see Displaying data in a pivot table (page 231).
Understanding star schema icons
Compose displays various icons to indicate both the status and characteristics of the star schema tables.
These icons are displayed in the table below.
Icon Description
Indicates that although the structure for the star schema has been defined, all
or part of the dimension(s) and/or fact table do not physically exist in the data
warehouse. Click Create Tables to create the tables and/or click Validate to
see what needs to be adjusted.
Displayed when the dimension(s) and/or fact table physically exist in the data
warehouse.
Star schema icons
Setup and User Guide - Qlik Compose, May 2022 230
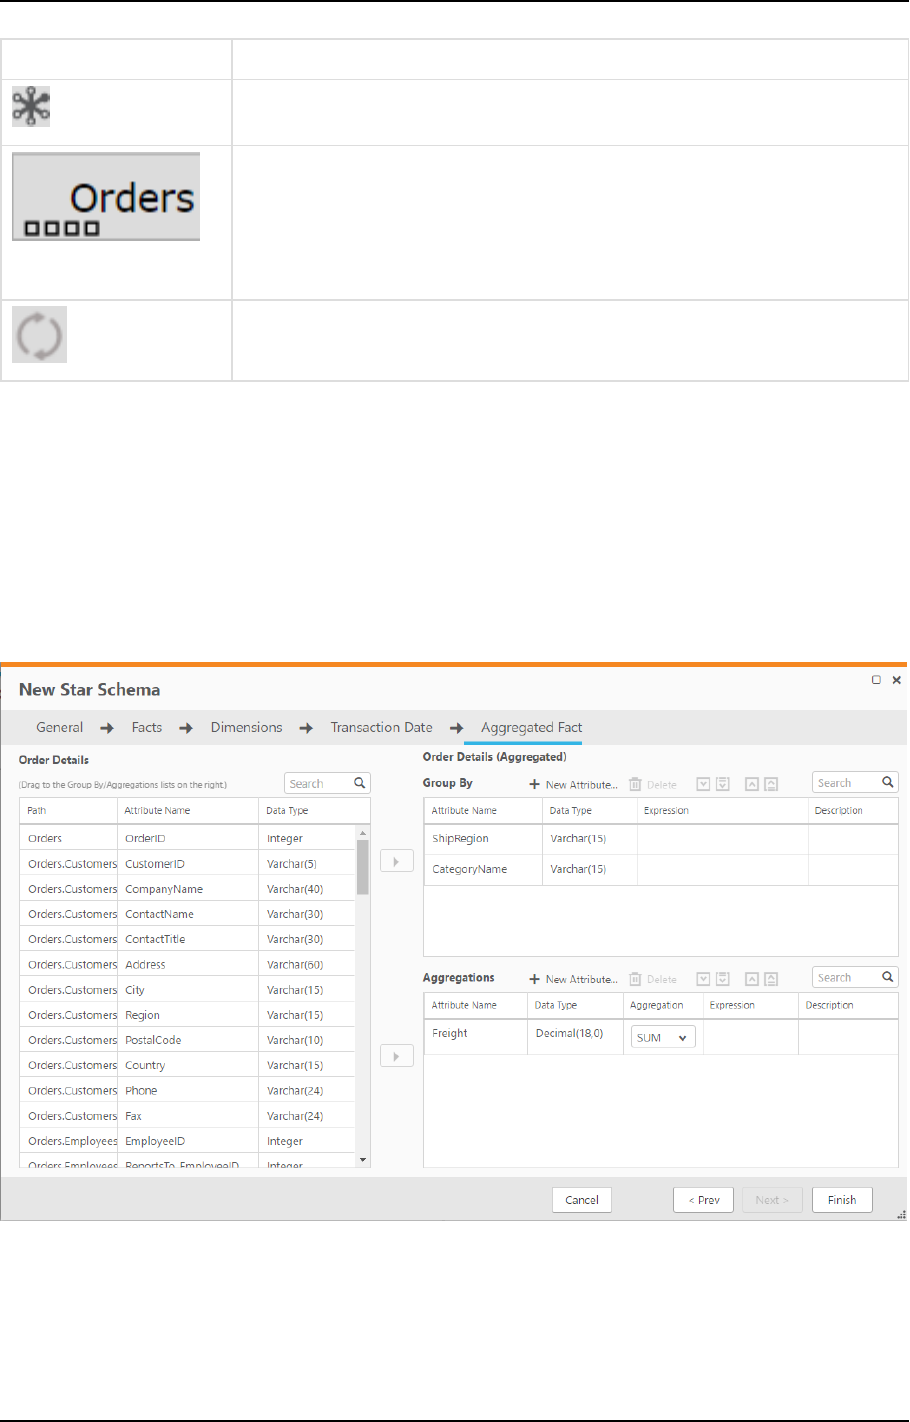
5 Data Warehouse projects
Icon Description
Indicates a conformed (shared) dimension.
Small squares indicate that there are denormalized tables under the root
dimension table. Each square represents a denormalized table, so in the image
on the left, the Orders root dimension has four denormalized tables. To view
the denormalized table names, hover the mouse cursor over each of the
squares.
Displayed when a dimension has a reference to itself.
Aggregation example
In the following example, Mike the organization’s data scientist, wants to create an aggregation table that
shows the total freight costs per shipping region and product category; for example, the total cost of shipping
rice to Australia in 2015.
To achieve this objective, he adds the CategoryName and ShipRegion attributes to the Group By list and then
adds the Freight attribute to the Aggregations list. As Mike is interested in the total freight cost, he selects
SUM as the Aggregation Type.
Displaying data in a pivot table
This section explains how you can use Compose to view the data in your star schema.
Setup and User Guide - Qlik Compose, May 2022 231
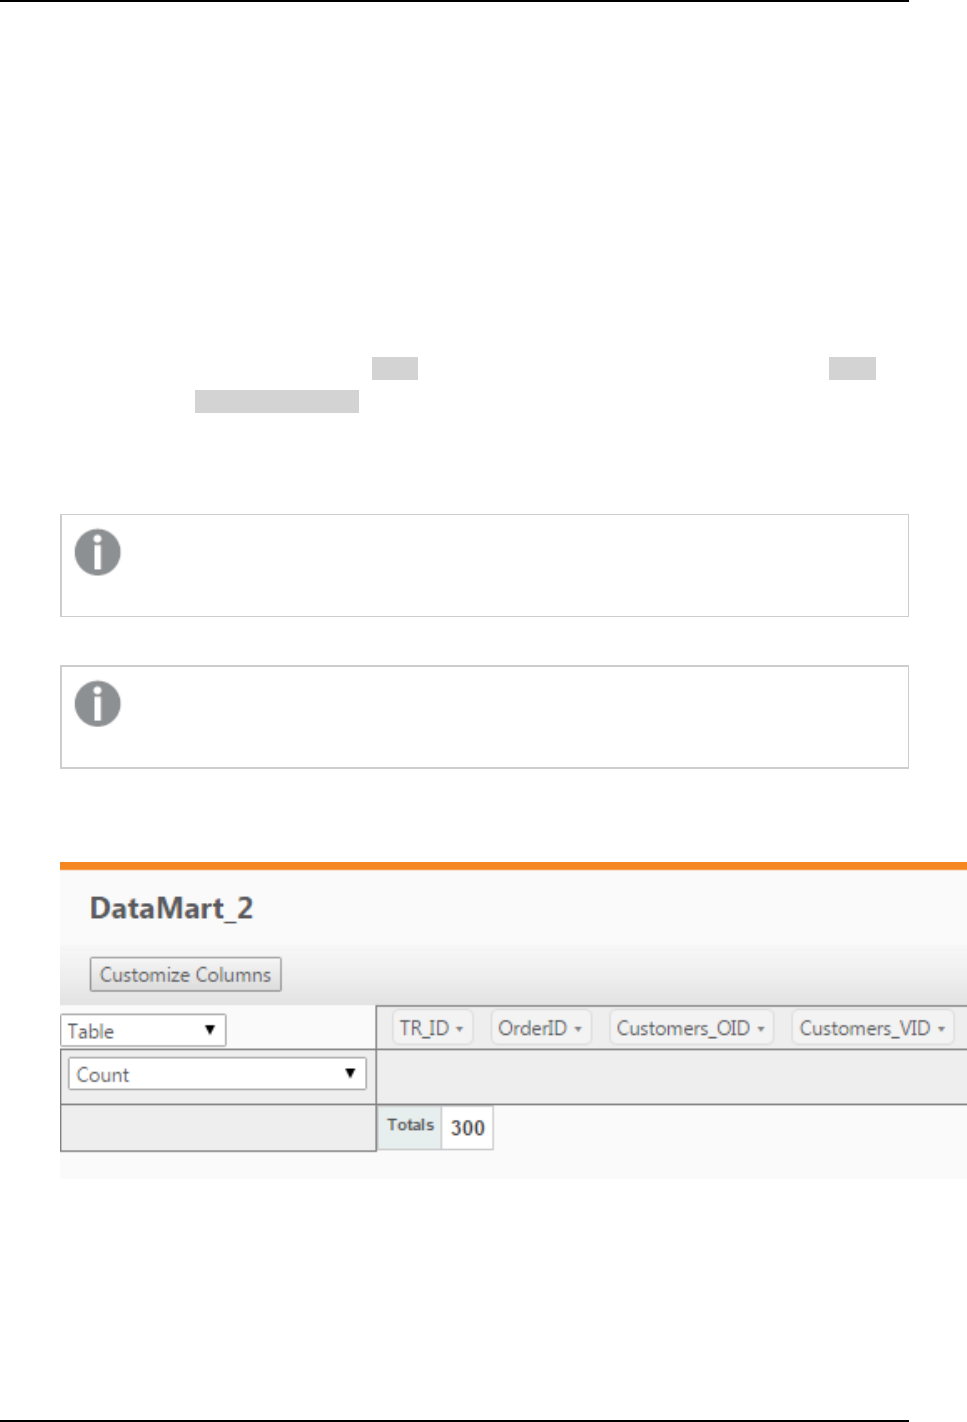
5 Data Warehouse projects
To view the data in a star schema:
1. Click the Manage button at the bottom of the Data Marts panel.
2. In the Manage Data Marts window, either:
Switch to Monitor view (by clicking the monitor icon) in the top right corner.
OR
Remain in Design view and select a star schema.
3. Click the Pivot toolbar button. If you clicked the Pivot toolbar button in Monitor view and your data
mart contains several star schemas, you will be prompted to selected a star schema. The Select
columns for Pivot table window opens. The drop-down list at the top of the window contains the Fact
table and the Dimensions tables that were used to create the star schema.
The Fact table name is prefixed with "Fct_" while dimension table names are prefixed with "Dim_".
4. Make sure that "Fct_<FactName>" is selected in the drop-down list and then select which fact
column to add to the pivot table.
5. From the drop-down list, select a dimension and then select which dimension columns to add to the
pivot table.
If you added the Date and Time dimension tables to your data mart, you will be able to
select.
6. Optionally, repeat Step 5 to add columns from different dimensions to the pivot table.
When the same column is included in two different dimensions, the pivot table may show
incorrect data.
7. Click OK. The pivot table window opens.
The names of columns that you can use to generate the data will be displayed at the top of the
window.
8. To form the actual table, drag columns to the gray area below the column names (the X-axis) and to
the gray area on the left of the window (the Y-axis). In the following example, the ShippedDate column
has been dragged to the X-axis while the OrderID column has been dragged to the Y-axis.
Setup and User Guide - Qlik Compose, May 2022 232
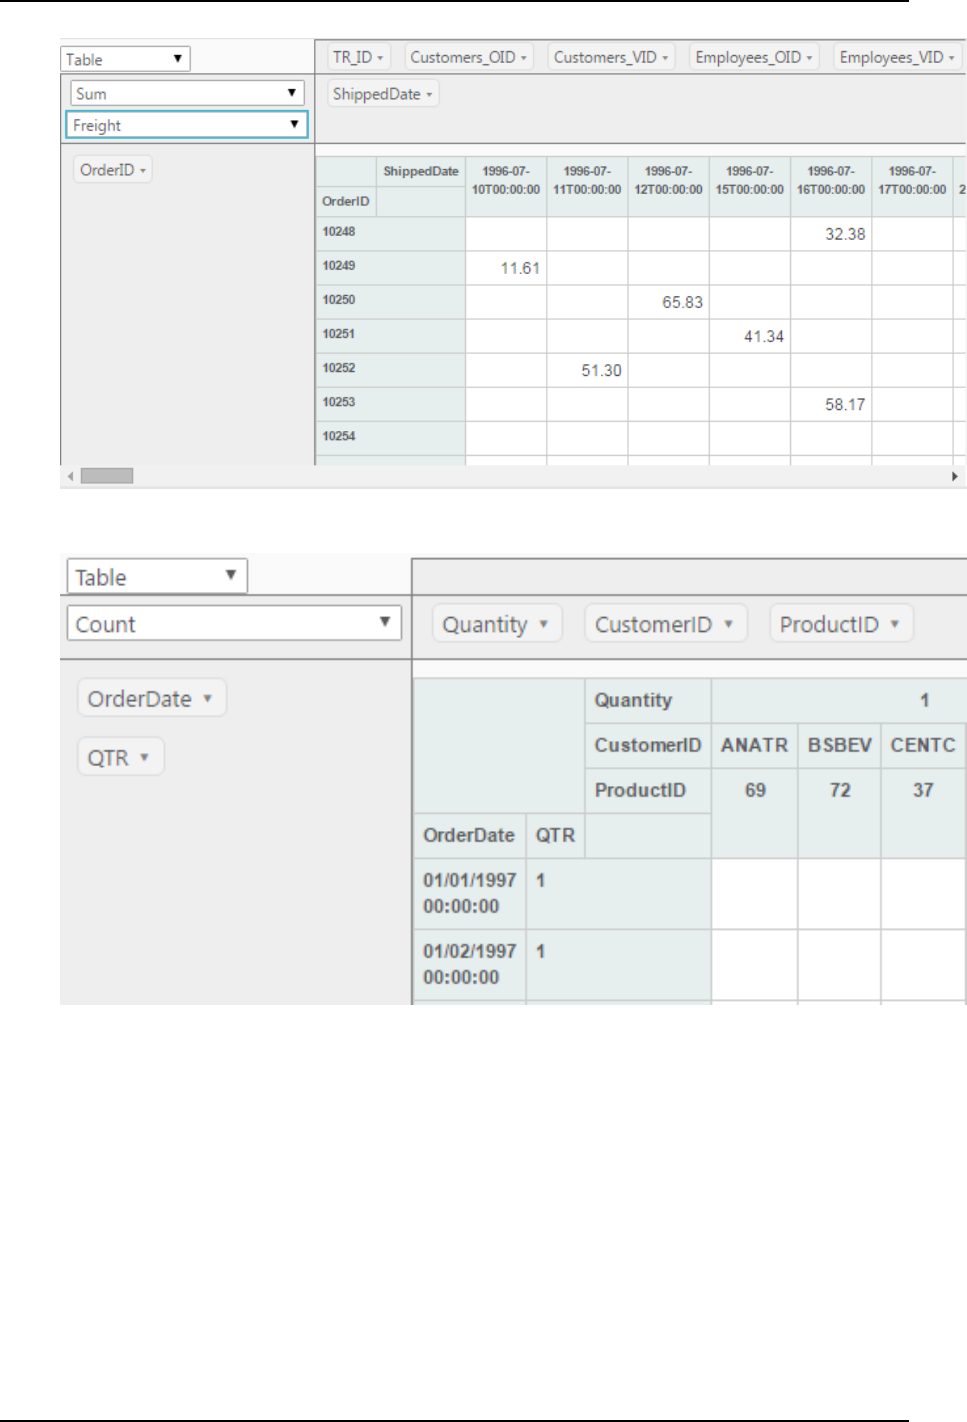
5 Data Warehouse projects
In this example, the QTR column was selected from the Date dimension, allowing orders to be grouped
by quarter.
9. Change the table format, set aggregation, or perform additional actions as described in the table
below.
Setup and User Guide - Qlik Compose, May 2022 233

5 Data Warehouse projects
To Do this
Set the table
format
From the upper drop-down list in the left of the pivot table window, choose one of
the following:
l
Table
l
Table bar chart
l
Heatmap
l
Row heatmap
l
Col heatmap
l
Treemap
Aggregation
options
From the lower drop-down list in the left of the pivot table window, choose one of
the available options.
Note that additional drop-down lists may be displayed depending on the selected
aggregation option. For example, when Sum over Sum is selected, two additional
drop-down lists (containing column names) will appear below the aggregation
options. The Sum over Sum aggregate is calculated by selecting one column from
each of the drop-down lists.
Change the
columns
Click the Customize Columns button and continue from Step 3 above.
Additional actions
10. Click OK to close the window.
Managing data marts
This section describes the following management options:
l
Adding star schemas and dimensions (page 234)
l
Editing star schemas (page 238)
l
Editing dimensions (page 243)
l
Deleting data marts, schemas and dimensions (page 250)
Data marts pointing to different databases cannot contain tables with the same name.
Adding star schemas and dimensions
A data mart can contain any number of star schemas and dimensions. You can either add dimensions when
you create a new star schema or you can add them later and attach them to star schemas as needed.
Regardless of how they are added, dimensions can be reused across several star schemas as necessary.
To add a star schema:
1. Either click the New Star Schema toolbar button.
OR
Right-click the Star Schemas or Dimensions items and select New Star Schema.
Setup and User Guide - Qlik Compose, May 2022 234

5 Data Warehouse projects
The New Star Schema wizard opens.
2. Perform steps4 to 13 in Adding data marts and star schemas (page 225). The star schema is added to
the Star Schemas list.
3. If you already created the data mart tables (as described in Adding data marts and star schemas (page
225)), you need to create the new star schema tables in the data mart. To do this, perform the
validation process described in Validating and adjusting the data mart (page 252).
Otherwise, perform steps 4 to 13 in Adding data marts and star schemas (page 225). If you also want to
run a data mart task, perform step 16 as well.
To add a dimension:
1. Select the dimension(s) you want to add to the data mart. Then click OK. The dimension(s) are added
to the Dimensions list.
2. If you already created the data mart tables (as described in Adding data marts and star schemas (page
225)), you need to create the new dimension table(s) in the data mart. To do this, perform the
validation process described in Validating and adjusting the data mart (page 252).
Otherwise, perform steps 14 and 15 in Adding data marts and star schemas (page 225). If you also want
to run a data mart task, perform step 16 as well.
3. Select the dimension(s) you want to add to the data mart. Then click OK. The dimension(s) are added
to the Dimensions list.
4. If you already created the data mart tables (as described in Adding data marts and star schemas (page
225)), you need to create the new dimension table(s) in the data mart. To do this, perform the
validation process described in Validating and adjusting the data mart (page 252).
Otherwise, perform steps 14 and 15 in Adding data marts and star schemas (page 225). If you also want
to run a data mart task, perform step 16 as well.
To attach a newly added dimension to a star schema:
1. Perform Steps 1-2 described in To add a dimension: (page 235) above.
2. Select the dimension(s) you want to add to the star schema and then click the Add Dimension to Star
Schema toolbar button. The Add Dimension <Name> to Star Schema window opens.
3. Select which star schema(s) you want to add the dimension to and then click OK. The dimension is
attached to the selected star schema(s).
4. If you already created the data mart tables (as described in Adding data marts and star schemas (page
225)), you need to create the new dimension table(s) in the data mart. To do this, perform the
validation process described in Validating and adjusting the data mart (page 252).
Otherwise, perform steps 14 and 15 in Adding data marts and star schemas (page 225). If you also want
to run a data mart task, perform step 16 as well.
Importing and referencing dimensions
You can import dimensions or reference existing dimensions as needed.
Importing dimensions
You can import dimensions from other data marts in the same project. This is especially useful if:
Setup and User Guide - Qlik Compose, May 2022 235

5 Data Warehouse projects
l
Several developers are working on the same data mart, developing different complex dimensions
l
You need to use a dimension from another data mart and modify it slightly
To import dimensions
1. Open the Manage Data Marts window and click the Import or Reference Dimensions toolbar button.
2. From the Source data mart drop-down list, select the data mart containing the dimensions to import.
3. Select Import the selected dimensions.
4. Select which dimensions to import and then click OK.
Only dimensions that do not already exist in the current data mart (with same name) are
available for selection.
The dimensions are imported to your data mart.
Referencing dimensions
The ability to reference dimensions improves data mart design efficiency and execution flexibility by
facilitating the reuse of data sets. Reuse of dimension tables across data marts allows you to break up fact
tables into smaller units of work for both design and data loading, while ensuring consistency of data for
analytics.
Throughout this section, a dimension that references another dimension will be referred to as a
"referencing dimension" where a dimension that is referenced by another dimension will be referred
to as a "referenced dimension".
To add a referencing dimension:
1. Open the Manage Data Marts window and click the Import or Reference Dimensions toolbar button.
2. In the Import or Reference Dimensions window, select the Source data mart and then select
Reference the selected dimension.
3. Select which dimensions you want to reference, then click OK.
The dimensions are added to the data mart.
Referencing Dimension names have the following format: <dimension name>_<data
mart name>
Setup and User Guide - Qlik Compose, May 2022 236
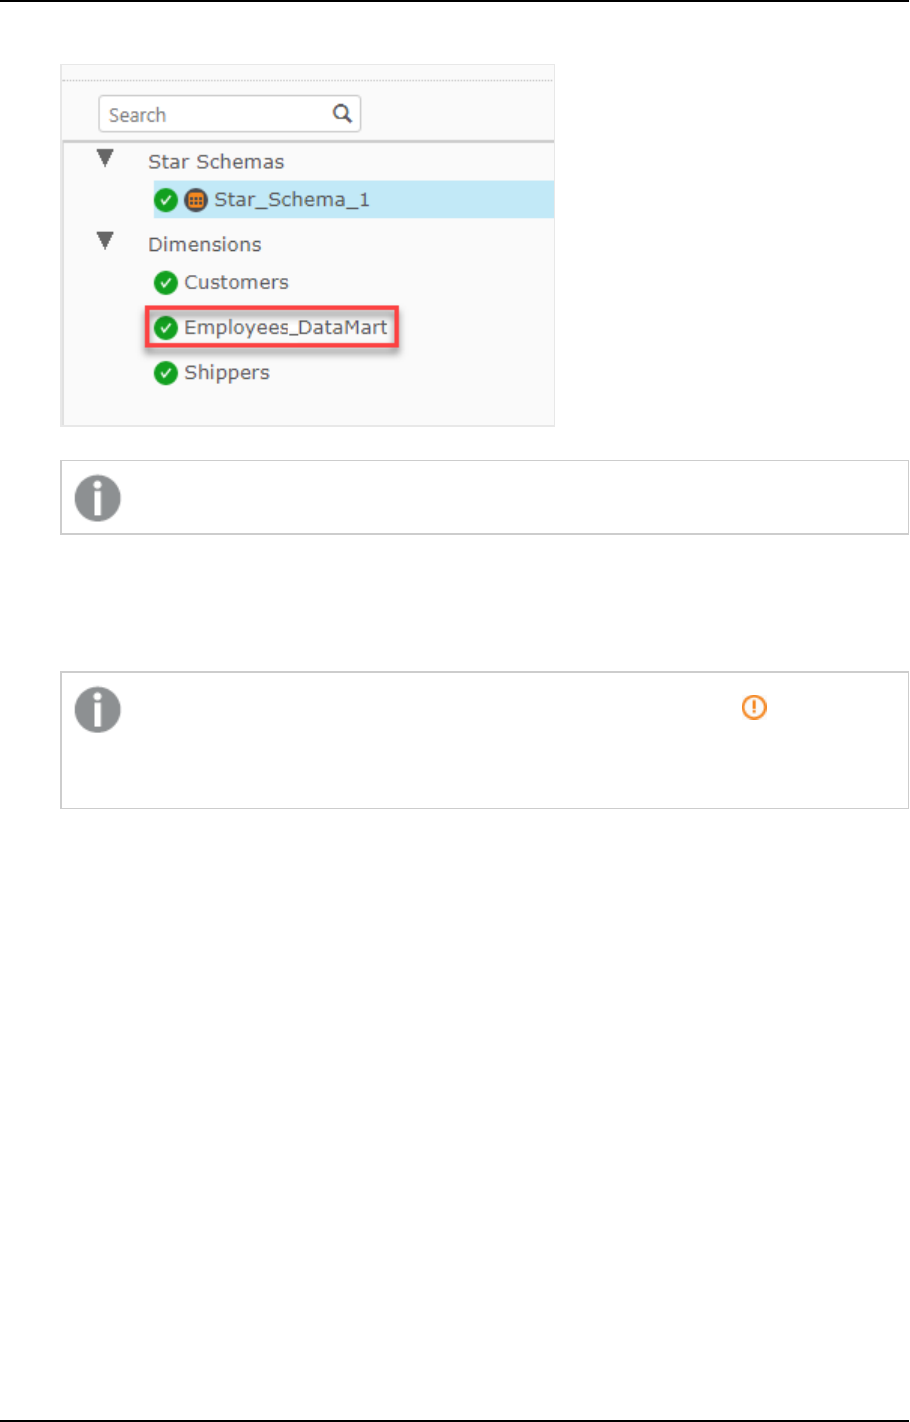
5 Data Warehouse projects
Data mart with referencing dimension
Referencing dimensions are read-only.
4. To add the newly added dimension to the star schema, right-click the dimension and then select Add
to Star Schema.
The Add Dimension <name> to Star Schema window opens.
5. Select which star schema(s) you want to add the dimension to and then click OK.
After adding the referencing dimension to the star schema, you might see a icon next to
the star schema name. This means that you need to validate and adjust the data mart
containing the referenced dimension.
Working with referenced dimensions
It's important to be aware of the limitations and considerations when referencing other dimensions as well as
the best practice guidelines.
Limitations and considerations
l
Referenced dimensions cannot be deleted from the source data mart.
l
Date and time dimensions cannot be referenced.
l
Data lineage will not show all of the referenced dimensions.
l
Deleting a dimension that references another referenced dimension should be done with caution. For
example, If dimension X is referencing dimension Y which in turn is referencing dimension Z, deleting
dimension Y will affect dimension X as well.
l
Referenced dimensions must be created in the same database as the star schema or fact using them.
They can be in a different schema however.
Best practices
l
To prevent data inconsistencies, make sure that the source data marts ( i.e. the data marts containing
the original dimensions) are processed before any data marts referencing those dimensions.
Setup and User Guide - Qlik Compose, May 2022 237

5 Data Warehouse projects
l
To ensure correct processing of referenced dimensions, it is preferable to avoid circular references. An
example of a circular reference is if Data Mart B references Dimension A in Data Mart A and Data
Mart A references Dimension B in Data Mart B.
In some cases, it is okay to use circular references. If, for example, both Data Mart A and
Data Mart B are incrementally updated, then any updates to Data Mart A will use the
current version of Data Mart B, and vice versa.
l
Conformed referenced dimensions that are used by one or more data marts should be grouped into a
single data mart, without fact tables.
l
Transactional fact tables should be grouped into data marts, based on processing requirements.
l
Aggregate and State-oriented star schemas (fact tables) are typically processed during batch windows
as they require complete rebuilds. It is therefore recommended practice to separate Aggregate and
State-oriented fact tables from Transactional fact tables. Doing so, allows Transactional fact tables to
be processed incrementally throughout the day as required, while allowing Aggregate and State-
oriented fact tables to be processed during batch windows.
Editing star schemas
You can edit a star schema according to your needs. Editing options include adding columns, adding
attributes and defining filters.
To edit a star schema (fact table):
1. Click the Manage button in the bottom left of the Data Mart panel. The Manage Data Marts window
opens.
2. In the left pane, select the data mart containing the star schema you want to edit.
3. Expand the list of start schemas and select the star schema you want to edit. Then either click the Edit
button in the lower toolbar or right-click the star schema and select Edit.
The Edit Star Schema - Name window opens. The following tabs are displayed:
l
General tab: In the General tab, you can edit the star schema name, the fact table name, the
fact view name and the description.
The following option is also available for transactional and aggregated facts:
l
Update fact with changes to Type 2 data warehouse entities - Select this option (the
default) if you want the fact table to always be updated with the last record version of
any Type 2 data warehouse entities the star schema contains.
Example:
Assuming the data warehouse has the following Type 2 entities:
l
Orders
l
Order Details
l
Address
Setup and User Guide - Qlik Compose, May 2022 238
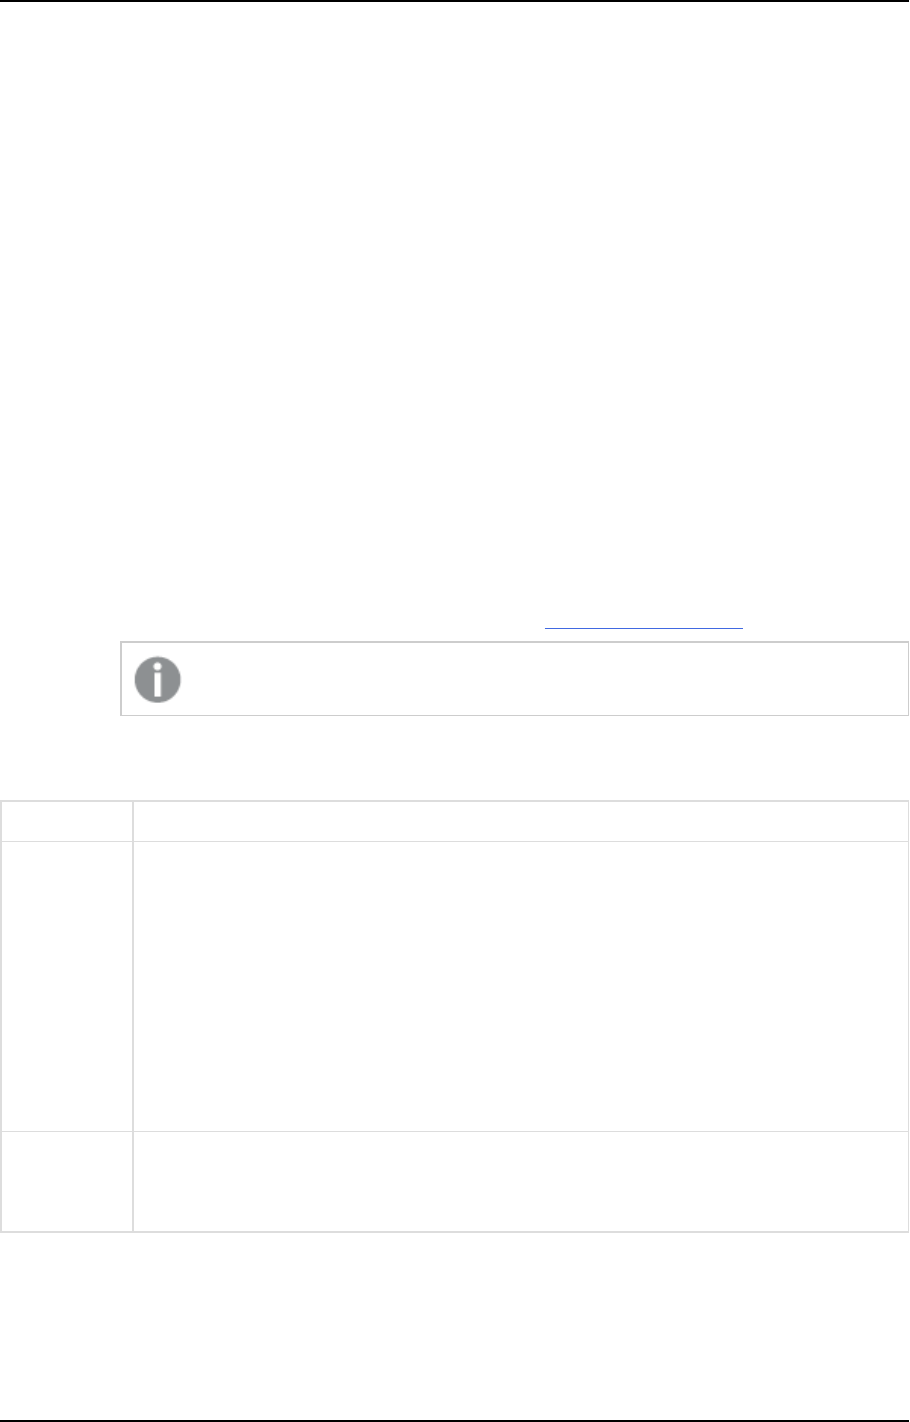
5 Data Warehouse projects
And the data mart consists of the following:
l
Fact = Orders and Order Details
l
Transaction date = Order Date in Orders
l
Dimension = Address (Type 2)
Then the last version of Orders and Order Details will always used and Address will be
updated according to the Oder Date.
See also: Data mart views (page 249).
l
Logical Attributes tab: In the Logical Attributes tab, you can add and delete columns, edit a
column’s properties, view a column’s lineage, change the column order, and define filters.
Edit the Logical Attributes tab according to the table below.
l
Physical Table tab: The Physical Table tab provides a preview of the actual "physical"
columns that will be created in the database. All editing tasks are performed in the Logical
Attributes tab, except for defining table creation modifiers which is performed in the Physical
Table tab.
For an explanation of how to define table creation modifiers, see Example of a Valid Table
Creation Modifier (page 241).
l
Transaction Date tab: The Transaction Date tab enables you to change the transaction date
that you selected when you created the star schema.
For more information on transaction dates, see the Transaction Date screen.
This tab will not be displayed if your Star Schema Type is "State Oriented".
Editing Logical Attributes
To Do this
Add a new
column
1. Click the New toolbar button.
The New Column window opens.
2. In the Name field, specify a name for the column.
3. From the Type drop-down list, select one of the available data types.
4. If the selected data type requires further configuration, additional fields will be
displayed. For example, when Decimal is selected, the Length and Scale fields will
be displayed. Set the values as required.
5. Optionally specify a Description.
6. Click OK to add the column and close the New Column window.
Edit a
column’s
properties
1. Double-click the row containing the column.
The Edit: Column Name window opens.
2. Edit the properties as described in steps 2-6 of Add a new column above.
Logical attributes editing options
Setup and User Guide - Qlik Compose, May 2022 239
5 Data Warehouse projects
To Do this
Delete a
column
Select the column(s) you want to delete (multi-selection is supported) and click the Delete
toolbar button.
The column(s) are deleted.
View a
Column’s
Lineage
1. Select the desired column.
2. Click the Lineage toolbar button.
A windows displaying the column’s lineage is displayed.
For more information about lineages, see Lineage and impact analysis (page 177).
Create a
filter
Click the Filter toolbar button. The Expression Builder opens with the heading: Edit Filter -
TableName.
For information on creating filters, see Creating expressions (page 181).
Using From Date (FD) and To Date (TD) columns in a filtering expression is not
supported.
The assumption is that columns that are used in the filters do not change
between different versions of the record. If this is not the case, the Full rebuild
option should be selected in the Data Mart settings. This assumption is also true
for relationships; for example, if a Sales record relates to Product which relates
to Country, and the filter is applied to the product's country, then the
assumption is that the sale cannot change its product so that it is filtered in or
out based on a new country.
Create or
edit an
expression
Hover the mouse cursor over the desired table column and then click the fx button that
appears to the right of the Expression column. The Expression Builder opens with the
heading: Edit Expression - Column Name.
For information on creating an expression, see Creating expressions (page 181).
Change the
column
order
Select the column(s) you want to move and then click the Move Down/Move to Bottom or
Move Up/Move to Top buttons as desired.
Defining Fact Table Creation Modifiers
You can set table creation modifiers for individual star schema (fact) tables, thereby overriding the default
settings in the project settings' Table creation modifiers tab (page 45). Table modifiers allow you to append
additional table properties to the default Compose CREATETABLE statement.
The available options are located below the Columns list in the Physical Table tab, and are as follows:
l
Project settings default - When this option is selected (the default), the settings from the project
settings' Table creation modifiers tab (page 45) will be used.
Setup and User Guide - Qlik Compose, May 2022 240
5 Data Warehouse projects
l
Custom - This option is useful for if you need to append table creation modifiers to the default
CREATETABLE statement Compose uses for fact tables. Leveraging this option requires SQLcoding
knowledge.
l
Custom distribution and sort keys - This option is useful if you only need to define custom
distribution keys or sort keys for the fact table. Although this can also be done using the Custom
option (see below), the Custom distribution and sort keys option is more convenient as it does not
require any prior SQL coding knowledge.
l
Supported with Amazon Redshift only.
l
The default distribution key for all data warehouse tables is the ID column.
Setting table creation modifiers
By default, Compose creates tables in the data warehouse using the standard CREATE TABLE statement.
However, organizations often need tables to be created with custom properties for better performance,
special permissions, custom collation, and so on. For example, in Microsoft Azure Synapse Analytics, it’s
possible to create a table as a HEAP, which is optimized for smaller tables. By default, Compose creates tables
in Microsoft Azure Synapse Analytics as a CLUSTERED COLUMNSTORE INDEX, which offers the best overall
query performance for large tables.
The procedure for settings table modifiers is as follows:
1. Open the star schema and select the Physical Table tab.
2. Select the Custom option.
3. Click the Edit button to open the Table Creation Modifier editor.
4. Enter the SQL parts you wish to append to the CREATE TABLE statement.
5. Optionally, but strongly recommended, validate the SQL in an external validation tool that supports
your specific database and version.
Compose does not provide any way of validating your SQL. Therefore, make sure to validate
the SQL before deploying in a production environment.
6. Click OK to close the editor and save your SQL parts.
Example of a Valid Table Creation Modifier
In the following example, the Compose CREATE TABLE statement (rows 1-5) is appended with an SQL part
instructing Compose to create the table as a HEAP (row 6).
CREATE TABLE MyTable
(
column1 integer,
column2 varchar(50),
)
WITH (HEAP)
Setup and User Guide - Qlik Compose, May 2022 241
5 Data Warehouse projects
Setting and managing custom distribution keys for Amazon Redshift tables
Set and manage distribution keys for Amazon Redshift Data Warehouse according to the table below.
To Do This
Add a distribution key 1. Click the Add Distribution Key button.
A row is added to the table displaying a drop-down list.
2. Select one of the available columns.
Set a distribution style From the Distribution Style drop-down, select Even, Key or All.
For more information on distribution styles, see:
Distribution styles - Amazon Redshift
Edit a distribution key 1. Double-click the row.
A drop-down list will be shown in the Column column.
2. Select one of the available columns.
Delete a distribution key Select the distribution key and then click the Delete button. The key is
deleted.
Change the position of a
distribution key
Select the distribution key and then click the "Up" or "Down" buttons to
move the key to the desired position.
Distribution key procedures
Setting and managing custom sort keys for Amazon Redshift tables
You can define one or more of the physical table columns as sort keys. Amazon Redshift stores your data on
disk in sorted order according to the sort key. The Amazon Redshift query optimizer uses sort order when it
determines optimal query plans. For guidelines on choosing sort keys, visit Choose the best sort key - Amazon
Redshift.
Set and manage sort keys for Amazon Redshift Data Warehouse according to the table below.
Setup and User Guide - Qlik Compose, May 2022 242

5 Data Warehouse projects
To Do This
Add a sort key 1. Select the Sort Keys tab below the Columns list.
2. From the Sort key style drop-down list, choose one of the following
styles:
l
None to disable the sort keys
l
Compound to use all of the columns listed in the sort key
definition, in the order they are listed
l
Interleaved to give equal weight to each column in the sort key
3. Click the Add Sort Key button.
A new row is added to the Sort Keys list. The Position column indicates
the order of the column.
4. From the drop-down list in the Column column, select the desired
column.
The column is add to the list.
5. Click OK to save your settings and close the Edit Dimension/Edit Star
Schema window.
Edit a sort key 1. Double-click the row.
A drop-down list will be shown in the Column column.
2. Select one of the available columns.
Change the position of a
sort key
Select the sort key you want to move and then click the up or down arrows to
promote or demote the key.
Delete a sort key Select the sort key you want to delete and then click the Delete button.
Sort key procedures
For more information about sort keys, visit: Choosing sort keys - Amazon Redshift.
Editing dimensions
You can edit a dimension according to your needs. Editing options include adding columns, adding attributes
and defining filters.
Changes in a dimension expression or lookup of a column in a dimension are not updated
retroactively. In order to update historical data, you would need to reload the data which could take
a long time depending on the number of records and their history.
To edit a dimension:
1. Click the Manage button in the bottom left of the Data Mart panel.The Manage Data Marts window
opens.
2. In the left pane, select the data mart containing the star schema you want to edit.
3. Expand the list of dimensions and select the dimension you want to edit. Then either click the Edit
button in the lower toolbar or right-click the star schema and select Edit.
Setup and User Guide - Qlik Compose, May 2022 243
5 Data Warehouse projects
The Edit Conformed Dimension - Name (or Edit Dimension - Name if the dimension has not yet been
added to the data mart) window opens. The following tabs are displayed:
l
General tab: In the General tab, you can edit the dimension name, the dimension table name,
the dimension view name and the description. You can also change the dimension’s history
type by selecting Type 1 or Type 2 from the History Type drop-down list. For more
information on changing the history type, see Understanding dimension history types (page 248).
See also Data mart views (page 249).
l
Logical Attributes tab: In the Logical Attributes tab, you can add and delete columns, edit a
column’s properties, view a column’s lineage, change the column order, and define filters.
Edit the Logical Attributes tab according to the table below.
l
Physical Table tab: The Physical Table tab provides a preview of the actual "physical"
columns that will be created in the database. All editing tasks are performed in the Logical
Attributes tab, except for defining table creation modifiers which is performed in the Physical
Table tab.
For an explanation of how to define table creation modifiers, see Example of a Valid Table
Creation Modifier (page 241).
4. Edit the Logical Attributes tab according to Editing star schemas (page 238).
You can apply or revert your changes at any time, simply by clicking the Apply or Cancel
buttons respectively.
5. Click OK to close the window and save your settings or Cancel to close the window without saving your
settings.
Editing Logical Attributes
To Do this
Add a new
column
1. Click the New toolbar button.
The New Column window opens.
2. In the Name field, specify a name for the column.
3. From the Type drop-down list, select one of the available data types.
4. If the selected data type requires further configuration, additional fields will be
displayed. For example, when Decimal is selected, the Length and Scale fields will
be displayed. Set the values as required.
5. Optionally specify a Description.
6. Click OK to add the column and close the New Column window.
Edit a
column’s
properties
1. Double-click the row containing the column.
The Edit: Column Name window opens.
2. Edit the properties as described in steps 2-6 of Add a new column above.
Logical attributes editing options
Setup and User Guide - Qlik Compose, May 2022 244

5 Data Warehouse projects
To Do this
Delete a
column
Select the column(s) you want to delete (multi-selection is supported) and click the Delete
toolbar button.
The column(s) are deleted.
View a
Column’s
Lineage
1. Select the desired column.
2. Click the Lineage toolbar button.
A windows displaying the column’s lineage is displayed.
For more information about lineages, see Lineage and impact analysis (page 177).
Create a
filter
Click the Filter toolbar button. The Expression Builder opens with the heading: Edit Filter -
TableName.
For information on creating filters, see Creating expressions (page 181).
Using From Date (FD) and To Date (TD) columns in a filtering expression is not
supported.
The assumption is that columns that are used in the filters do not change
between different versions of the record. If this is not the case, the Full rebuild
option should be selected in the Data Mart settings. This assumption is also true
for relationships; for example, if a Sales record relates to Product which relates
to Country, and the filter is applied to the product's country, then the
assumption is that the sale cannot change its product so that it is filtered in or
out based on a new country.
Create or
edit an
expression
Hover the mouse cursor over the desired table column and then click the fx button that
appears to the right of the Expression column. The Expression Builder opens with the
heading: Edit Expression - Column Name.
For information on creating an expression, see Creating expressions (page 181).
Change the
column
order
Select the column(s) you want to move and then click the Move Down/Move to Bottom or
Move Up/Move to Top buttons as desired.
Defining Dimension Table Creation Modifiers
You can set table creation modifiers for individual dimension tables, thereby overriding the default settings in
the project settings' Table creation modifiers tab (page 45). Table modifiers allow you to append additional
table properties to the default Compose CREATETABLE statement.
The available options are located below the Columns list in the Physical Table tab, and are as follows:
l
Project settings default - When this option is selected (the default), the settings from the project
settings' Table creation modifiers tab (page 45) will be used.
Setup and User Guide - Qlik Compose, May 2022 245

5 Data Warehouse projects
l
Custom - This option is useful for if you need to append table creation modifiers to the default
CREATETABLE statement Compose uses for dimension tables. Leveraging this option requires
SQLcoding knowledge.
l
Custom distribution and sort keys - This option is useful if you only need to define custom
distribution keys or sort keys for the dimension table. Although this can also be done using the
Custom option (see below), the Custom distribution and sort keys option is more convenient as it
does not require any prior SQL coding knowledge.
l
Supported with Amazon Redshift only.
l
The default distribution key for all data warehouse tables is the ID column.
Setting table creation modifiers
By default, Compose creates tables in the data warehouse using the standard CREATE TABLE statement.
However, organizations often need tables to be created with custom properties for better performance,
special permissions, custom collation, and so on. For example, in Microsoft Azure Synapse Analytics, it’s
possible to create a table as a HEAP, which is optimized for smaller tables. By default, Compose creates tables
in Microsoft Azure Synapse Analytics as a CLUSTERED COLUMNSTORE INDEX, which offers the best overall
query performance for large tables.
The procedure for settings table modifiers is as follows:
1. Open the dimension and select the Physical Table tab.
2. Select the Custom option.
3. Click the Edit button to open the Table Creation Modifier editor.
4. Enter the SQL parts you wish to append to the CREATE TABLE statement.
5. Optionally, but strongly recommended, validate the SQL in an external validation tool that supports
your specific database and version.
Compose does not provide any way of validating your SQL. Therefore, make sure to validate
the SQL before deploying in a production environment.
6. Click OK to close the editor and save your SQL parts.
Example of a Valid Table Creation Modifier
In the following example, the Compose CREATE TABLE statement (rows 1-5) is appended with an SQL part
instructing Compose to create the table as a HEAP (row 6).
CREATE TABLE MyTable
(
column1 integer,
column2 varchar(50),
)
WITH (HEAP)
Setup and User Guide - Qlik Compose, May 2022 246

5 Data Warehouse projects
Setting and managing custom distribution keys for Amazon Redshift tables
Set and manage distribution keys for Amazon Redshift Data Warehouse according to the table below.
To Do This
Add a distribution key 1. Click the Add Distribution Key button.
A row is added to the table displaying a drop-down list.
2. Select one of the available columns.
Set a distribution style From the Distribution Style drop-down, select Even, Key or All.
For more information on distribution styles, see:
Distribution styles - Amazon Redshift
Edit a distribution key 1. Double-click the row.
A drop-down list will be shown in the Column column.
2. Select one of the available columns.
Delete a distribution key Select the distribution key and then click the Delete button. The key is
deleted.
Change the position of a
distribution key
Select the distribution key and then click the "Up" or "Down" buttons to
move the key to the desired position.
Distribution key procedures
Setting and managing custom sort keys for Amazon Redshift tables
You can define one or more of the physical table columns as sort keys. Amazon Redshift stores your data on
disk in sorted order according to the sort key. The Amazon Redshift query optimizer uses sort order when it
determines optimal query plans. For guidelines on choosing sort keys, visit Choose the best sort key - Amazon
Redshift.
Set and manage sort keys for Amazon Redshift Data Warehouse according to the table below.
Setup and User Guide - Qlik Compose, May 2022 247
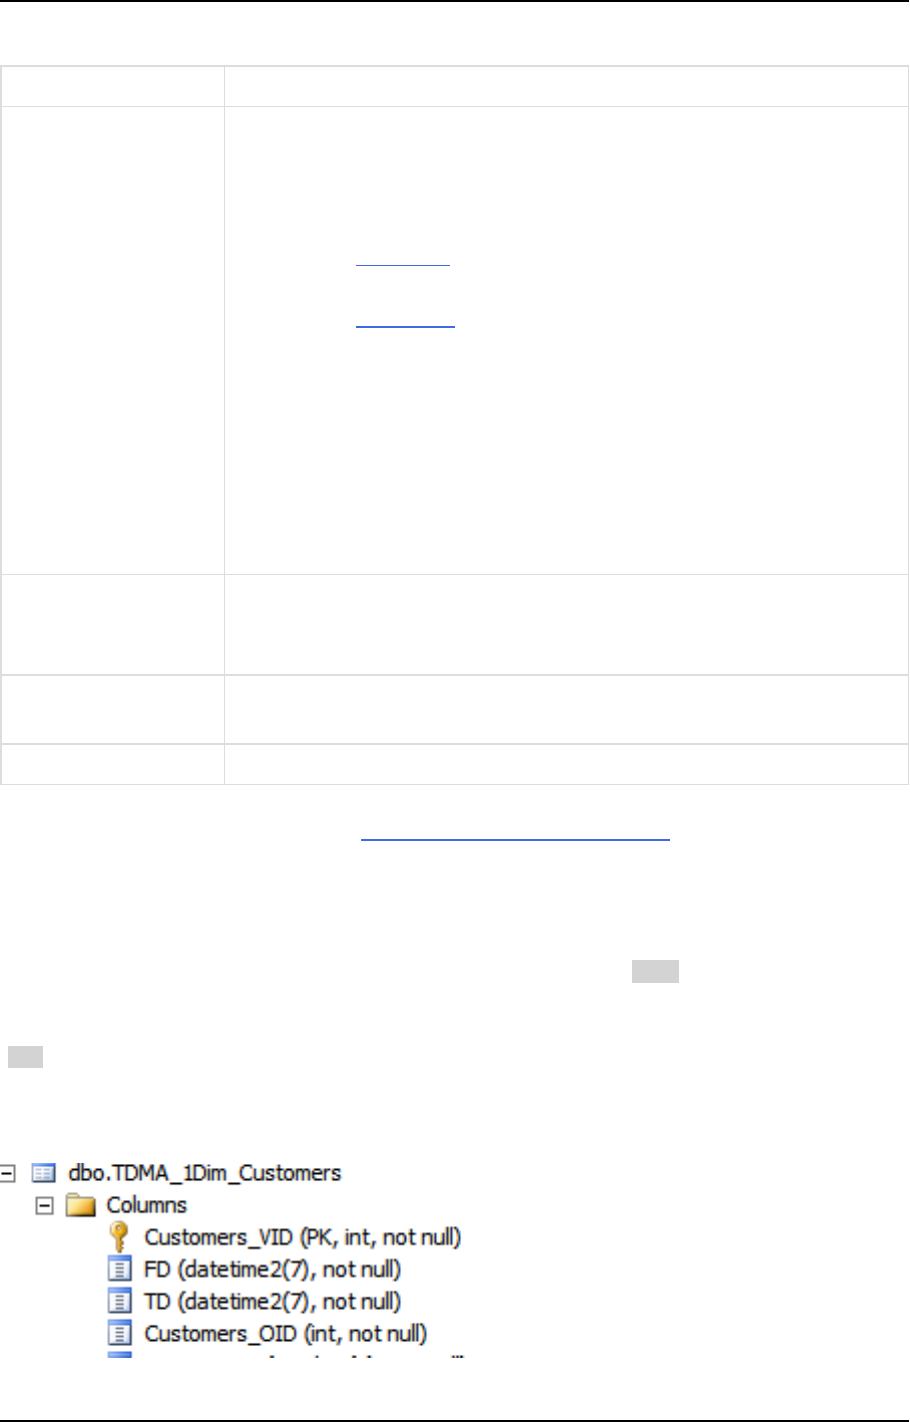
5 Data Warehouse projects
To Do This
Add a sort key 1. Select the Sort Keys tab below the Columns list.
2. From the Sort key style drop-down list, choose one of the following
styles:
l
None to disable the sort keys
l
Compound to use all of the columns listed in the sort key
definition, in the order they are listed
l
Interleaved to give equal weight to each column in the sort key
3. Click the Add Sort Key button.
A new row is added to the Sort Keys list. The Position column indicates
the order of the column.
4. From the drop-down list in the Column column, select the desired
column.
The column is add to the list.
5. Click OK to save your settings and close the Edit Dimension/Edit Star
Schema window.
Edit a sort key 1. Double-click the row.
A drop-down list will be shown in the Column column.
2. Select one of the available columns.
Change the position of a
sort key
Select the sort key you want to move and then click the up or down arrows to
promote or demote the key.
Delete a sort key Select the sort key you want to delete and then click the Delete button.
Sort key procedures
For more information about sort keys, visit: Choosing sort keys - Amazon Redshift.
Understanding dimension history types
By default, dimension tables are defined as history type 2, meaning that a new record is added each time a
record is updated (as opposed to updating the same record). In the data warehouse, dimension tables always
contain an object identifier column which is the table name appended with "_OID". However, when a
dimension table’s history type is 2, an additional "version" column is added as the dimension table’s Primary
Key. This column, which is used to identify the version, has the same name as the table, but is appended with
"VID".
The flowing figure shows the Customer_VID and Customer_OID (object identifier) columns in the Customers
dimension table:
Setup and User Guide - Qlik Compose, May 2022 248
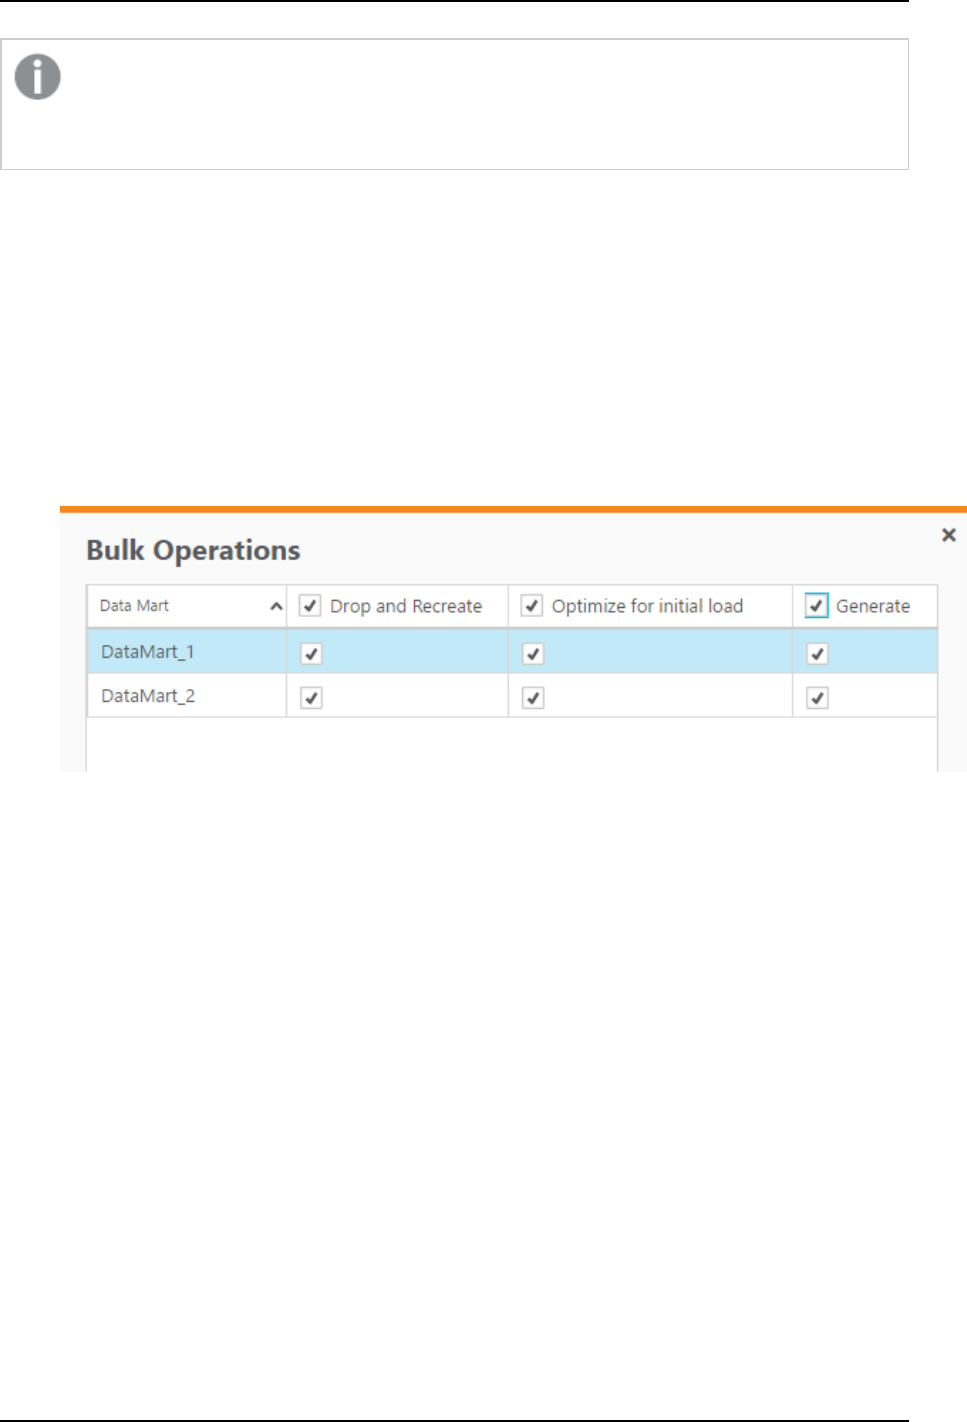
5 Data Warehouse projects
If a dimension table is defined as history type 1 and one or more of the columns in the corresponding
data warehouse are defined as type 2, records in the dimension table will simply be replaced with
the most up-to-date record in the corresponding data warehouse table.
Bulk operations
You can perform the following bulk operations on one or more data marts:
l
Drop and recreate tables
l
Enable/Disable the Optimize for initial load option
l
Generate the data mart task
To perform bulk operations
1. Click the Bulk Operations toolbar button in the Manage Data Marts widow. The Bulk Operations
window opens.
2. Select which operations to perform and on which data marts to perform them.
3. Click OK. The Preparing All Data Marts window opens, displaying the progress of the selected
operations.
4. When the <n> data marts were prepared successfully message is displayed, click Close.
Data mart views
By default, data mart tables are created without corresponding views. Views may be useful however because
they:
l
Allow authorized employees to utilize the data mart for analytics while preventing changes to the
actual data.
l
Can be queried without needing to worry about "locking" the data.
When you create a view for a fact or dimension table, you also need to set the schema in which the view will
be created.
Additionally, the schema permissions should only allow authorized employees to access the view(s).
For instructions on setting the view schema, see Modifying data mart settings (page 255).
See also Editing star schemas (page 238) and Editing dimensions (page 243).
Setup and User Guide - Qlik Compose, May 2022 249

5 Data Warehouse projects
Deleting data marts, schemas and dimensions
You can delete data marts, star schemas and dimensions that you no longer require.
Deleting a data mart
1. Select the data mart and then click the upper Delete Data Mart toolbar button.
2. Click OK when prompted to confirm the deletion.
Deleting a star schema
1. Select the star schema and then click the lower Delete toolbar button.
OR
Right-click the star schema and select Delete.
2. Optionally select the Drop unused dimensions check box.
3. Click OK when prompted to confirm the deletion.
Deleting a dimension
1. Select the dimension and then click the lower Delete toolbar button.
OR
Right-click the dimension and select Delete.
2. Click OK when prompted to confirm the deletion.
Creating and managing custom ETLs
You can create and manage Pre and Post Loading ETLs as described in the table below.
Common Table Expressions (CTEs) are not supported as well as some special clauses.
Setup and User Guide - Qlik Compose, May 2022 250

5 Data Warehouse projects
To Do This
Define a Pre Loading or
Post Loading ETL
1. Select either the Pre Loading or Post Loading tab as appropriate.
2. Click the New button above the User Defined ETL column.
The Add New Pre/Post Loading window opens.
3. Specify a name for the ETL and then click OK.
The name is added as a link to the User-Defined ETL column.
4. Click the link.
The Edit ETL Instruction: Name window opens.
5. To define an ETL:
a. Select a table and/or column and click the arrow to the right of
the selected table/column to add it to the ETL.
b. Use the Select, Delete, Insert and Update quick access buttons
at the top of the window to add SQL statements to your ETL.
c. To save your ETL, click OK.
d. To enable/disable the ETL, select or clear the check box to the
left of it as required.
Rename a Pre Loading or
Post Loading ETL
1. Select either the Pre Loading or Post Loading tab as appropriate.
2. At the end of the row containing the ETL name click the Rename
button (A).
3. Rename the ETL and then click OK to save the new name.
Edit a Pre Loading or Post
Loading ETL
1. Select either the Pre Loading or Post Loading tab as appropriate.
2. At the end of the row containing the ETL name click the Edit button.
3. Edit the ETL as described in Step 5 of Define a Pre Loading or Post
Loading ETL.
ETLactions
Updating custom ETLs
Compose CLI requires Administrator permission. To grant Administrator permission, select "Run as
administrator" when opening the command prompt. All commands should be run from the Compose
bin directory (C:\Program Files\Qlik\Compose with a default installation).
You can update custom ETLs using the Compose CLI. This functionality can be incorporated into a script to
easily update Custom ETLs.
Syntax:
composecli update_custom_etls --project name --infolder path
Where:
l
project is the name of the project with the custom ETLs you want to update
l
infolder is the full path to the folder containing the custom ETL files
Setup and User Guide - Qlik Compose, May 2022 251

5 Data Warehouse projects
Example:
composecli update_custom_etls --project my-project --infolder
c:\Compose\CustomETLs
The file names in the input folder must be identical to the custom ETL names in the specified project.
Otherwise, an error will occur. The file extension (for example, .txt) is not important, but the file must
be in SQL format.
Viewing and exporting task statements
You can view the task statements that are run during the data mart task. You can also export the task
statements to a CSV file for reviewing and sharing.
To view the task statements:
l
Click the Task statements toolbar button. The ETL - Name window opens in List View. Navigate
through the statements using the scroll bar or find specific statements using the Search box.
OR
l
Click the Item View button and navigate through the statements using the navigation buttons at the
bottom of the ETL - Name window
To jump to a specific statement, type the statement number in the Go To field at the bottom of the
window and then press [Enter].
To export the task statements to a CSV file:
1. In List View, click the Export to CSV File button located to the left of the search field.
2. A file named "<name>_ETL_Instructions.csv" will be saved to your default Downloads location
or you will be prompted to save it (according to your browser settings).
Validating and adjusting the data mart
Whenever you edit a data mart, certain actions need to be performed to ensure that the data mart is valid. For
a data mart to be considered valid, the tables defined in the data mart need to be identical to the physical
tables in terms of metadata. Depending on the change, this may require adjusting the physical tables or
dropping and recreating them (via Compose).
Additionally, the generated task statements must reflect the current state of the data mart. So, for example, if
a filter or expression was added/edited, you will need to regenerate the task statements before running the
data mart task.
If the data mart is not valid, any tasks that you attempt to run will fail.
Situations in which you need to validate the data mart and/or regenerate the task statements include:
Setup and User Guide - Qlik Compose, May 2022 252

5 Data Warehouse projects
l
Each time the data warehouse is adjusted
l
Each time a new dimension is added to a star schema
l
Each time a new star schema is added to a data mart
l
Adding or removing columns
l
Changes to a dimension’s history type
l
Changes to transformations (expressions/filters)
l
Changes to a star schema’s transaction date
l
Changes to a star schema’s aggregation type (max, min, etc.)
Note that clicking the Validate button only verifies that the table metadata is valid. In certain cases, even if
the metadata is valid, Compose will prompt you to regenerate the task statements (by clicking the Generate
button).
When you validate a data mart, Compose presents you with a list of operations that it needs to perform for
the data mart to be valid. Examples of such operations include adding dimension and fact tables, deleting the
fact table when the transaction date column has been deleted from the model, and so on. You can either click
Adjust Automatically or Drop and Recreate Tables to approve the operations or click Cancel to continue
working with the data mart in its present state.
To validate the data mart:
1. Click the Validate toolbar button in the Manage Data Marts window. The Validating the Data Mart
progress window opens.
If any differences are detected, the following message will be displayed:
Data mart validation failed. The data mart is different from the model.
2. Click Close. The Model and Data Mart Comparison Report window opens.
3. Review the report and then click Adjust Automatically or Drop and Recreate Tables to resolve the
differences.
Either the Adjust Data Mart progress window opens or, if you clicked Drop and Recreate Tables,
confirm the drop and recreate operation. When you confirm the drop and recreate operation, the
Creating Data Mart: Name window is displayed.
4. When the "The data mart was adjusted successfully." or "The data mart has been created
successfully." (in the case of drop and recreate) message is displayed, close the window.
5. Click the Generate toolbar button to regenerate the task statements.
When a dimension’s history type has been changed directly in the data mart, the data mart
validation will be successful, but you also need to drop and recreate the tables by clicking the
Create Tables toolbar button. For information on changing history types, see the General tab tab in
the Edit Dimensions window.
You can also adjust the data mart automatically using the generate_project CLI. For more information, see
Generating projects using the CLI (page 98).
Setup and User Guide - Qlik Compose, May 2022 253
5 Data Warehouse projects
Auto-adjust limitations and considerations
The Adjust Automatically option has the following limitations, which also apply when the data mart is
adjusted using the generate_project CLI.
l
If a new data warehouse attribute was added to a dimension or to a fact by directly editing them in
Compose:
l
All columns are supported except Transaction Date columns, which cannot be added
automatically.
l
For existing records, the newly added column will be set to the database default value, usually
NULL. If you want to load historical data for this column, you need to drop and create the data
mart and then reload it. For information on reloading the data mart, see Reloading the data
mart (page 254).
l
If a logical attribute was dropped from a dimension or from a fact in the data mart, the data mart
adjust will:
l
Drop it in the relevant tables, except Transaction Date columns which cannot be dropped
automatically.
l
When there is an external dependent object that prevents deletion of the column (for example,
a View is defined on top of the data mart table), Compose will report the error in the adjust
execution messages. You then need to drop that object and run the adjust again.
l
For referenced dimensions:
l
Adjusting a data mart does not adjust any dimensions that are referencing that data mart. The
data mart containing the referencing dimensions needs to be adjusted separately.
l
Adjusting a dimension might also affect the referencing data mart facts.
The limitations and considerations are also applicable when the data mart is automatically adjusted
using the generate_project CLI.
Reloading the data mart
After columns have been added to dimension or fact tables as part of an adjust operation, you might want to
load those columns with historical data. You can do this using the markReloadDatamartOnNextRun CLI.
You mark the entire data mart to be reloaded on the next run, which might be useful if many columns have
been added, or you can mark only specific facts or dimensions to be reloaded on the next run.
You can also mark dimensions and facts from several data marts to be reloaded on the next run or mark
multiple data marts to be reloaded in their entirety (on the next run) using a CSV file.
Command syntax
ComposeCli.exe mark_reload_datamart_on_next_run --project
project_name
--datamart
datamart_
name
[--fact
fact_name
|--dimension
dimension_name
|--csv
csvfile_name
] [--obsoleteallrecords]
Setup and User Guide - Qlik Compose, May 2022 254

5 Data Warehouse projects
Parameters
Parameter Description
--project The name of the project.
--datamart The name of the data mart containing the fact(s) or dimension(s) to be
reloaded.
--fact The name of a specific fact you want to be reloaded.
--dimension The name of a specific dimension you want to be reloaded. Any facts
related to these dimensions will also be reloaded to ensure that the data
mart VIDs stay valid.
--obsoleteallrecords Use this parameter to mark all of the existing dimension records as
obsolete. You might need to do this if, for example, a new column was
added to the dimension and you want to reload existing records with the
new column. In such a case, you might want to preserve the old records
as they were before the new column was added and populated.
See also: The "Obsolete" indicator (page 257).
--csv A CSV file containing a list of facts or dimensions from one or more data
marts, or a list of data marts. Each row in the CSV file should also contain
"yes" or "no", indicating whether or not to mark the records as obsolete.
CSV file format:
data mart,fact|dimension,yes|no
Example 1 - Reloading dimensions from two different data marts:
MyDataMart1,orders,no
MyDataMart2,customers,yes
Example 2 - Reloading two complete data marts:
MyDataMart1,,no
MyDataMart2,,no
Example
ComposeCli.exe mark_reload_datamart_on_next_run --project inventory --datamart MyDataMart
--
fact orders
Modifying data mart settings
You can modify the data mart settings according to your needs.
Setup and User Guide - Qlik Compose, May 2022 255
5 Data Warehouse projects
To modify data mart settings:
1. In the Manage Data Marts window, select a data mart and click Settings.
The Setting - Data Mart Name window opens. In the General tab, the following settings are available:
l
Log level: Select the log level granularity, which can be any of the following:
l
INFO (default) - Logs informational messages that highlight the progress of the ETL
process at a coarse-grained level.
l
VERBOSE - Logs fine-grained informational events that are most useful to debug the ETL
process.
l
TRACE - Logs finer-grained informational events than the VERBOSE level.
The log levels VERBOSE and TRACE impact performance. Therefore, you should only select
them for troubleshooting if advised by Qlik Support.
l
Load Type: Select Full rebuild to build the data mart from scratch each time or Incremental
loading (default) to only load changes.
Incremental loading is not available for Aggregated or State Oriented fact tables.
l
Create tables in database - By default, data mart tables are created in the database specified
in the data warehouse connection settings. Optionally, click the browse button and select a
different database.
This option is only available for Microsoft SQL Server.
l
Create tables in schema - By default, data mart tables are created in the schema specified in
the data warehouse connection settings. Optionally, specify a different schema, either by typing
the schema name or by clicking the browse button and selecting one of the existing schemas. If
you specify the name of a non-existing schema, Compose will create the schema automatically.
This option is available for Microsoft SQL Server, Snowflake, and Microsoft Azure
Synapse Analytics only.
l
Create views in schema - By default, data mart views are created in the schema specified in
the data warehouse connection settings. Optionally, specify a different schema, either by typing
the schema name or by clicking the browse button and selecting one of the existing schemas. If
you specify the name of a non-existing schema, Compose will create the schema automatically,
unless the database is Oracle.
If the view schema is different from the data mart schema, you need to grant the
following permission:
Grant SELECT on DM_SCHEMA to DM_VIEW_SCHEMA WITH GRANT OPTION
See also Data mart views (page 249).
2. In the Advanced tab, the following settings are available:
Setup and User Guide - Qlik Compose, May 2022 256

5 Data Warehouse projects
l
Sequential Processing: Select this option if you want to run all the data mart tasks
sequentially, even if they can be run in parallel. This can be good for debugging or profiling.
l
Maximum number of database connections: Enter the maximum number of connections
allowed. The default size is 10.
For more information, see Determining the required number of database connections (page 24).
l
JVM memory settings: Edit the memory for the java virtual machine (JVM) if you experience
performance issues. Xms is the minimum memory; Xmx is the maximum memory. The JVM
starts running with the Xms value and can use up to the Xmx value.
Only the following characters are supported (shown as a regular expression):
/^[-a-zA-Z0-9:]*$/
l
Position in Default Workflow: Set the position you want the data mart to appear in the default
workflow. For more information on workflows, see Workflows (page 268).
l
Optimize for initial load: This option is not applicable to the State Oriented and Aggregated
fact types. If the "Incremental Loading" option is enabled (the default), clear the "Optimize for
initial load" option after the initial load task completes and regenerate the Data Mart task. If the
"Full Rebuild" option is enabled, selecting "Optimize for initial load" may accelerate the loading
process.
l
Write task statement duration to the TLOG_PROCLOG table in the data warehouse: This
option is useful for troubleshooting performance issues with task statements as it records the
duration of each task statement in a special table (named TLOG_PROCLOG) in the data
warehouse. You can then use this information to locate task statements with abnormal
duration times and modify them accordingly.
l
Do not drop temporary tables: Select this option if you want to keep the temporary tables
created during the task. Only use for debugging.
l
Enable table logging: This option is available for Oracle only. When enabled, the data mart
tables will be created with the Oracle LOGGING option enabled. Leaving this option unselected
(the default) should improve performance, but in some cases DML operations will not be
recorded in the redo log file. For more information on this option, refer to the Oracle online
documentation.
3. Click OK.
The "Obsolete" indicator
The Obsolete indicator is used in data marts with Type 2 dimensions and State Oriented Fact tables only.
These type of tables store history, so the attribute OBSOLETE__INDICATION will always be present in data
mart tables that contain the From Date and To Date attributes.
The Obsolete indicator is used in data marts when retroactive changes are applied. When a row is added to a
table for an object in which the From Date is earlier than the date of the existing row, the existing row will be
earmarked as obsolete by setting the value for OBSOLETE__INDICATION to the current run number of the
data mark task.
If no retroactive changes are used in the data marts, the value for the OBSOLETE__INDICATION will be 0.
Setup and User Guide - Qlik Compose, May 2022 257
5 Data Warehouse projects
Rows in a dimension that become obsolete will also enforce changes to the Fact table. The references of the
Fact table to the obsolete rows is updated automatically so that the current, correct rows are referenced. This
means that obsolete rows are isolated, in the sense that they can be deleted without subverting the
referential integrity of the data mart.
The reason Compose does not delete these rows is for auditing purposes. For instance, consider a report that
was generated in the past (using the data mart) and now contains incorrect information. Inspecting the
obsolete rows may account for the discrepancy (i.e. incorrect data in the database as opposed to a deliberate
attempt to manipulate the data).
5.9 Creating and managing command tasks
Command tasks enable you to incorporate custom processes into your Compose workflow. This is especially
useful if you need to leverage external tools to transfer files, validate data, and so on. A Command task can
run any script or executable supported by the operating system including batch files, Python scripts,
PowerShell scripts, executables and so on.
For security reasons, command tasks are blocked by default. To enable command tasks, a Compose
administrator needs to run the following commands in the Compose CLI:
ComposeCli.exe connect [--url connection-url]
Where
--url connection-url
is only required if the Compose Server is on a different machine.
To enable task commands:
ComposeCli.exe allow_user_scripts --enable
To disable task commands:
ComposeCli.exe allow_user_scripts --disable
In this section:
l
Defining command tasks (page 258)
l
Managing command tasks (page 259)
l
Controlling and monitoring command tasks (page 259)
Defining command tasks
This section explains how to define a command task. You can define as many command tasks as you need and
execute them at different stages of a Compose workflow.
Before you define a command task, make sure that the executable or script file that you want to run
resides in the following directory on the Compose server machine:
PRODUCT_DIR\data\projects\YOUR_PROJECT\scripts
Setup and User Guide - Qlik Compose, May 2022 258

5 Data Warehouse projects
To define a command task:
1. From the project drop-down menu, select Manage Command Tasks.
The Manage Command Tasks window opens.
2. Provide a name for the task.
Task names cannot contain the following characters: /\,&#%$@=^*+"'`~?<>:;[]{} as well as all
non-printable characters (below 0x20). The task name can contain a single dot, but it cannot
be the first or last character.
3. Optionally, enter a description.
4. In the Script/Executable File field, specify the name of the files that you want to run.
5. In the Parameters field, specify any parameters required by the command. Parameters should be
separated by a space.
6. The user context is the user account under which the Task will run. To change the current user context,
provide the User, Password and Domain of the account under which you want the Task to run.
7. Click Save to save your changes or Discard to discard any unsaved changes.
The task will be added to the list of tasks in the left of the window.
Managing command tasks
The table below describes the task management options.
Editing a task
Select the task in the tasks list in the left of the Manage Command Tasks window and edit it as described in
Defining command tasks (page 258).
Deleting a task
Select the task in the tasks list in the left of the Manage Command Tasks window and then click the Delete
toolbar button. When prompted to confirm the deletion, click OK.
Searching for a task
Enter part of the task name in the search box above the task list. The list of tasks will be filtered to show only
tasks that include the search term in their name.
Controlling and monitoring command tasks
Command Tasks can be run from the Manage Command Tasks window or from the main Compose Monitor
view. Although they can be run individually, command tasks are usually run as part of a workflow.
For information on defining workflows, controlling and monitoring tasks, and controlling and monitoring
workflows, see Controlling and monitoring tasks and workflows (page 260).
Setup and User Guide - Qlik Compose, May 2022 259

5 Data Warehouse projects
To run a command task from the Manage Command Tasks window:
1. Open the Manage Command Tasks window and select the task you want to run.
2. Click the Run toolbar button.
3. The Manage Command Tasks window switches to Monitor view.
In Monitor view the following information is available:
l
The task ID
l
The current status
l
When the task started and ended
l
The overall task progress
5.10 Controlling and monitoring tasks and workflows
The Compose monitor shows the current status of all your tasks and enables you to drill-down for additional
information about each task. Task instances can be run immediately or scheduled to run in the future (either
once or at set intervals).
In this section:
l
Viewing information in the monitor (page 260)
l
Viewing missing references (page 262)
l
Controlling tasks (page 264)
l
Notifications (page 266)
l
Workflows (page 268)
l
Monitoring and controlling Qlik Replicate tasks (page 272)
Viewing information in the monitor
As well as providing a high-level summary of all your tasks, the monitor also lets you view more detailed
information about specific tasks.
To switch to monitor view:
1. Open a data warehouse project and click the Monitor icon in the top right of the console.
A list of tasks is displayed for the current project. The left pane of the monitor allows you to filter the
task list by status as well as indicating the current number of running, failed and completed tasks.
Setup and User Guide - Qlik Compose, May 2022 260
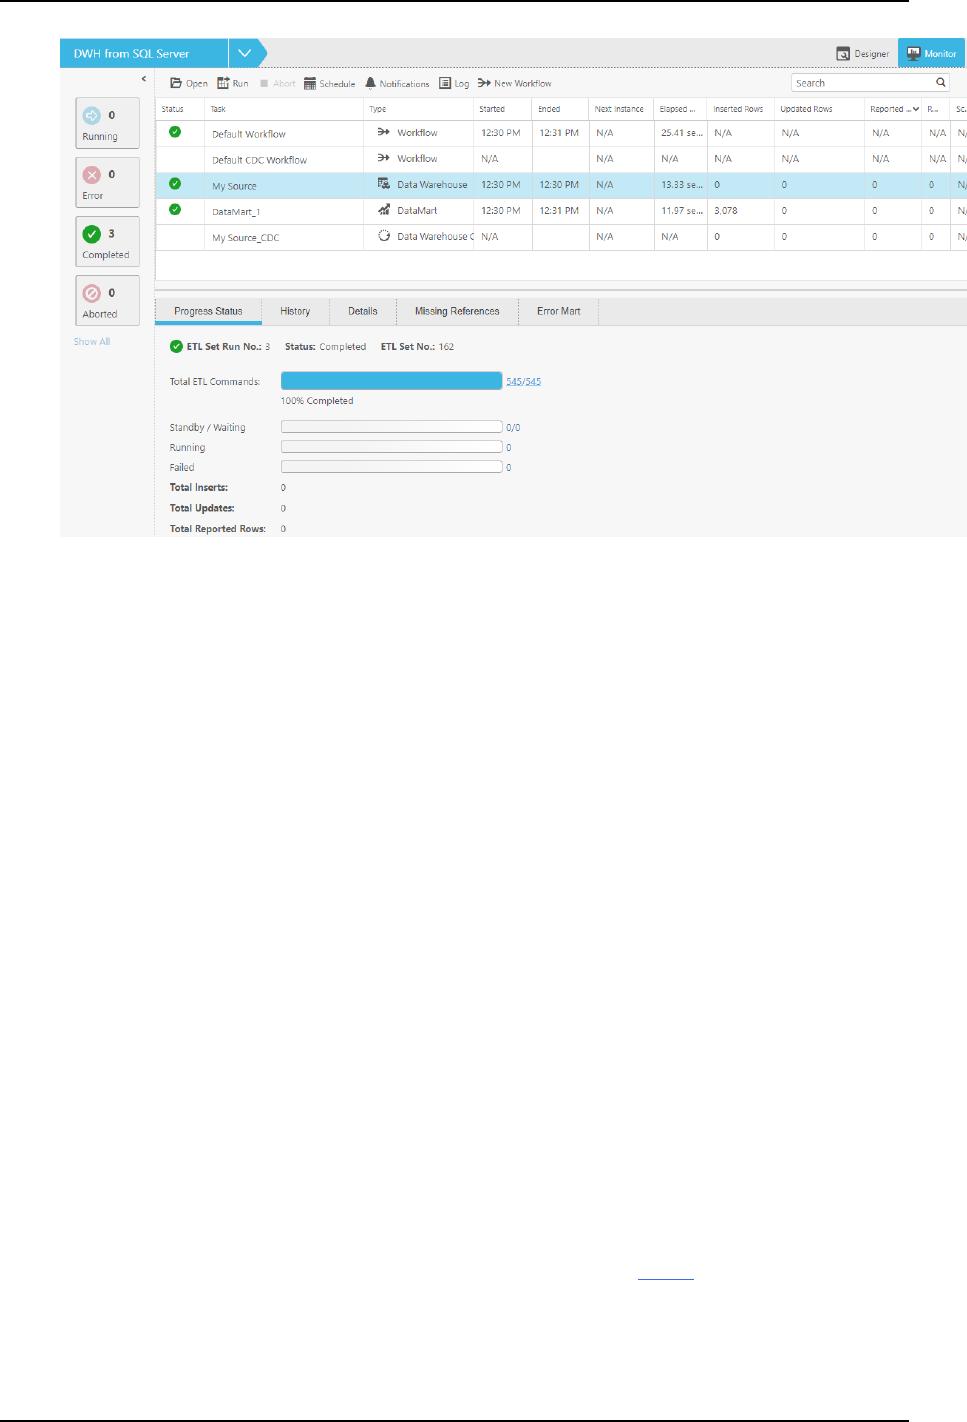
5 Data Warehouse projects
For each task, the monitor displays the following information:
l
Status - Running, Completed or Failed
l
Name - The task name.
l
Type - Data Warehouse, Data Mart, Workflow, Command Task or Replicate Task.
l
Started and Ended - The date and time the task started and completed (according to the
server time). If the task is running, the Ended column will display the current progress. In the
case of a Replicate task performing Change Processing, Running CDC will be displayed.
l
Next Instance - The next time the task is due to run (if the task is scheduled).
l
Elapsed Time - The time it took for the task to complete or - if the task is still running - how
long the task has been running.
l
Inserted Rows - The number of rows inserted into the data warehouse or data mart.
l
Updated Rows - The number of rows updated in the data warehouse or data mart.
l
Reported Rows - The number of rows reported to the error mart table(s). - The number of rows
reported to the error mart table(s).
For more information on error marts, see Defining and managing data quality rules (page 211).
l
Disabled - Whether the scheduled job has been disabled.
2. To view additional information about a task, select the task. The information is displayed in the
following tabs in the lower pane of the monitor:
l
Details - Use the navigation arrows to browse through task instances. For each entity, the total
number of inserted, updated and deleted rows is shown.
l
History - The History tab provides a list of previous task instances.
To view a task instance’s log file, select the task and click the View Log button.
To view more details about a task instance, either double-click the instance or select the
instance and then click the View Instance Details button. The Details tab is shown.
Setup and User Guide - Qlik Compose, May 2022 261

5 Data Warehouse projects
l
Progress Status - The Progress Status tab shows the task’s current progress as well as the
sub-status of task statements within the task (Waiting/Standby, Running, Failed, etc.). To see
details about a specific task statements, click the number to the right of the command status.
For example, to view more information about an task statement with an error status, click the
number to the right of Error.
l
Error Mart - The Error Mart tab displays information when one or more Data Quality rules are
enforced during the task (and the rules have been configured to report non-compliant data).
The following information is available:
l
Entity Name - The name of the entity for which rule was created.
l
Mappings - The mapping for which the rule was created.
l
Error Mart Table - The name of the error mart table crated as a result of the rule being
enforced.
l
Schema - The name of the schema containing the error mart table.
l
Reported Rows - The number of rows reported to the error mart. Clicking the number
opens the actual error mart table as it appears in the data warehouse.
l
Missing References - For a description of this tab, see Viewing missing references (page 262).
See also: Defining and managing data quality rules (page 211).
3. To run a job immediately, select the task and then click the Run toolbar button.
4. To view a task’s settings, select the task and then click the Open toolbar button. For more information
about the settings, see Creating and managing the data warehouse (page 190) and Creating and
managing data marts (page 225).
Viewing missing references
In some cases, incoming data is dependent on or refers to other data. If the referenced data cannot be loaded
for some reason, you can either decide to add the data manually or continue on the assumption that the data
will arrive before it is needed.
There are two ways you can view missing references in Compose. Either via the Monitor tab in the Manage
Data Warehouse Tasks window or by switching the console to Monitor view and selecting the Missing
References tab. The instructions below cover both of these methods.
To check for missing references in the Manage Data Warehouse Tasks window:
1. Click the Manage button in the lower left corner of the Data Warehouse panel.
2. Select the desired task in the left side of the Manage Data Warehouse Tasks window.
3. Switch to Monitor view by clicking the Monitor tab in the top right of the Manage Data Warehouse
Tasks window.
4. Click the View Missing References toolbar button. The Missing References - <task Name> window
opens.
The following information is displayed:
l
General information: The run number of the task, when it started and ended, the total number
of inserts and updates, and the number of reported rows (if any).
l
Missing references information:
Setup and User Guide - Qlik Compose, May 2022 262

5 Data Warehouse projects
l
Missing Records from Entity - The name of the entity with missing reference and the
number of missing references.
To see the missing record keys for the entity, click the number in parentheses to the
right of the entity name.
The Missing Record Keys for Entity - <Entity Name> window opens showing the list of
missing keys and the number of times each key is referenced per entity.
l
Referenced from Entity - The entities that are referencing the entity with missing
references.
l
Via Relationship - The name of the relationship in the Model.
5. To close the window, click Close.
To check for missing references in the Compose Monitor:
1. Switch the console to Monitor View.
2. Select the desired task.
3. Click the Missing References tab below the task list.
The following information is displayed:
l
General information: The run number of the task, when it started and ended, the total number
of inserts and updates, and the number of reported rows (if any).
l
Missing references information:
l
Missing Records from Entity - The name of the entity with missing reference and the
number of missing references.
To see the missing record keys for the entity, click the number in parentheses to the
right of the entity name.
The Missing Record Keys for Entity - <Entity Name> window opens showing the list of
missing keys and the number of times each key is referenced per entity.
l
Referenced from Entity - The entities that are referencing the entity with missing
references.
l
Via Relationship - The name of the relationship in the Model.
4. To close the window, click Close.
Missing references example
In the following example, Orders and Disputes both reference Customers.
Orders contains seven records pointing to Mr. Brown and one record pointing to Mr. Smith. Disputes contains
four records referencing Mr. Brown. Mr. Brown and Mr. Smith are "missing" from Customers.
The would be reflected as follows:
Missing Records from Entity Referenced from Entity Via Relationship
Customers (2) Orders (8) Customers
- Disputes (4) CustomerDisputes
Example table content
Setup and User Guide - Qlik Compose, May 2022 263

5 Data Warehouse projects
Clicking the number to the right of Customers (in the Missing Records from Entity column) would open the
following window:
Key Referenced from Entity Via Relationship
Mr. Brown Orders (7) Customers
- Disputes (4) CustomerDisputes
Mr. Smith Orders (1) Customers
Example table content
See also: How Compose handles missing references in the data warehouse (page 191).
Controlling tasks
You can run and stop tasks/workflow manually or you can schedule them to run periodically.
In this section:
l
Running and aborting tasks manually (page 264)
l
Scheduling tasks (page 264)
l
Running tasks using the CLI (page 265)
Running and aborting tasks manually
You can run tasks manually and abort them if required.
To run a task manually:
l
Select the task and click the Run toolbar button.
To abort a task:
l
Select the task and click the Abort toolbar button.
The task process is aborted. Note that aborting a task may leave the data warehouse or data mart
tables in an inconsistent state. Consistency will be restored the next time the task is run.
Scheduling tasks
Scheduling tasks is a convenient way of continually updating the data warehouse and associated data mart(s).
For instance, you could schedule a data warehouse task to run at 4:00 pm and then schedule a data mart task
to run at 5:00 pm.
Note that as Compose does not provide a task-chaining option (i.e. run another task as soon as the current
task completes), it may be better to schedule tasks using an external tool that supports this capability.
You can also use the command line interface (CLI) to run an task. For details, see Running tasks using the CLI
(page 265).
Setup and User Guide - Qlik Compose, May 2022 264
5 Data Warehouse projects
To schedule a task:
1. Click the Schedule toolbar button.
2. In the <Name> Scheduler window, choose one of the following options from the Run Job drop-down
list.
l
Once - to run the job once on a specific date and time.
l
Every - to run the job at set intervals.
l
Daily - to run the job every day at a specific time.
l
Weekly - to run the job on selected days at a specific time
l
Monthly - to run the job on the nth of every month at a specific time
l
Advanced - to use a Cron expression. For a description of allowed cron formats together with
usage examples, see Cron format and examples (page 393).
3. Set the scheduling parameters according to the selected scheduling option.
4. Click OK to save your settings.
The date and time the next instance is scheduled to run will appear in the Next Instance column.
5. To disable a scheduled job, select the task and click the Edit Scheduling toolbar button. Then, select
the Disable check box in the <Name> Scheduler window.
6. To cancel a scheduled job for a task, select the task and click the Edit Scheduling toolbar button.
Then, in the <Name> Scheduler window, click Delete.
Running tasks using the CLI
Before you can run a task, you must first run the Connect command as described in Connecting to Qlik
Compose server (page 78).
As Compose CLI requires Administrator permission, make sure to select "Run as administrator" when
opening the command prompt.
The run_task command populates the data warehouse or data mart with data. The "ETL" operation can also
be performed using the Run toolbar button located in Monitor view as well as in the Manage Data
Warehouse Tasks and Manage Data Marts windows.
When this command succeeds, it returns 0.
Command syntax
ComposeCli.exe run_task --project
project_name
--type DW|DM|WF --task
task_name
--wait
timeout_in_sec
Parameters
Parameter Description
--project The name of the project.
--type The type of tables that you want to populate. Specify DW to populate a
data warehouse, DM to populate a data mart, or WF to run a workflow.
Setup and User Guide - Qlik Compose, May 2022 265

5 Data Warehouse projects
Parameter Description
--task When:
l
--type DW, this should be specified as the name of the task that
you want to run.
l
--type DM, this should be specified as the name of the data mart
that you want to populate.
l
--type WF, this should be specified as the name of the workflow
that you want to run.
--wait The wait time specified in seconds.
The command line can run in sync or async mode. A value of 0 (seconds)
indicates sync mode. This means that as soon as the task finishes, the
command line returns to prompt. The default mode is async, with a value
of -1. This is also applied if you leave this parameter empty. Other
negative values are not permitted.
Note that if wait is excluded from the command, the task may appear to
complete successfully even if it encountered an error.
Example
ComposeCli.exe run_task --project MyProject --type DW --task DWH1 --wait 1
Notifications
You can select events, on the occurrence of which, a notification will be sent to the specified recipients.
Adding a notification rule
To set a notification rule:
1. Switch to Monitor view.
2. Click the downward arrow at the top left of the console and select Notification Rules from the drop-
down menu.
The Notification Rules window opens.
3. Click the New toolbar button.
The New Notification wizard opens.
4. In the Events screen:
l
Specify a name for the notification
l
Choose for which type of events you want the notification to be sent, both at the task level and
at the workflow level.
5. Click Next. In the Recipients screen:
l
Select Windows Event to send the notification to Windows Event Log and/or Recipients to
send the notification to a list of email recipients.
Setup and User Guide - Qlik Compose, May 2022 266

5 Data Warehouse projects
l
If you selected Recipients, enter the recipient email addresse(s) in the To, Cc (optional) and
Bcc (optional) boxes. Multiple addresses must be separated by a semi-colon.
6. Click Next. In the Message screen, optionally, edit the default notification message. You can add
variables to the message by selecting the variable on the right and then clicking the arrow to the left of
the variables list.
The following variables are available:
Variable Description
${PROJECT} The name of the Compose project in which the event occurred.
${TASK_NAME} The name of the task in which the event occurred.
${INSERTED} The number of rows inserted in the Data Warehouse/Data Mart.
${UPDATED} The number of rows updated in the Data Warehouse/Data Mart.
${DELETED} The number of rows deleted from the Data Warehouse/Data Mart.
${ERROR_CODE} The error code if an error was encountered during the task.
${ERROR_DETAILS} The error message if an error was encountered during the task.
${EVENT_TYPE} The event type (Started, Error or Completed).
${EVENT_TYPE_DESCRIPTION} -
${EVENT_TIME} The date and time the event occurred.
${LINK} A link to the relevant Compose project.
Notification message variables
7. Click Next. In the Associate with screen, select whether to apply the rule to all tasks of to selected
tasks. If you chose Selected Tasks, select which tasks to apply the rule to.
8. Click Next to see a summary of the notification settings or Finish to save your settings and exit the
wizard.
9. If you clicked Next, review your settings and then click Finish to save the notification rule and exit the
wizard or Prev to edit your settings. You can also click the headings on the right of the wizard to go
directly to a specific window.
The notification will be added to the list of notifications in the Notification Rules window.
Managing notification rules
In the Notification Rules window, you can edit, delete and enable/disable notification rules as described in
the table below.
To Do This
Delete a
Rule
Select the rule and then click the Delete toolbar button. When prompted to confirm the
deletion, click Yes.
Edit a
Rule
Either double-click the rule you want to edit or select the rule and click the Edit toolbar
button. Continue from Notifications (page 266).
Notification rule actions
Setup and User Guide - Qlik Compose, May 2022 267
5 Data Warehouse projects
To Do This
Disable a
Rule
Select the rule you want to disable and then either click the Disable toolbar button or clear
the check box in the Enabled column.
Enable a
Rule
Select the rule you want to enable and then click the Enable toolbar button or select the
check box in the Enabled column.
Event IDs in Windows Event Log
The table below lists the Event IDs for Compose events in Windows Event Log.
If a notification is set for several events, the event ID will be 0 for each of the events.
Event IDs for task states within Workflows are not supported.
Event ID Description
261 The task ended with error
400 The task has started.
406 The task completed successfully.
Windows Event Log IDs
Workflows
Workflows enable you to run tasks both sequentially and in parallel. You can either schedule workflows as
described in Scheduling tasks (page 264) or run them manually using the Run toolbar button.
You can create your own workflow and/or use the built-in workflow. The built-in workflow enables you to run
all of your data warehouse and data mart tasks as a single, end-to-end process. In a project with a single data
mart, all tasks run sequentially in the default workflow, starting with the data warehouse tasks and ending
with the data mart task. However, in projects with multiple data marts, the data mart tasks run in parallel,
following the completion of the data warehouse tasks.
When you create your own workflow, you decide which tasks to include in the workflow and the order in
which they will be run.
In this topic:
l
Adding and designing workflows (page 268)
l
Validating workflows (page 271)
l
Managing workflows (page 271)
l
Running and monitoring workflows (page 272)
Adding and designing workflows
This section provides instructions for adding and creating workflows.
Setup and User Guide - Qlik Compose, May 2022 268

5 Data Warehouse projects
Adding a workflow
To add a workflow:
1. Switch to Monitor view by clicking the Monitor button in the top right of the Compose console.
2. Click the New Workflow toolbar button.
The New Workflow window opens.
3. To create a workflow with all current tasks, select Create default workflow and then click OK.
Otherwise, continue from Step 4 below. Separate workflows will be created for Full Load and Change
Processing tasks. The default workflow cannot be edited and will appear as Default Workflow in the
list of monitored tasks.
To update the default workflow with newly added tasks, repeat steps 2-3 above.
4. Specify a name for your workflow.
5. To create a workflow based on an existing workflow, select the Duplicate from check box and then
select an existing workflow from the drop-down list.
6. Click OK to save your settings.
The <workflow_name> window opens.
7. Continue from Designing a workflow below.
Designing a workflow
The workflow window is divided into two panes. The pane on the left (hereafter referred to as the Elements
pane) is where you design your workflow and contains two default elements: Start and End.
The Elements pane contains gateways and tasks that you can use in your workflow. The following elements
are available:
l
Tasks - All existing Data Warehouse tasks, Data Mart tasks, and Command tasks.
l
Gateways - There are two types of gateway: Parallel Split and Synchronize. Use the Parallel Split
gateway to create parallel paths. This is useful, for example, if you want two or more tasks to run in
parallel.
Use the Synchronize gateway to merge parallel paths. The workflow waits for all the Tasks that
precede the gateway to complete before continuing the flow.
To design a workflow:
1. Drag the desired workflow elements from the Elements pane to the pane on the left.
2. Arrange the elements in the order that you want them to run.
3. Connect the elements to each other by dragging the connector from the gray dot (that appears on the
right of an element when you hover the mouse cursor over it) to the target element. When a blue
outline appear around the target element, release the mouse button.
4. Optionally add error paths to the workflow. The workflow will follow the error path if a task encounters
an error. For example, if an error occurs with a Data Mart task, you may want to run another Data Mart
task in its place.
Setup and User Guide - Qlik Compose, May 2022 269
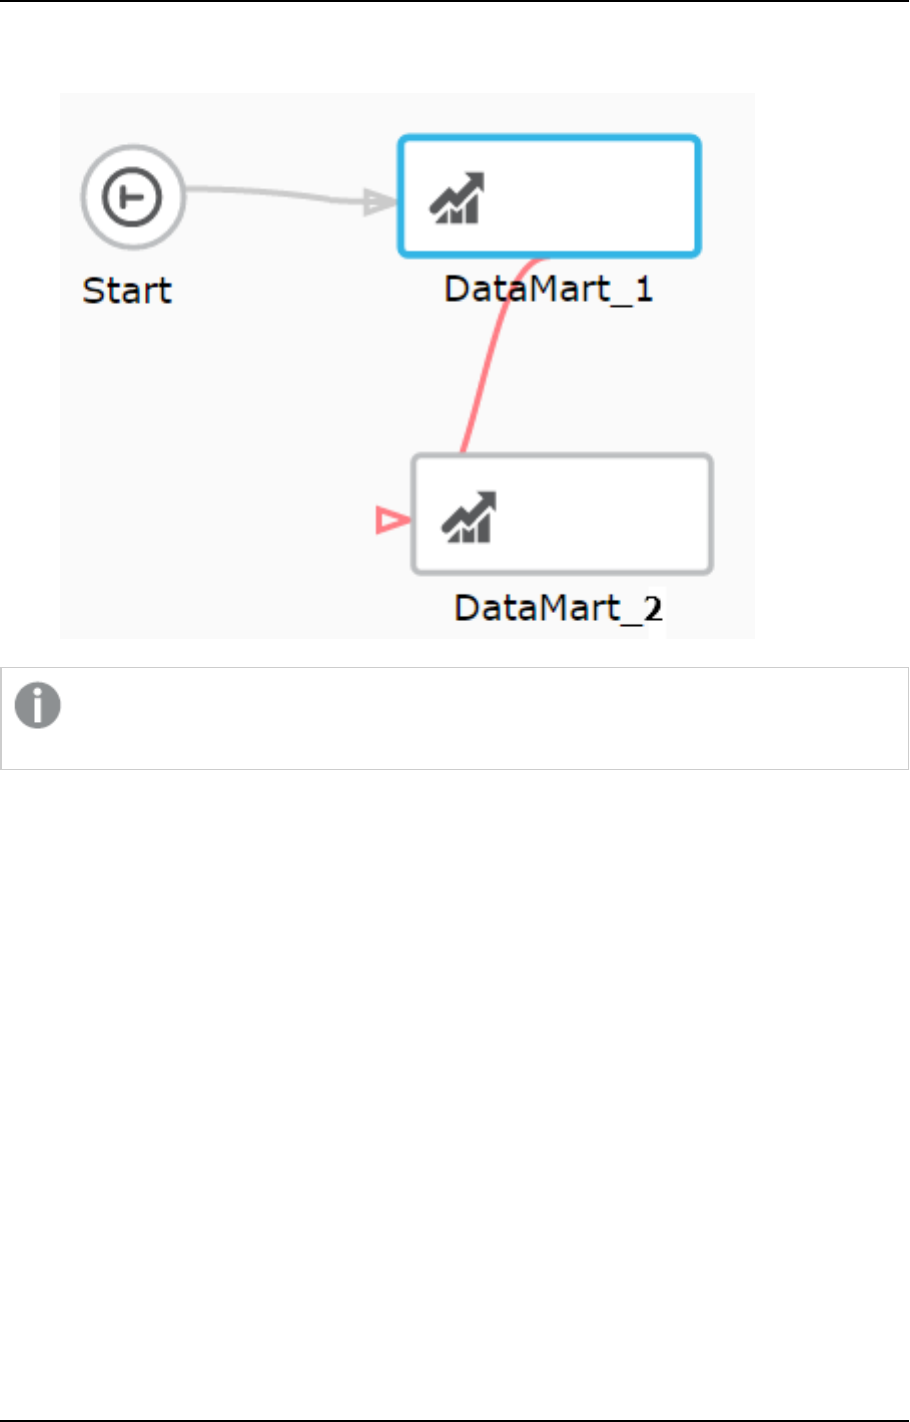
5 Data Warehouse projects
To add an error path, hover your mouse cursor over the task element. A red dot will appears below the
element. Drag the connector from the red dot to the target element, as shown below.
Connecting two error paths to the same task should be avoided as the workflow will fail if the task
tries to run twice.
Continuing a workflow in the event of parallel task failure
In a workflow, all task elements have an error port. This allows you to change the course of the workflow in
the event of a task failure, as described in Step Adding and designing workflows (page 268) above. Similar to
Task elements, the Synchronize gateway also has an error port which can be used to reroute the workflow if
any of the tasks between the Parallel Split and Synchronize gateways should fail.
By default, a workflow will end with an error if one or more parallel tasks do not complete successfully.
However, in certain cases you may want the workflow to continue, even if one or more of the parallel tasks
failed.
To do this, you need to connect the error port of the relevant task(s) directly to the Synchronize gateway. You
can also design the workflow so that it follows the path leading from the Synchronize error port, instead of
continuing its normal flow.
In the example below, the error port of the MyCommandTask is connected to the Synchronize gateway,
meaning that even if MyCommandTask task fails, the workflow will continue. However, if the
MyCommandTask task fails, the workflow will not proceed directly to the End element. Instead, it will follow
the Synchronize gateway’s error path to the Source task.
Setup and User Guide - Qlik Compose, May 2022 270
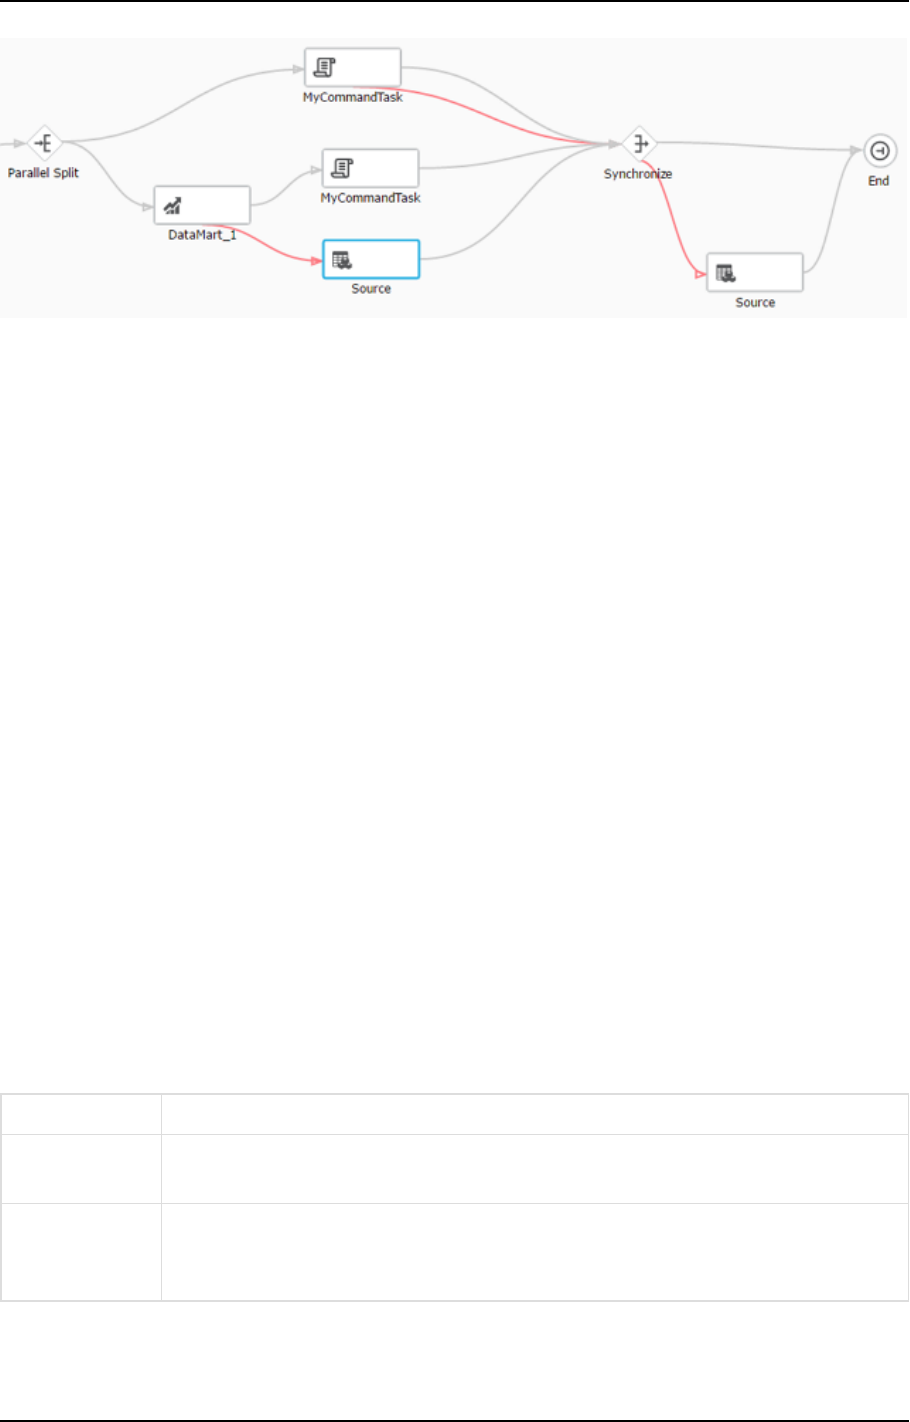
5 Data Warehouse projects
Validating workflows
It is strongly recommended to validate your workflow before running it. This will prevent errors from occurring
during runtime due to an invalid workflow.
Workflow rules include:
l
All elements must be connected to each other
l
A workflow must contain Start and End elements and at least one task.
l
A workflow cannot contain a Parallel Split gateway without a Synchronize gateway and vice versa.
l
Data warehouse tasks cannot run in parallel with data mart tasks.
l
Data warehouse tasks that update the same tables cannot run in parallel.
l
A workflow cannot contain a Parallel Split gateway without a Synchronize gateway and vice versa.
l
The execution order of elements must be sequential and not cyclic. For example an element cannot
loop back to an element that precedes it in the execution order.
To validate your workflow:
l
Click the Validate Flow toolbar button.
If the workflow is valid, a "<workflow_name> is valid." message will be appear at the top of the window. If
the workflow is not valid, a message describing the problems will appear instead.
Managing workflows
The table below describes the options available for managing workflows.
To Do This
Delete a
Workflow
In Monitor view, select the workflow in the Task column and then click the Delete
Workflow toolbar button.
Edit a Workflow In Monitor view, either double-click the workflow you want to edit or select the
workflow and click the Open toolbar button. Continue from Adding and designing
workflows (page 268).
Workflow management actions
Setup and User Guide - Qlik Compose, May 2022 271
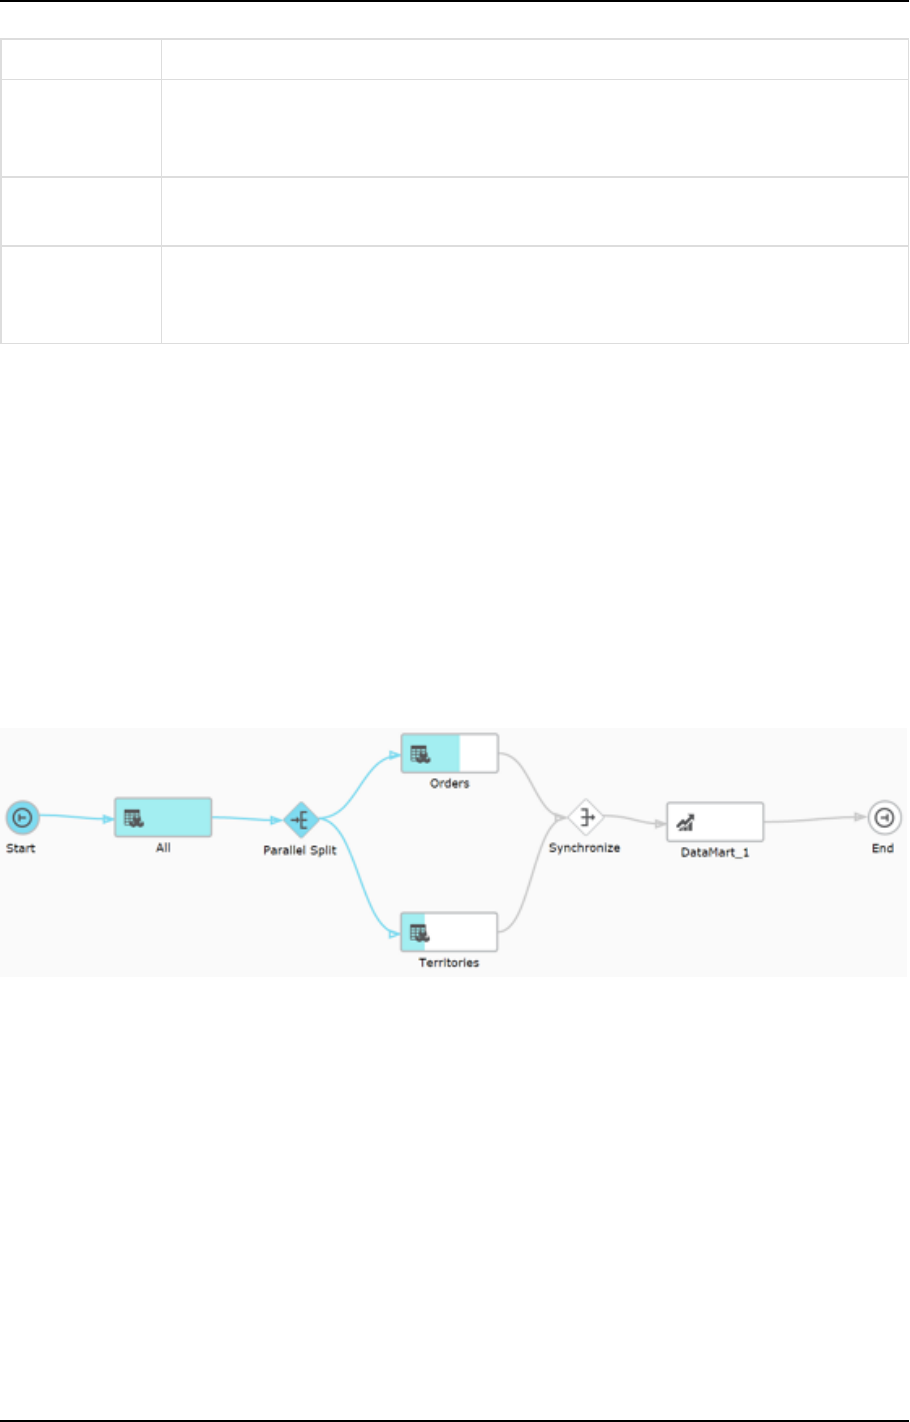
5 Data Warehouse projects
To Do This
Delete an
element in
workflow
Either right-click the element and select Delete or select the element and then click the
Delete toolbar button.
Reset the
workflow view
Click the reset button to the right of the slider at the top of the window.
Zoom in
to/zoom out of
the workflow
Move the slider at the top of the window to the left or right as required.
Running and monitoring workflows
You can either schedule workflows as described in Scheduling tasks (page 264) or run them manually using the
Run toolbar button. The Run toolbar button appears both in the main Monitor view and in the workflow
design window. Note that when you run a workflow from the workflow design window, a new Monitor tab is
added to the window and the view automatically switches to the Monitor tab.
You can monitor the workflow either in the Monitor tab or in the Progress Status tab. During runtime, the
workflow elements fill with blue providing a graphic indication of progress. If a task encounters an error, the
task element will appear with red fill instead of blue.
The example below shows a workflow containing three data warehouse tasks and one data mart task. In the
workflow, the data mart task will be run only after the completion of the parallel data warehouse tasks.
Monitoring and controlling Qlik Replicate tasks
Before you can create a Compose project, you need to define a Replicate task that replicates the relevant
source tables from the source database to the landing zone. You can define a different task for each project or
the same task can serve several projects.
Monitoring and controlling Replicate tasks from within Compose involves the following steps:
l
Step 1: Configure Compose to connect to the Replicate machine (page 273)
l
Step 2: Add the Replicate task to the data source settings (page 273)
l
Step 3: Monitor and control the Replicate task (page 274)
Setup and User Guide - Qlik Compose, May 2022 272
5 Data Warehouse projects
Step 1: Configure Compose to connect to the Replicate machine
1. Open the Manage Replicate Servers window using any of the following methods:
l
From the Management drop-down menu in the main toolbar, select Manage Replicate
Servers.
l
In the New Data Source window, click the Replicate Server Settings link below the Associate
with Replicate task field.
The Manage Replicate Servers window opens.
2. Click Add Replicate Server.
The Add Server window opens.
3. Enter the following information:
l
Name: A display name for the server.
l
Description: (Optional) A description for the server.
l
Host: The IP address or host name of the Qlik Replicate machine.
When Replicate Server is installed on Linux, enter the IP address of the Windows
machine on which the Replicate UI Server is running.
l
Port: Optionally, change the default port (443). You should only change the default port if you
are certain that a different SSL port is being used.
l
User Name and Password: Your credentials for logging in to the Qlik Replicate machine.
When Replicate Server is installed on Linux, enter the user name and password for the
Windows machine on which the Replicate UI Server is running.
l
Get metadata timeout - The time to wait when discovering a task’s source database or
refreshing the metadata cache before returning a timeout error.
l
Get task timeout - The time to wait when starting a Replicate task before returning a timeout
error.
In environments with complex networks, operations related to Replicate may exceed
the default timeout limit. If you experience frequent timeouts starting tasks,
discovering a task’s source database, or refreshing the metadata cache, increasing
these values may help.
4. Click Test Connection and then click OK if the connection is successfully verified.
The server is added to the Manage Replicate Servers window. Click Close to close the window.
Step 2: Add the Replicate task to the data source settings
1. Open the New Data Source or Edit Data Source: <Name> window as described in Defining landing
zones (page 140).
2. Click the browse button to the right of the Associate with Replicate task field.
The Select Replicate Task window opens.
Setup and User Guide - Qlik Compose, May 2022 273
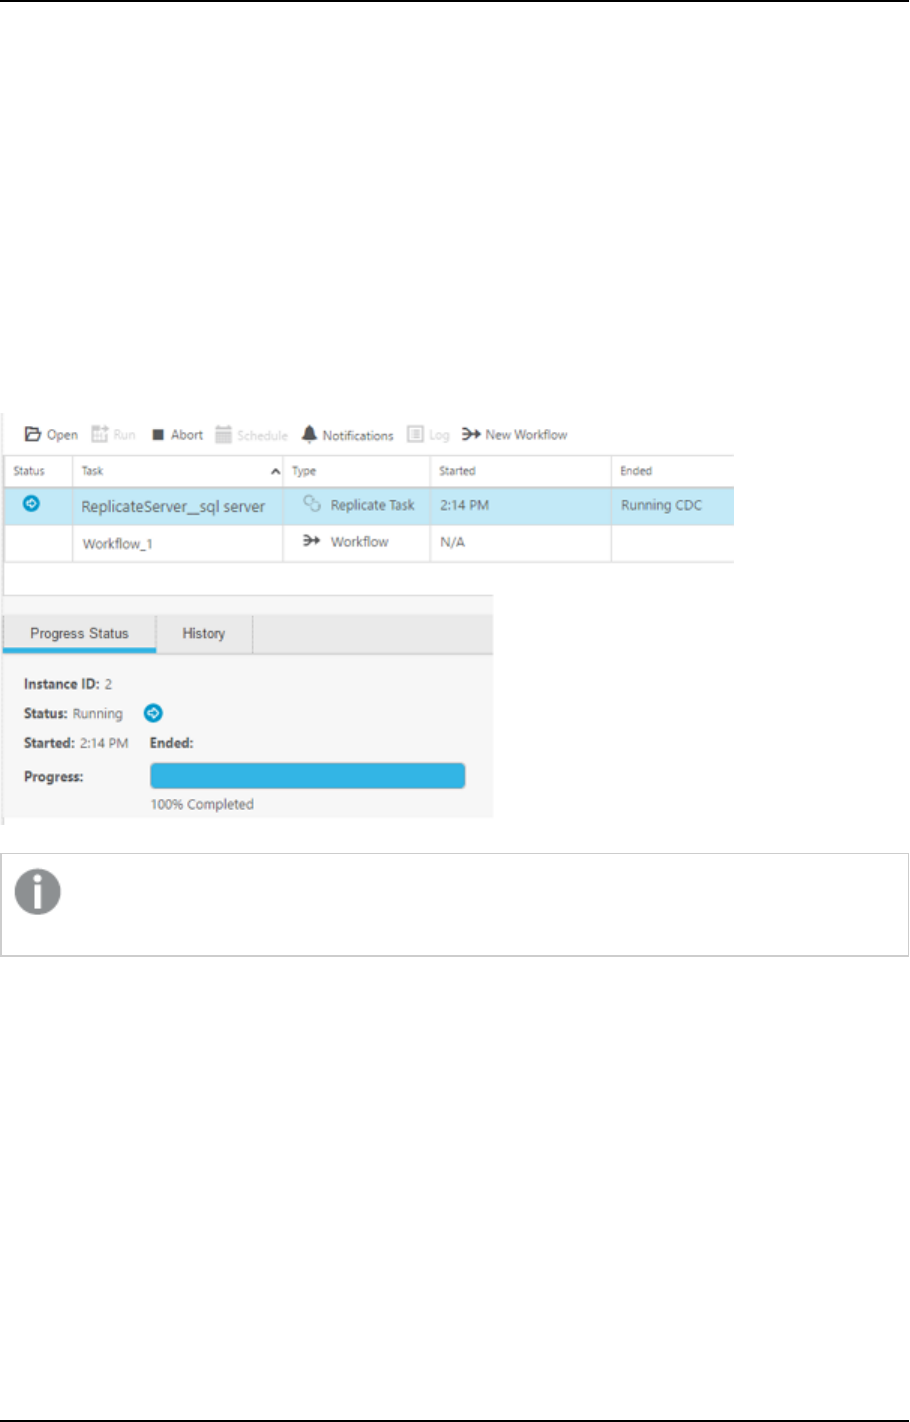
5 Data Warehouse projects
3. Select a Replicate Server from the Server drop-down list.
The Replicate Tasks list is populated with all tasks defined on the selected server.
4. Select the task that is replicating the source tables to the landing zone and then click OK.
5. If you want to discover source database for model generation, select Source database connection
and then configure the settings as described in Defining Replicate data source connections (page 147).
6. When you're done, click OK again to save the data source settings.
The Replicate task is immediately added to the Compose monitor.
Step 3: Monitor and control the Replicate task
The example below shows how the Replicate task appears in the Compose Monitor. You can start and stop the
Replicate task using the Abort and Run toolbar buttons. To view and edit the task on Replicate Server, click
Open.
If a task is stopped from within Replicate, the task status in Compose will be "Completed" instead of
"Aborted".
You can also define notifications for the task and add the task to a workflow. For more information, see
Notifications (page 266) and Workflows (page 268) respectively.
The monitor provides various information about the task. For details, see Viewing information in the monitor
(page 260).
Setup and User Guide - Qlik Compose, May 2022 274
6 Data Lake projects
6 Data Lake projects
This section explains how to set up Data Lake projects.
In this section:
l
Defining a Qlik Replicate task (page 275)
l
Adding and managing Data Lake projects (page 277)
l
Getting started with Data Lake projects (page 302)
l
Setting up landing and storage connections (page 305)
l
Selecting source tables and managing metadata (page 316)
l
Creating and Managing Storage Zone Tasks (page 337)
l
Creating and managing command tasks (page 352)
l
Controlling and monitoring tasks and workflows (page 354)
6.1 Defining a Qlik Replicate task
In order to work with Compose, you first need to define a Qlik Replicate task that replicates the source tables
from the source endpoint to a landing zone in the storage (defined as the target endpoint in the Replicate
task). The landing zone should then be defined as the data source for the Compose project.
For information on which endpoints can be used in a Replicate task that lands data for Compose, see
Supported hive distributions for Data Lake projects (page 392).
Configuring multiple Replicate tasks with the same landing zone is not supported.
The steps below highlight the settings that are required when using Qlik Replicate with Compose. For a full
description of setting up tasks in Qlik Replicate, please refer to the Qlik Replicate Help.
Prerequisites
When defining the Replicate task, make sure the following prerequisites have been met.
l
If the Landing Zone database supports append, it is recommended to select Sequence as the file
format in the Replicate target endpoint settings and to set the Control Tables format (if available) to
Text. This will improve performance by allowing Replicate to append to the file instead of creating a
new file for every Change Data Partition.
If the above is not possible, then it is recommended to periodically delete files that are no longer
required from the target directory. This will prevent files from amassing and degrading performance.
This can be done automatically using Replicate's partition retention feature. For more information, see
the Qlik Replicate Help.
l
When Microsoft Azure HDInsight is defined as the Replicate target endpoint, you must set the
endpoint's Target storage format to Sequence.
Setup and User Guide - Qlik Compose, May 2022 275

6 Data Lake projects
l
When Oracle is defined as the source endpoint in the Replicate task, full supplemental logging should
be defined for all source table columns that exist on the target and any source columns referenced in
expressions.
When using live views, to ensure transactional consistency, it is recommended to turn off Speed
partition mode in the Replicate task settings. When set to off, Replicate will close the partition only
at the end of each transaction. This might require you to shorten the partition interval in order for
the changes to be propagated to Compose in a timely manner. Shortening the partition interval
might also require you to increase the partition cleanup frequency to prevent too many files from
accumulating on the target and degrading performance.
For information about turning off Speed partition mode, setting partitioning intervals, and partition
cleanup, see the Replicate Help.
Limitations and Considerations
l
Replicate allows you to define global transformations that are applied to source/Change tables during
task runtime. The following global transformations, however, should not be defined (as they are not
compatible with Compose tasks):
l
Rename Change Table
l
Rename Change Table schema
l
The Create target control tables in schema option in the Replicate task settings' Control Table tab is
not supported.
l
As Compose requires a full-after image to be able to perform Change Processing, the following
Replicate source endpoints are not directly supported (as they do not provide a full-after image):
l
SAP HANA (log based)
l
Salesforce
l
Compose does not support the JSON and XML data types. Therefore, columns that are usually created
with these data types (by the Replicate target endpoint) should be created as STRINGs instead. This
can be done automatically within Replicate using a data type transformation. For information on which
target endpoints support JSON and XML data types as well as instructions on how to create a data type
transformation, refer to the Replicate Help.
l
From Compose May 2022 SR 01, if you use Replicate November 2022 to land data in Databricks, only
the Databricks (Cloud Storage) target endpoint can be used. If you are using an earlier supported
version of Replicate, you can continue using the existing Databricks target endpoints.
Setting up the task
To define the task:
1. Open Qlik Replicate and in the New Task dialog, do one of the following:
l
To enable Full Load and CDC replication, enable the Full Load and Store Changes options only
(the Apply Changes option should not be enabled).
l
To enable Full Load only replication (without CDC), enable the Full Load replication option
only.
Setup and User Guide - Qlik Compose, May 2022 276

6 Data Lake projects
2. Open the Manage Endpoint Connections window and define a source and target endpoint. The target
endpoint must be the Hive database where you want Compose to create the Storage Zone tables. For
more information on supported endpoints, see Supported hive distributions for Data Lake projects (page
392).
3. Add the endpoints to the Replicate task and then select which source tables to replicate.
4. This step is not relevant for Full Load only tasks. To facilitate Schema evolution (page 327) in Compose,
select the DDL History Control Table in the Task Settings’ Metadata|Control Tables tab. If you intend
to scan all data sources (when performing schema evolution), then you must do this for ALL Replicate
tasks that move data to the Landing Zone, even those with source endpoints that do not support
schema evolution (e.g. Salesforce).
If you want the DDL History Control Table to be updated with any new source tables that are
added during the Replicate task, you must define Table Selection Patterns in Replicate's
Select Tables window.
5. This step is not relevant for Full Load only tasks. In the Task Settings' Store Change Setting tab, make
sure that Store Changes in is set to Change tables.
6. This step is not relevant for Full Load only tasks. In the Task Settings’ Change Processing|Store
Changes Settings tab, enable Change Data Partitioning.
7. This step is not relevant for Full Load only tasks. In the Task Settings’ Metadata|Control Tables tab,
select the Change Data Partitioning Control Table.
8. This step is not relevant for Full Load only tasks. If a Primary Key in a source table can be updated, it is
recommended to turn on the DELETE and INSERT when updating a primary key column option in
Replicate's task settings' Change Processing Tuning tab. When this option is turned on, history of the
old record will not be preserved in the new record. Note that this option is supported from Replicate
November 2022 only.
9. Run the task.
Wait for the Full Load replication to complete and then continue the workflow in Compose as
described in Adding and managing data warehouse projects (page 37).
6.2 Adding and managing Data Lake projects
This section describes how to add and manage Data Lake projects.
Prerequisites
Before defining your Data Lake project, make sure the following prerequisites have been met.
Required clients
Depending on the Compute platform you select when you set up your project, you will need to install one of
the following drivers.
Setup and User Guide - Qlik Compose, May 2022 277
6 Data Lake projects
l
As the driver name is the same for Cloudera Data Platform, Google Dataproc, and Azure
HDInsight, in order to prevent driver conflicts, only one project with any of the
aforementioned compute platforms can be created per Compose installation.
l
As the driver name is the same for Cloudera Data Platform and Amazon EMR, in order to
prevent driver conflicts, only one project with any of the aforementioned compute platforms
can be created per Compose installation.
Cloudera Data Platform, Google Dataproc, and Azure HDInsight
1. Download the Hive JDBC Driver from the Cloudera website:
https://www.cloudera.com/downloads/
Then, extract the HiveJDBC41.jar file from the zip file that contains the Hive JDBC Connector.
You need to register on the Simba and Cloudera websites before you can download the
Hortonworks or Hive JDBC Driver.
2. Copy the HiveJDBC41.jar file to <Compose_Installation_Dir>\java\jdbc.
3. Restart the Qlik Compose service.
Databricks
1. Download the SimbaSparkJDBC42-<version>.zip or DatabricksJDBC42-<version>.zip file from the
Databricks website.
Unity Catalog support requires DatabricksJDBC42-2.6.32.1054.zip or later.
2. Copy the SparkJDBC42.jar file or the DatabricksJDBC42.jar file (according to the file you
downloaded) to <compose_product_dir>\java\jdbc.
3. Restart the Qlik Compose service.
Amazon EMR
1. Download the Amazon Hive JDBC Driver (HiveJDBC41.jar) from the Amazon website.
2. Copy the HiveJDBC41.jar file to <compose_product_dir>\java\jdbc.
3. Restart the Qlik Compose service.
Required databases and privileges
Compose Data Lake projects require four separate databases. You can create the required databases manually
(which will also allow you to override the default storage location for the files) or let Compose create them for
you. If you want Compose to create the databases, you need to grant the user defined in the Storage Zone
settings, the CREATE DATABASE privilege for the following databases:
l
Storage Zone database - The database specified in the Storage Zone settings. This database can have
any name.
l
Landing Zone database - The database specified in the Landing Zone settings. This database can have
any name.
Setup and User Guide - Qlik Compose, May 2022 278

6 Data Lake projects
l
Exposed views database - This database must have the same name as the Storage Zone database and
be appended with the suffix defined in the project settings’ Naming tab (_v by default).
l
Internal views database - Both ODS Live Views and the HDS Live Views reference this database for
updates. This database must have the same name as the Storage Zone database and be appended
with the suffix defined in the project settings’ Naming tab (_v_internal by default).
For more information about Compose views, see Working with views (page 313).
Required table and view privileges
The user specified in the Storage Connection Settings must be granted the following privileges on the required
databases:
l
SELECT
l
CREATE
l
MODIFY
l
READ_METADATA
Data Lake project guidelines
The following topic provides guidelines for setting up your Hive cluster and determining the scheduling
frequency of Change Processing storage tasks.
Working with views
Compose creates the Storage Zone with both storage tables and storage views. The storage tables are created
in the database that you defined in your storage settings while two separate database are created for the
views:The exposed views database and the internal views database. The exposed views database is the
primary views database and contains all view types. The internal views database is used to store updates to
ODS Live Views and HDS Live Views. The exposed views database and the internal views database share the
same name as the Storage Zone database, but are appended with a unique suffix (by default, _v and _v_
internal respectively), which is set in the project settings’ Naming tab. Consuming applications should be set
up to read from the exposed views database, which provide several benefits over tables including better
security (requiring read-only access only), data concurrency, and minimizing duplicate records in projects
defined with non-ACID storage.
Optimizing your Hive cluster setup
While the convenience of having the metadata, storage system, and compute platform on a single machine
may have certain benefits (Option 1 below), it may also increase costs. Having the metadata and the storage
on separate clusters to the compute platform (Option 2 below) will allow you to power down the compute
machine when it's not in use, thereby saving costs.
Compose can work with either Option 1 or Option 2 without requiring any special configuration. Simply
specify the Hive server and database name in the storage connection settings.
Note that certain platforms such as Databricks automatically power the compute platform on and off as
needed. With these platforms, Option 2 may not offer any benefits over Option 1.
Setup and User Guide - Qlik Compose, May 2022 279
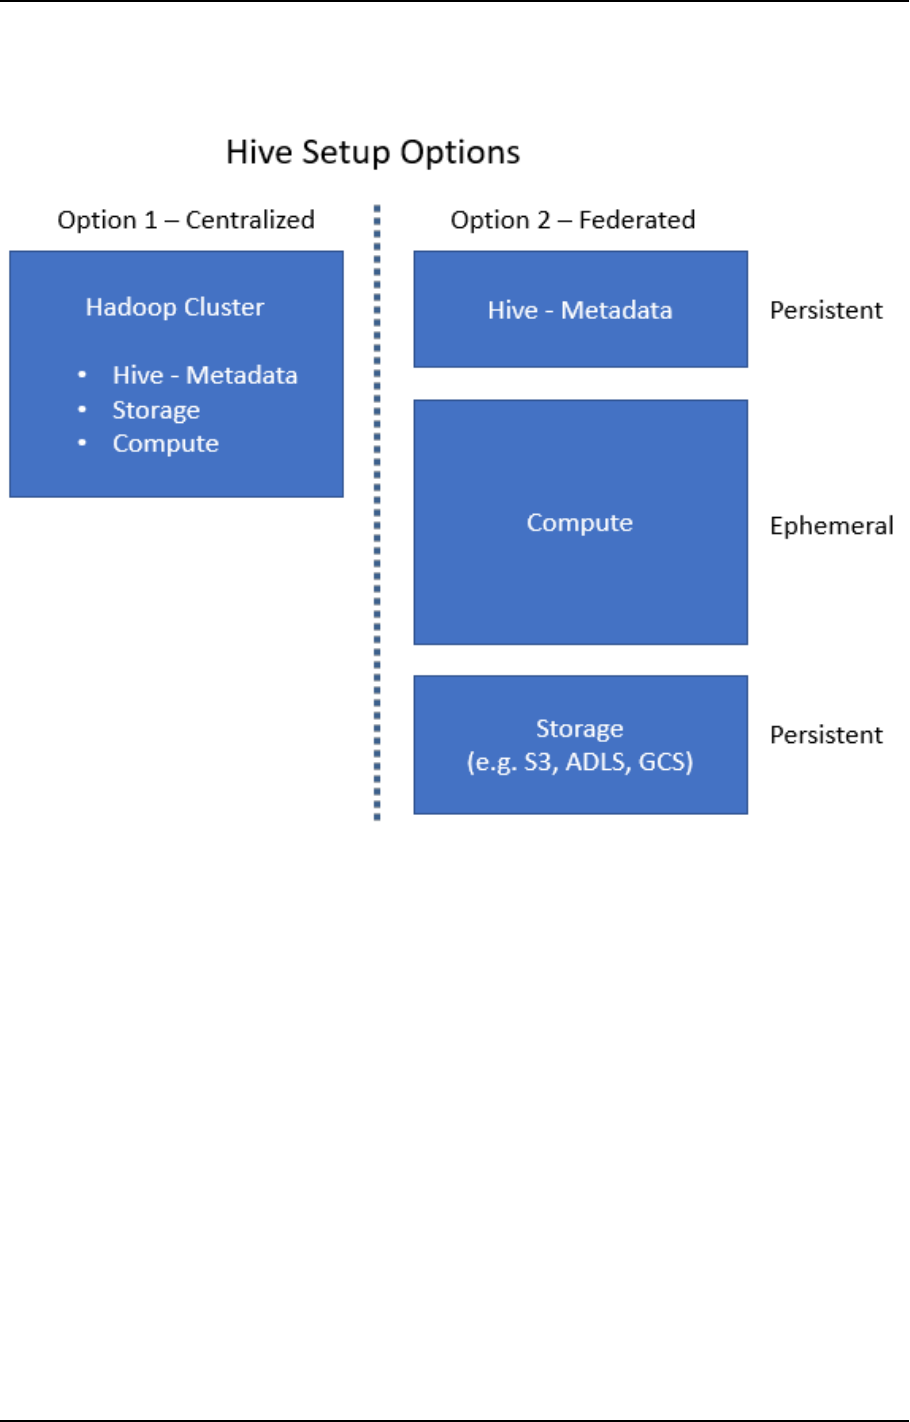
6 Data Lake projects
As the “Federated” architecture may be better suited to certain environments, it’s recommended to compare
the performance of both options in a test environment before deciding which one to go with.
Determining scheduling frequency
To prevent data inconsistency issues, you should schedule the Change Processing storage task frequency to
be greater than or equal to the Partition every interval defined for the Replicate task (in the Task Settings’
Store Changes Settings tab).
As a general rule, the shorter the Change Processing task interval, the greater the impact on performance and
the higher the computing costs. Therefore, it is recommended to limit the frequency of Change Processing
tasks only to what is absolutely necessary.
The scheduling frequency should be determined by the rate at which data updates are required by
downstream consuming applications.
Adding data lake projects
Adding a new project is the first task you need to undertake in order to work with Qlik Compose.
There are two types of project:
Setup and User Guide - Qlik Compose, May 2022 280
6 Data Lake projects
l
Data Lake - for ingesting data from multiple sources and moving it to a storage system for analytics.
l
Data Warehouse - for ingesting data from multiple sources and creating analytics-ready data marts.
This topic guides you through the steps required to set up a Data Lake project. For instructions on setting up a
Data Warehouse project, see Adding data warehouse projects (page 38).
You can set up as many projects as you need, although the ability to actually run tasks is determined by your
Compose license.
To prevent unpredictable behavior, each project must be defined with a dedicated Storage Zone.
To add a new Data Lake project:
1. Click the New Project toolbar button.
The New Project wizard opens.
2. In the Project Name tab, specify the following and then click Next:
l
Name: The project name.
Project names cannot contain the following characters: /\,&#%$@=^*+"'`~?<>:;[]{} as
well as all non-printable characters (below 0x20). The project name can contain a
single dot, but it cannot be the first or last character.
l
Environment Type: Optionally, change the default environment type.
l
Environment Title: Optionally, specify an environment title.
For information about the environment settings, see Environment tab (page 286).
The following names are reserved system names and cannot be used as project names:
>CON, PRN, AUX, CLOCK$, NUL, COM1, COM2, COM3, COM4, COM5, COM6, COM7, COM8,
COM9, LPT1, LPT2, LPT3, LPT4, LPT5, LPT6, LPT7, LPT8
and
>LPT9
.
3. Select Data Lake as your project type.
4. Choose whether to create your Storage as an Operational Data Store (ODS)or as an Operational and
Historical Data Store (ODS + HDS). Choose Operational Data Store to create an ODS from the source
data or Operational and Historical Data Store to create an ODS from the source data while
maintaining previous versions of updated records. Once you have made your choice, click Next.
5. In the Deployment tab, select where you want your Data Lake to be deployed. Then click Next.
Your choice will determine which storage system options are available in the Storage screen.
6. In the Storage tab, select a storage system. If you select File System, choose a file format. Then click
Next.
Setup and User Guide - Qlik Compose, May 2022 281
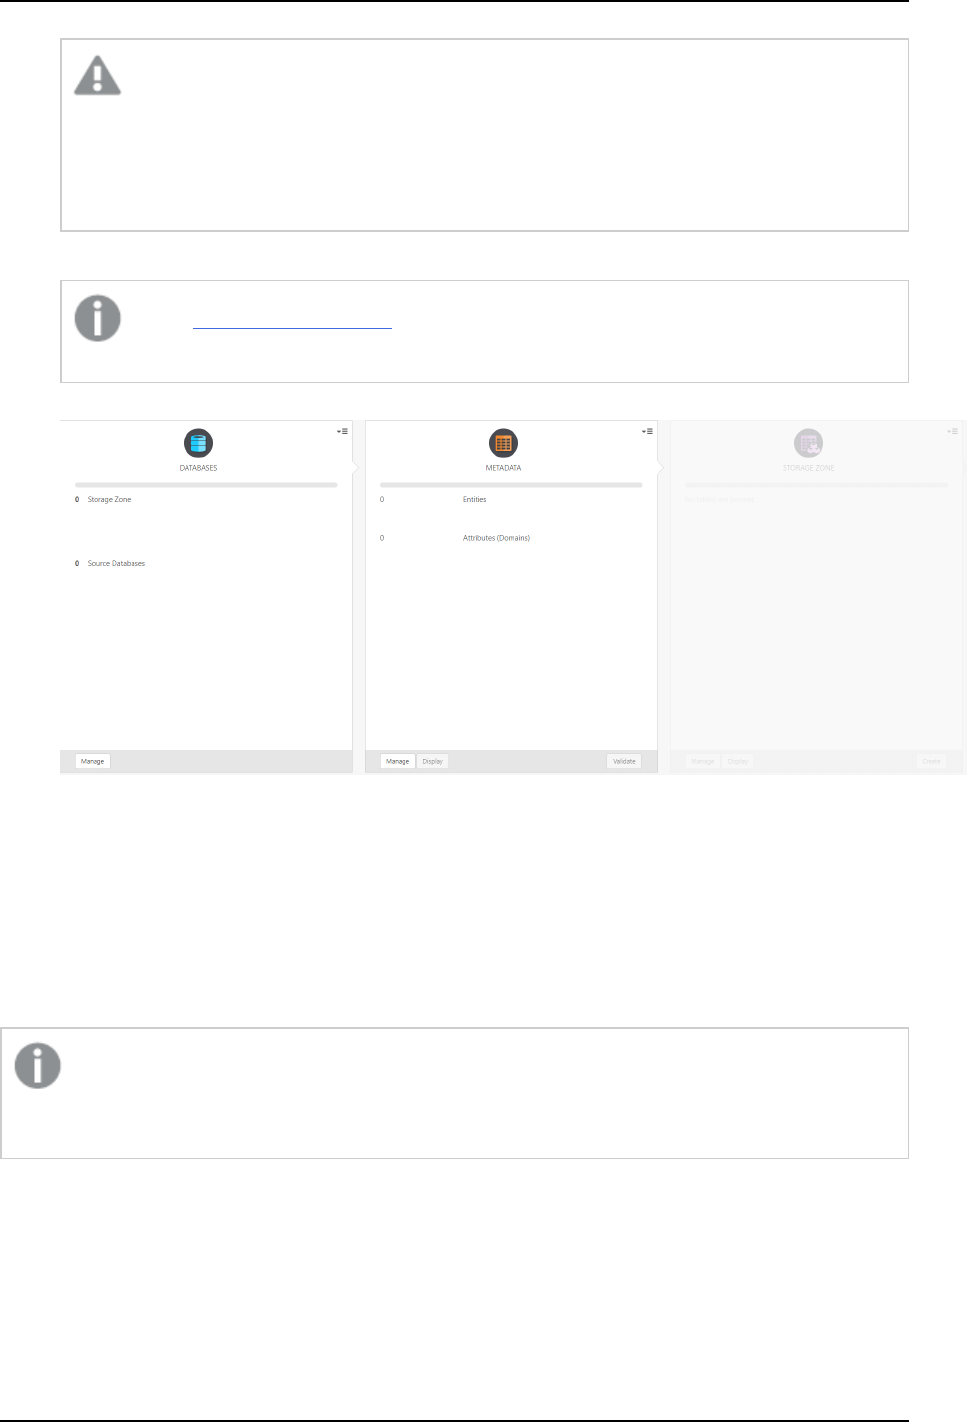
6 Data Lake projects
l
Renaming a column in Parquet or Avro format will cause the loss of all data in that
column.
l
Parquet and Avro formats do not allow spaces in Primary Key column names. If your
project is set up to ingest tables from Replicate, you can define a global
transformation in Replicate to remove spaces from Primary Key column names.
7. In the Compute tab, select a compute platform and then click Finish to exit the wizard.
Before configuring connectivity, make sure to install the relevant driver for your compute
platform. See Prerequisites (page 277) for more information.
8. The project panels will be displayed.
9. Add a Storage Zone (Data Lake) and at least one source database as described in Defining a Storage
Zone (page 305) and Defining Landing Zones (page 314) respectively.
10. Select the source tables as described in Selecting source tables and managing metadata (page 316).
11. Create the storage tables as described in Creating and Managing Storage Zone Tasks (page 337).
Managing and monitoring projects
The table below describes the available project management options.
Project management actions are performed in the main Compose window. To switch from a specific
project to the main window, click the downward arrow to the right of the project name and then
select All Projects from the drop-down menu.
Setup and User Guide - Qlik Compose, May 2022 282
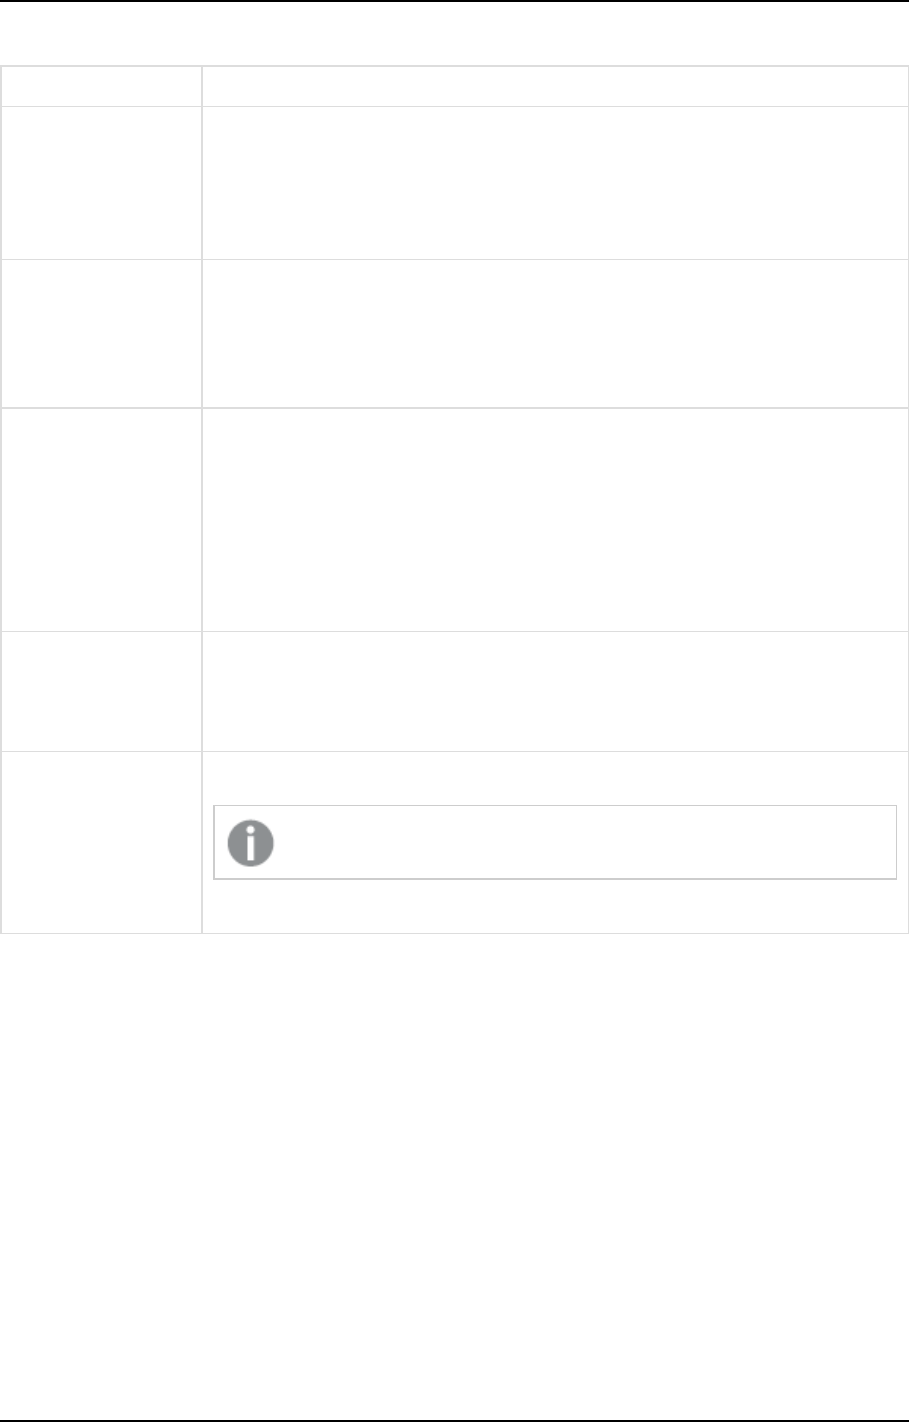
6 Data Lake projects
To Do this
Edit a project Any of the following:
l
Double-click the project.
l
Right-click the project and select Designer.
l
Select the project and then click the Open toolbar button.
Monitor a project Any of the following:
l
Right-click the project and select Monitor.
l
Double-click the project and select the Monitor tab on the right of the
console.
Create a deployment
package
Any of the following:
l
Right-click the project and select Create Deployment Package.
l
Select the project and then select Create Deployment Package from the
Deployment toolbar menu.
See also: Project deployment (page 47) (Data Warehouse projects) and Project
deployment (page 289) (Data Lake projects).
Delete a project Any of the following:
l
Right-click the project and select Delete.
l
Select the project and then click the Delete toolbar button.
View or change user
permissions
Right-click the project and select User Permissions.
Relevant for Data Warehouse projects only.
See also: User permissions (page 371).
Project management procedures
Project settings
You can modify the project settings according to your needs.
To open the project settings window
1. Open your project as described in Managing and monitoring projects (page 282).
2. Click the downward arrow to the right of the project name and select Settings from the drop-down
menu.
The Settings window opens.
The project settings window is divided into the following tabs:
l
General tab (page 284)
l
Naming tab (page 285)
l
Environment tab (page 286)
Setup and User Guide - Qlik Compose, May 2022 283
6 Data Lake projects
General tab
In this tab, the following settings are available:
Project details
Read-only information about the project deployment type, storage type, and compute type (which were all set
in the project setup wizard).
Miscellaneous
l
Generate DDL scripts but do not run them: By default, Compose executes the CREATE, ADJUST and
DROP statements immediately upon user request. When you select this option, Compose will only
generate the scripts but not execute them. This allows you to review and edit the scripts before they
are executed.
For example, if you want to apply custom sorting or special formatting, you will need to edit the
CREATE statement accordingly.
Note that if you select this option, you will need to copy the scripts to your Storage Zone and run them
manually. You can view, copy and download the DDL scripts as described in Viewing and downloading
DDL scripts (page 299).
When this option is selected, you need to do the following to see the results:
l
After running the scripts, clear the metadata cache as described in Clearing the
metadata cache (page 350).
l
When this option is selected, you need to press [F5] (i.e. refresh the page) in order for
the web console to display the updated list of tables. This can be done either before
running the scripts (recommended) or after running the scripts. Note that until you
refresh the browser, the information in the web console will only be partially updated.
l
Ignore Mapping Data Type Validation: By default, Compose issues a validation error when a landing
table is mapped to a staging table with a different data type. You can select this option to allow the
mapping of different data types. Note that you should only select this option if you need to map
landing table data types to compatible (though not identical) staging table data types.
l
Do not display the default workflows in the monitor: Select this option if you want to prevent the
default workflows from being executed.
Default data store type for new entities
Choose one of the following:
l
Operational Data Store - This will create an ODS from the source data.
l
Operational and Historical Data Store - This will create an ODS from the source data while
maintaining previous versions of updated records.
Deleted records in ODS (Operational Data Store) views
Requires Compose August 2021 Service Release 03 or later.
You can choose to exclude/include records marked as deleted from/in the ODS views.
Setup and User Guide - Qlik Compose, May 2022 284
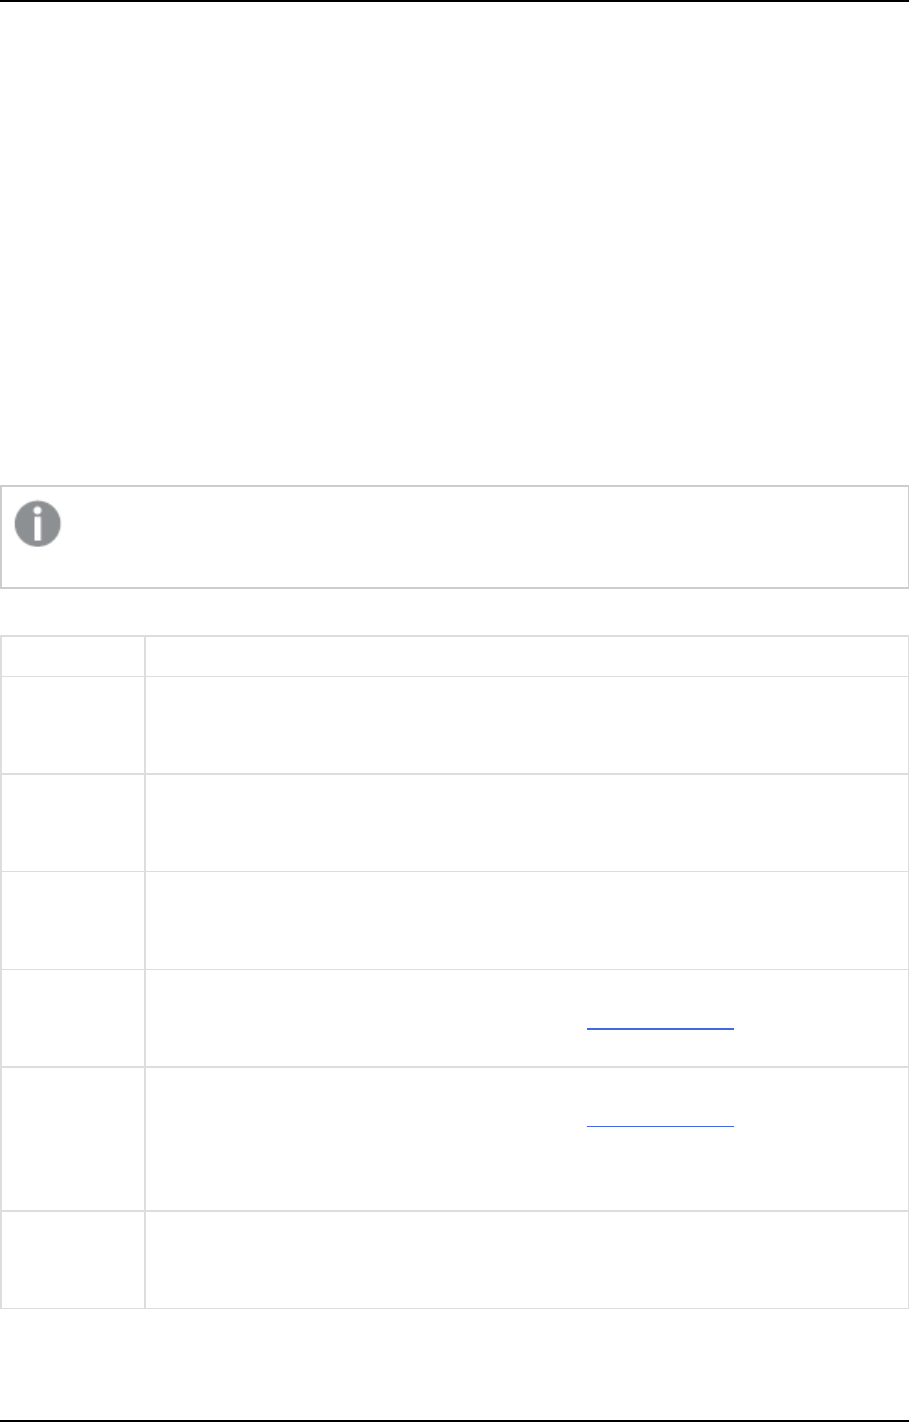
6 Data Lake projects
l
Exclude the corresponding record from the ODS views - This is the default option as records
marked as deleted should not usually be included in ODS views.
l
Include the corresponding record in the ODS views - Although not common, in some cases, you
might want include records marked as deleted in the ODS views in order to analyze the number of
deleted records and investigate the reason for their deletion. Also, regulatory compliance might
require you to be able to retrieve the past record status (which requires change history as well).
Dates
l
Lowest Date - The value of the "From Date" column when no other value is available.
l
Highest Date - The value of the "To Date" column when no other value is available.
For a description of the "From Date" and "To Date" columns, see Naming tab below.
Naming tab
In this tab, you can change the default column, prefix, and suffix names.
If you change the prefix or suffix of existing tables (e.g. data warehouse tables), you need to drop
and create the data warehouse and data mart tables.
Name Description
Suffix for
exposed views
database
The suffix used to identify the database used for exposed views.
Suffix for
internal views
database
The suffix used to identify the database used for internal views.
Suffix for
Replicate
Change Tables
The suffix used to identify Replicate Change Tables in the landing zone of the Storage
Zone.
Prefix for
storage tables
The prefix to add to table names in the Storage Zone. Changing this after the Storage
Zone tables have already been created requires you drop and recreate your Storage Zone
tables.
Prefix for all
storage view
types
The prefix to add to view names in the Storage Zone. Changing this after the Storage
Zone tables have already been created requires you drop and recreate your Storage Zone
tables.
For more information on storage view types, see Working with views (page 313).
Suffix for ODS
standard
views
The suffix used to identify ODS standard views.
For more information on storage view types, see Working with views (page 313).
Name management options
Setup and User Guide - Qlik Compose, May 2022 285
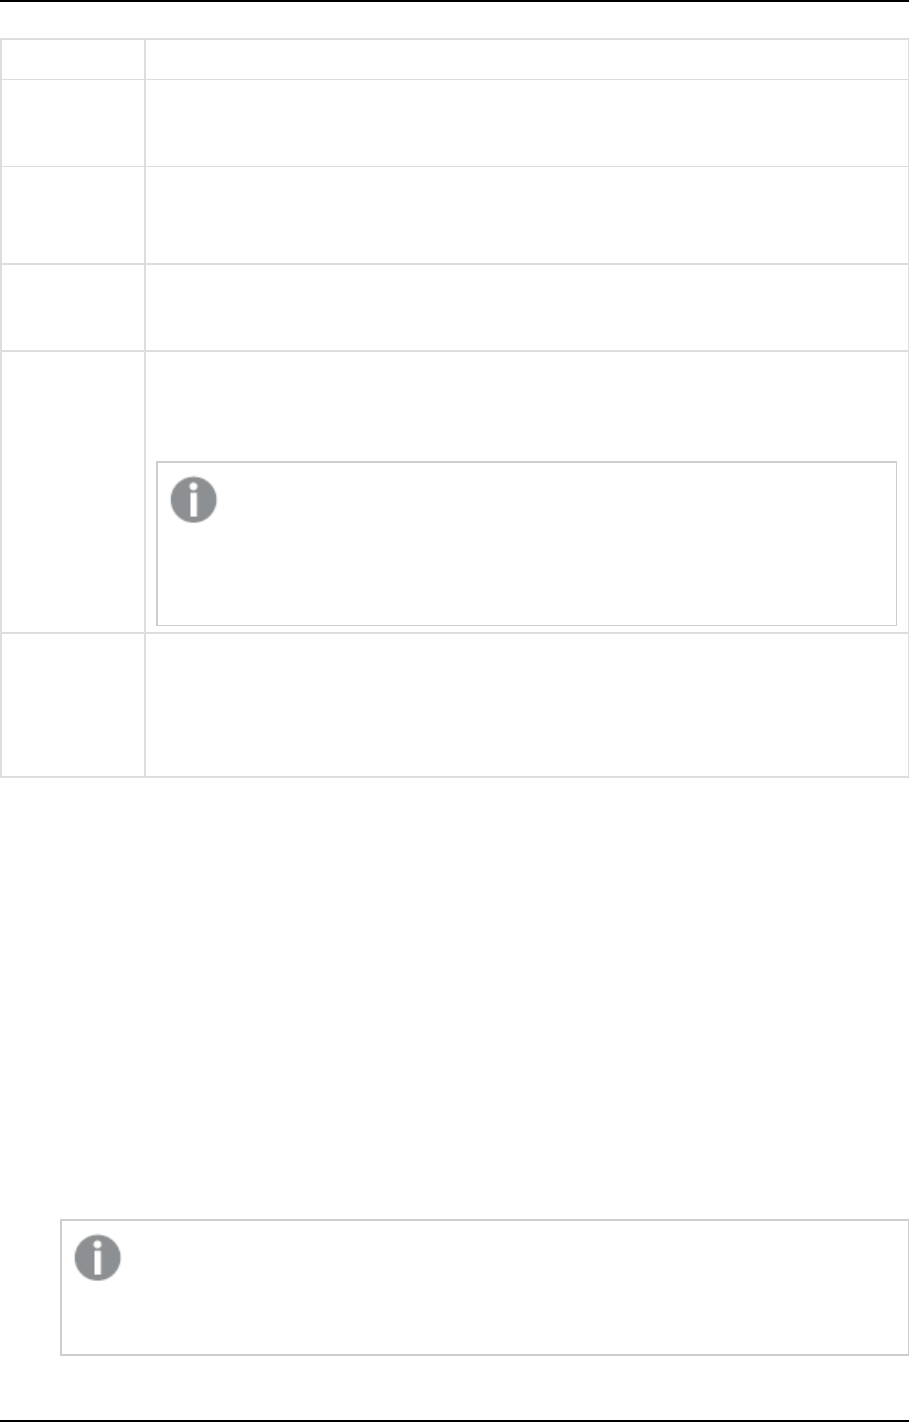
6 Data Lake projects
Name Description
Suffix for ODS
Live Views
The suffix used to identify ODS live views.
For more information on storage view types, see Working with views (page 313).
Suffix for HDS
standard
views
The suffix used to identify HDS standard views.
For more information on storage view types, see Working with views (page 313).
Suffix for HDS
Live Views
The suffix used to identify HDS live views.
For more information on storage view types, see Working with views (page 313).
"From Date"
column name
The name of the "From Date" column. This column is added to tables that contain
attributes (columns) with history. The column is used to delimit the range of dates for a
given record version.
l
This name cannot be used in other columns.
l
NULL values are not allowed in this column. If the source "From Date"
column contains NULLs, an expression should be created to convert
them to non-null values.
"To Date"
column name
The name of the "To Date" column. This column is added to tables that contain attributes
(columns) with history. The column is used to delimit the range of dates for a given record
version.
This name cannot be used in other columns.
Environment tab
In this tab, you can specify information about your environment that will be displayed as a banner at the top
of the window when you open the project.
Provide the following information and then click OK to save your settings.
l
Environment type:Select one of the following types according to your environment type:
Development, Test, Acceptance, Production, Other. This information will not be displayed in the
banner.
l
Environment title: Specify a title for your environment. The title will be displayed in the banner at the
top of the console.
l
Project title: Specify a title for your project. The project title will be shown in the console banner. If
both an Environment Title and a Project Title are defined, the project title will be displayed to the
right of the environment title.
l
The Project title option requires Compose August 2021 Patch Release 12 or later.
l
When a project is deployed to a new environment, the environment title and
environment type in the new environment will not be overridden.
Setup and User Guide - Qlik Compose, May 2022 286
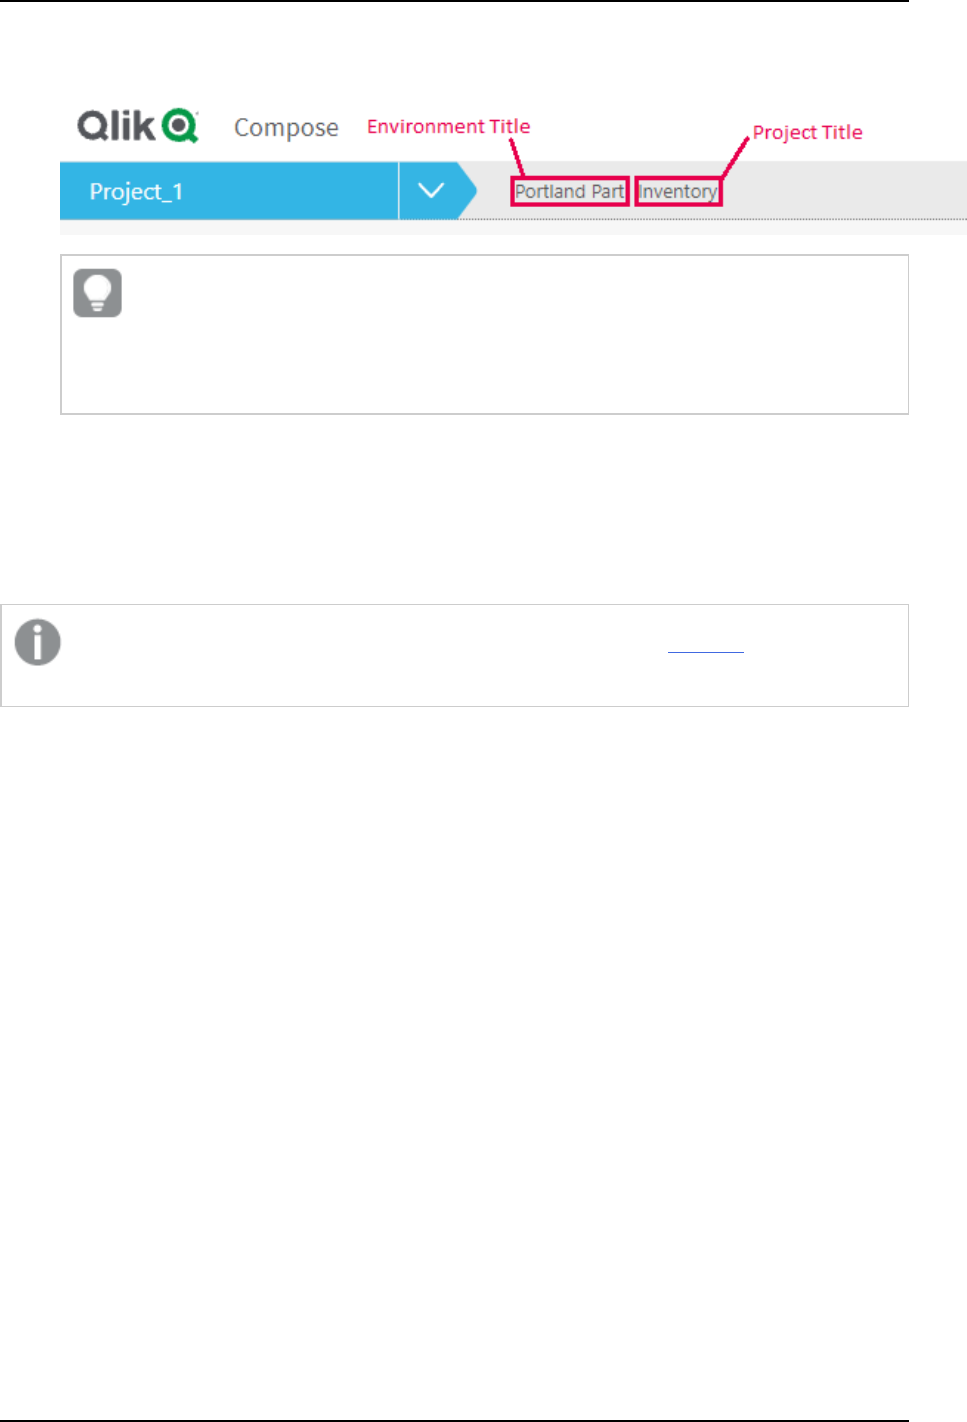
6 Data Lake projects
The following image shows the banner with both an Environment title and a Project title:
The banner text is shown without the Environment title and Project title labels. This
provides greater flexibility as it allows you add any banner text you like, regardless of the
actual label name. For example, specifying Project owner: Mike Smith in the
Project title field, will display that text in the banner.
Creating or Dropping Storage Tables
Limit the number of database connections to: The higher the number of database connections, the more
storage tables Compose will be able to create or drop in parallel. While increasing the default should improve
performance, it may also impact other database applications. It is therefore not recommended to increase the
default unless you encounter performance issues.
As environments are project-specific, the environment information can be imported to a new project,
but cannot be imported to an existing project.
Task recovery
You can set SQL state classes and error codes, on the occurrence of which, a task will be retried.
You can set the following parameters:
l
Maximum retry count: The number of times to retry a task before exiting with failure. Increasing the
number of retries will impact system resources. Therefore, only increase the default value if you expect
tasks to recover after the default number of retries.
l
Interval between retry attempts (sec): The time to wait between retry attempts. Increasing the
interval will consume more system resources. Therefore, only increase the default value if it is critical
that the task recover as soon as possible.
l
Retry on these SQL state classes: The default is 08 (connection exceptions). You can add additional
classes as desired. Classes should be separated with a comma.
Example: 08,22,2F
l
Retry also on these error codes: The default is 1205 (which occurs when a table is locked by another
process). You can add additional error codes as desired. Error codes should be separated with a
comma.
Example: 1205,2020,233
Setup and User Guide - Qlik Compose, May 2022 287

6 Data Lake projects
Limitations and considerations:
l
Schema evolution retries are not supported.
l
ODBC statements comprise a small part of the task execution sequence. However, as the task retry
mechanism is JDBC-based, ODBC statements will not be retried even if the specified SQL state/error
code is encountered.
Task and Workflow Information Retention
You can set the maximum number of runs to keep task and workflow logs and messages. The default is 100.
Task information includes logs, the number of inserted/updated rows per table, errors, and various other
runtime messages. If you find that the number of accumulated logs and messages is degrading performance,
reducing this value might help.
This setting requires Compose August 2021 SR1 or later.
Resetting projects
You can reset projects as required. This can be useful during the project development stage as it allows you to
easily delete unwanted project elements.
Be careful not to reset a project and delete data in a production environment.
To reset a project:
1. Open your project as described in Managing and monitoring projects (page 282).
2. Click the downward arrow to the right of the project name and select Reset Project from the drop-
down menu.
The Reset Project window opens.
3. Select which elements to reset according to your project type.
l
Metadata and mapping definitions
For information on mappings, data storage tasks and metadata, see Selecting source tables and
managing metadata (page 316).
l
Reusable transformations
For information on the reusable transformations, seeReusable transformations (page 335).
l
Storage tables and files
For information on the Storage Zone, seeCreating and Managing Storage Zone Tasks (page 337).
l
Command tasks
For more information, seeCreating and managing command tasks (page 352).
l
DDL scripts
For more information on DDL scripts, see Project settings (page 283) and Viewing and
downloading DDL scripts (page 299).
4. Click Reset Project and then click Yes when prompted to confirm your request.
Setup and User Guide - Qlik Compose, May 2022 288

6 Data Lake projects
Project deployment
Project deployment packages can be used to back up projects or migrate projects between different
environments (e.g. testing to production). As a deployment package is intended to be deployed in a new
environment, it contains the Storage Zone and data source definitions, but without any passwords. The
deployment package also does not contain any data from the Storage Zone, only the metadata. The
deployment package also contains the project metadata and mapping information, which should be
consistent with the Landing Zone tables in the new environment.
For a complete list of objects contained in the deployment package, see Exporting a project (page 291).
Creating deployment packages
This section explains how to create a project deployment package.
To create a deployment package:
1. Choose one of the following methods:
l
In the main Compose window, right-click the desired project and select Create Deployment
Package from the context menu.
l
In the main Compose window, select the desired project. Then, click the Deployment toolbar
button and select Create Deployment Package from the drop-down menu.
l
In the project window, select Deployment > Create Deployment Package from the project
drop-down menu.
The Create Deployment Package - <Project_Name> window opens.
2. Provide a Version number and a Description in the designated fields and then click OK.
A ZIP file containing a JSON file (i.e. the project settings) and a readme.txt file will be saved to your
browser's default download location.
The ZIP file name is in the following format:
<Project_Name>_deployment_<Date>__<Time>.zip
The readme.txt file contains the following information about the deployment package: project name,
export date, exporter user name, deployment version, and description.
Deploying packages
This section explains how to deploy a project deployment package. You can only deploy packages to an
existing project. Therefore, before deploying a project, create a new project with the user name and password
required for connecting to the Storage Zone database and the Landing Zone database (if defined) in the new
environment. In addition, the Landing Zone databases in the target project must have the same display name
(defined in the Compose console) as the corresponding databases in the source project. Note that as database
settings are usually environment specific, the database settings in the target project will not be overwritten by
those of the source project.
When deploying, Compose does not override existing connection parameters, assuming they are environment-
local. This enables you to easily migrate projects from test to production, for example, without the need to
change user names, passwords or IP addresses.
Setup and User Guide - Qlik Compose, May 2022 289
6 Data Lake projects
If preferred, you can create an empty project and provide the required credentials after the
deployment completes. In this case, an error message prompting you for the missing credentials will
be displayed after the deployment completes.
To deploy a project:
1. Copy the ZIP file created when you created your deployment package to a location that is accessible
from the Compose machine.
2. Open Compose and choose one of the following methods:
l
In the main Compose window, select the desired project. Then, click the Deployment toolbar
button and select Deploy from the drop-down menu.
l
In the project window, select Deployment > Deploy from the project drop-down menu.
The Deploy window opens.
3. Either drag and drop the file on the window.
-OR-
Click Select and browse to the location of the deployment package. In the Open window, either
double-click the deployment package ZIP file or select the file and click OK.
The package details will be displayed.
4. Click Deploy to deploy the package. When prompted to replace the existing project, confirm the
operation.
The project will be deployed.
When deploying a project defined with multiple Replicate Servers to any of the following:
l
A project without any Landing Zone databases
l
A project which is missing one or more Landing Zone databases defined in the source project
Then the Landing Zone settings from the source project will be used, but the missing databases will
be created without a password and Replicate Server. These will need to be configured manually.
Exporting and importing projects using the CLI
Compose CLI requires Administrator permission. To grant Administrator permission, select "Run as
administrator" when opening the command prompt.
Under normal circumstances, use the deployment options described in Project deployment (page 289) to
export and import projects. For deployment automation or control by another tool, you can use the command
line interface (CLI) to perform the following tasks:
l
Exporting a project (page 291)
l
Importing a project (page 293)
l
Exporting the project configuration (page 294)
l
Importing the Project Configuration (page 296)
Setup and User Guide - Qlik Compose, May 2022 290

6 Data Lake projects
To export or import a project or project configuration including passwords, you first need to change
the default Master User Password.
For more information on changing the master user password, see Changing the master user
password (page 32).
See also: Migrating projects from the test environment to the production environment (page 296)
and Import/Export scenarios: When is a password required? (page 297)
Before running any command, you must run the Connecting to Qlik Compose server (page 78) command.
To get help when using the command line, you can run the Help command. For example, for help about
exporting a project, issue the following command:
ComposeCli.exe export_project_repository --help
This brings up a list of help parameters.
Exporting a project
You can use the export_project_repository CLI to export a project.
Exported projects include the following:
l
Data zone connections
l
Metadata definitions (entities and attributes)
l
Mappings between Landing Zone and Storage Zone table columns.
l
Storage Zone ETL tasks
l
Project settings
Existing Storage Zone tables and generated task statements are not exported. Notifications and
schedules are also not exported as they are considered to be environment-specific.
Command syntax
ComposeCli.exe export_project_repository --project
project_name
--outfile
output_file
[--is_
without_credentials] [--password
password
] [--master_user_password
master_user_password
]
Parameters
Parameter Description
--project The name of the project.
--outfile The path to and name of the output file. This file is in JSON format (e.g.
C:\file.json).
Setup and User Guide - Qlik Compose, May 2022 291

6 Data Lake projects
Parameter Description
--is_without_credentials Use this parameter to specify that you want to export the project settings
without the encrypted fields. When importing to a new project, you will
need to manually enter the project passwords (in the Compose database
connection settings) after the import completes. In addition to eliminating
the need to specify a password when exporting or importing the project,
the is_without_credentials parameter also allows the project to be
used in every Compose installation, regardless of its master user
password. It is also useful in the event that you would like to keep the
existing passwords in the target environment (e.g. when exporting from a
testing environment to an existing project in the production
environment).
--password The password for encrypting the credentials in the exported project. When
used, this parameter must be used together with the master_user_
password parameter described below. Use the password > parameter if
you want to encrypt the credentials in the exported project, but do not
want the source master password to be used in a different environment.
The specified password must be at least 32 characters in length and can
either be user-devised or generated using the genpassword utility
described in Changing the master user password (page 32).
--master_user_password The master user password defined for the source machine. When used,
this parameter must be used together with the password parameter. Use
the master_user_password > parameter if you want to encrypt the
credentials in the exported project, but do not want the source master
password to be used in a different environment. In such a case, when you
import the project to an environment that has a different master
password, you will only need to specify the password qualifier.
For instructions on changing the master user password, see Changing the
master user password (page 32).
See also: Moving projects from the test environment to the production
environment (page 86) and Import/export scenarios - When is a password
required? (page 86)
Example
Export project without a password
ComposeCli.exe export_project_repository --project MyProject --outfile file.json --is_without_
credentials
Export project with a password
ComposeCli.exe export_project_repository --project MyProject --outfile file.json --password
MyPassword --master_user_password MyMasterUserPassword
Setup and User Guide - Qlik Compose, May 2022 292

6 Data Lake projects
Importing a project
You can use the import_project_repository CLI to import a project. If you import to an existing
project, all of the project settings, except the project configuration items will be overridden. For information
on the project configuration items, see Exporting the project configuration (page 294).
Imported projects include the following:
l
Data zone connections
l
Model definitions (entities and attributes)
l
Mappings between Landing Zone and Storage Zone table columns.
l
Storage Zone ETL tasks
Command syntax
ComposeCli.exe import_project_repository --project
project_name
--infile
input_file
[--
password
password
] [--is_without_credentials] [--override_configuration] [--dont_backup_
existing_project]
Parameters
Parameter Description
--project The name of the project.
--infile The full path to the input file, including the file name. This file is
in JSON format (e.g. C:\file.json).
--password The password specified with the password parameter during
export.
For instructions on changing the master user password, see
Changing the master user password (page 32).
See also: Moving projects from the test environment to the
production environment (page 86) and Import/export scenarios -
When is a password required? (page 86)
--is_without_credentials Use this parameter to specify to import the project settings
without the encrypted fields. In this case, you will need to
manually enter the project passwords in the Compose database
connection settings.
--override_configuration Use this parameter to override the existing project configuration.
When importing a project, the default setting is not to override
the existing project configuration.
--dont_backup_existing_project Use this parameter to specify not to back up the existing project.
By default, existing projects are backed up to the following
location (and automatically restored if the import fails):
<product_dir>\data\projects\<project_name>_backup_
<timestamp>
Setup and User Guide - Qlik Compose, May 2022 293

6 Data Lake projects
Example
ComposeCli.exe import_project_repository --project MyProject --infile file.json --password
MyPassword --override_configuration --autogen
Existing Storage Zone tables and generated task statements are not imported. After the import
completes, you must perform step 3 below. You may also need to perform step 1 or 2, depending on
whether you changed the Storage Zone connection settings (step 1) or kept the existing connection
settings (step 2).
1. If you changed the Storage Zone connection settings after importing the project, then you
need to create the tables in the new Storage Zone.
2. If you edited the Metadata in a testing environment and then imported the project into a
production environment, you need to validate and adjust the Storage Zone.
3. Generate the Data Storage task statements.
For information on validating the Storage Zone and generating the task statements, see Creating and
Managing Storage Zone Tasks (page 337).
Exporting the project configuration
You can use the Compose CLI to export the configuration settings of an existing project. This includes Landing
and Storage Connections, scheduling jobs, and notifications. This is helpful, for example, when you need to
migrate configuration settings from a test environment to the production environment.
For information about migrating projects, see Migrating projects from the test environment to the production
environment (page 296).
Command syntax:
ComposeCli.exe export_project_repository_config --project
project_name
--outfile
output_file
[-
-is_without_credentials] [--password
password
] [--master_user_password
master_user_password
]
Parameters
Parameter Description
--project The name of the project.
--outfile The path to and name of the output file. This file is in JSON format (e.g.
C:\file.json).
Setup and User Guide - Qlik Compose, May 2022 294

6 Data Lake projects
Parameter Description
--is_without_credentials Use this parameter to specify that you want to export the project settings
without the encrypted fields. When importing to a new project, you will
need to manually enter the Landing Zone(s) and Storage Zone passwords
(in the Connections panel) after the import completes. In addition to
eliminating the need to specify a password when exporting or importing
the project, the is_without_credentials parameter also allows the
project to be used in every Compose installation, regardless of its master
user password. It is also useful in the event that you would like to keep
the existing passwords in the target environment (e.g. when exporting
from a testing environment to an existing project in the production
environment).
--password The password for encrypting the credentials in the exported project. When
used, this parameter must be used together with the master_user_
password parameter described below. Use the password > parameter if
you want to encrypt the credentials in the exported project, but do not
want the source master password to be used in a different environment.
The specified password must be at least 32 characters in length and can
either be user-devised or generated using the genpassword utility
described in Changing the master user password (page 32).
--master_user_password The master user password defined for the source machine. When used,
this parameter must be used together with the password parameter. Use
the master_user_password > parameter if you want to encrypt the
credentials in the exported project, but do not want the source master
password to be used in a different environment. In such a case, when you
import the project to an environment that has a different master
password, you will only need to specify the password qualifier.
For instructions on changing the master user password, see Changing the
master user password (page 32).
See also: Moving projects from the test environment to the production
environment (page 86) and Import/export scenarios - When is a password
required? (page 86)
Example
Export project configuration without a password
ComposeCli.exe export_project_repository_config --project MyProject --outfile file.json --is_
without_credentials
Export project configuration with a password
ComposeCli.exe export_project_repository_config --project MyProject --outfile file.json --
password MyPassword --master_user_password MyMasterUserPassword
Setup and User Guide - Qlik Compose, May 2022 295
6 Data Lake projects
Importing the Project Configuration
You can use the Compose CLI to import the configuration settings of an existing project. This includes Data
Zone definitions, scheduling jobs, and notifications. This is helpful, for example, when you need to migrate
configuration settings from a test environment to the production environment. For information about
migrating projects, see Migrating projects from the test environment to the production environment (page 296).
Before you can import the project configuration, you must first run the import_project_
repository command described in Importing a project (page 293).
Command syntax:
ComposeCli.exe import_project_repository_config --project
project_name
--infile
input_file
[--
password
password
] [--is_without_credentials]
Parameters
Parameter Description
--project The name of the project.
--infile The full path to the input file, including the file name. This file is in JSON
format (e.g. C:\file.json).
--password The password specified with the password parameter during export.
For instructions on changing the master user password, see Changing the
master user password (page 32).
See also: Moving projects from the test environment to the production
environment (page 86) and Import/export scenarios - When is a password
required? (page 86)
--is_without_credentials Use this parameter to specify to import the project settings without the
encrypted fields. In this case, you will need to manually enter the project's
Landing Zone and Storage Zone passwords in the Data Zone Connection
settings.
Example
ComposeCli.exe import_project_repository_config --project MyProject --infile file.json --
password MyPassword
Migrating projects from the test environment to the production environment
After successfully creating and testing projects in the test environment, you now want to move those projects
to the production environment. You also need to propagate updates from the testing environment to the
production environment as necessary. Although it sounds complicated, moving new and updated projects
from the test environment to the production environment is actually quite straightforward, as explained
below.
See also Import/Export scenarios: When is a password required? (page 297).
Setup and User Guide - Qlik Compose, May 2022 296
6 Data Lake projects
Landing and Storage Connections (landing, storage and provisioning) will not be overridden when
moving to a production environment. This also includes the file format set in the provisioning task.
The Landing Zone and Storage Zone display names must be identical in both the testing and the
production environments.
To perform the initial migration from the testing environment to the production environment:
1. Export the project from the test environment as described in Exporting a project (page 291).
2. Import the test project to the production environment as described in Importing a project (page 293).
3. Edit the connection settings to point to the production Landing Zone and Storage Zone.
For more information, see Defining Landing Zones (page 314)and Defining a connection to the Storage
Zone (page 306)respectively.
4. Configure notifications and scheduling as needed.
For more information, see Scheduling tasks (page 357) and Notifications (page 358) respectively.
To propagate updates from the testing environment to the production environment:
1. Export the project from the test environment as described in Exporting a project (page 291).
2. Import the test project to the production environment as described in Importing a project (page 293).
Import/Export scenarios: When is a password required?
The following section describes which of the various export/import scenarios require a password to be
specified.
In all scenarios, if you import a project to an existing project, the credentials of the existing projects
are preserved (as they are part of the project configuration).
Scenario 1: Moving a project or project configuration between two Compose machines without
retaining the project credentials. This is useful when importing to a new project that will have different
project credentials.
In such a scenario, simply add the is_without_credentials parameter to either the export or the
import command.
Scenario 2: Moving a project or project configuration between two Compose machines that have the
same Master User Password.
In such a scenario, neither the export command nor the import command need to include a password. If you
do not want the source and target projects to have the same credentials (for Data Zone connectivity, etc.),
then you also need to specify the is_without_credentials parameter in either the export or the import
command.
Setup and User Guide - Qlik Compose, May 2022 297

6 Data Lake projects
Scenario 3: Moving a project or project configuration between two Compose machines that have a
different Master User Password, but without revealing the Master User Password of the source
machine.
In such a scenario, the export command must include the password and master_user_password
parameters while the import command must include the password parameter. The same password
(specified with the password parameter) must be used for both export and import.
Scenario 4: Moving a project or project configuration between two Compose machines that have a
different Master User Password.
In such a scenario, the export command does not need to include a password, but the import command
should specify the Master User Password of the source machine (using the password parameter).
Generating projects using the CLI
The instruction below explain how to automatically generate projects using the CLI. This can be especially
useful when deploying projects between different environments.
Command syntax
ComposeCli.exe generate_project --project
project_name
[--database_already_adjusted]
Parameters
Parameter Description
--project The name of the project.
--database_already_adjusted An optional parameter that should only be included if the
data warehouse and data marts were adjusted outside of
Compose.
Example
ComposeCli.exe generate_project --project MyProject --database_already_adjusted
When the command is run, Compose will:
l
Validate the metadata.
l
Create any storage tables that do not exist.
l
Validate the storage.
l
Adjust the storage if needed.
l
If an Adjust script is needed and
--database_already_adjusted
is included in the
command, the script (DDL) will not be run as it is assumed that the user ran it
manually.
l
If the "Adjust" cannot be performed automatically, the process will be stopped.
l
Generate all storage tasks.
Setup and User Guide - Qlik Compose, May 2022 298

6 Data Lake projects
If Compose encounters an error while generating a storage task, it will skip the problematic
task and continue with the remaining tasks.
Viewing and downloading DDL scripts
In the DDL Script Files window, you can view and download the Storage Zone DDL script files. By default,
Compose executes the Create, Adjust and Drop statements immediately upon user request. However, when
the Generate DDL scripts but do not run them option is enabled, Compose will only generate the scripts but
not execute them.
For more information on the Create DDL scripts only option, see Project settings (page 283).
To open the DDL Script Files window:
1. Open your project as described in Managing and monitoring projects (page 282).
2. Click the downward arrow to the right of the project name and select Show DDL Scripts from the
drop-down menu.
The DDL Script Files window opens.
3. To view a script, select the desired script in the Script Files pane on the left. The script will be
displayed on the right.
Setup and User Guide - Qlik Compose, May 2022 299
6 Data Lake projects
4. To download a script, select the desired script in the Script Files pane on the left. Then click the
download button in the top right of the window.
5. To search for an element in the script, start to type in the search box. All strings that match the search
query will be highlighted blue.
You can navigate between search query matches using the arrows to the right of the search box. Use
the right and left single arrows to navigate matches sequentially. Use the right and left double arrows
to jump to the last and first match respectively.
6. To reset the search, either delete the search query or click the "x" in the right of the search box.
Project versioning
Compose provides built-in project version control using the Git engine. Version control enables Compose
developers to commit project revisions to both a local and a remote Git repository. If a mistake is made,
Compose developers can easily roll back to earlier versions of the project while minimizing disruption to all
team members.
Revisions only store metadata and mapping information. After you revert to a saved revision, you
will need to recreate the data warehouse and data mart tables.
Configuring version control settings
To define Version Control Settings:
1. From the project drop-down menu, select Version Control > Settings.
The Version Control Settings - Git window opens.
The Local Commits area shows the local root folder where project revisions are committed. The first
time a project revision is committed, Compose creates a JSON file with the current project settings.
The <project_name>.json file is archived to a ZIP file (<project_name>_deployment.zip), which is
located in a project-specific folder under the source-control folder.
2. To enable commits to a remote Git database, select Enable remote commits and then provide the
following information:
l
URL - The address of the remote Git database.
l
User name - Your user name for accessing the remote Git database.
l
Password - Your password for accessing the remote Git database.
Committing projects
You can commit a project using the console or using the CLI:
To commit a project to Version Control using the web console:
1. From the project drop-down menu, select Version Control > Commit.
The Commit - <Project_Name> window opens.
2. Enter a message in the Message box and optionally select the Remote push check box. Note that the
Remote push check box will be disabled if the Enable remote commits option described above is not
selected.
Setup and User Guide - Qlik Compose, May 2022 300

6 Data Lake projects
To commit a project to Version Control using the CLI:
Run the following command from the Compose bin directory:
Command syntax
ComposeCli.exe commit --project
project_name
[--message
message
] [--remote]
Parameters
Parameter Description
--project The name of the project.
--message An optional message to accompany the commit.
--remote This parameter is required if you want to commit the project to a remote
Git repository (see above). By default, the project will be committed locally
to <product_dir>\data\source-control.
Example
ComposeCli.exe commit --project MyProject --remote
To revert to a saved revision:
1. From the project drop-down menu, select Version Control > Revisions history.
The Revision History - <Project_Name> window opens.
By default, the last 10 revisions are shown. You can change this number by selecting one of the
available options from the Show drop-down list.
2. Optionally, use the Search box to find a specific revision.
3. Select the desired revision and then click the Deploy to Revision toolbar button.
4. When prompted to confirm the operation, click Yes.
The existing project will be replaced.
5. Click Close to close the Revision History - <Project_Name> window.
To download a saved revision:
1. From the project drop-down menu, select Version Control > Revisions history.
The Revision History - <Project_Name> window opens.
By default, the last 10 revisions are shown. You can change this number by selecting one of the
available options from the Show drop-down list.
2. Optionally, use the Search box to find a specific revision.
3. Select the desired revision and then click the Download Revision as Package toolbar button.
The package will be saved as a ZIP file in your browser's default download location.
Creating a diagnostics package
To assist in troubleshooting esoteric issues, a Qlik Support Engineer may ask you for a diagnostics package.
The diagnostics package contains the following information:
Setup and User Guide - Qlik Compose, May 2022 301

6 Data Lake projects
l
The project "data" directory
l
Java logs and workflow logs
l
.NET logs
l
Deployment package file
As a prerequisite to creating a diagnostics package, the project must have at least one database
connection configured.
To create a diagnostics package:
1. From the Project menu, select Create Diagnostics Package.
2. A zip file in the following format will either be downloaded to your computer or you will be prompted
to download it (according to your browser settings):
Compose_Diagnostics_<project_name>_<timestamp>.zip
6.3 Getting started with Data Lake projects
This section provides an overview of the Data Lake project workflow, familiarizes you with the console
elements and explains how to set up a task in Qlik Replicate.
In this section:
l
High-level flow (page 302)
l
Console elements (page 302)
High-level flow
A Qlik Compose workflow is typically set up as follows (simplified):
1. In Replicate, define a task that replicates the source tables to a specific target. The target should be
defined as the Landing Zone in your Qlik Compose project.
2. In Compose:
a. Configure access to your Storage Zone and your Landing Zone(s).
b. Use the "Discover" option to auto-generate the metadata from the source tables located in the
Landing Zone(s). You can even create the Metadata manually if you prefer.
c. Optionally, create the Storage Zone tables and then generate the ETL statements that will be
executed when the task runs.
d. Run the separate Full Load and CDC tasks (in that order) that were automatically created when
the source tables were discovered.
See also Introduction (page 17).
Console elements
This section will familiarize you with the elements that comprise the Qlik Compose UI.
To open Qlik Compose:
Setup and User Guide - Qlik Compose, May 2022 302
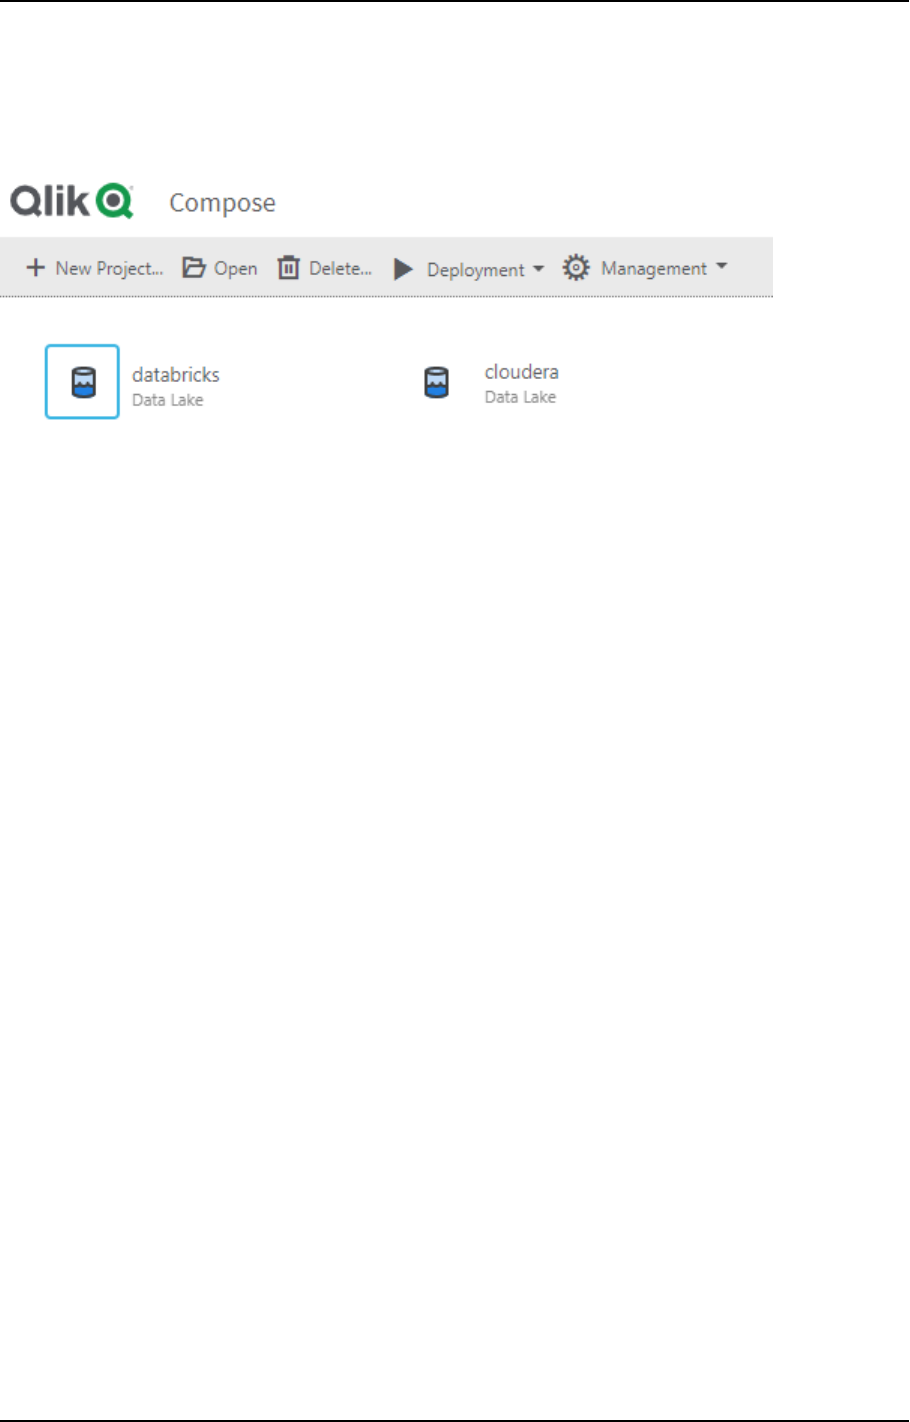
6 Data Lake projects
From the Windows Start menu, select All Programs > Qlik Compose > Qlik Compose Console.
The Qlik Compose Console opens in Management view.
Qlik Compose Console - Management View
Management View
In Management view, you can manage the following:
l
Qlik Compose projects
For more information, see Adding and managing data warehouse projects (page 37).
l
The product license
l
Replicate Server connections
l
Compose Agent connection
l
Log levels and cleanup options
l
Email settings
l
User permissions
For more information, see Managing Compose (page 366).
Designer View
When you add a new project or open an existing project, the console switches to Designer view. You can
switch back and forth between Designer view and Monitor view by clicking the Designer and Monitor tabs in
the top right of the console.
Designer view comprises the following panels:
l
Landing and Storage Connections - Configure access to your Landing Zone(s) and Storage Zone.
For more information, see Defining Landing Zones (page 314)and Defining a connection to the Storage
Zone (page 306)respectively.
l
Storage Zone - In the Storage Zone, you can:
l
Discover and manage the source table metadata.
l
Define data storage tasks that move the data from the Landing Zone(s) to the Storage Zone.
Setup and User Guide - Qlik Compose, May 2022 303
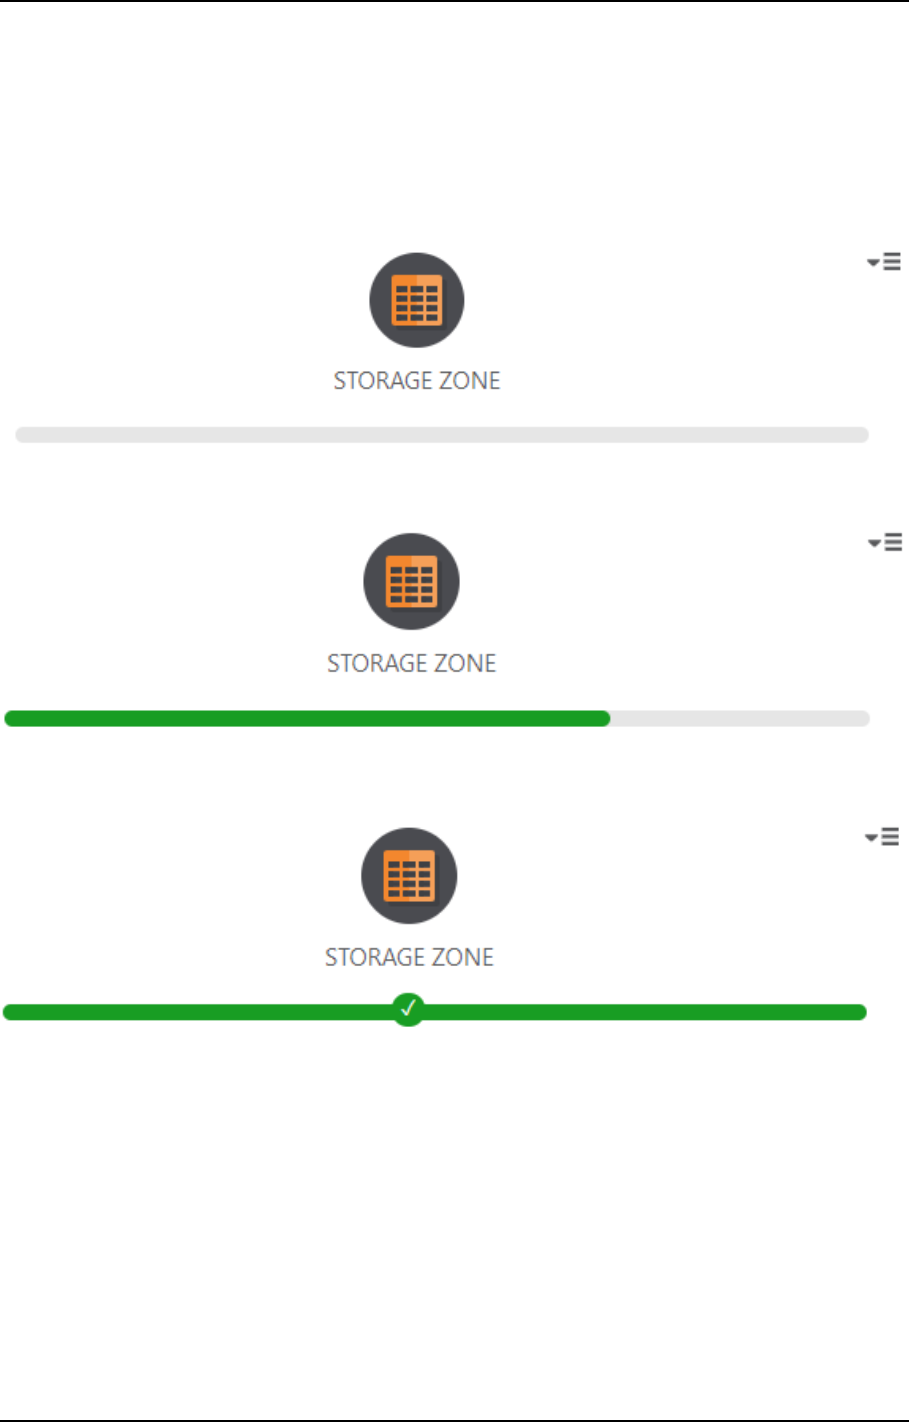
6 Data Lake projects
For more information, see Selecting source tables and managing metadata (page 316) and Creating and
Managing Storage Zone Tasks (page 337).
In Designer view, each of the panels has a bar below the panel name. The bar can be empty, half-filled or
completely filled, according to the current configuration status of the panel properties, as follows:
No fill (gray) - Not configured
Partially filled - Configuration is not complete
Completely filled - Fully configured
Monitor View
To switch to Monitor view, click the Monitor tab in the top right of the console.
Setup and User Guide - Qlik Compose, May 2022 304
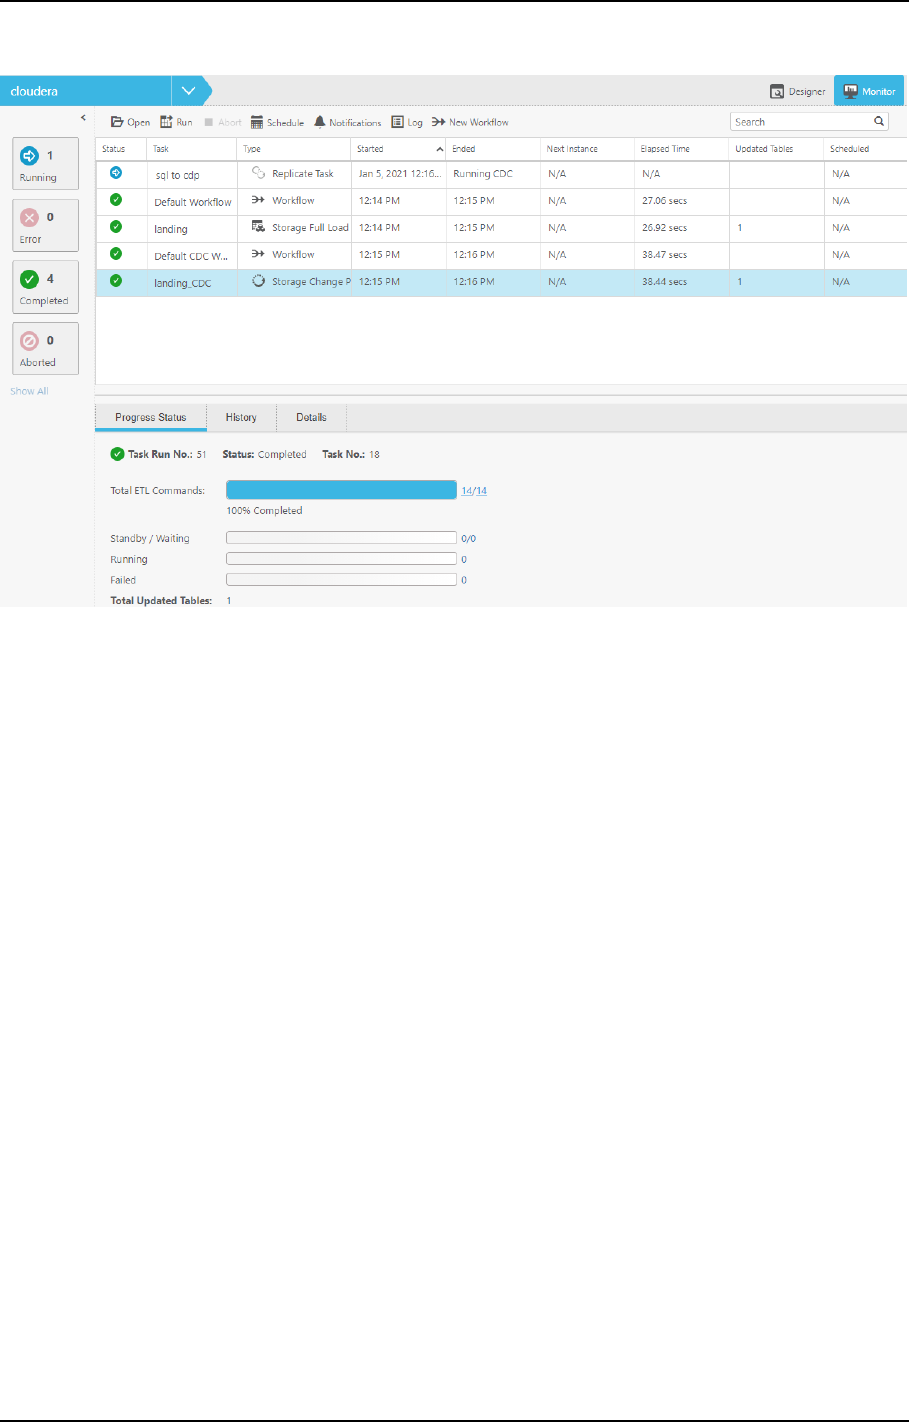
6 Data Lake projects
Monitor View
In Monitor view, you can view the status of Qlik Compose tasks, schedule their execution (either individually or
as a workflow), view logs, and create notifications.
For more information, see Controlling and monitoring tasks and workflows (page 354).
6.4 Setting up landing and storage connections
This topic explains how to configure connectivity to your Storage Zone and Landing Zone(s).
In this section:
l
Defining a Storage Zone (page 305)
l
Defining Landing Zones (page 314)
l
Managing Landing and Storage connections (page 316)
Defining a Storage Zone
This section explains how to set up Storage Zone connectivity in a Qlik Compose project.
In this section:
l
Defining a connection to the Storage Zone (page 306)
l
Supported data types (page 312)
l
Required permissions (page 305)
Required permissions
The following permissions are required:
Setup and User Guide - Qlik Compose, May 2022 305
6 Data Lake projects
l
Metadata: Read and Write
l
Tables: Insert and Update, and Delete.
Defining a connection to the Storage Zone
As the server connection settings for the Landing Zone are derived from the Storage Zone settings,
you must define a Storage Zone before defining a Landing Zone.
For more information on adding data sources, see Defining Landing Zones (page 314).
To define the Storage Zone connection:
1. Open your project and click the Manage button in the bottom left of the Databases panel.
The Manage Databases window opens.
2. Either, click the Add New Database link in the middle of the window.
-OR-
Click the New toolbar button.
The New Storage window opens. The settings will be relevant for the compute platform you selected
when you set up your project. The sections below detail the settings according to each of the available
compute platforms.
To use AVRO file format with Hive 3.x, you must set the following parameter:
metastore.storage.schema.reader.impl=org.apache.hadoop.hive.metastore.SerDeStorageSc
hemaReader
Cloudera Compute Platform
Security
Use SSL - Select to connect using SSL.
l
Use self-signed certificate - Select to connect using a self-signed certificate.
l
Trusted store full path - Enter the full path to the store containing your trusted certificates.
l
Trusted store password - Enter the password for your trusted certificate store.
Authentication Type:
l
User name - Select to connect to the Hadoop cluster with only a user name. Then, in the User name
field, specify the name of a user authorized to access the Hadoop cluster.
l
User name and password - Select to connect to the Hadoop cluster with a user name and password.
Then, in the User name and Password fields, specify the name and password of a user authorized to
access the Hadoop cluster.
Setup and User Guide - Qlik Compose, May 2022 306
6 Data Lake projects
l
Knox - Select this option if you need to access the Hortonworks Hadoop distribution through a Knox
Gateway. Then, provide the following information:
l
Host - The FQDN (Fully Qualified Domain Name) of the Knox Gateway host.
l
Knox port - The port number to use to access the host. The default is "8443".
l
Knox Gateway path - The context path for the gateway. The default is "gateway".
The port and path values are set in the gateway-site.xml file. If you are unsure
whether the default values have been changed, contact your IT department.
l
Cluster name - The cluster name as configured in Knox. The default is "Default".
l
User name - Enter your user name for accessing the Knox gateway.
l
Password - Enter your password for accessing the Knox gateway.
l
Kerberos - Select to authenticate against the Hadoop cluster using Kerberos. Then, provide the
following information:
l
Realm: The name of the realm in which your Hadoop cluster resides.
For example, if the full principal name is [email protected], then EXAMPLE.COM is
the realm.
l
Principal: The user name to use for authentication. The principal must be a member of the
realm entered above. For example, if the full principal name is [email protected],
then john.doe is the principal.
l
Keytab file: The full path of the Keytab file. The Keytab file should contain the key of the
Principal specified above.
The krb5.ini file should be located in C:\Windows (according to the Java default).
However, if Replicate is installed on the same machine as Compose, the file might be
in C:\Program Files\MIT\Kerberos. In such a case, simply copy the file to
C:\Windows.
l
Host: The FQDN that will be used to locate the correct Principal in Kerberos. This is only
required if the IP address of the Hive machine is not known to Kerberos.
l
Service name: The default is "hive". You should only change this if you are sure that the service
name is different.
In case of an issue with the Kerberos authentication, do the following:
1. Test the connection to the Hive machine with Kerberos.
2. Check the Kerberos configuration on HDFS.
If you are unsure about any of the above, consult your IT administrator.
Setup and User Guide - Qlik Compose, May 2022 307
6 Data Lake projects
Hive Access
l
Use ZooKeeper - Select if your Hive machines are managed by Apache ZooKeeper.
l
ZooKeeper hosts - The machines that make up the ZooKeeper ensemble (cluster). These should be
specified in the following format:
host1:port1,host2:port2,host3:port3
l
ZooKeeper namespace - The namespace on ZooKeeper under which the HiveServer2 znodes are
located.
l
Host - If you are not using ZooKeeper, specify the IP address of the Hive machine. This should be the
same as the host name or IP address specified in the Cloudera Data Platform Private Cloud or
Hortonworks Data Platform target endpoint settings in the Replicate task.
l
Port - If you are not using ZooKeeper, optionally change the default port.
l
Database name - Specify the name of the Hive target database. This must be different from the
database specified in the Landing Zone settings.
If the database does not exist Compose will try and create it. This requires the Compose user
to be granted the necessary permission to create the database.
l
JDBC parameters - Additional parameters to add to the default Simba JDBC connection string. These
should be key values separated by a semi-colon.
Example:
KEY=VALUE;KEY1=VALUE1
l
You can set Hive parameters in the JDBC parameters. For example:
l
mapred.job.queue.name=<queuename>
l
hive.execution.engine=<enginename>
l
To distinguish Compose Hive sessions from other Hive Sessions, if Tez is being used,
you can define a JDBC parameter to change the query description, as follows:
hive.query.name=my_description
Amazon EMR Compute Platform
Security
l
Use SSL - Select to connect using SSL.
Authentication type:
l
User name - Select to connect to the Hadoop cluster with only a user name. Then, in the User name
field, specify the name of a user authorized to access the Hadoop cluster.
l
User name and password - Select to connect to the Hadoop cluster with a user name and password.
Then, in the User name and Password fields, specify the name and password of a user authorized to
access the Hadoop cluster.
If you are unsure about any of the above, consult your IT administrator.
Setup and User Guide - Qlik Compose, May 2022 308

6 Data Lake projects
Hive Access
l
Host - Specify the IP address of the Hive machine. This should be the same as the host name or IP
address specified in the Amazon EMR target endpoint settings in the Replicate task.
l
Port - Optionally change the default port.
l
Database name - Specify the name of the Hive target database. This must be different from the
database specified in the Landing Zone settings.
If the database does not exist Compose will try and create it. This requires the Compose user
to be granted the necessary permission to create the database.
l
JDBC parameters - Additional parameters to add to the default Simba JDBC connection string. These
should be key values separated by a semi-colon.
Example:
KEY=VALUE;KEY1=VALUE1
l
You can set Hive parameters in the JDBC parameters. For example:
l
mapred.job.queue.name=<queuename>
l
hive.execution.engine=<enginename>
l
To distinguish Compose Hive sessions from other Hive Sessions, if Tez is being used,
you can define a JDBC parameter to change the query description, as follows:
hive.query.name=my_description
l
Hive metadata storage type - Select one of the following storage mediums for your Hive metadata:
l
Hive Metastore - This is the default metadata storage type.
l
AWSGlue Data Catalog - You can choose to store Hive metadata using the AWSGlue Data
Catalog. AWS Glue allows you to store and share metadata in the AWS Cloud in the same way as
in a Hive metastore.
When using AWSGlue Data Catalog for metadata storage, Compose control tables
will be created with the data type STRING instead of VARCHAR (LENGTH).
Databricks Compute Platform
From Compose May 2022 SR 01, if you use Replicate November 2022 to land data in Databricks, only
the Databricks (Cloud Storage) target endpoint can be used. If you are using an earlier supported
version of Replicate, you can continue using the existing Databricks target endpoints.
Security
All connections to Databricks use SSL.
Setup and User Guide - Qlik Compose, May 2022 309
6 Data Lake projects
l
Authentication type - "Databricks Delta". This cannot be changed.
l
User name - The default user name is "token", which requires you to specify your personal access
token in the Password field. Although it's strongly recommended to use a token, you can also access
your Databricks account using a standard user name and password.
l
Password - If you are using a personal access token, this will be the token value. Otherwise, specify the
password for accessing your Databricks account.
l
HTTP Path - The HTTP path to your Databricks compute resources.
Example:
sql/protocolv1/o/8388045294310983/0123-xxxxxx-xxxxxxx
If you are unsure about any of the above, consult your IT administrator.
Hive Access
l
Host - Specify the IP address of the Hive machine. This should be the same as the host name or IP
address specified in the Databricks target endpoint settings in the Replicate task.
l
Port - Optionally change the default port.
l
Catalog - If you want the storage tables to be created in Unity Catalog, specify the catalog name.
If the Replicate task is Full Load and Store Changes, the storage catalog name can be
whatever you choose. However, both the catalog name defined in the Replicate Databricks
(Cloud Storage) target endpoint and the catalog name defined in the landing settings must
be hive_metastore.
l
Database name - Select the Hive target database. This must be different from the database specified
in the Landing Zone settings. If you specified a catalog (above), only databases in the catalog will be
available for selection.
l
If the database does not exist Compose will try and create it. This requires the
Compose user to be granted the necessary permission to create the database.
l
To prevent table name conflicts when using Databricks, the Landing Zone and
Storage Zone databases should be different.
l
JDBC parameters - Additional parameters to add to the default Simba JDBC connection string. These
should be key values separated by a semi-colon.
Example:
KEY=VALUE;KEY1=VALUE1
l
You can set Hive parameters in the JDBC parameters. For example:
l
mapred.job.queue.name=<queuename>
l
hive.execution.engine=<enginename>
l
To distinguish Compose Hive sessions from other Hive Sessions, if Tez is being used,
you can define a JDBC parameter to change the query description, as follows:
hive.query.name=my_description
Setup and User Guide - Qlik Compose, May 2022 310

6 Data Lake projects
HDInsight Compute Platform
Security
All connections to HDInsight use SSL.
l
User name - Specify the name of a user authorized to access the Hadoop cluster.
l
Password - Specify the password of the user specified in the User name field.
Hive Access
l
Host - Specify the IP address of the Hive machine. This should be the same as the host name or IP
address specified in the Microsoft Azure HDInsight target endpoint settings in the Replicate task.
l
Port - Optionally change the default port.
l
Database name - Specify the name of the Hive target database. This must be different from the
database specified in the Landing Zone settings.
If the database does not exist Compose will try and create it. This requires the Compose user
to be granted the necessary permission to create the database.
l
JDBC parameters - Additional parameters to add to the default Simba JDBC connection string. These
should be key values separated by a semi-colon.
Example:
KEY=VALUE;KEY1=VALUE1
l
You can set Hive parameters in the JDBC parameters. For example:
l
mapred.job.queue.name=<queuename>
l
hive.execution.engine=<enginename>
l
To distinguish Compose Hive sessions from other Hive Sessions, if Tez is being used,
you can define a JDBC parameter to change the query description, as follows:
hive.query.name=my_description
Dataproc Compute Platform
Security
l
Use SSL - Select to connect using SSL.
Authentication type:
l
User name - Select to connect to the Hadoop cluster with only a user name. Then, in the User name
field, specify the name of a user authorized to access the Hadoop cluster.
l
User name and password - Select to connect to the Hadoop cluster with a user name and password.
Then, in the User name and Password fields, specify the name and password of a user authorized to
access the Hadoop cluster.
If you are unsure about any of the above, consult your IT administrator.
Setup and User Guide - Qlik Compose, May 2022 311
6 Data Lake projects
Hive Access
l
Host - Specify the IP address of the Hive machine. This should be the same as the host name or IP
address specified in the Google Dataproc target endpoint settings in the Replicate task.
l
Port - Optionally change the default port.
l
Database name - Specify the name of the Hive target database. This must be different from the
database specified in the Landing Zone settings.
If the database does not exist Compose will try and create it. This requires the Compose user
to be granted the necessary permission to create the database.
l
JDBC parameters - Additional parameters to add to the default Simba JDBC connection string. These
should be key values separated by a semi-colon.
Example:
KEY=VALUE;KEY1=VALUE1
l
You can set Hive parameters in the JDBC parameters. For example:
l
mapred.job.queue.name=<queuename>
l
hive.execution.engine=<enginename>
l
To distinguish Compose Hive sessions from other Hive Sessions, if Tez is being used,
you can define a JDBC parameter to change the query description, as follows:
hive.query.name=my_description
After defining your Storage Zone connection parameters:
1. Click Test Connection to verify that Compose is able to establish a connection with the specified
database.
2. Click OK to save your settings. The database is added to the list on the left side of the Manage
Databases window.
Supported data types
The following table shows the default mapping from Compose data types to Apache Hive and Databricks data
types.
Compose Data Types Hive Data Types Databricks Data Types
INTEGER INT INT
DATETIME TIMESTAMP TIMESTAMP
TIME TIMESTAMP TIMESTAMP
DATE DATE DATE
BIGINT REAL BIGINT
BYTE ARRAY STRING STRING
Data type mappings
Setup and User Guide - Qlik Compose, May 2022 312
6 Data Lake projects
Compose Data Types Hive Data Types Databricks Data Types
DECIMAL DECIMAL (P,S) DECIMAL (P,S)
GUID VARCHAR (38) STRING
VARCHAR VARCHAR (LENGTH) VARCHAR (LENGTH)
STRING STRING STRING
Working with views
Compose creates the Storage Zone with both storage tables and storage views. The storage tables are created
in the database that you defined in your storage settings while two separate database are created for the
views:The exposed views database and the internal views database. The exposed views database is the
primary views database and contains all view types. The internal views database is used to store updates to
ODS Live Views and HDS Live Views. The exposed views database and the internal views database share the
same name as the Storage Zone database, but are appended with a unique suffix (by default, _v and _v_
internal respectively), which is set in the project settings’ Naming tab. Consuming applications should be set
up to read from the exposed views database, which provide several benefits over tables including better
security (requiring read-only access only), data concurrency, and minimizing duplicate records in projects
defined with non-ACID storage.
There are four types of view, depending on the project-level or entity-level data store type:
l
ODS standard views – Created when the data store type is ODS only. These views will always reflect
the same data unless the storage task is run.
l
ODS Live Views – Created when the data store type is ODS only. As opposed to standard views, these
views always reflect any changes to the Replicate Change Tables and to the Storage tables.
l
HDS standard views – Created when the data store type is ODS + HDS. These views contain both
current records and historical records and will only be updated if you run storage tasks.
l
HDS Live Views – Created when the data store type is ODS + HDS. These views contain both current
records and historical records. As opposed to standard views, these views always reflect any changes
to the Replicate Change Tables and to the Storage tables.
When using live views, to ensure transactional consistency, it is recommended to turn off Speed
partition mode in the Replicate task settings. When set to off, Replicate will close the partition only
at the end of each transaction. This might require you to shorten the partition interval in order for
the changes to be propagated to Compose in a timely manner. Shortening the partition interval
might also require you to increase the partition cleanup frequency to prevent too many files from
accumulating on the target and degrading performance.
For information about turning off Speed partition mode, setting partitioning intervals, and partition
cleanup, see the Replicate Help.
Setup and User Guide - Qlik Compose, May 2022 313
6 Data Lake projects
Tables that were reloaded in Replicate will be automatically reloaded in Compose the next time the
task runs. To prevent data inconsistency, Live Views should not be read while the tables are being
reloaded.
Standard views contain data that was already applied to the storage tables, with mid to low-level latency. As
consuming data from standard views requires less computing resources, this should be the first choice for
downstream users. However, if latency is too high for some applications, Live views can be used instead.
Although using live views significantly reduces latency, doing so requires greater computational resources.
There is also the possibility that the date in live views might be less consistent than the data in standard views
as updates may not have been applied to all the storage tables at the same time.
Although the views are in a separate database, you can use the suffixes (specified in the project settings’
Naming tab) to help identify them.
Defining Landing Zones
This section explains how to set up Landing Zone connectivity in a Qlik Compose project.
In this section:
l
Landing Zone permissions (page 314)
l
Defining Landing Zones connections (page 314)
Landing Zone permissions
For proper operation, the Landing Zone database must be granted the following permissions:
l
Read metadata
l
Select from tables
For information on configuring the Landing Zone, see Defining Landing Zones connections (page 314).
Defining Landing Zones connections
In a Data Lake project, you can define any number of Landing Zone connections. Defining multiple Landing
Zone connections is necessary if the data that you eventually want to be available in your Storage Zone is
located in several Landing Zones.
The Landing Zone connection settings tell Compose where the source tables from the Replicate task are
located. Since the Landing Zone is always located on the Storage Zone Server and the Storage Zone
connection details have already been defined, you do not need to provide them again.
l
Before you can define a Landing Zone connection in a Data Lake project, you first need to
define a Storage Zone connection.
For more information on defining a Storage Zone connection, see Defining a connection to the Storage Zone
(page 306).
To define a Landing Zone connection:
Setup and User Guide - Qlik Compose, May 2022 314
6 Data Lake projects
1. Open your project and click Manage in the Databases panel.
The Manage Databases window opens.
2. Click the New toolbar button.
The New Data Source window opens.
3. In the Name field, specify a display name for your Landing Zone.
4. From the Content type drop-down list, choose whether the content in the landing zone is Full Load
Only, Change Processing or Full Load and Change Processing (according to the Qlik Replicate task
definition).
5. Specify the name of the Unity Catalog in the Catalog field, according to the following guidelines:
l
If the Replicate task is Full Load and Store Changes, both the catalog name defined in the
Replicate Databricks (Cloud Storage) target endpoint and the catalog name defined in landing
settings must be hive_metastore.
l
If the Replicate task is Full Load only, the name must be the same as the catalog name defined
in the Replicate Databricks (Cloud Storage) target endpoint.
l
Relevant for Databricks only.
l
If the storage connection settings were defined without a catalog, then the landing
connection settings must also be defined without a catalog.
6. In the Database name field, select the database that was defined in the Replicate target endpoint
settings. If you specified a catalog (above), only databases in the catalog will be available for selection.
For more information, see Defining a Qlik Replicate task (page 36).
7. Associate with Replicate Task - This is required. Select this to associate your Data Lake project with
the related Replicate task. Replicate tasks replicate the relevant tables from the source database to the
Landing Zone. Specifying the Replicate task name will enable you to monitor and control that task
from within Compose.
Before you can choose a Replicate task however, you first need to define the connection
settings to the Qlik Replicate Server machine. To do this, click the Replicate Server Settings
link below the Task field and then configure the settings as described in Replicate Server
settings (page 370).
Once you have configured connectivity to at least one Replicate Server, you can then proceed to select
a Replicate task.
To select a Replicate task:
1. Click the browse button to the right of the Associate with Replicate task field.
The Select Replicate Task window opens.
2. Select a Replicate Server from the Server drop-down list.
The Replicate Tasks list is populated with all tasks defined on the selected server.
3. Select the task that is replicating the source tables to the landing zone and then click OK.
The name of the selected task is shown as read-only in the Associate with Replicate task field.
8. Click Test Connection and then, if the connection is successful, click OK to save your settings.
Setup and User Guide - Qlik Compose, May 2022 315

6 Data Lake projects
Managing Landing and Storage connections
You can edit and delete Landing and Storage Connections as required. The table below describes the available
options.
To Do this
Edit a Data
Zone
connection
In the left side of the Manage Landing and Storage Connections window, select the
desired Data Zone (Landing Zone or Storage Zone) and then click the Edit toolbar button.
Delete a Data
Zone
connection
In the left side of the Manage Landing and Storage Connections window, select the
desired Data Zone (Landing Zone or Storage Zone) and then click the Delete toolbar
button.
Click Yes when prompted to confirm the deletion.
6.5 Selecting source tables and managing metadata
This section describes how to select source tables and manage metadata. The source tables are the tables
that were replicated to the Landing Zone by the Replicate task (i.e. the target tables of the Replicate task).
In this section:
l
Reserved column names (page 316)
l
Selecting and adding the source tables (page 317)
l
Validating the metadata and storage (page 320)
l
Managing the metadata (page 322)
l
Schema evolution (page 327)
l
Creating transformations (page 329)
l
Reusable transformations (page 335)
Reserved column names
The following section lists the reserved column names. If the any of the discovered tables contain columns
with these names, you need to rename them in Compose. For information on renaming columns, see
Managing attributes (page 323).
l
BIR_MAPPING_NR - internal mapping identifier used in staging tables for ETL
l
ROWNR - internal row identifier used in staging tables for ETL
l
RUNNO_INSERT - The task run number for INSERT operations.
l
RUNNO_UPDATE - The task run number for UPDATE operations.
l
OBSOLETE__INDICATION - Used to mark OBSOLETE records in data mart objects. See also: The
"Obsolete" indicator (page 257)
l
TR_ID - The unique Transaction ID for a fact table record.
l
BID_OCCS - Internal column used in ETL processing.
Setup and User Guide - Qlik Compose, May 2022 316
6 Data Lake projects
l
FD - This column is added to tables that contain attributes (columns) with a History Type 2. The
column is used to delimit the range of dates for a given record version. The column name can be
changed in the project settings.
If you change the "From Date" name in the project settings, the new name will become a
reserved word.
l
TD - This column is added to tables that contain attributes (columns) with a History Type 2. The
column is used to delimit the range of dates for a given record version. The column name can be
changed in the project settings.
If you change the "To Date" name in the project settings, the new name will become a
reserved word.
l
FKNR - Foreign key number column used in logging tables to report missing references captured via
the data warehouse ETL
Selecting and adding the source tables
This section explains how to select and add the source tables. Note that in the following explanations,
"table"refers to the physical database object whereas "entity" refers to the logical object within Compose.
In this section:
l
Discovering the Landing Zone (page 317)
l
Importing entities and mappings from another project (page 318)
l
Clearing the metadata cache (page 350)
See also Managing entities (page 323) for information on adding entities manually.
Discovering the Landing Zone
If you want the metadata to be created with Primary Keys, you need to associate a Replicate task
with the Landing Zone. For instructions on how to do this, see Defining Landing Zones connections
(page 314).
To discover the source tables:
1. Open your project.
2. In the Metadata panel, select Discover from the drop-down menu in the top right corner.
-OR-
In the Manage Metadata window, click the Discover toolbar button on the left.
The Discover window opens.
3. Select the desired source Landing Zone and then click OK.
The Source Tables/Views Selection - Name window opens.
Setup and User Guide - Qlik Compose, May 2022 317
6 Data Lake projects
4. Choose one of the following Search for options:
a. To search for tables only, select Tables.
b. To search for views only, select Views.
c. To search for tables and views, select All.
5. To include internal Qlik tables in the search results, select the Show Internal Qlik Tables check box.
This may be useful for debugging, but is not usually not necessary.
6. To only search for tables/views whose names contain a specific string, type the string in the Name
field.
For example, entering "ers" will return "customers" and "suppliers" in the search results.
7. Click the Search button.
The resulting tables/views will be displayed in the list in the left of the window.
8. Optionally, click the Clear Cache button to clear the Landing Zone's metadata cache (tables and
columns). This may be necessary, for example, if tables were added to the Landing Zone or renamed.
Such tables will not appear in the table list until the cache is cleared.
9. To add all of the resulting tables/views, click the >> button (Add All)
You can select multiple tables/views by holding down the [Shift] (sequential selection) or
[Ctrl] (non-sequential selection) button.
10. To add specific tables/views, select the desired tables and/or views and then click the > (Add) button.
If you add a table that already exists in the Metadata with the same name, then the new
table is added with the name: source_table_name_DISCOVERED (or source_table_name_
DISCOVERED_02 if the name source_table_name_DISCOVERED already exists, and so on).
If the table contains attribute domains that differ from existing ones but have the same
name, they will also be appended with the _01 suffix.
11. Click OK to add the selected tables/views to the project.
The Generating Metadata from [Metadata Name] window opens.
A progress bar indicates the current metadata generation progress. For each stage of the metadata
generation process, a corresponding message appears in the Messages list.
12. After the metadata has been generated, click Close.
13. Repeat steps 2-12 to discover additional sources.
Importing entities and mappings from another project
You can import entities and mappings from another project with the same Storage Zone type. This can be
useful within a development environment, for example, if you need to integrate a private developer's project
with the main project.
To import entities and mappings
1. Open the Manage Metadata window as described in Managing the metadata (page 322).
2. In the Entities toolbar, click the Import from Project button.
3. The Import from Project wizard opens.
Setup and User Guide - Qlik Compose, May 2022 318
6 Data Lake projects
4. In the Entities tab:
l
Select a project from the Import from Project drop-down list.
l
Optionally, search for specific entities.
l
Select which entities to import or select Select All to import all entities.
5. Click Next to select which mappings to import.
To create new entities and mappings if the selected entities and mappings already exist,
clear the Replace existing entities and mappings check box.
The new entities/mappings will be named <existing_name>_IMPORTED (or
<existing_name>_IMPORTED_<n+> if the entity/mapping is imported more than
once).
6. In the Mappings tab:
Either click Finish to import all mappings for the selected entities (the default).
-OR-
Select which mappings you want to import and then click Finish to import the selected entities and
mappings.
If you do not wish to import any mappings, clear the Mappings check box before clicking
Finish.
Clearing the metadata cache
To improve performance when reading from the Landing Zone or from the Storage Zone, Compose caches
both the Landing Zone metadata and the Storage Zone metadata. However, synchronization issues may
sometimes occur if the structure of the Landing Zone or the Storage Zone metadata is altered outside of the
Compose project.
If you aware of external changes to the metadata or if you notice any data synchronization anomalies,
Compose enables you to clear the metadata cache, either using the web console or using the CLI.
Clearing the landing zone metadata cache
To clear the landing zone metadata cache and refresh the mappings on the next reading of the metadata:
1. Click the Manage button at the bottom left of the Storage Zone panel.
2. Click the Clear Landing Cache button in the Manage Storage Tasks window.
See also the section describing how to clear the cache before discover.
Clearing the storage zone metadata cache
To clear the storage zone metadata cache:
1. In the Storage Zone panel, select the Clear Metadata Cache item from the menu in the top right
corner.
2. Click Yes to clear the storage zone metadata.
3. When the storage zone metadata cache has been successfully cleared, click Close.
Setup and User Guide - Qlik Compose, May 2022 319

6 Data Lake projects
Clearing the metadata cache using the CLI
You can also clear the metadata cache using the CLI.
Command syntax:
ComposeCli.exe clear_cache --project
project_name
[--type landing|storage] [--landing_zone
source_name]
Parameters
Parameter Description
--project The name of the project.
--type Which type of metadata cache to clear. Possible values are:
l
landing
l
storage
If --type
landing
and you want to clear a specific landing zone,
you must set the --landing_zone parameter as well. To clear the
metadata cache in all landing zones, specify --type
landing
and
omit the --landing_zone parameter.
--landing_zone the name of the landing zone when --type landing_zone
Example
ComposeCli.exe clear_cache --project MyProject --type landing --landing_zone MySource1
Validating the metadata and storage
Once the table metadata has been generated, to prevent data inconsistency issues, it is strongly
recommended to check the validity of the metadata and the Storage Zone. For example, for the metadata to
be valid, each of the tables must have a Business Key.
Validating the metadata does not recalculate expressions for historical data that has changed.
To validate the metadata:
1. Click the Validate button in the bottom right of the Metadata panel.
Compose will run validation checks and identify any entities which are not valid.
If the metadata is valid, the following message will be displayed:
Validation tests completed successfully. No issues were detected.
If the metadata is not valid, the Validating Storage Zone window opens. This window is divided into
the following columns:
l
Severity: Warning or Error.
l
Message: A message indicating why the entity is invalid.
l
Names:The names of the affected entities.
Setup and User Guide - Qlik Compose, May 2022 320
6 Data Lake projects
l
Resolve: To open the Manage Metadata window and manually resolve the issue, click the Edit
Entities button.
2. Resolve the issue (for example, by adding a Business Key) and then click Close.
The Validate Metadata window will open.
3. Click the Refresh button in the top left corner.
A message will confirm the metadata’s validity.
4. Click Close to exit the window.
To validate the Storage Zone:
1. Click the Validate button in the bottom right of the Storage Zone panel, or select Validate from the
drop-down menu in the top right of the Storage Zone panel.
2. Compose will run a series of validation checks and the Validating the Storage window opens.
If the Storage Zone metadata is not valid, the following message will be displayed:
The metadata is not valid.
If the Storage Zone is valid, the following message will be displayed:
The Storage Zone is valid.
If the metadata in the Manage Metadata window is not the same as the Storage Zone metadata, the
following message will be displayed:
The Storage Zone is different from the metadata.
3. This step is only applicable if the Storage Zone metadata differs from the metadata in Compose.
Review the report in the Metadata and Storage Comparison Report window and then do one of the
following:
l
If all the changes can be adjusted automatically, do one of the following according to your
configuration::
l
Click Adjust Automatically. The Adjust Storage Zone progress window opens. When
the "The Storage Zone was adjusted successfully." message is displayed, close the
window.
l
If the Generate DDL scripts but do not run them option is set, click Generate Adjust
Script.
Automatic adjust supports ADDENTITY, DROP ENTITY, and ADD ATTRIBUTE (if it's the
last attribute in the entity) only.
l
If some or none of the changes cannot be adjusted automatically, the Adjust Automatically
button will not be shown. In this case, do one of the following according to your configuration:
l
Click Drop and Recreate Tables. You will be prompted to confirm this action. Click Yes.
The Dropping Storage Tables window opens. When the "The Storage Zone tables were
dropped and recreated successfully." message is shown, close the window.
l
If the Generate DDL scripts but do not run them option is set, click Generate DDL
Script.
Setup and User Guide - Qlik Compose, May 2022 321

6 Data Lake projects
Clicking Generate Adjust Script or Generate DDL Script
When you click Generate Adjust Script or Generate DDL Script, the Generate DDL Scripts window
opens showing the progress of the script generation.
The generated scripts will be saved to:
<product_dir>\data\projects\<project_name>\ddl-scripts
Once the script(s) have been generated, close the Generate DDL Scripts window.
When working with a Hive-based compute platform, after you close the Generate DDL Scripts
window, the DDL Script Files window opens automatically displaying the generated scripts. The DDL
Script Files window provides a read-only view that allows you to review the scripts and download
them.
The scripts need to be executed directly in your Storage Zone. Make sure that any modifications that
you make to the scripts are done prior to executing them.
When you run the adjust scripts, backup tables are created from the existing tables. The
backup table names are appended with an "_old" suffix and must be deleted manually after
the script completes.
Search for "TODO" in the script to locate the part of the script that needs modifying.
4. Close any open validation windows.
See also: Supported characters (page 396).
Managing the metadata
You can add, remove and edit the entities and attributes according to your needs. All management tasks are
performed in the Manage Metadata window, which you can open using one of the following methods:
l
Click the Manage button at the bottom left of the Metadata panel.
l
Click the Entities number in the Metadata panel.
l
Select Manage from the drop-down menu in the top right of the Metadata panel.
The Manage Metadata window is split into two tabs: The Logical Metadata tab and the Physical Metadata
tab. The Logical Metadata tab shows the entities and attributes as they appear in the Metadata whereas the
Physical Metadata tab provides a preview of the actual tables (and columns) that will be created in the
Storage Zone.
In the Logical Metadata tab, you can perform various management tasks such as adding and/or editing
entities and attributes.
In this section:
l
Managing entities (page 323)
l
Managing attributes (page 323)
Setup and User Guide - Qlik Compose, May 2022 322

6 Data Lake projects
l
Managing the Attributes Domain (page 326)
Managing entities
You can add, edit and remove entities as described in the table below.
Reducing the window size also shortens the toolbar. If the toolbar is too short to contain all the
buttons, the toolbar options will be displayed in the drop-down menu instead. The shorter the
toolbar, the more options will appear in the drop-down menu.
To Do This
Add an entity 1. Click the New Entity button in the Entities toolbar.
2. Provide a name and description (optional) for the entity and then click OK.
Edit an entity 1. Select the entity you want to edit and then select Edit from the drop-down menu
in the Entities toolbar.
2. Edit the entity’s name and description (optional) and then click OK.
Remove an
entity
1. Select the entity (or multiple entities) that you want to remove, and then select
Delete from the drop-down menu in the Entities toolbar.
2. When prompted to confirm the deletion, click Yes.
Duplicate an
entity
1. Select the entity you want to duplicate and then select Duplicate from the drop-
down menu in the Entities toolbar.
2. Edit the entity’s name and description (optional) and then click OK.
The duplicated entity is added to the Entities list.
Import entities
from another
project
See Importing entities and mappings from another project (page 318).
Include
historical
records
Select the check box in the Save History column to the right of the desired entity. Note
that if you chose ODS +HDS as your data store, all of the Save History check boxes will
be selected by default.
Managing attributes
You can add, edit and remove attributes as required. All attributes in the Metadata belong to the Attributes
Domain. When adding a new attribute, you can either select an existing attribute from the Attributes Domain
or create a new Attributes Domain. Both of these options are described below.
To add an attribute from the attributes domain:
1. Click the New Attribute button in the Attributes toolbar.
The New Attribute window opens.
2. From the Attribute domain drop-down list, select the desired attribute.
Setup and User Guide - Qlik Compose, May 2022 323
6 Data Lake projects
3. To edit the selected attribute domain on-the-fly, click the edit button located after the Attribute
domain drop-down list. This will open the Edit - AttributeDomainName window. Then, continue from
Step 2 in Edit an attribute domain.
4. In the Attribute name field, optionally change the default instance name for the attribute domain.
The name cannot contain any of the following forbidden (by Hive) characters:
: ; . , ' "
You can create multiple instances of a single Attribute Domain. This is especially useful if you want to
use the same Attribute Domain across multiple tables, with each "instance" having its own unique
name. This also allows you to edit the properties of each attribute without affecting the other
attributes, even though all of the Attribute Domain instances share the same parent Attribute Domain.
For example, if the Attribute Domain name is "ID", you could create one instance for it in the
"Categories" entity named "CategoryID" and another instance in the "Employees" entity named
"EmployeeID". If, however, you edit the parent Attribute Domain attribute, all instances of that
attribute will be updated as well.
5. Data type: The data type of the Attribute Domain. This can only be edited by editing the Attribute
Domain.
6. To add a prefix to the attribute name, enter the desired prefix in the Prefix field.
Adding a prefix to an attribute name allows you to add multiple instances of the same attribute
domain. For example, the attribute "Employee" could become two different attributes: "ReportsTo_
Employee" and "HiredBy_Employee".
7. To create an expression for the attribute, click the fx button located after the Expression field and
then continue from Creating transformations (page 329).
8. Click OK to save your settings.
To create a new attribute domain and add it to the Metadata:
1. Click the New Attribute button in the Attributes toolbar.
The New Attribute window opens.
2. Click the plus sign to the right of the Attribute domain drop-down list.
The New Attribute Domain window opens.
a. Specify a Name for the attributes domain.
The name cannot contain any of the following forbidden (by Hive) characters:
: ; . , ' " :
b. From the Type drop-down list, select one of the available data types.
c. If the selected data type requires further configuration, additional fields will be displayed. For
example, when Decimal is selected, the Length and Scale fields will be displayed. Set the
values as desired.
d. Optionally, specify a Description.
Setup and User Guide - Qlik Compose, May 2022 324
6 Data Lake projects
e. Click OK to add the newly created attribute domain to the Attribute domain field and close the
New Attribute Domain window.
3. Continue from Step 4 in Add an existing attribute domain above.
You can also add new attribute domains via the Manage Attribute Domains window. For
more information, see Managing the Attributes Domain (page 326)
To edit an attribute:
Method 1:
1. Select the attribute you want to edit and then click the Edit button in the Attributes toolbar.
The Edit Attribute Name window opens.
2. Edit the values as required and then click OK.
Method 2:
1. Double-click the attribute you want to edit.
The values in the attribute row become editable.
2. Edit the values as required and then click the tick button at the end of the row.
To remove an attribute:
1. Select the attribute(s) you want to delete.
2. Click the Delete button in the Attributes toolbar.
3. When prompted to confirm the deletion, click Yes.
The Storage Zone needs to be "adjusted" when deleting an attribute from the metadata and then
adding the same attribute back to the metadata. However, the "Adjust" operation will also delete
the data from the corresponding Storage Zone column.
To change the attribute order:
l
Select the attribute you want to move and use the Move Up/Move to Top and Move Down /Move to
Bottom toolbar buttons to move the attribute
To manage the Attributes Domain:
l
See Managing the Attributes Domain (page 326).
To create an expression for an attribute:
l
See Add an attribute from the attributes domain or Edit an attribute above.
To export the attributes to a TSV file:
l
Select an entity from the Entities list on the left of the Manage Metadata window and then select
Export to TSV from the drop-down menu in the Attributes toolbar.
Setup and User Guide - Qlik Compose, May 2022 325
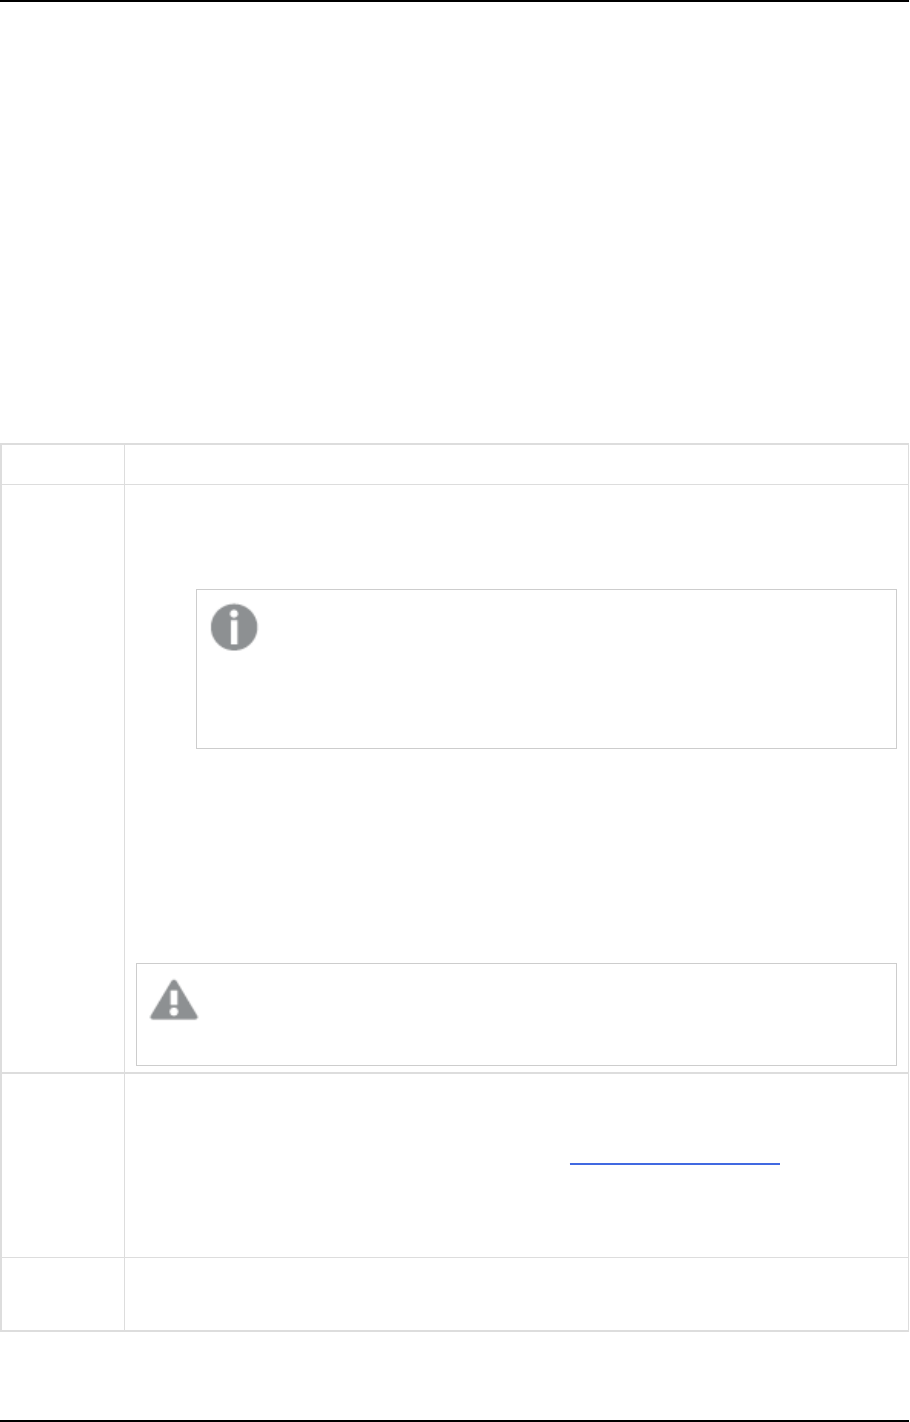
6 Data Lake projects
Depending on your browser settings, you will either be prompted to download the <entityname>_
Attributes.tsv file or it will be downloaded to your default Downloads location.
Managing the Attributes Domain
The Attributes Domain provides a list of all the attributes available in the Compose metadata, as well as their
data type. You can add, edit and delete attributes according to your data warehousing needs. The Attributes
Domain also allows you to see which entities each attribute belongs to, as a single attribute may be present in
several entities.
To manage the Attributes Domain:
1. From the drop-down menu in the top right of the Storage Zone panel, select Manage Attributes
Domain.
2. Add, delete and edit attributes as describe in the table below.
To Do This
Add an
attributes
domain
1. Click the New Attributes Domain toolbar button.
The New Attribute Domain window opens.
2. In the Name field, specify a name for the attribute.
The name cannot contain any of the following forbidden (by Hive)
characters:
: ; . , ' " :
3. From the Type drop-down list, select one of the available data types.
4. If the selected data type requires further configuration, additional fields will be
displayed. For example, when Decimal is selected, the Length and Scale fields
will be displayed. Set the values as desired.
5. Optionally specify a Description.
6. Click OK to add the attribute and close the New Attribute Domain window.
Attribute domains names are case insensitive. For example, a project cannot
contain one attribute domain called date and another called DATE.
Edit an
attribute
domain
1. Select the desired attribute and then click the Edit toolbar button.
The Edit: Name window opens.
2. Edit the attribute as described in steps 2-6 of Add an attributes domain above.
Note that the Edit: Name window also contains a Used in Entities list. Knowing
which entities the attribute is used in may affect the type of changes you make, as
the planned changes may not be appropriate for all entities.
Remove an
attribute
1. Select the attribute you want to delete and then click the Delete toolbar button.
2. When prompted to confirm the deletion, click Yes.
Setup and User Guide - Qlik Compose, May 2022 326

6 Data Lake projects
Schema evolution
Schema evolution allows users to easily detect structural changes to multiple data sources and then control
how those changes will be applied to your project. Schema evolution can be used to detect all DDL changes
that were made to the source database, although not all changes can be applied automatically (see
"Supported data changes" below). Schema evolution can be performed using the web console or using the CLI
as described below.
Required permission: Compose Designer or Admin.
Schema evolution requires certain options to be turned on in the Replicate task(s). For information about
which options need to be enabled in Replicate for schema evolution, see Defining a Qlik Replicate task (page
275).
Supported data source changes
The following changes are supported:
l
New columns - When this change is applied:
l
The new column will be added (as an attribute) to the end of the entity in the metadata
l
The column will be added to any mappings for that entity
l
The data warehouse will be adjusted
l
The storage task will be generated (but not run)
l
New tables - When this change is applied:
l
The new table will be added (as an entity) to the metadata
l
A default mapping will be created
l
In the case of multiple storage tasks, the mapping will be added to the first task according to
alphabetical order
l
The data warehouse will be adjusted
l
The storage task will be generated (but not run)
Data warehouse adjustment and storage task generation will only occur if the appropriate apply
option (see Step 5 below) was selected.
Schema evolution using the web console
1. Open the Schema Evolution window using one of the following methods:
l
Click the Schema Evolution button at the bottom of the METADATA panel.
l
Select Schema Evolution from the hamburger menu in the top right of the METADATA panel.
l
Open the Manage Metadata window and click the Schema Evolution toolbar button in the
Logical Metadata tab.
2. Select which data sources to scan for changes. You can select either All data sources or Selected data
sources. If you choose the latter, select which data sources to scan for changes.
3. Click Scan for Changes.
During the scan, if a change is detected, the following message will be displayed:
Setup and User Guide - Qlik Compose, May 2022 327
6 Data Lake projects
Found new DDL changes for data source <name>
If no changes were detected, the following message will be displayed:
No new DDL changes were found for data source <name>
If unsupported changes were detected, one of the following messages will be displayed:
DDL type <type> is not supported and will be skipped
Column operation <operation> in data source <name> is not supported and
will be skipped
4. When the scan completes, click Close.
If changes were detected, the Schema Changes window opens showing the list of changes since the
last scan (via the web console or the CLI).
5. Click Apply Changes Options if you want to apply the changes or Ignore Changes to close the
window without applying the changes.
When you click Apply Changes Options, the Apply Schema Changes window opens, showing the
following apply options:
l
Apply changes to the metadata and the mappings - Select this option if you have other
changes you would like to make before adjusting the data warehouse. You may even wish to
undo some of the schema evolution changes as Compose does not allow you to choose which
changes to apply.
l
Apply changes to the metadata and the mappings, and adjust the data warehouse - Select
this option if you have other changes you would like to make before generating the tasks.
l
Apply changes to the metadata and the mappings, adjust the data warehouse, and
generate relevant tasks - Select this option if you want to apply all the changes and generate
associated tasks without making any prior changes.
6. Choose one of the options and click Apply Changes.
The Applying Schema Changes window opens.
7. After the operations you selected in Step 5 have completed, click Close.
If, for whatever reason, Compose fails to add the changes to the metadata or the mappings,
the next time you perform a scan, the changes will be detected again. However, if Compose
succeeds to apply the changes but fails to adjust the data warehouse or generate the tasks,
the changes will not be detected again. In such a case, you will need to manually adjust the
data warehouse and/or generate the tasks after resolving the issue that prevented these
operations from being performed automatically.
Schema evolution using the CLI
You can also use the Compose CLI to perform schema evolution. As opposed to the web console, the CLI does
not output a list of changes, which makes it more suited to customers that wish to automate schema
evolution through the use of scripts.
Command syntax:
ComposeCli.exe schema_evolution --project
project_name
[--data_sources
data_source
] --action
apply_to_model_and_mappings|apply_to_model_mappings_adjust_storage|apply_to_model_mappings_
adjust_storage_generate_tasks|ignore_changes
Setup and User Guide - Qlik Compose, May 2022 328

6 Data Lake projects
Parameters
Parameter Description
--project The name of the project.
--data_sources A comma-separated list of data sources to scan for changes. When
omitted, all of the project’s data sources will be scanned. If there are no
changes, “0” will be returned.
To avoid errors, the data source names must be exactly as defined in your
project.
--action How (or whether) to apply the changes. Possible values are:
l
apply_to_model_and_mappings - Select this option if you have
other changes you would like to make before adjusting the data
warehouse. You may even wish to undo some of the schema
evolution changes, as Compose does not allow you to choose
which changes to apply.
l
apply_to_model_mappings_adjust_storage - Select this option if
you have other changes you would like to make before generating
the tasks.
l
apply_to_model_mappings_adjust_storage_generate_tasks -
Select this option if you want to apply all the changes and
generate associated tasks without making any prior changes.
l
ignore_changes - Select this option to ignore all changes.
Example
ComposeCli.exe schema_evolution --project MyProject --data_sources mysource1,mysource2 --
action apply_to_model_mappings_adjust_storage
Creating transformations
Compose allows you to transform data using an expression either in Replicate or Compose, according to your
needs. The table below provides further information about creating transformations.
Setup and User Guide - Qlik Compose, May 2022 329

6 Data Lake projects
Where the
Transformation is
Created
Reasons to Create a Transformation There When the
Transformation is
Applied
Replicate
l
Filtering large amounts of data that is not
needed for the Storage Zone (in the present or
the future)
l
Obfuscation due to regulatory reasons or internal
policies
l
Data type conversion (e.g. converting a source
data type that is not supported on the Storage
Zone platform)
Before the data reaches
the landing zone.
Metadata
l
The default location if you are not sure where to
put it
l
General business logic
l
Needed for several sources or several data marts
Between the Landing
Zone and the Storage
Zone.
Storage Zone
l
Specific source preparation
l
Need to preserve the original unfiltered source
information in Hadoop
l
Needed for merging several sources
Between the Landing
Zone and the Storage
Zone.
Where to create a transformation
See also Reusable transformations (page 335).
In this section:
l
Expression Builder overview (page 330)
l
Building Expressions (page 332)
l
You test your expression to check that results are as expected. The following figure is an example of an
expression that has been evaluated and tested. (page 333)
Expression Builder overview
The following section provides an overview of the Expression Builder functionality.
The Expression Builder enables you to create a transformation without needing to type anything manually.
The Expression Builder can be opened in several places, depending on your needs. For more information
about where to create a transformation, see Creating transformations (page 329).
Setup and User Guide - Qlik Compose, May 2022 330
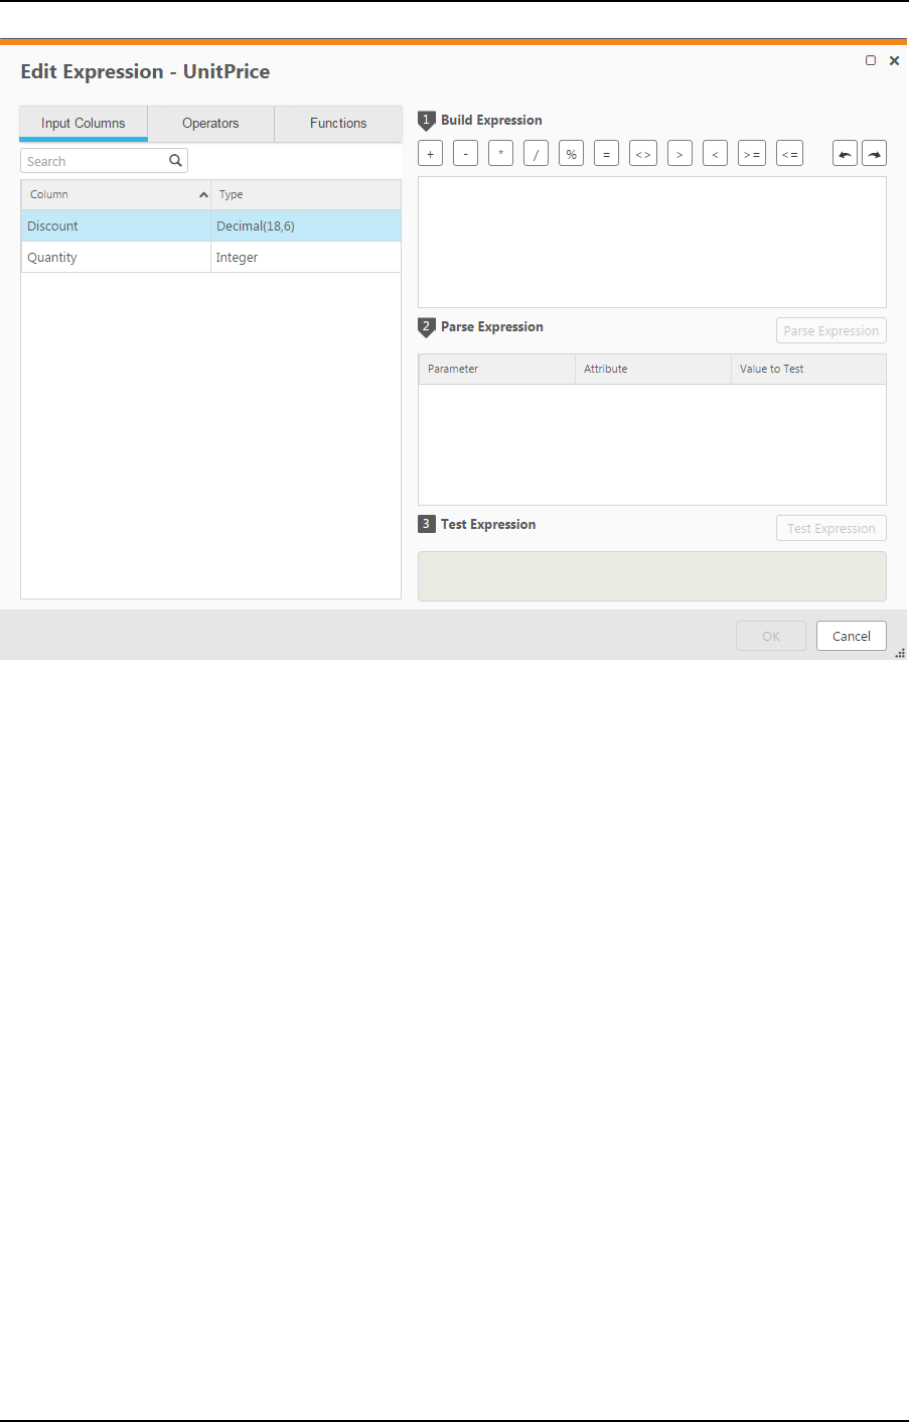
6 Data Lake projects
The Expression Builder consists of the following panels:
l
Tabs on the left of the Expression Builder: These tabs contains elements that you can add to an
expression. Select elements and add them to the Build Expression pane to create an expression. For
more information, see Building Expressions (page 332).
The following tabs are available:
l
Parameters - Only displayed when opening the Expression Builder from within the Reusable
Transformations > Edit Transformation window.
For information on reusable transformations, see Reusable transformations (page 335) below.
l
Input Columns/Input Attributes - Columns/attributes that can be used to build your
expression.
l
Transformations - Contains a list of reusable transformations. The tab is not displayed if no
reusable transformations have been defined.
For information on reusable transformations, see Reusable transformations (page 335) below.
l
Operators - Operators that can be used to build your expression.
l
Functions - Functions that can be used to build your expression.
Setup and User Guide - Qlik Compose, May 2022 331

6 Data Lake projects
The Operators and Functions displayed in the Expression Builder use SQL format. As
SQL support and implementation is different for each database type and version, the
database being used in your Compose project will determine which Operators and
Functions will be available.
Additionally, the list of Operators and Functions displayed in the Expression Builder is
not comprehensive. However, you can use any Operators and Functions supported by
the database, even if they are not included in the list.
For an explanation of the available Operators and Functions, refer to the Help for
your data lake.
l
Build Expression Pane: The Build Expression pane is where you build your expression. You can add
elements, such as columns or operators to the panel as well as type all or part of the expression. For
more information, see Building Expressions (page 332).
l
Parse Expression Pane: This pane displays the parameters for the expression. After you build the
expression, click Parse Parameters to list the expression parameters. You can then edit the
parameters, enter a value for each of the parameters and associate attributes with them. For more
information, see Parsing expressions (page 333).
l
Test Expression Pane: This panel displays the results of a test that you can run after you provide
values to each of the parameters in your expression. For more information, see You test your expression
to check that results are as expected. The following figure is an example of an expression that has been
evaluated and tested. (page 333).
Building Expressions
The first step in using the Expression Builder is to build an expression in the Build Expression pane.
To build an expression:
1. Hover the mouse cursor over the element that you want to add to your expression (expressions usually
start with an Input Column) and click the arrow that appears to its right.
2. Add Operators additional Input Columns and Functions as required.
To add operators to your expression, you can use the Operator tab on the left or the Operator
buttons located above the Build Expression pane or any combination of these.
Example:
To create an expression that combines the FirstName name and LastName columns, do the following:
1. Add the FirstName Input Column to the Build Expression pane.
2. In the Operator toolbar above the Build Expression pane, click the concatenate operator.
3. Then add a space between single quote characters and click the concatenate (+) operator again.
Setup and User Guide - Qlik Compose, May 2022 332
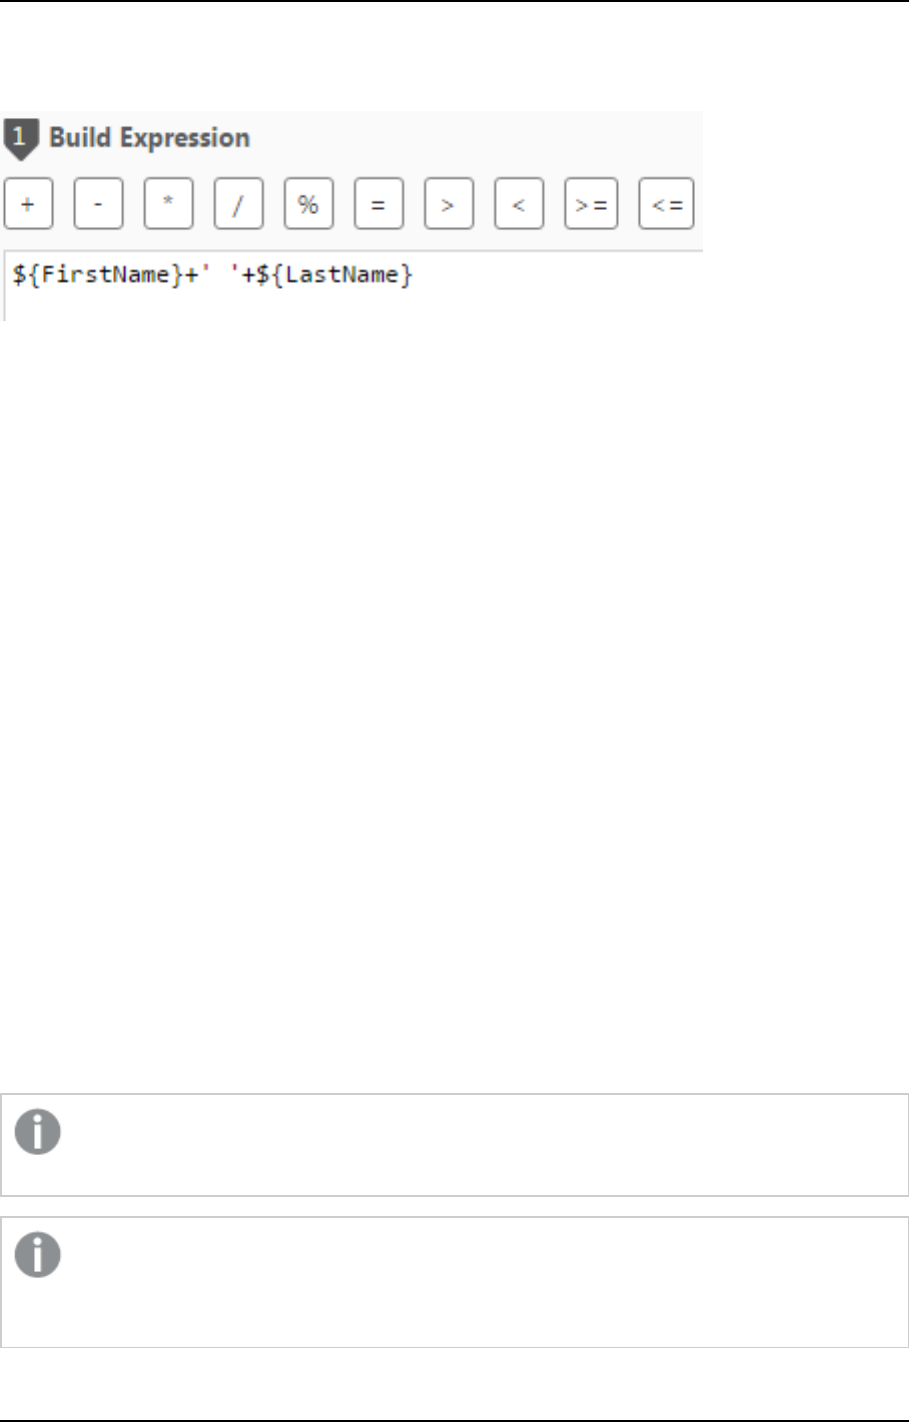
6 Data Lake projects
4. Add the LastName Input Column to the Build Expression pane.
The expression would look like this:
Parsing expressions
When you add operators to the expression, the expression’s parameters are usually added automatically to
the Parse Expression pane. However, when you complete your expression or edit it, you may need to parse
the expression see all of the parameters.
To parse the expression parameters:
l
Click the Parse Expression button below the Build Expression pane.
If the expression is not valid, a red error message will appear at the bottom of the Expression Builder window.
If the expression is valid, the expression parameters and attributes (Input Columns) will be displayed in the in
the Parse Expression pane. See the figure Test Expression (page 334).
Editing parameter names
By default, the parameter name is the same as the input column name. However, you can change the
parameter name as needed and then associate it with an input column. This is useful, for instance, when you
need to shorten attribute names. For example, EstimatedTimeOfArrival can be abbreviated to ETA.
To edit a parameter and associate it with an input column:
1. In the Parse Expression pane, edit the parameter name as required.
2. From the Attribute drop-down list, select the desired input column.
Testing expressions
You test your expression to check that results are as expected. The following figure is an example of an
expression that has been evaluated and tested.
Testing an expression that contains an analytic function will validate the syntax without actually
executing the function. Additionally, the test will only be performed on a single record.
Compose does not check the data types of columns used in an expression for compatibility. For
example, if a column of type integer is used in an expression for a column of type varchar, the
expression will not be executed successfully.
Setup and User Guide - Qlik Compose, May 2022 333
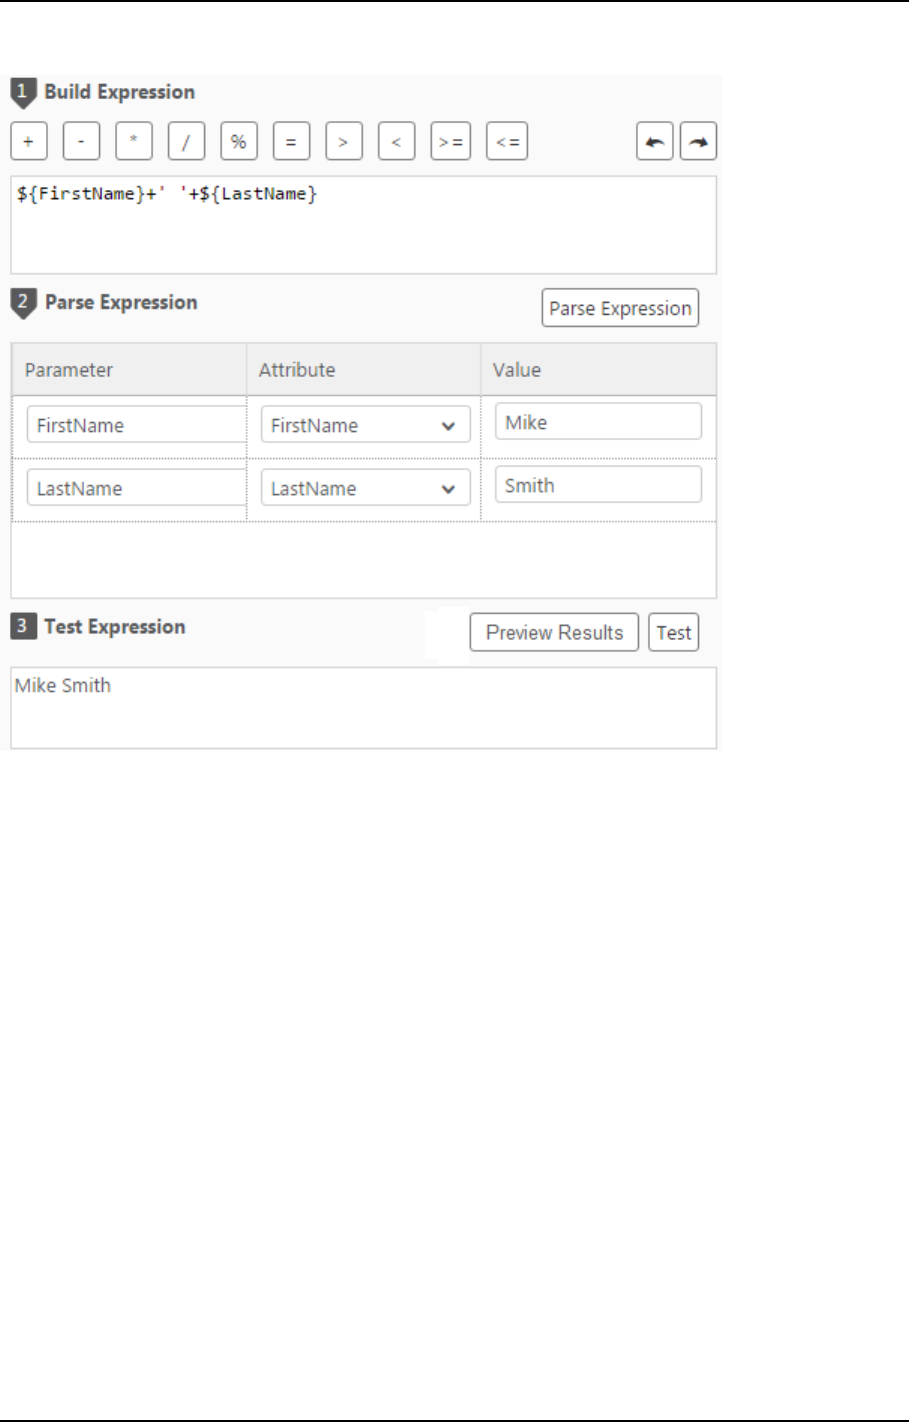
6 Data Lake projects
Test Expression
To test an expression:
1. In the Expression Builder window, build an expression as described in Building Expressions (page 332).
2. Click Parse Expression as described in Parsing expressions (page 333).
3. View the parameters that are displayed. If your expression is not valid, an error message is displayed.
4. Optionally edit the parameters name(s) as described in Editing parameter names (page 333).
5. Type values for each parameter and then click Test Expression to see the expression result.
For example, using the expression in Test Expression (page 334), type Mike for FirstName and
Smith for LastName. The result displayed is Mike Smith.
6. This step is only available for transformations created in the Edit Mappings window. When you create
a transformation in the Edit Mappings window, an additional button called Show Data appears to the
left of the Test Expression button. You can click this button to see how your expression translates into
actual data.
For example, clicking the Show Data button for the expression UnitPrice*Quantity will open the
following window.
Setup and User Guide - Qlik Compose, May 2022 334
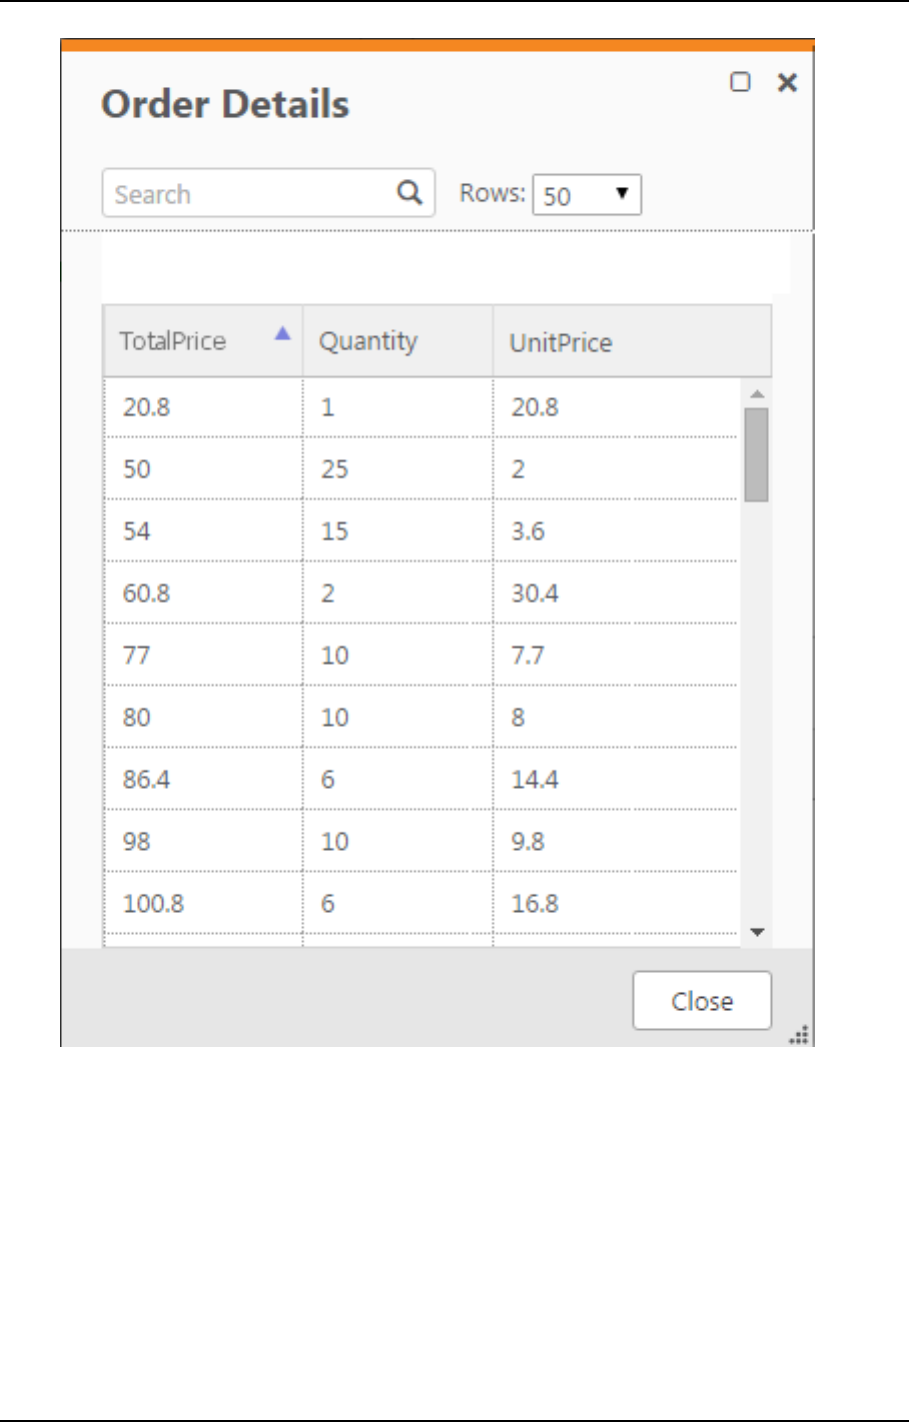
6 Data Lake projects
For more information on the Edit Mappings window, see Column mappings (page 342) in Creating and
Managing Storage Zone Tasks (page 337).
Reusable transformations
In a single Compose project there may be several processes that require similar data transformations. For
example a reusable transformation can be defined that concatenates first and last names. This transformation
could then be used both in the Customers mapping and in the Employees mapping.
Setup and User Guide - Qlik Compose, May 2022 335

6 Data Lake projects
As opposed to stored functions or procedures which are environment dependent, reusable transformations
are environment agnostic, meaning that not only can they be used as required within a Compose project, but
they can also be used across different environments (using Compose’s export/import function).
Centrally managed transformations increase efficiency by eliminating unnecessary duplication, while at the
same time, enabling the seamless propagation of changes to all transformation instances.
Adding a reusable transformation
To define a reusable transformation:
1. From the drop-down menu in the top right of the Storage Zone panel, select Reusable
Transformations.
The Reusable Transformations window opens.
The window is split into the following panes:
l
Upper pane - Lists the reusable transformations that have been defined.
l
Lower pane - Provides additional information about transformation instances such as where
they are in use (e.g. mappings, metadata, etc.) and the expression that was created using the
transformation.
Select a transformation to see the additional information.
2. Click the New Transformation toolbar button.
The New Transformation window opens.
1. In the Name field, specify a name for the transformation.
2. In the Category field, specify a category name. If the category name already exists it will be
displayed below the field when you start to type the name. To group the new transformation in
the same category, simply select the existing name (unless of course you wish to create a new
category with a similar name).
In the Expression Builder, transformations are grouped according to their category name,
making it easier to find the transformation you want to use. Therefore, when specifying a
category name, it is recommended to choose a name that reflects the purpose of the
transformation. For example, if you create several transformations that concatenate data, it
would make sense to group those transformations under a category called "Join".
3. To add a parameter to the transformation, click the New button to the right of the Parameters
heading.
A new row is added to the Parameters list.
4. Specify a name for the parameter, select an appropriate data type, and optionally provide a
description.
If you add multiple parameters, you can change a parameter’s position by selecting
the parameter and then using the Up/Down arrows (above the Parameters list) to
reposition it.
5. Click the Create Expression button below the Parameters list.
The Edit Transformation window opens.
6. In the Edit Transformation window, create an expression using the parameters you defined
earlier.
Setup and User Guide - Qlik Compose, May 2022 336
6 Data Lake projects
For information on creating expressions, see Creating transformations (page 329).
7. Click OK to save the transformation.
The transformation is added to the list in the upper pane.
Once a transformation has been defined, it will be available for selection as needed in the Expression Builder’s
Transformations tab.
For information on creating expressions, see Creating transformations (page 329).
Managing reusable transformations
You can manage reusable transformation as described in the table below.
To Do This
Delete a
transformation
Select the transformation and then click the Delete toolbar button. When prompted to
confirm the action, click OK.
If the transformation is in use, you first need to delete the transformation
instances.
Edit a
transformation
Double-click the transformation or select the transformation and then click the Edit
toolbar button. Continue as described in Reusable transformations (page 335).
Any changes you make to a transformation will be propagated to all
instances of that transformation.
Edit a parameter Open the Edit Transformation window as described in Reusable transformations (page
335). Then, select the parameter you want to delete and click the Delete button above
the Parameters list.
6.6 Creating and Managing Storage Zone Tasks
Once the Metadata has been prepared, the next step in the Compose workflow is to create the Storage Zone
tables (optional), generate the task statements and run the Storage Zone task. Tasks can either be run
manually or scheduled to run periodically or in the future.
In this section:
l
Defining and running data storage tasks (page 338)
l
Managing task definitions (page 341)
l
Viewing and exporting task statements (page 351)
l
Modifying task settings (page 352)
Setup and User Guide - Qlik Compose, May 2022 337
6 Data Lake projects
Defining and running data storage tasks
This section, describes how to create the Storage Zone tables, generate the task statements and run a Data
Storage task.
It contains the following topics:
l
Creating the Storage Zone (page 338)
l
Generating the task statements (page 338)
l
Controlling data storage tasks (page 339)
Creating the Storage Zone
If table(s) were reloaded in Replicate, the table(s) will also be (automatically) reloaded in Compose
the next time the task runs. During reload, Live Views should not be read.
To create the Storage Zone tables:
1. Click the Create button in the bottom right of the Storage Zone panel.
The Creating Storage Zone window opens.
A progress bar indicates the current progress. For each stage of the Storage Zone generation process, a
corresponding message appears in the Messages list.
2. When the process completes, click Close.
See also: Supported characters (page 396).
Generating the task statements
After the Storage Zone tables have been created, you then need to generate the task statements that will be
used in the Storage Zone task. The task statements include the Mappings between the Landing Zone tables
and the Storage Zone tables. If you need to make changes to the Mappings, continue from Managing task
definitions (page 341).
l
Changing a Primary Key in the source record will cause a new record to be inserted in the
storage table.
l
Regenerating the task statements after performing a non-supported change in the metadata
will appear to succeed without errors or warnings, but the task will fail if run later.
l
Defining a single task that ingests data from several Landing Zones is not supported. As a
workaround, you can create a separate task for each Landing Zone.
To generate the Storage Zone task statements:
1. Click the Data Storage Tasks button in the bottom left of the Storage Zone panel.
The Manage Data Storage Tasks window opens.
2. If there are multiple tasks, in the left pane, select the desired task.
3. Click the Generate toolbar button, and select one of the following options:
Setup and User Guide - Qlik Compose, May 2022 338

6 Data Lake projects
l
With validation - This is the default option for generating storage tasks.
You can also generate storage tasks with validation (default option) by clicking the
Generate toolbar button.
l
Without Validation - Select this option if you are sure that the storage tables are adjusted
properly and the mapping is valid. The generation of storage tasks is much faster. Note that you
could have errors later when running the task if something is not valid.
The Generating Statements for Task: Name progress window opens. When the "Generate task
finished successfully" message is displayed, close the window.
Only mappings associated with the task in the Manage Tasks window will be generated.
Controlling data storage tasks
Once the Storage Zone tables have been created and the task statements have been generated, you can then
proceed to run the Storage Zone task. The Storage Zone task extracts data from the Landing Zone tables and
loads it into the Storage Zone tables.
Limitations and considerations
l
When task are reloaded in Replicate November 2020, Compose will also reload the task (i.e. perform a
Full Load) and only then apply the changes. Depending on the number of tables involved, this may
takes some time as two reloads will be performed (one in Replicate and the other in Compose).
l
A storage directory may be used exclusively by only one Compose project.
l
Data storage tasks are optimized to run on relatively large batches of data. It is recommended to
specify a partition length in excess of one hour. Although specifying a partition length of less than one
hour may improve latency, creating many partitions on the target may also impact (target)
performance (especially in systems with large volumes of changes).
l
Change Processing creates a new file on every write. This may cause many files to amass and degrade
performance. Therefore, it is recommended to monitor the storage directory and periodically
consolidate small files into larger ones and move/delete files that are no longer required.
l
Storage directories and subdirectories are managed by Compose; you should not delete files or write
to them unless approved by Qlik Support or explicitly recommended in this guide.
l
When using a Hive-based compute platform, for optimal performance, it is recommended to allocate a
dedicated queue to Compose tasks only.
l
When using a Hive-based compute platform, in order to see the delta of data changes in the storage
tables, you need to define the following commands so that Hive can read the subdirectories:
set hive.supports.subdirectories=true;
set hive.input.dir.recursive=true;
Running a task
Storage Zone tasks can be run manually, scheduled to run periodically or run as part of a workflow. The
section below describes how to run a Storage Zone task manually. For information on scheduling Storage
Zone tasks or including them in a workflow, see Controlling and monitoring tasks and workflows (page 354).
Setup and User Guide - Qlik Compose, May 2022 339
6 Data Lake projects
If there is a Replicate source table with data, that:
l
Was not originally selected in the Replicate Full Load and Apply Changes task (i.e. was added
later).
-OR-
l
Was selected in a Replicate Full Load and Apply Changes task, but was not selected in the
mappings of the Compose Full Load and Change Processing data storage tasks, and the
tasks have already been run.
In any of the above scenarios, in order to get the data that was added later, you need to:
1. Duplicate the Compose Full Load and Change Processing tasks associated with that table.
2. Run the duplicated Full Load task.
3. Run the duplicated Change Processing task.
Note that after running these tasks, duplicate records may exist in the Storage Zone, but they will be
removed when reading from the Storage Zone views.
To run a Storage Zone task:
1. Click the Manage button in the bottom left of the Storage Zone panel.
The Manage Storage Tasks window opens.
2. If multiple tasks have been defined, in the left pane, select the task that you want to run.
3.
Click the Run toolbar button. The window switches to Monitor view and the following status bars are
displayed:
l
Completed - Shows the tables that have already been loaded into Hive
l
Loading - Shows the tables currently being loaded into Hive
l
Queued - Shows the tables waiting to be loaded into Hive
l
Error - Shows the tables that could not be loaded into Hive due to error. Click the Show Details
link below the bar to see more information about the statement(s) that resulted in the error.
l
Canceled - The number of canceled tables (tables that were not processed due to the task
being aborted) does not appear as a separate status bar. To view the number of canceled
tables, click the Select All link above the status bars.
To see more information about tables in a particular status, click the relevant status bar. A list of tables
in the selected status will be shown.
When the task status is indicated by a icon, close the Manage Storage Tasks window.
You can stop the task at any time by clicking the Abort toolbar button. This may be necessary if you
need to urgently edit the task settings due to some unforeseen development. After editing the task
settings, simply click the Run button again to restart the task.
You can also access the task log files by clicking the View Log button.
Setup and User Guide - Qlik Compose, May 2022 340

6 Data Lake projects
Aborting a task may leave the Storage Zone tables in an inconsistent state. Consistency will
be restored the next time the task is run.
Managing task definitions
Task definitions contain the mappings between the columns in the Landing Zone tables and the columns in
the Storage Zone tables(and any transformations applied to those mappings). The same mappings can be
used by several tasks. You can create new tasks, duplicate tasks and edit existing tasks as required.
The following options are available:
l
Adding and duplicating tasks (page 341)
l
Column mappings (page 342)
l
For each Compose task, all of the mapping tables should be populated by data from
one Replicate task.
l
You must regenerate the task statements and then run a Storage Zone task whenever
the mappings are modified. Populating the Storage Zone can either be done
manually as described in Controlling data storage tasks (page 339) or automatically
as described in Scheduling tasks (page 357).
If you have already run the data mart tasks, then you also need to regenerate the
data mart ETLs and run the tasks again as described in Managing task definitions
(page 341).
l
Using lookup tables (page 346)
l
Dropping and recreating tables (page 348)
Adding and duplicating tasks
As the default task definitions are generated automatically (by discovering the Landing Zone tables), there is
usually no reason to manually create or duplicate an task. One possible reason to duplicate an task is if your
Metadata contains different types of tables and you want to manage them in separate tasks. An exception to
this is if you import your model from ERwin without first defining global mappings. In such a case, you will
need to manually add the Task and create the mappings.
For more information on global mappings, see Managing global mappings (page 160).
The following task types are available:
l
Full Load - Loads the selected tables from the Landing Zone into the Storage Zone.
l
Change Processing - Updates the Storage Zone tables with the Landing Zone changes.
l
Full Load and Change Processing - Loads the selected tables into the Storage Zone and then updates
them with the Landing Zone changes.
Setup and User Guide - Qlik Compose, May 2022 341
6 Data Lake projects
To Do This
Add a new
Task
1. Click the Manage button at the bottom left of the Storage Zone panel.
The Manage Tasks window opens.
2. Click the New Task toolbar button.
The Add New Task window opens.
3. Specify a name for the task.
Task names cannot contain the following characters:
/\,&#%$@=^*+"'`~?<>:;[]{} as well as all non-printable characters (below
0x20). The task name can contain a single dot, but it cannot be the first or
last character.
4. Optionally, specify a description.
5. Choose Full Load and/or Change Processing as the task type.
6. Click OK.
7. Select the task name in the left pane and continue from Column mappings (page
342).
Duplicate a
Task
1. Click the Manage button at the bottom left of the Storage Zone panel.
The Manage Tasks window opens.
2. Select the task you want to duplicate and then click the Duplicate toolbar button.
The Duplicate window opens.
3. Specify a Name for the new Task.
4. Select a Landing Zone.
5. Optionally change the default Schema.
6. Select the Task type according to your Replicate task type.
7. Click OK.
8. Select the task name in the left pane and continue from Column mappings (page
342).
Column mappings
For improved metadata performance during discovery and mapping, Compose caches the metadata
of the Landing Zones after reading them. However, synchronization issues may arise if the Landing
Zone is modified outside of Compose. In such cases, you should click Clear Landing Cache in the
Mappings tab of the Storage Zone panel in order to refresh the cache on the next reading of the
metadata.
For details on recreating the Storage Zone cache, see Clearing the metadata cache (page 350).
Setup and User Guide - Qlik Compose, May 2022 342

6 Data Lake projects
The mappings show the current mapping between the Landing Zone tables and the Storage Zone tables. By
default, the columns names and data in the Landing Zone tables and the Storage Zone tables will be identical.
However, you can manually change the mappings according to your needs, either by simply mapping a
Landing Zone column to a different Storage Zone column and/or by using an expression.
Setup and User Guide - Qlik Compose, May 2022 343
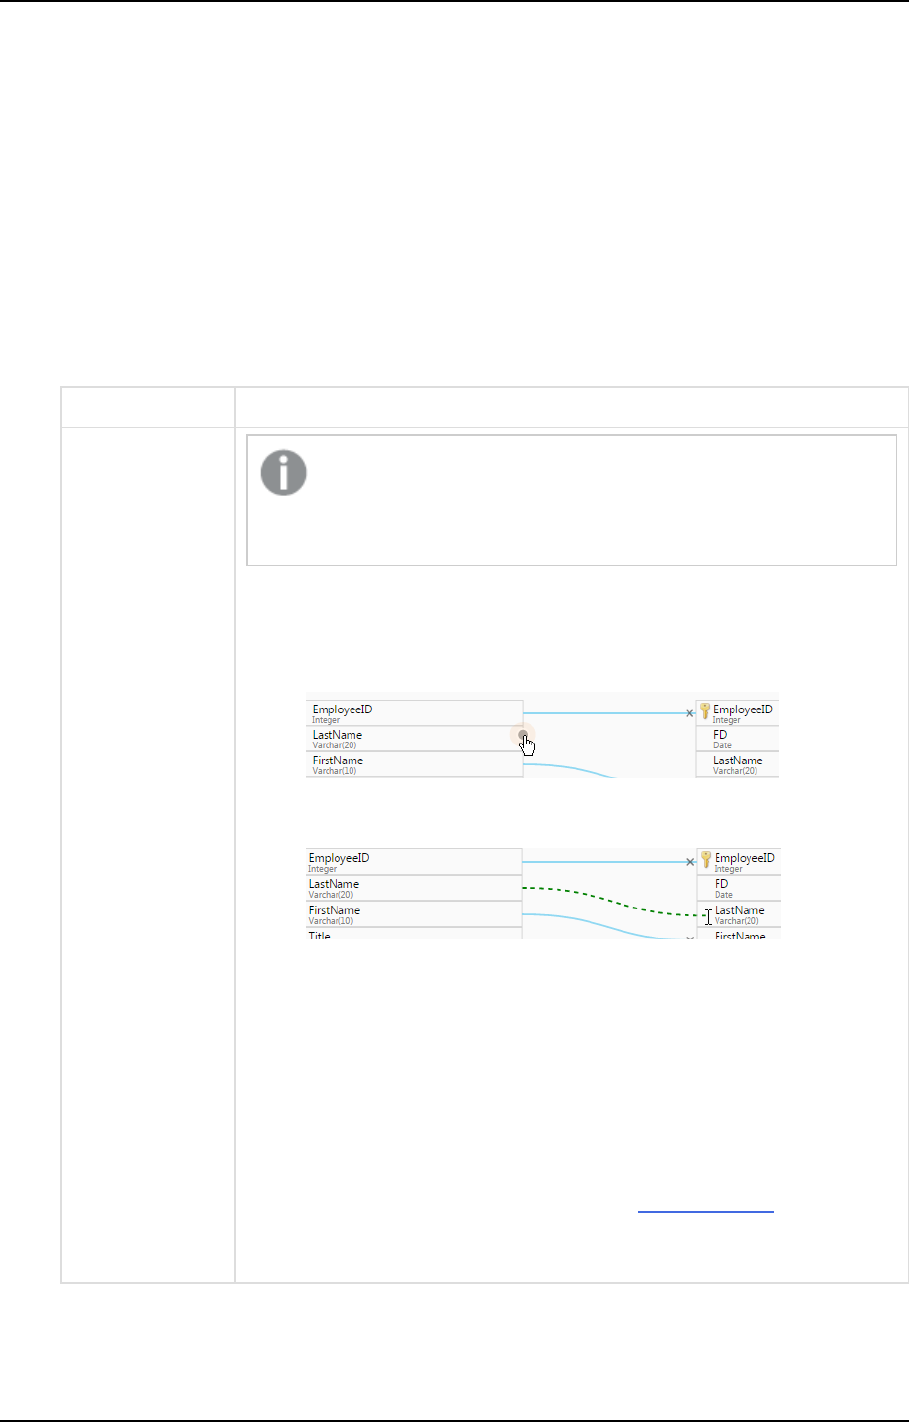
6 Data Lake projects
Limitations and considerations
l
Creating multiple mappings for a single table is not supported.
l
Mapping from Views is not supported.
Editing column mappings
To edit column mappings:
1. Click the Manage button in the Storage Zone panel.
The Mappings tab is displayed. Each of the Storage Zone tables has a corresponding mapping name.
2. In the Mappings column, click the mapping that you want to edit.
The Edit Mapping: Name window opens.
3. Edit the mapping as described in the table below.
To Do This
Map a column in a
Landing Zone
table to a column
in a Storage
Zonetable
The mapping procedure differs depending on whether you are in
Standard View or Compact View. For information on changing the
view, see Change the view (page 345).
In Standard View:
1. Hover the mouse cursor over the Landing Zone column name as shown
in the image below.
A gray dot appears to the right of the column name.
2. Drag the mouse cursor from the gray dot to the desired column in the
Storage Zone table.
3. When the dotted line turns green (as shown below), release your mouse
button.
The mapping operation is completed.
Note that if the dotted line turns red (instead of a green), you will not
be able to map the Landing Zone column with the desired Storage
Zone column. A red dotted line indicates that the Landing Zone and
Storage Zone column data types are incompatible with each other.
In Compact View:
1. Switch to Compact View as described in Change the view.
2. Drag the Landing Zone column to the cell located to the left of the
target Storage Zone column.
Setup and User Guide - Qlik Compose, May 2022 344
6 Data Lake projects
To Do This
Auto-generate
mapping
Click the Auto-Map toolbar button.
Remove all
mappings
Click the Reset toolbar button.
Change the view Changing to a more compact view is recommended for Landing Zone tables
that have numerous columns. In compact view, the table columns are
organized in rows (instead of a single list), making it easier to locate Landing
Zone columns and map them to the desired Storage Zone columns.
To change the view:
Click the Change View toolbar button. For information on creating mappings
in Compact view, see Map a column in a Landing Zone table to a column in a
Data Lake table.
Select a different
source database
Select a database from the Landing Zone Database drop-down list on the left
of the window.
Select a different
source schema
Select a schema from the Schema drop-down list on the left of the window.
Select a different
table
Select a table from the Table drop down list on the left of the window.
Create a column-
level
transformation
1. Hover the mouse cursor over the Storage Zone Column for which you
want to create a transformation and then click the fx button that
appears to its right.
The Expression Builder opens.
2. Continue from Creating transformations (page 329).
Adding, renaming and deleting mappings
You can add, rename and delete mappings as required. For example, if you want one of the Storage Zone
tables to contain columns from several tables in the Landing Zone, then you need to add a new mapping for
each of the Landing Zone tables.
To add, delete, and rename mappings:
1. Click the Manage button in the Storage Zone panel.
The Manage taskTasks window opens.
2. In the left pane, select the desired taskTask.
3. Select the Mappings tab.
4. Add or delete mappings as described in the following table.
Setup and User Guide - Qlik Compose, May 2022 345

6 Data Lake projects
To Do This
Add a new
mapping
1. In the Data Lake Tables column, select the table that you want to map.
2. Click the NewMapping button above the Delivery Tables column.
The New Mapping window opens.
3. Optionally change the default mapping name.
4. From the Entity drop-down list, select the entity in the Storage Zone to
which you want to map.
5. Click OK to save the mapping.
6. Enable the mapping.
Delete a
mapping
1. In the Mappings column, hover the mouse cursor over the mapping you
want to delete.
2. Click the Delete(x) button that appears to its right.
3. Click OK when prompted to confirm the deletion.
Rename a
mapping
1. In the Mappings column, hover the mouse cursor over the mapping you
want to rename.
2. Click the Rename (A) button that appears to its right.
The Rename window opens.
3. Specify a new name for the mapping and then click OK.
Using lookup tables
Lookup tables are useful for replacing source data with the actual data that you want to appear in the Storage
Zone. For example, a lookup table could be used to replace a zip code with a full address or, conversely, to
replace a full address with a zip code.
Lookup on a column which is mapped to the Compose "From__Date" column is not supported.
Linking lookup tables
To link a lookup table column to a Storage Zone table column:
1. Click the link to the desired task in the Storage Zone panel.
The Manage Tasks window opens.
2. In the Mappings column, click the mapping for the Storage Zone table containing the result column
(with the data that you want to replace).
The Edit Mapping - Name window opens.
3. Hover the mouse cursor over the relevant Storage Zone column and then click the Lookup button that
appears to the right of the column name.
The Select Lookup Table window opens.
Setup and User Guide - Qlik Compose, May 2022 346

6 Data Lake projects
1. From the Database drop-down list, select the database containing the lookup table.
The database must reside in your Landing Zone.
2. From the Schema drop-down list, select the schema containing your source lookup tables.
3. Select either Table or View according to the lookup table type.
4. From the Table drop-down list, select the lookup table.
The right side of the Select Lookup Table window displays the lookup table columns and their
data types. To view the data in the lookup table, click the Show Lookup Data button.
5. After you have selected the lookup table, click OK.
The Lookup Transformations - Table Name.Column Name window opens.
The window is divided into the following panes:
Upper pane: The upper part of the right pane (Condition) displays the condition expression, which
stipulates the condition(s) for performing the lookup.
Lower pane: The lower part of the right pane (Result Column) displays the column result expression,
which stipulates what data to replace in the target column.
4. To change the lookup table, click the Change Lookup Table button above the lookup table columns
and then perform steps a. to d. above.
5. To view the lookup table or landing table data, click the Show Lookup Data or Show Landing Data
buttons respectively.
6. To specify the condition(s) for performing the lookup, click the Create Expression button (which
changes to Edit Expression after an expression has been created) above the Condition expression.
The Condition Expression - Column Name window opens.
7. Create an expression using the landing and lookup table columns on the left.
For an example, see Using lookup tables (page 346).
For information on creating expressions, see Creating transformations (page 329).
8. To specify what data to replace or add if the lookup conditions are met, click the Create Expression
button (which changes to Edit Expression after an expression has been created) above the Result
Column expression.
The Result Expression - Column Name window opens.
9. Create an expression using the landing and lookup table columns on the left.
For an example, see Using lookup tables (page 346).
For information on creating expressions, see Creating transformations (page 329).
10. To preview the results, click the Preview Results button.
11. Click OK to save your settings and close the Lookup Transformations - Table Name.Column Name
window.
Lookup example
The following example shows how a lookup table is used to concatenate a Dutch translation of the category
name (located in the lookup table) to the original category name located in the landing table.
The lookup could be defined using the following expressions:
1. Condition expression:
${Lookup.CategoryID}=${Landing.CategoryID}
Setup and User Guide - Qlik Compose, May 2022 347

6 Data Lake projects
Meaning: Perform the lookup only if the Category ID in the landing table and the lookup table are the
same.
2. Result column expression:
${Lookup.CategoryName} + ' is ' + ${Landing.CategoryName}
Meaning: Add the data in the CategoryName column in the lookup table to the data in the
CategoryName column in the landing table (separated by the word "is").
Assuming the result column name is "Split Name", clicking the Preview Results button would display the
following table:
Split Name Category Name
(Lookup)
Category Name
(Landing)
Category ID
(Lookup)
Category ID
(Landing)
dranken is Beverages dranken Beverages 1 1
Specerijen is
Condiments
Specerijen Condiments 2 2
Gebak is Confectionary Gebak Confectionary 3 3
Zuivelproducten is Dairy
Products
Zuivelproducten Dairy Products 4 4
Grains/Granen is
Grains/Cereal
Grains/Granen Grains/Cereal 5 5
Vlees/Gevolgete is
Meat/Poultry
Vlees/Gevolgete Meat/Poultry 6 6
Dropping and recreating tables
Compose enable you to drop and recreate the Storage Zone tables as required.
When changing certain project settings (e.g. table prefixes) drop and create is required. If you change the
Metadata after the Storage Zone tables and/or files were already created and loaded with data, you should
adjust the Storage Zone to reflect the modified Metadata (as described in Validating the metadata and storage
(page 320)). Some changes however cannot be resolved by adjusting the Storage Zone. In such cases, you can
either revert the Metadata to its pre-modified state or drop and (optionally) recreate the Storage Zone tables.
Note that dropping and recreating tables will delete all of the data in the tables and should only be performed
in lieu of a better option.
Setup and User Guide - Qlik Compose, May 2022 348

6 Data Lake projects
l
In some scenarios, you need to edit the CREATE table statements before they are run. This
can be done using the Generate DDL scripts but do not run them option in Project settings
(page 40). For example, if you want to override the default sorting of your Storage Zone
tables or add specific formatting annotations, you will need to edit the script to accomplish
this.
l
The Change Processing context (i.e. the point in time when changes were last captured) is
deleted when dropping all tables but preserved when dropping selected tables. Therefore
after deleting selected tables, in order for Compose to continue processing changes from
when the tables were dropped, you need to perform the following additional steps:
1. Duplicate the Full Load and Change Processing tasks.
2. Delete the old tasks (i.e. the tasks that were duplicated) making sure to select the Delete
mappings not used by other tasks option.
3. Run the Full Load and Change Processing tasks again. This may result in duplicates in
the Storage Zone tables, but the duplicates are excluded from the Storage Zone Views
and will not appear in any provisioned data.
To drop and recreate all storage tables:
1. In the Storage Zone panel, select the Drop and Recreate|Tables item from the menu in the top right
corner.
2. The Drop and Recreate Tables window opens.
3. Select Recreate to drop and recreate the storage tables or Drop to drop them only.
4. Click OK to perform the drop and/or recreate operation.
The tables will be dropped and/or recreated, unless the Generate DDL scripts but do not run them
option is enabled.
Dropping and recreating views
Generally speaking, you should not need to recreate the views very often. Usually, recreating the views is only
required after upgrading to a newer Compose version or patch release that contains updates to the views.
Although unlikely, you may also need to recreate the views if they were accidentally deleted. If there is a need
to recreate the views after upgrading, it will be clearly stated in the release notes. The Views can be recreated
using the Compose web console or using the Compose CLI.
If Compose detects a mismatch between the Logical Metadata (defined via the Metadata panel) and the
Storage Zone metadata, the view recreation operation will fail and you will need to validate and adjust the
storage before retrying the operation.
Recreating the Views with the web console
To recreate the Views using the web console, simply select Recreate Views from the menu in the top-right of
the STORAGE ZONE panel. You will be prompted to confirm the operation as it might take some time, during
which the Views data might not be accessible.
Setup and User Guide - Qlik Compose, May 2022 349

6 Data Lake projects
Recreating the Views with the CLI
Command syntax
ComposeCli.exe recreate_views--project
project_name
Where:
--project is the name of the project.
Example
ComposeCli.exe recreate_views --project MyProject
See also: Validating the metadata and storage (page 320)
Clearing the metadata cache
To improve performance when reading from the Landing Zone or from the Storage Zone, Compose caches
both the Landing Zone metadata and the Storage Zone metadata. However, synchronization issues may
sometimes occur if the structure of the Landing Zone or the Storage Zone metadata is altered outside of the
Compose project.
If you aware of external changes to the metadata or if you notice any data synchronization anomalies,
Compose enables you to clear the metadata cache, either using the web console or using the CLI.
Clearing the landing zone metadata cache
To clear the landing zone metadata cache and refresh the mappings on the next reading of the metadata:
1. Click the Manage button at the bottom left of the Storage Zone panel.
2. Click the Clear Landing Cache button in the Manage Storage Tasks window.
See also the section describing how to clear the cache before discover.
Clearing the storage zone metadata cache
To clear the storage zone metadata cache:
1. In the Storage Zone panel, select the Clear Metadata Cache item from the menu in the top right
corner.
2. Click Yes to clear the storage zone metadata.
3. When the storage zone metadata cache has been successfully cleared, click Close.
Clearing the metadata cache using the CLI
You can also clear the metadata cache using the CLI.
Command syntax:
ComposeCli.exe clear_cache --project
project_name
[--type landing|storage] [--landing_zone
source_name]
Setup and User Guide - Qlik Compose, May 2022 350
6 Data Lake projects
Parameters
Parameter Description
--project The name of the project.
--type Which type of metadata cache to clear. Possible values are:
l
landing
l
storage
If --type
landing
and you want to clear a specific landing zone,
you must set the --landing_zone parameter as well. To clear the
metadata cache in all landing zones, specify --type
landing
and
omit the --landing_zone parameter.
--landing_zone the name of the landing zone when --type landing_zone
Example
ComposeCli.exe clear_cache --project MyProject --type landing --landing_zone MySource1
Viewing and exporting task statements
You can view the task statements that were run during the Storage Zone task. You can also export the task
statements to a TSV file for reviewing and sharing.
To view the task statements :
Click the Task Statements toolbar button.
The Task Statements - <Source_Landing_Zone_Name> window opens in List View. The Description column
provides a description of each operation that was performed on the target tables. Each operation has a
different process number (displayed in the Process Number column). For additional details about an
operation, double-click the operation.
-OR-
Click the Item View button and navigate through the statements using the navigation buttons at the bottom
of the Task Statements - <Source_Landing_Zone_Name> window.
To jump to a specific statement, type the statement's number in the Go To field at the bottom of the
window and then press [Enter].
To export the task statements to a TSV file:
In List View, click the Export to TSV File button located to the left of the search field.
A file named "<name>_Task_Instructions.tsv" will be saved to your default "Downloads" location or you will
be prompted to save it (according to your browser settings).
To hide non-SQL steps from the display, select the Filter non-SQL steps check box
Setup and User Guide - Qlik Compose, May 2022 351
6 Data Lake projects
Modifying task settings
For each task, you can modify the settings according to your needs.
To modify task settings:
1. In the Manage Storage Tasks window, select a task in the left pane and then click Settings.
The Setting - <Task_Name> window opens.
2. In the General tab, you can change the logging granularity. In the Log level drop-down list, the
following options are available:
l
INFO (default) - Logs informational messages that highlight the progress of the task at a coarse-
grained level.
l
DEBUG - Logs fine-grained informational events that can be used to debug the task.
l
TRACE - Logs finer-grained informational events than the DEBUG level.
Note that the log levels DEBUG and TRACE impact performance. You should only select them
for troubleshooting if advised by Qlik Support.
3. In the Advanced tab, the following settings are available:
l
Sequential Processing: Select this option if you want all the Storage Zone processes to run
sequentially, even if they can be run in parallel. This may be useful for debugging or profiling,
but it may also affect performance.
l
Maximum number of database connections: Enter the maximum number of database
connections that Compose is allowed to open for the task. The default number is 10.
l
JVM memory: Edit the memory for the java virtual machine (JVM) if you experience
performance issues. Xms is the minimum memory; Xmx is the maximum memory. The JVM
starts running with the Xms value and can use up to the Xmx value.
Only the following characters are supported (shown as a regular expression):/^[-a-zA-
Z0-9:]*$/
l
Position in default workflow: Select where you want the Storage Zone tasks to appear in the
default workflow. For more information on workflows, see Workflows (page 360).
4. To save your changes, click OK.
6.7 Creating and managing command tasks
Command tasks enable you to incorporate custom processes into your Compose workflow. This is especially
useful if you need to leverage external tools to transfer files, validate data, and so on. A Command task can
run any script or executable supported by the operating system including batch files, Python scripts,
PowerShell scripts, executables and so on.
Setup and User Guide - Qlik Compose, May 2022 352
6 Data Lake projects
For security reasons, command tasks are blocked by default. To enable command tasks, a Compose
administrator needs to run the following commands in the Compose CLI:
ComposeCli.exe connect [--url connection-url]
Where
--url connection-url
is only required if the Compose Server is on a different machine.
To enable task commands:
ComposeCli.exe allow_user_scripts --enable
To disable task commands:
ComposeCli.exe allow_user_scripts --disable
In this section:
l
Defining Command tasks (page 353)
l
Managing Command tasks (page 354)
l
Controlling and monitoring Command tasks (page 354)
Defining Command tasks
This section explains how to define a command task. You can define as many command tasks as you need and
execute them at different stages of a Compose workflow.
For security reasons, before you define a command task, make sure that the executable or script file
that you want to run resides in the following directory on the Compose server machine:
PRODUCT_DIR\data\projects\YOUR_PROJECT\scripts
To define a command task:
1. From the project drop-down menu, select Manage Command Tasks.
The Manage Command Tasks window opens.
2. Provide a name for the task.
Task names cannot contain the following characters: /\,&#%$@=^*+"'`~?<>:;[]{} as well as all
non-printable characters (below 0x20). The task name can contain a single dot, but it cannot
be the first or last character.
3. Optionally, enter a description.
4. In the Script/Executable File field, specify the name of the files that you want to run.
5. In the Parameters field, specify any parameters required by the command. Parameters should be
separated by a space.
Setup and User Guide - Qlik Compose, May 2022 353

6 Data Lake projects
6. The user context is the user account under which the Task will run. To change the current user context,
provide the User, Password and Domain of the account under which you want the Task to run.
7. Click Save to save your changes or Discard to discard any unsaved changes.
The task will be added to the list of tasks in the left of the window.
Managing Command tasks
The table below describes the task management options.
To Do This
Edit a
task
Select the task in the tasks list in the left of the Manage Command Tasks window and edit it
as described in Defining Command tasks (page 353).
Delete a
task
Select the task in the tasks list in the left of the Manage Command Tasks window and then
click the Delete toolbar button. When prompted to confirm the deletion, click OK.
Search
for a task
Enter part of the task name in the search box above the task list. The list of tasks will be
filtered to show only tasks that include the search term in their name.
Controlling and monitoring Command tasks
Command Tasks can be run from the Manage Command Tasks window or from the main Compose Monitor
view. Although they can be run individually, command tasks are usually run as part of a workflow.
For information on defining workflows, controlling and monitoring tasks, and controlling and monitoring
workflows, see Controlling and monitoring tasks and workflows (page 354).
To run a command task from the Manage Command Tasks window:
1. Open the Manage Command Tasks window and select the task you want to run.
2. Click the Run toolbar button.
3. The Manage Command Tasks window switches to Monitor view.
In Monitor view the following information is available:
l
The task ID
l
The current status
l
When the task started and ended
l
The overall task progress
6.8 Controlling and monitoring tasks and workflows
The Compose monitor shows the current status of all your tasks and enables you to drill-down for additional
information about each task. Task instances can be run immediately or scheduled to run in the future (either
once or at set intervals).
In this section:
l
Viewing information in the monitor (page 355)
l
Running and controlling tasks (page 356)
Setup and User Guide - Qlik Compose, May 2022 354
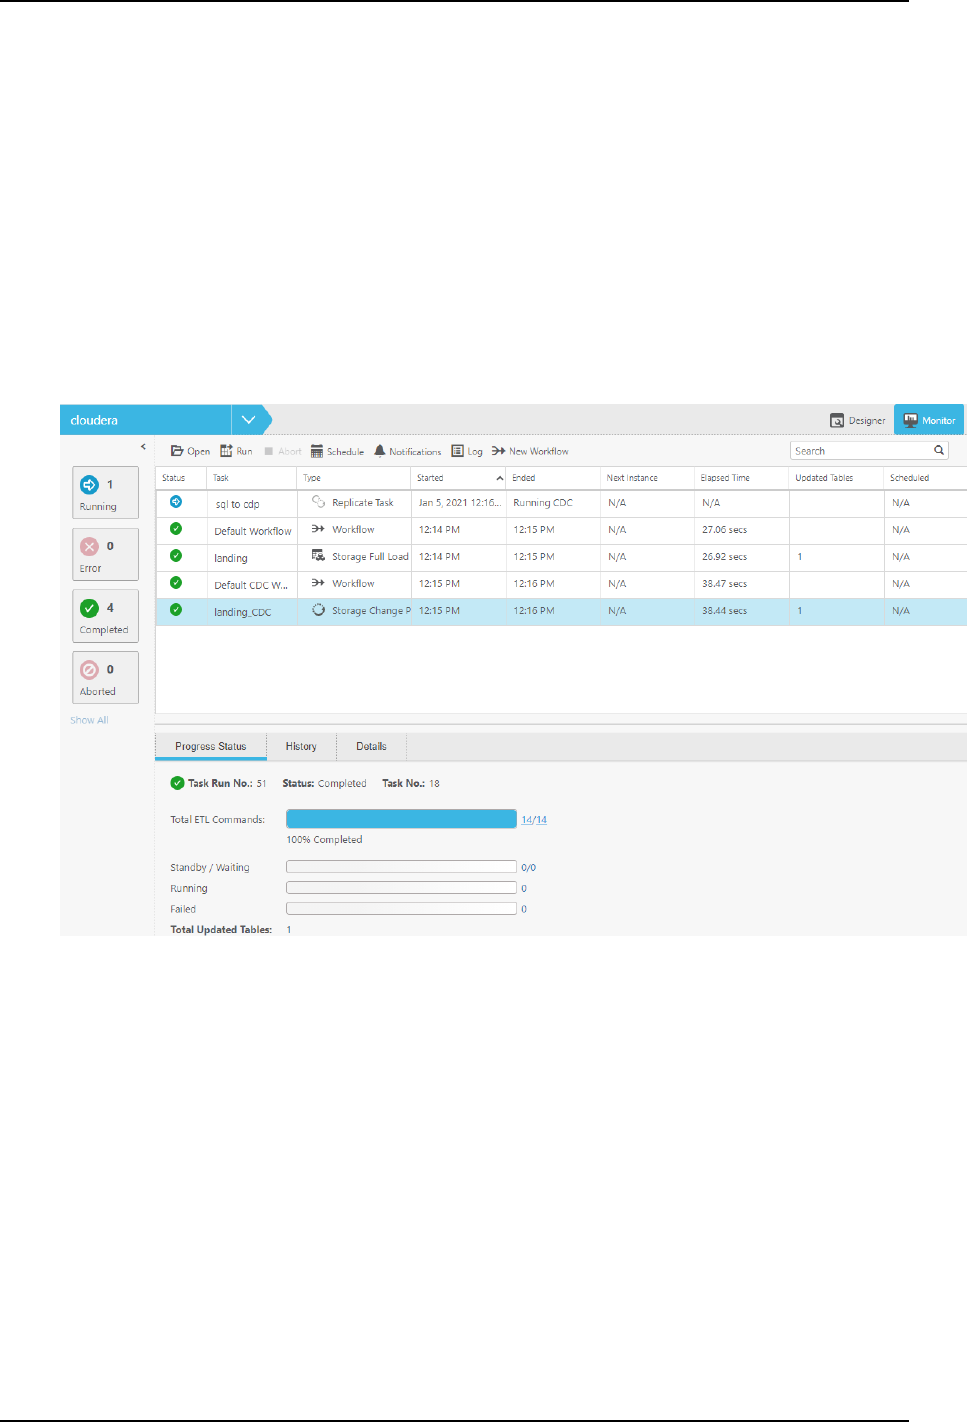
6 Data Lake projects
l
Notifications (page 358)
l
Workflows (page 360)
l
Monitoring and controlling Replicate tasks (page 364)
Viewing information in the monitor
As well as providing a high-level summary of all your tasks, the monitor also lets you view more detailed
information about specific tasks.
To switch to monitor view:
1. Open a Compose project and click the Monitor icon in the top right of the console.
A list of tasks is displayed for the current project. The left pane of the monitor allows you to filter the
task list by status as well as indicating the current number of running, failed and completed tasks.
For each task, the monitor displays the following information:
l
Status - Running, Completed, Failed or Aborted.
l
Task - The task name.
Type - The following task types are available:
l
Storage Full Load - Moves the data in its entirety from the Landing Zone to the Storage Zone.
l
Storage Change Processing - Moves changes to the data from the Landing Zone to the Storage
Zone.
l
Workflow - Executes several tasks in succession. See also Adding and designing workflows (page
361).
l
Command - For information about Command Tasks, seeCreating and managing command tasks
(page 352)
Setup and User Guide - Qlik Compose, May 2022 355

6 Data Lake projects
l
Replicate - The Qlik Replicate task that moves the data from the source database to the
Landing Zone.
l
Started and Ended - The date and time the task started and completed (according to the
server time). If the task is running, the Ended column will display the current progress. In the
case of a Replicate task performing Change Processing, Running CDC will be displayed.
l
Next Instance - The next time the task is due to run (if the task is scheduled).
l
Elapsed Time - The time it took for the task to complete or - if the task is still running - how
long the task has been running.
l
Updated Tables - The number of tables updated in the Storage Zone.
l
Scheduled - Whether the task has been scheduled. "N/A" indicates that the task has never been
scheduled whereas a check box indicates that the task has been scheduled. Clear the check box
to disable the scheduling.
2. To view additional information about a task, select the task. The information is displayed in the
following tabs in the lower pane of the monitor:
l
Details - The Details tab shows the following status bars:
l
Completed - Shows the tables that have already been loaded into Hive.
l
Loading - Shows the tables currently being loaded into Hive.
l
Queued - Shows the tables waiting to be loaded into Hive.
l
Error - Shows the tables that could not be loaded into Hive due to error. Click the Show
Details link below the bar to see more information about the statement(s) that resulted
in the error.
To see more information about tables in a particular status, click the status bar. A list of tables
in the selected status will be shown.
You can also click the Task Commands button for more information about the operations
performed during the task.
l
Progress Status - The Progress Status tab shows the task’s current progress as well as the
sub-status (Waiting/Standby, Running, Failed, etc.) of operations within the task. To see details
about a specific operations, click the number to the right of the operation status.
For example, to view more information about an operation with an error status, click the
number to the right of the Failed bar.
l
History - The History tab provides a list of previous task instances.
To view a task instance’s log file, select the task and click the View Log button.
To view more details about a task instance, either double-click the instance or select the
instance and then click the View Instance Details button. The Details tab is shown.
3. To run a task immediately, select the task and then click the Run toolbar button.
4. To view and manage a task’s settings, select the task and then click the Open toolbar button. For more
information about the settings, see the relevant topic in this guide.
Running and controlling tasks
You can run and stop tasks/workflow manually or you can schedule them using the scheduling options
described in Scheduling tasks (page 357).
Running and aborting tasks manually
You can run tasks manually and abort them if required.
Setup and User Guide - Qlik Compose, May 2022 356

6 Data Lake projects
To run a task manually:
l
Select the task and click the Run toolbar button.
To abort a task:
l
Select the task and click the Abort toolbar button.
The task process is aborted. Note that aborting a task may leave the Storage Zone or data mart tables
in an inconsistent state. Consistency will be restored the next time the task is run.
Scheduling tasks
Scheduling tasks is a convenient way of continually updating the Storage Zone and associated data mart(s).
For instance, you could schedule a data warehouse task to run at 4:00 pm and then schedule a data mart task
to run at 5:00 pm.
Note that as Compose does not provide a task-chaining option (i.e. run another task as soon as the current
task completes), it may be better to schedule tasks using an external tool that supports this capability.
You can also use the command line interface (CLI) to run a task. For details, see Running tasks using the CLI
(page 357).
To schedule a task:
1. Click the Schedule toolbar button.
2. In the <Name> Scheduler window, choose one of the following options from the Run Job drop-down
list.
l
Once - to run the job once on a specific date and time.
l
Every - to run the job at set intervals.
l
Daily - to run the job every day at a specific time.
l
Weekly - to run the job on selected days at a specific time
l
Monthly - to run the job on the nth of every month at a specific time
l
Advanced - to use a Cron expression. For a description of allowed cron formats together with
usage examples, see Cron format and examples (page 393).
3. Set the scheduling parameters according to the selected scheduling option.
4. Click OK to save your settings.
The date and time the next instance is scheduled to run will appear in the Next Instance column.
5. To disable a scheduled job, select the task and click the Edit Scheduling toolbar button. Then, select
the Disable check box in the <Name> Scheduler window.
6. To cancel a scheduled job for a task, select the task and click the Edit Scheduling toolbar button.
Then, in the <Name> Scheduler window, click Delete.
Running tasks using the CLI
You can also run tasks using the CLI. This is especially useful if you wish to run Compose tasks from external
schedulers such as HP OpenView or Control-M. Before you can run a task, you must first run the Connect
command as described in Connecting to Qlik Compose server (page 78).
Setup and User Guide - Qlik Compose, May 2022 357

6 Data Lake projects
As Compose CLI requires Administrator permission, make sure to select "Run as administrator" when
opening the command prompt.
The run_task command populates the Storage Zone with data. The task can also be run using the Run
toolbar button located in Monitor view as well as in the Manage Task window.
When this command succeeds, it returns 0.
Command syntax
ComposeCli.exe run_task --project
project_name
--type
storage|workflow
--task
task_name
--wait
timeout_in_sec
Parameters
Parameter Description
--project The name of the project.
--type The type of task that you want to run you want to run.
l
storage - data storage task.
l
workflow - workflow task.
--task The name of the task that you want to run.
--wait The wait time specified in seconds.
The command line can run in sync or async mode. A value of 0 (seconds)
indicates sync mode. This means that as soon as the task finishes, the
command line returns to prompt. The default mode is async, with a value
of -1. This is also applied if you leave this parameter empty. Other
negative values are not permitted.
Note that if wait is excluded from the command, the task may appear to
complete successfully even if it encountered an error.
Example
ComposeCli.exe run_task --project MyProject --type workflow --task DL1 --wait 1
Notifications
You can select events, on the occurrence of which, a notification will be sent to the specified recipients.
Notifications will not be sent unless the mail server settings are correctly defined.
Setting notifications
To set a notification rule:
Setup and User Guide - Qlik Compose, May 2022 358
6 Data Lake projects
1. Switch to Monitor view.
2. Click the Notifications toolbar button.
The Notification Rules window opens.
3. Click the New toolbar button.
The New Notification wizard opens.
4. In the Events screen:
l
Specify a name for the notification
l
Choose for which type of events you want the notification to be sent, both at the task level and
at the workflow level.
5. Click Next. In the Recipients screen:
l
Select Windows Event to send the notification to Windows Event Log and/or Recipients to
send the notification to a list of email recipients.
See also: Notifications (page 358).
l
If you selected Recipients, enter the recipient email addresses in the To, Cc (optional) and Bcc
(optional) boxes. Multiple addresses must be separated by a semi-colon.
6. Click Next. In the Message screen, optionally, edit the default notification message. You can add
variables to the message by selecting the variable on the right and then clicking the arrow to the left of
the variables list.
The following variables are available:
Variable Description
${PROJECT} The name of the Compose project in which the event occurred.
${TASK_NAME} The name of the task in which the event occurred.
${INSERTED} The number of rows inserted in the Storage Zone.
${UPDATED} The number of rows updated in the Storage Zone.
${DELETED} The number of rows deleted from the Storage Zone.
${ERROR_CODE} The error code if an error was encountered during the task.
${ERROR_DETAILS} The error message if an error was encountered during the task.
${EVENT_TYPE} The event type (Started, Error or Completed).
${EVENT_TYPE_DESCRIPTION}
${EVENT_TIME} The date and time the event occurred.
${LINK} A link to the relevant Compose project.
7. Click Next. In the Apply to screen, select whether to apply the rule to all tasks of to selected tasks. If
you chose Selected Tasks, select which tasks to apply the rule to.
8. Click Next to see a summary of the notification settings or Finish to save your settings and exit the
wizard.
9. If you clicked Next, review your settings and then click Finish to save the notification rule and exit the
wizard or Prev to edit your settings. You can also click the headings on the right of the wizard to go
directly to a specific window.
Setup and User Guide - Qlik Compose, May 2022 359
6 Data Lake projects
The notification will be added to the list of notifications in the Notification Rules window.
Managing notification rules
In the Notification Rules window, you can edit, delete and enable/disable notification rules as described in
the table below.
To Do This
Delete a
Rule
Select the rule and then click the Delete toolbar button. When prompted to confirm the
deletion, click Yes.
Edit a
Rule
Either double-click the rule you want to edit or select the rule and click the Edit toolbar
button. Continue from Notifications (page 358).
Disable a
Rule
Select the rule you want to disable and then either click the Disable toolbar button or clear
the check box in the Enabled column.
Enable a
Rule
Select the rule you want to enable and then click the Enable toolbar button or select the
check box in the Enabled column.
Event IDs in Windows Event Log
The table below lists the Event IDs for Compose events in Windows Event Log.
If a notification is set for several events, the event ID will be 0 for each of the events.
Event ID Description
261 The task ended with error
400 The task has started.
406 The task completed successfully.
Windows Event Log IDs
Workflows
Workflows enable you to run tasks both sequentially and in parallel. You can either schedule workflows as
described in Scheduling tasks (page 357) or run them manually using the Run toolbar button or Compose CLI.
You can create your own workflow and/or use the built-in workflow. The built-in workflow enables you to run
all of your tasks as a single, end-to-end process. The built-in workflow appears in the Type column as "Default
Workflow".
When you create your own workflow, you decide which tasks to include in the workflow and the order in
which they will be run.
In this section:
l
Adding and designing workflows (page 361)
l
Validating workflows (page 363)
Setup and User Guide - Qlik Compose, May 2022 360
6 Data Lake projects
l
Managing workflows (page 363)
l
Running and monitoring workflows (page 364)
Adding and designing workflows
This section provides instructions for adding and creating workflows.
Adding a workflow
To add a workflow:
1. Switch to Monitor view by clicking the Monitor button in the top right of the Compose console.
2. Click the New Workflow toolbar button.
The New Workflow window opens.
3. To create a workflow with all current tasks, select Create default workflow and then click OK.
Otherwise, continue from Step 4 below. Separate workflows will be created for Full Load and Change
Processing tasks. The default workflow cannot be edited and will appear as Default Workflow in the
list of monitored tasks.
Any tasks you create after adding the default workflow will not be automatically included in
the default workflow. If you want to create a default workflow that includes newly added
tasks, simply delete the existing default workflow and create another one in its place.
4. Specify a name for your workflow.
5. To create a workflow based on an existing workflow, select the Duplicate from check box and then
select an existing workflow from the drop-down list.
6. Click OK to save your settings.
The <workflow_name> window opens.
7. Continue from Designing a workflow below.
Designing a workflow
The workflow window is divided into two panes. The pane on the left (hereafter referred to as the Elements
pane) is where you design your workflow and contains two default elements: Start and End.
The Elements pane contains gateways and tasks that you can use in your workflow. The following elements
are available:
l
Tasks - All existing Data Warehouse tasks, Data Mart tasks, and Command tasks.
l
Gateways - There are two types of gateway: Parallel Split and Synchronize. Use the Parallel Split
gateway to create parallel paths. This is useful, for example, if you want two or more tasks to run in
parallel.
Use the Synchronize gateway to merge parallel paths. The workflow waits for all the Tasks that
precede the gateway to complete before continuing the flow.
Setup and User Guide - Qlik Compose, May 2022 361
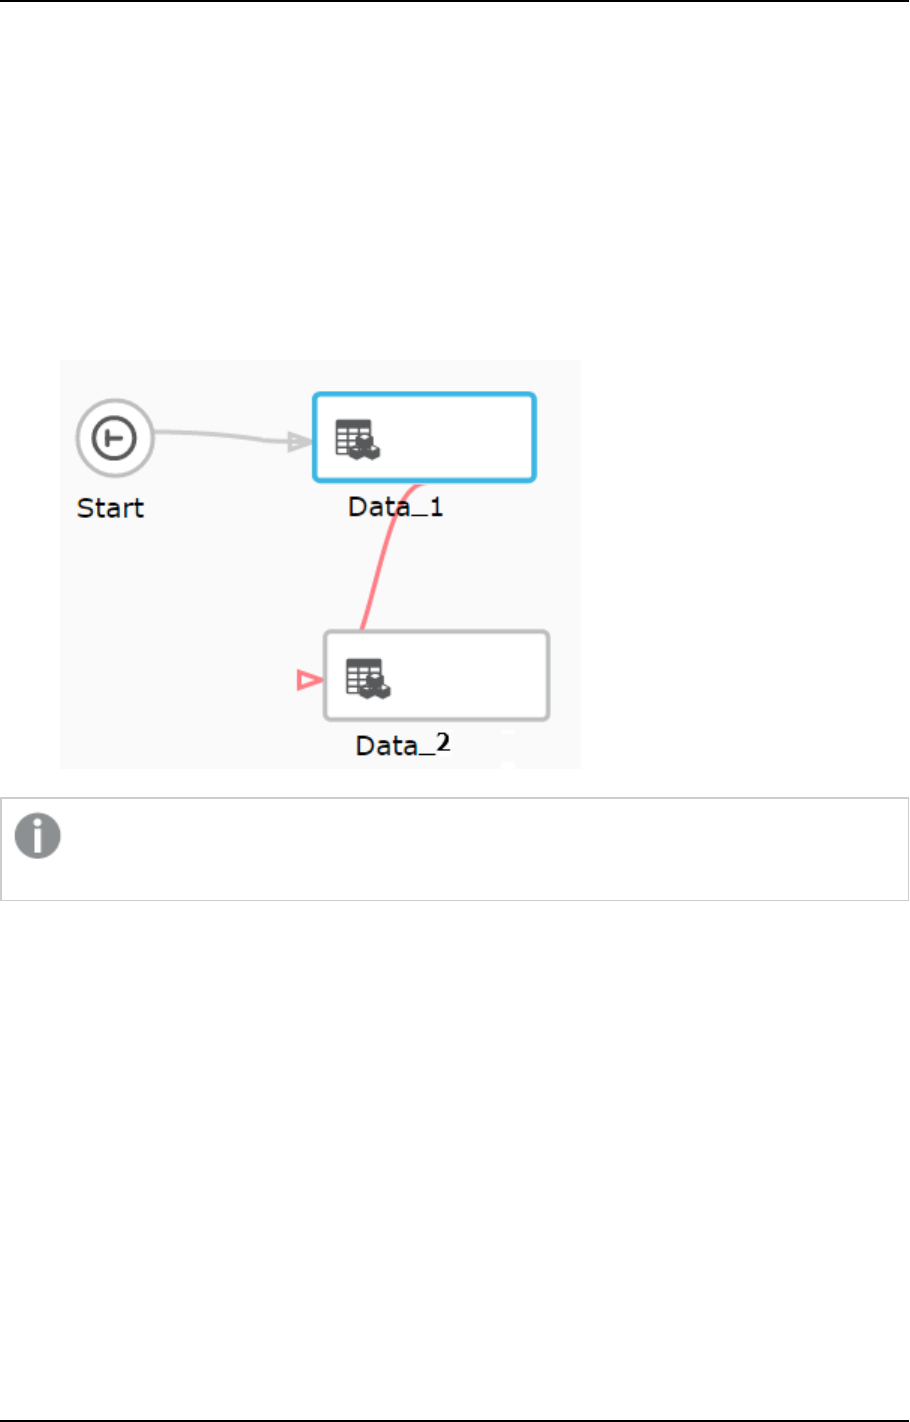
6 Data Lake projects
To design a workflow:
1. Drag the desired workflow elements from the Elements pane to the pane on the left.
2. Arrange the elements in the order that you want them to run.
3. Connect the elements to each other by dragging the connector from the gray dot (that appears on the
right of an element when you hover the mouse cursor over it) to the target element. When a blue
outline appear around the target element, release the mouse button.
4. Optionally add error paths to the workflow. The workflow will follow the error path if a task encounters
an error. For example, if an error occurs with one task, you may want to run another task in its place.
To add an error path, hover your mouse cursor over the task element. A red dot will appears below the
element. Drag the connector from the red dot to the target element, as shown below.
Connecting two error paths to the same task should be avoided as the workflow will fail if the task
tries to run twice.
Continuing a workflow in the event of parallel task failure
In a workflow, all task elements have an error port. This allows you to change the course of the workflow in
the event of a task failure, as described in Step Adding and designing workflows (page 361) above. Similar to
Task elements, the Synchronize gateway also has an error port which can be used to reroute the workflow if
any of the tasks between the Parallel Split and Synchronize gateways should fail.
By default, a workflow will end with an error if one or more parallel tasks do not complete successfully.
However, in certain cases you may want the workflow to continue, even if one or more of the parallel tasks
failed.
To do this, you need to connect the error port of the relevant task(s) directly to the Synchronize gateway. You
can also design the workflow so that it follows the path leading from the Synchronize error port, instead of
continuing its normal flow.
Setup and User Guide - Qlik Compose, May 2022 362
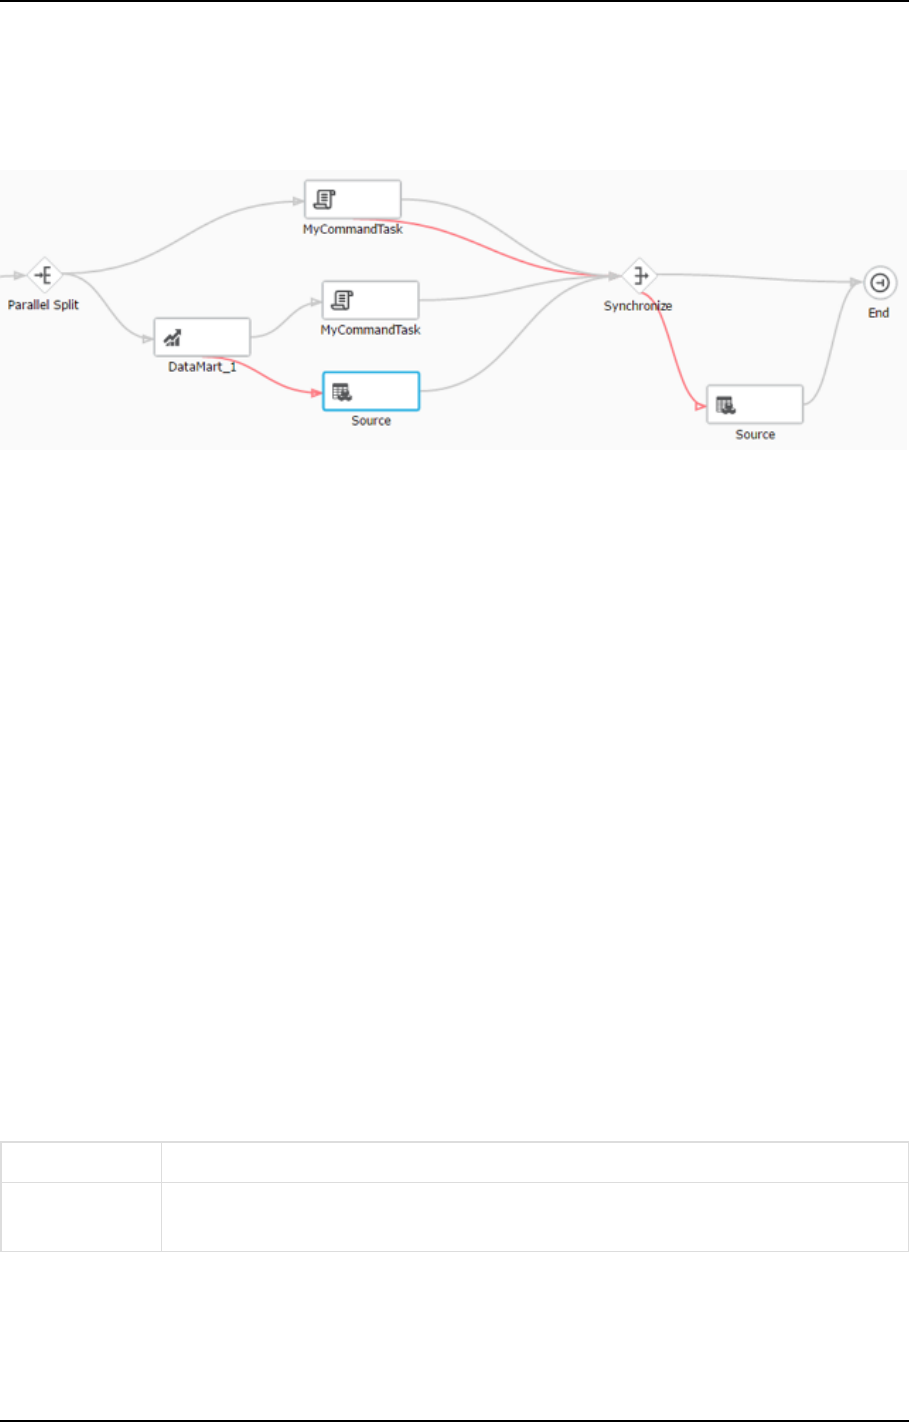
6 Data Lake projects
In the example below, the error port of the MyCommandTask is connected to the Synchronize gateway,
meaning that even if MyCommandTask task fails, the workflow will continue. However, if the
MyCommandTask task fails, the workflow will not proceed directly to the End element. Instead, it will follow
the Synchronize gateway’s error path to the Source task.
Validating workflows
It is strongly recommended to validate your workflow before running it. This will prevent errors from occurring
during runtime due to an invalid workflow.
Workflow rules include:
l
All elements must be connected to each other
l
A workflow must contain Start and End elements and at least one task.
l
A workflow cannot contain a Parallel Split gateway without a Synchronize gateway and vice versa.
l
Storage Zone tasks that update the same tables cannot run in parallel.
l
A workflow cannot contain a Parallel Split gateway without a Synchronize gateway and vice versa.
l
The execution order of elements must be sequential and not cyclic. For example an element cannot
loop back to an element that precedes it the execution order.
To validate your workflow:
l
Click the Validate Flow toolbar button.
If the workflow is valid, a "<workflow_name> is valid." message will be appear at the top of the
window. If the workflow is not valid, a message describing the problems will appear instead.
Managing workflows
The table below describes the options available for managing workflows.
To Do This
Delete a
Workflow
In Monitor view, select the workflow in the Task column and then click the Delete
Workflow toolbar button.
Setup and User Guide - Qlik Compose, May 2022 363

6 Data Lake projects
To Do This
Edit a Workflow In Monitor view, either double-click the workflow you want to edit or select the
workflow and click the Open toolbar button. Continue from Adding and designing
workflows (page 361).
Delete an
element in
workflow
Either right-click the element and select Delete or select the element and then click the
Delete toolbar button.
Reset the
workflow view
Click the reset button to the right of the slider at the top of the window.
Zoom in
to/zoom out of
the workflow
Move the slider at the top of the window to the left or right as required.
Running and monitoring workflows
You can either schedule workflows as described in Scheduling tasks (page 357) or run them manually using the
Run toolbar button. The Run toolbar button appears both in the main Monitor view and in the workflow
design window. Note that when you run a workflow from the workflow design window, a new Monitor tab is
added to the window and the view automatically switches to the Monitor tab.
You can monitor the workflow either in the Monitor tab or in the Progress Status tab. During runtime, the
workflow elements fill with blue providing a graphic indication of progress. If a task encounters an error, the
task element will appear with red fill instead of blue.
Monitoring and controlling Replicate tasks
Before you can create a Compose project, you need to define a Replicate task that replicates the relevant
source tables from the source database to the Landing Zone. You can define a different task for each project
or the same task can serve several projects. You can also define multiple tasks for a single project. The tasks
can either reside on the same Replicate server or on several Replicate servers distributed throughout your
organization.
Monitoring and controlling Replicate tasks from within Compose involves the following steps:
l
Step 1: Configure Qlik Compose to connect to the Qlik Replicate machine(s) as described in Replicate
Server settings (page 370).
l
Step 2: Add the Replicate task name to the source Landing Zone settings as described in Defining
Landing Zones connections (page 314).
l
Step 3: Monitor and control the Replicate task as described below.
The image Replicate Task in the Compose Monitor (page 365) shows how the Replicate task appears in the
Compose Monitor. You can stop and start the Replicate task using the Abort and Run toolbar buttons.
If a task is stopped from within Replicate, the task status in Compose for Data Lakes will be
"Completed" instead of "Aborted".
Setup and User Guide - Qlik Compose, May 2022 364

6 Data Lake projects
You can also define notifications for the task and add the task to a workflow. For more information, see
Notifications (page 358) and Workflows (page 360) respectively.
The monitor provides various information about the task. For details, see Viewing information in the monitor
(page 355).
Replicate Task in the Compose Monitor
Setup and User Guide - Qlik Compose, May 2022 365

7 Managing Compose
7 Managing Compose
Qlik Compose management options can be accessed from the Management menu located at the top of the
Compose main page.
In this section:
l
License settings (page 366)
l
Logging settings (page 367)
l
Mail server settings (page 369)
l
Running tasks on a remote Compose server (page 370)
l
Replicate Server settings (page 370)
l
User permissions (page 371)
l
Audit trails (page 380)
7.1 License settings
You need to register a valid license in order to use Qlik Compose. The license file contains details such as the
product expiration date, the date the license was issued, which source databases can be used, and so on.
License enforcement
The license is enforced only when trying to generate, run, or schedule a task (via the web console or API ).
Other operations such as Test Connection may also fail if you do not have an appropriate license.
Registering a license
This section describes how to register your Compose license. You can register the license either using the
console or using a command line.
To register a license using the console:
1. Copy the license file to the computer on which Compose is installed or to any computer in your
network that can be accessed from the Compose computer.
2. Click Load and browse to find and select the license file. The license text is displayed in the window.
Check to be sure that the details are correct.
3. Click Register License to register the license. A message indicating the license was registered
successfully is displayed.
To register a license using the command line:
Run the following command from the Compose bin directory:
Command syntax
ComposeCli.exe register_license --infile|license_text
Setup and User Guide - Qlik Compose, May 2022 366

7 Managing Compose
Parameters
Parameter Description
--infile The full path to the Qlik Compose license file.
--license_text A string in JSON format. When specifying a JSON string, any quote
symbols should be escaped using a backslash (\).
Example
Register a license with --infile:
ComposeCli.exe register_license --infile c:\Admin\Temp\lic.txt
Register a license with --license_text:
ComposeCli.exe register_license --license_text "{ \"$type\": \"ComposeLicense\", \"product\":
\"Compose\", \"issued_to\": \"qa\", \"issued_by\": \"Qlik\", 07-21\", \"hosts\": \"\",
\"product_version\": \"2.8\", \"notes\": \"\", \"host_role\": \"\", \"source_db_types\": \"\",
\"dwh_type\": \"\", \"number_of_dms\": \"0\", \"managed_dwh_size\": \"0\",
LcVLPfXvD4wY5ZyUYlasdjtOvQd1Hwk5UzT7xe5+pqhZtB1dfUUyl50+7zKju7vm1kkPnz3I+L5LbLm3FpvqxIxOFrj2LQ
Bk1LoUxMN+v06vI+w5aMSGQw6fttUgbYohFCIOduk8=\"}"
7.2 Viewing a license
You can view the license information in the Qlik Compose Console at any time.
To view the license information:
1. From the Management menu, select License|View License.
2. The License window opens. All of the license information is displayed in the License window.
7.3 Logging settings
You can set the server logging level, configure automatic roll over and cleanup, and view and download log
files.
Setting the logging level
The logging level determines what type of information is written to the log files. The log files provide
information about Qlik Compose Server and Qlik Compose Agent processes.
The following logging levels are available (ordered from the lowest level to the highest level):
1. Errors
2. Warnings
3. Info
4. Trace
5. Verbose
Setup and User Guide - Qlik Compose, May 2022 367

7 Managing Compose
The higher levels always include the messages from the lower levels. Therefore, if you select Error, only error
messages are written to the log files. However, if you select Info, informational messages, warnings, and error
messages will be included. Selecting Verbose writes all possible messages to the log.
To set the server logging level:
1. From the Management menu, select Logs|Log Management. The Log Management window opens
displaying the Server Log tab.
2. To set a global logging level, move the top slider to the desired logging level. All of the sliders for the
individual modules move to the same level that you set in the main slider.
3. To set a logging level for individual Compose components, select a module and then move its slider to
the desired logging level.
4. Click OK to save your changes and close the Log Management window.
To set the Qlik Compose Agent level:
1. From the Management menu, select Logs|Log Management. The Log Management window opens
displaying the Server Log tab.
2. Select the Qlik Compose Agent log tab, and then move the slider to the desired logging level.
3. Click OK to save your changes and close the Log Management window.
Changes to the logging level take place immediately. There is no need to restart the Qlik Compose
service.
Setting automatic roll over and cleanup
You can define when log files should be automatically rolled over as well as how many log files to keep.
Rolling over log files keeps any single log file from becoming too large and provides an easy way to identify
files that are no longer being used so that an automated script can clean the logging directory. Automatic
deletion of old log files ensures that the logs do not take up too much disk space when there is a lot of activity
in the system.
To set the log file roll over and cleanup options:
1. From the Management menu, select Logs|Log Management. The Log Management window opens.
2. Select the Log Settings tab.
3. The following options are available:
l
Enable automatic roll over: Select this check box to determine the maximum size a log file can
reach before it is rolled over. The current log file is called Compose.log and saved (older) log
files are called Compose_xxxxxxxxxxxx.log where xxxxxxxxxxxx represents a 12-digit
timestamp.
l
Roll over the log if the log file is larger than (MB): Use the counter or type in the
maximum amount of megabytes for a specific log file. When the log file reaches the
specified size, the old log is saved with a timestamp appended to its name and a new
log file is started. The default value is 10 megabytes.
Setup and User Guide - Qlik Compose, May 2022 368

7 Managing Compose
The scheduled job that checks the log size runs every five minutes. Consequently, the
actual size of the log when rolled over might be larger than specified.
l
Enable automatic cleanup: Select this check box to define the maximum number of log files to
keep.
l
Maximum number of log files to keep: Use the counter or type in the maximum
number of log files to keep. When the number of log files reaches the specified
maximum, Compose will delete the oldest log file whenever a new log file is created,
thereby ensuring the number of log files never exceeds the set limit. The default is 45.
4. Click OK to save your settings and close the Log Management window.
Viewing and downloading Compose log files
This section explains how to view and download Compose log files.
The logs are in four different locations:
l
<product_dir>\data\logs – Server log file
l
<product_dir>\java\data\logs – Compose Agent log file
l
<product_dir>\data\projects\<project_name>\logs – project logs , workflow logs, and
command task logs
To view Compose log files:
1. From the Management menu, select Logs|View Logs. The Log File Viewer opens.
2. Select the log file you want to view from the list in the Log Files pane.
The contents of the log file will be displayed in the right pane. When you select a row in the log file, a
tooltip will display the full message of the selected row.
3. Browse through the log file using the scroll bar on the right and the navigation buttons at the top of
the window.
4. To search for a specific string in the log file, enter the search string in the search box at the top of the
window. Any terms that match the specified string will be highlighted blue.
To download Compose log files:
1. From the Management menu, select Logs|View Logs. The Log File Viewer opens.
2. From the list in the Log Files pane, select the log file you want to download.
3. Click the Download Log File button in the top right of the window. The log file is downloaded.
7.4 Mail server settings
The mail parameters define the mail server used to send notifications.
Setup and User Guide - Qlik Compose, May 2022 369

7 Managing Compose
To configure the mail server settings:
1. From the Management menu, select Mail Server Settings. The Mail Settings window opens.
2. Configure the settings as follows:
l
Mail server: Specify the outgoing mail server that will be used to send Qlik Compose
notifications, for example, smtp.example.com.
l
Port: Enter the mail server port number. The default value is 25.
l
Use secure email (SMTPS): Select this to connect to the mail server using TLS.
l
Anonymous login: Enable this to allow Qlik Compose to access the mail server without having
to provide any user credentials.
l
User name: Specify the user name for the account that will be used to send notifications.
l
Password: Specify the password for the account that will be used to send notifications.
l
Sender email address: Enter the email address that sends the email notifications. This is the
address that appears in the From field of the email notification.
l
Send Test Mail: You this option to validate your mail server settings. Click Send Test Mail to
open the Send Test Email window. In the Email address for test email, enter the email
address to which you want the test email to be sent and then click Send.
3. Click OK to save your settings and close the Mail Settings window.
7.5 Running tasks on a remote Compose server
You can run Compose tasks either locally (the default) or on a remote Compose server.
To run tasks on a remote server:
1. From the Management menu in the projects view, select Compose Agent Settings.
2. In the Compose Agent Settings window, select Remote server and provide the required connection
details.
3. Click OK to save your settings.
7.6 Replicate Server settings
Before you can create a Compose project, you need to define at least one Replicate task that replicates the
relevant source tables from the source database to the Landing Zone.
If you want to monitor the Replicate tasks, you need to provide the information that Compose needs in order
to establish a connection to the Replicate Server on which the tasks are running. After providing this
information, you will then be able to associate a source Landing Zone with a specific Replicate task.
To configure the Replicate Server connection settings:
1. Open the Manage Replicate Servers window using any of the following methods:
l
From the Management drop-down menu in the main toolbar, select Manage Replicate
Servers.
Setup and User Guide - Qlik Compose, May 2022 370
7 Managing Compose
l
In the New Data Source window, click the Replicate Server Settings link below the Associate
with Replicate task field.
The Manage Replicate Servers window opens.
2. Click Add Replicate Server.
The Add Server window opens.
3. Enter the following information:
l
Name: A display name for the server.
l
Description: (Optional) A description for the server.
l
Host: The IP address or host name of the Qlik Replicate machine.
When Replicate Server is installed on Linux, enter the IP address of the Windows
machine on which the Replicate UI Server is running.
l
Port: Optionally, change the default port (443). You should only change the default port if you
are certain that a different SSL port is being used.
l
User Name and Password: Your credentials for logging in to the Qlik Replicate machine.
When Replicate Server is installed on Linux, enter the user name and password for the
Windows machine on which the Replicate UI Server is running.
l
Get metadata timeout - The time to wait when discovering a task’s source database or
refreshing the metadata cache before returning a timeout error.
l
Get task timeout - The time to wait when starting a Replicate task before returning a timeout
error.
In environments with complex networks, operations related to Replicate may exceed
the default timeout limit. If you experience frequent timeouts starting tasks,
discovering a task’s source database, or refreshing the metadata cache, increasing
these values may help.
4. Click Test Connection and then click OK if the connection is successfully verified.
The server is added to the Manage Replicate Servers window. Click Close to close the window.
7.7 User permissions
Security roles allow you to grant Qlik Compose users different roles according to the tasks you want them to
perform. Qlik Compose comes with the following predefined security roles: Admin, Designer, Operator and
Viewer. Each role has its own set of permissions, as described in Default user permissions according to role
(page 372).
You can associate a user with a security role by adding the user to the appropriate Active Directory group or
by assigning a role directly to the user. By default, the user under whose account you install Qlik Compose is
an Admin. You can also fine-tune access control per user or group. For more information, see Granular access
control (page 373)
Setup and User Guide - Qlik Compose, May 2022 371
7 Managing Compose
As a user with the relevant permissions, you can view and change the permissions for existing users or groups,
or add users or groups that do not yet exist in Qlik Compose.
The advantage of adding groups over users is that you can assign a security role to a group as a whole, instead
of to individual users, and any new user that is added to an existing group automatically acquires the security
role granted to that group.
To set user permissions using Active Directory groups, you can either create Active Directory groups with the
names listed in the table below, or you can create Active Directory groups with different names. Then, add
users to the groups according to the role you want them to perform.
If you create your own Active Directory groups, you need to add them to the User Permissions tab in the
Settings window and set their permissions as described in Managing user permissions (page 377).
Role Active Directory Group
Administrator QlikComposeAdmins
Designer QlikComposeDesigners
Operator QlikComposeOperators
Viewer QlikComposeViewers
Predefined user permission roles
Default user permissions according to role
In the Qlik Compose Console, the menus, buttons, and options can be accessed only by users who have the
relevant permissions. For example:
l
The Project view is available to all roles, but Designers only have read-access to user permissions, and
operators cannot add projects – they can only view the different settings but not edit them. Viewers
cannot edit settings, add, edit, or delete a project, or register a license.
l
The Model view for the Data Warehouse is available to all roles, but only Designers can create and
manage the model, import entities and mappings from other projects (including models created in
ERwin), manage global mappings, validate, define reusable transformations, add Date and Time
entities for the model, and so on.
The following table lists the permissions granted to each of the predefined security roles:
Permission Admin Designer Operator Viewer
Projects:View projects and logs, generate
documentation
Yes Yes Yes Yes
Projects: Define and manage command tasks Yes Yes Yes No
Projects:Create, design, reset, define settings for,
control versions, commit, revert, delete, create
deployment package
Yes Yes No No
Permission access properties
Setup and User Guide - Qlik Compose, May 2022 372

7 Managing Compose
Permission Admin Designer Operator Viewer
View databases and model Yes Yes Yes Yes
Model: Add, edit, delete, discover, import from other
tools (e.g. ERwin), validate
Yes Yes No No
Data Warehouse: View data and logs, tasks,
commands and mapping
Yes Yes Yes Yes
Data Warehouse: Create, edit, delete source and
target Data Warehouse databases
Yes Yes No No
Data Warehouse: Manage settings, populate tasks,
cleaning and validation rules
Yes Yes No No
Data marts: View details and logs Yes Yes Yes Yes
Populate data marts Yes Yes Yes No
Data marts: Create, edit, delete, edit expressions and
filters, import and add dimensions, generate tasks
Yes Yes No No
Monitor tasks (in Monitor view) Yes Yes Yes Yes
Workflow operations: Create, edit, populate,
notification rules, run Replicate and command tasks
Yes Yes Yes No
Perform runtime operations such as starting and
aborting tasks.
Yes Yes Yes No
Define table creation modifiers Yes Yes No No
Manage Compose (e.g. license registration, email
settings, and so on)
Applies only if the user is an Admin at the
Compose level.
Yes No No No
Granular access control
For each user, Qlik Compose lets you set granular access permissions for different hierarchy levels in the
system and for different objects at the same hierarchy level. This granular access control facilitates the
decentralization of control, effectively preventing the same user from, for example, designing the model and
managing the mappings. As such, granular access control lets you create a buffer between those who can
create and design models and those who can create and run the mappings.
Qlik Compose handles permission management as follows:
l
Admins can add, remove, and change permissions.
l
Designers and Operators can view permissions.
l
Viewers cannot view permissions.
By default, each object inherits its permissions from its parent.
Setup and User Guide - Qlik Compose, May 2022 373
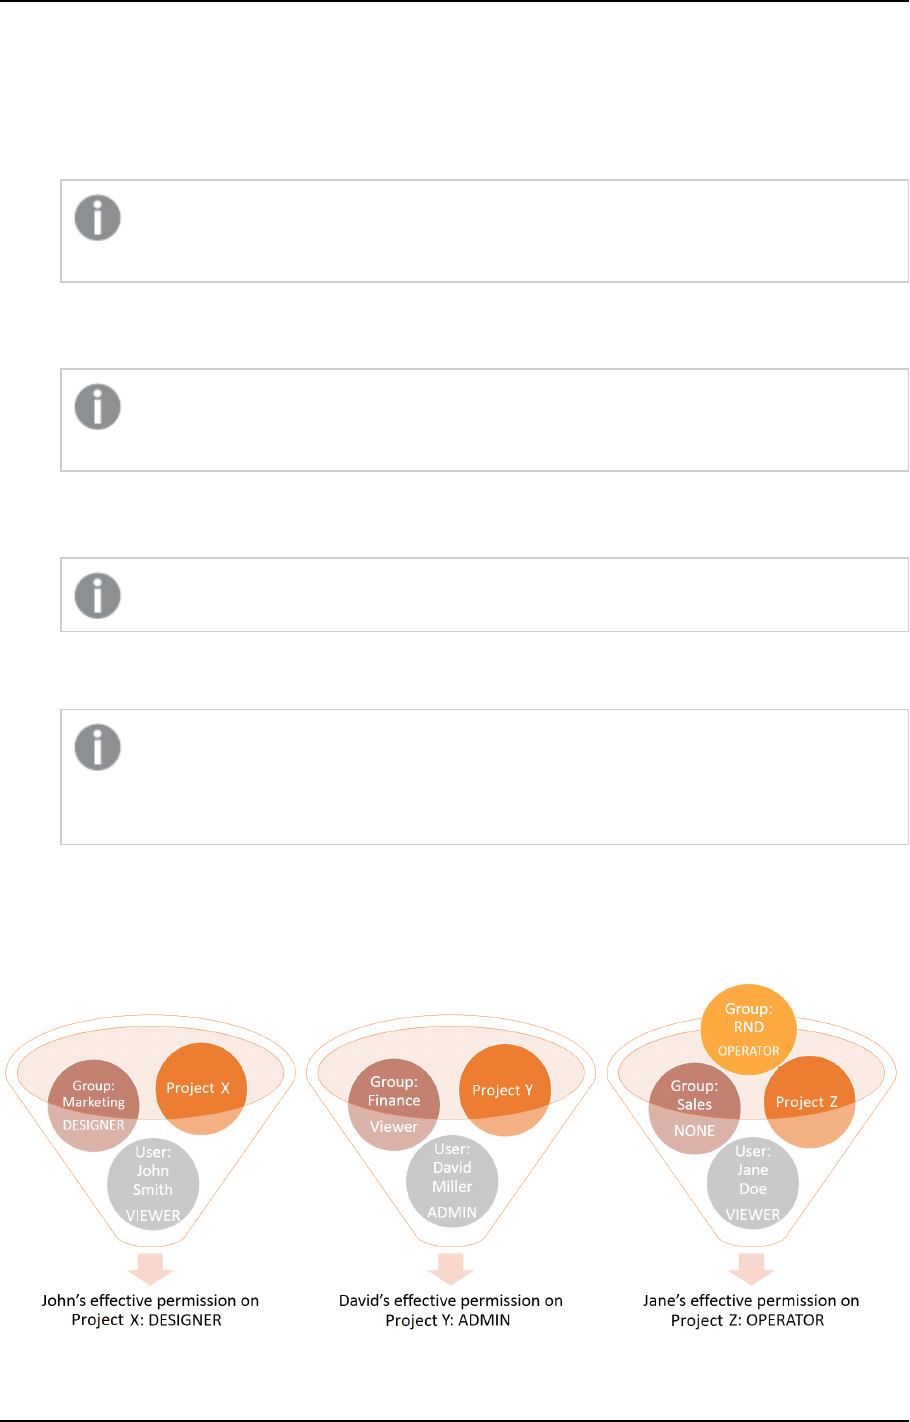
7 Managing Compose
User permissions can be assigned to individual Data Warehouse projects as well as across all projects. The
following hierarchy is in place, whereby:
l
Compose User Permissions are applied globally. Changes to Compose permissions will affect any level
that inherits those permissions. At Compose root level, users must have at least Viewer permissions.
Only Admin users at the Compose level can perform logging actions, such as, changing the
logging level and rolling over logs.
l
All Projects User Permissions apply to all projects. When inheritance is enabled (the default),
permissions will be inherited from the “Compose” root level.
A user that is assigned All Projects User Permissions but not Compose User Permissions is
not authorized to log in to Compose.
l
Project User Permissions apply to a specific project. When inheritance is enabled (the default),
permissions will be inherited from the “All Projects” level.
Supported with Data Warehouse projects only.
l
Model User Permissions apply to the model unless overridden at any of the lower levels. When
inheritance is enabled (the default), permissions will be inherited from the “Project” level.
l
Not applicable to Data Lake projects
l
If user permissions are other than None at the Project level, in the Model level the
user must have at least Viewer permissions.
Inheritance and overrides
Group permission may contradict the permission that a particular user was granted. In this case, the higher
permission overrides the lower permission, as illustrated in the following figure:
Setup and User Guide - Qlik Compose, May 2022 374
7 Managing Compose
Effective permissions are the permissions that take effect when a user is part of more than one group, or when
there is a conflict between the user's permission and the group's permission, or in the hierarchy.
By default, the permission of a user or group object is inherited from the access control list (ACL)of the
object's parent. However, a lower or higher permission may override this permission. In this case, the
overriding higher permission is the effective permission for the object, stopping inheritance from the parent.
As a result, any changes to the parent no longer affect this user or group.
In the User Permissions window, inheritance is indicated by a check mark in the Inherited column. By
default, inheritance is enabled for all users and groups on any level. Changing permissions by using the slider
automatically stops inheritance for the selected user or group. Qlik Compose also lets you disable inheritance
by disconnecting the entire authorization level from the parent level. For information on how to do this, see
Managing user permissions (page 377).
Managing user and group roles using the Compose CLI
This feature is available from Compose May 2022 SR 01
You can set and update user and group roles using the Compose CLI. You can also remove users and groups
from a role in one of the available scopes (for example, Admin in All Projects). This is especially useful if you
need to automate project deployment. Before you can use the CLI, you must first run the Connect command
as described in Connecting to Qlik Compose server (page 78).
Adding or updating roles
You can add a new user or group and assign a role to that user/group, or you can update the role of an
existing user or group. If the specified user or group does not exist, they will be added to Compose.
Syntax
composecli set_user_or_group_role --scope global|allprojects|project [--
project_name project-name] --role admin|designer|operator|viewer|none --user_
name netbios\user|--group_name netbios\group
Parameters
Parameter Description
scope The scope of the user or group: global, allprojects, or project.
role Required. The role that you want to assign the user or group: none, viewer, operator,
designer, or admin.
project_
name
The name of the project to assign the role on. Only required if --scope project.
Setup and User Guide - Qlik Compose, May 2022 375

7 Managing Compose
Parameter Description
user_name The name of the user to add or update. Required if no group is specified.
Users must be specified in the following format:
NetBIOS-name\user
Example:
qa\mike
group_name The name of the group to add or update. Required if no user is specified.
Users must be specified in the following format:
NetBIOS-name\group
Example:
qa\admins
Example
composecli set_user_or_group_role --scope project --project_name myproject --
role admin --group_name qa\admins
Revoking roles
You can revoke a user or group's role from a particular project, from all projects, or from Compose.
Syntax
composecli remove_user_or_group_role --scope global|allprojects|project [--
project_name project-name] --user_name netbios\user|--group_name
netbios\group
Parameters
Parameter Description
scope The scope of the user or group to remove: global, allprojects, or project.
project_
name
The name of the project to remove the user or group from. Only required if --scope
project.
user _name The name of the user to remove. Required if no group is specified.
Users must be specified in the following format:
NetBIOS-name\user
Example:
qa\mike
Setup and User Guide - Qlik Compose, May 2022 376

7 Managing Compose
Parameter Description
group_name The name of the group to remove. Required if no user is specified.
Users must be specified in the following format:
NetBIOS-name\group
Example:
qa\admins
Example
composecli remove_user_or_group_role --scope project --project_name myproject
--user_name qa\mike
Managing user permissions
This section explains how to access user permissions at different levels in the hierarchy, edit user permissions,
add and remove users or groups, disable or enable inheritance, restore inherited permissions if they were
overridden, and view effective permissions for a user.
By default, inheritance is enabled for all objects (users and groups). This means that permissions are
automatically carried over from the parent object. You can turn inheritance on or off for all objects at the
current level. Effective permissions are the permissions that are in effect for a user at any particular level.
For more information on the underlying concepts, see Granular access control (page 373) and Inheritance and
overrides (page 374).
To access user permissions at the Compose level
l
In the Qlik Compose Console, from the Management menu, select User Permissions.
By default, the User Permissions window opens at Console root level, displaying the currently assigned user
role permissions for each defined user/group. These permissions apply globally unless they are overridden at
any of the lower levels.
Changes to Compose permissions will affect any level inheriting those permissions.
To access user permissions at the All Projects level
l
In the User Permissions window, select the All Projects tab.
The All Projects User Permissions window displays the currently assigned user role permissions for each
defined user/group. These permissions apply to all projects unless they are overridden at any of the lower
levels.
When inheritance is enabled, permissions will be inherited from the Compose root level.
Setup and User Guide - Qlik Compose, May 2022 377
7 Managing Compose
To access user permissions for a specific project:
l
In the Qlik Compose Console, select the required project, and then select User Permissions from the
context menu.
The Project User Permissions window shows the user role permissions that apply to the specific project '
{project name}' for each defined user/group. These permissions apply to the specific project unless overridden
at any of the lower levels.
When inheritance is enabled, permissions will be inherited from the All Projects level.
To access user permissions for a Model:
l
In the User Permissions for project: '{project name}' window, click the Model tab. The Model User
Permissions windowshows the user role permissions that apply to the specific project model for each
defined user/group.
When inheritance is enabled, these permissions will be inherited from the Project level.
To edit user permissions:
1. In the User Permissions window, adjust the permission slider for a user or group as required.
Adjusting the slider stops inheritance from the parent object.
2. Click Save or OK to accept the changes, or Discard Changes or Cancel to undo them.
To add a user or group:
1. In the User Permissions window, click Add.
2. In the Add User/Group window, select User or Group.
3. Enter the name for the new user or group in the following format:
NetBIOS_name\user (for example:qa\qa)
4. Click OK to add the user/group and close the window.
5. Click Save or OK to accept the changes, or Discard Changes or Cancel to undo them.
To remove a user or group:
1. In the User Permissions window, select the user or group you want to remove.
2. Click Remove.
3. When prompted, click Yes to confirm.
4. Click Save or OK to accept the changes, or Discard Changes or Cancel to undo them.
To disable inheritance:
1. In the User Permissions window, click Disable Inheritance.
This option disconnects the entire authorization level from the parent level.
Setup and User Guide - Qlik Compose, May 2022 378
7 Managing Compose
2. In the Disable Inheritance window, select whether you want to:
l
Convert inherited permissions on this object into explicit permissions: This option changes
inherited permissions to explicit permissions. Any new users or groups will not inherit
permissions from the parent.
l
Remove all inherited permissions from this object: This option removes all existing
permissions inherited from the parent level. Any new users or groups will not inherit
permissions from the parent.
3. Click Disable. If you chose to convert inherited permissions, the check mark in the Inherited column
changes into an X. If you chose to remove inherited permissions, all users and groups disappear from
the list.
4. Click Save or OK to accept the changes, or Discard Changes or Cancel to undo them.
To enable inheritance:
1. In the User Permissions window, click Enable Inheritance.
This option enables inheritance for all users and groups on this level.
2. In the Enable Inheritance window, select whether you want to:
l
Inherit all permissions from parent and override any definition manually made at this
level: This option reinstates inherited permissions for all users and groups that are already
defined, and new users and groups will inherit their permissions from the parent level.
l
Inherit all permissions from parent but keep definitions manually made at this level: This
option preserves the permissions already defined for the existing users and groups, and adds all
permissions from the parent level. New users and groups will inherit permissions from the
parent level.
3. Click Enable.
4. Click Save or OK to accept the changes, or Discard Changes or Cancel to undo them.
To restore inherited permissions for a single user or group if they were overridden:
1. In the User Permissions window, select the user or group.
2.
Click Restore Inheritance . The check mark returns to the Inherited column to indicate that
permissions for this user or group are inherited from the parent.
To view effective permissions for a user:
1. In the User Permissions window, do one of the following:
l
Select a user in the list on the left.
l
If a user does not appear in the list but exists in the system and is part of a group, enter the
user name in the text field in the Effective Permissions pane on the right. Make sure to use the
following format:
NetBIOS_name\user (for example: qa\qa)
2. Click Get Effective Permissions. The effective permissions for the user you entered appear below the
button.
Setup and User Guide - Qlik Compose, May 2022 379

7 Managing Compose
7.8 Audit trails
The information provided in an Audit Trail can be leveraged for user accountability, reconstruction of events,
intrusion detection, and other operational issues. As such, Audit Trails are an indispensable tool for regulatory
compliance (e.g. SOX).
For operations performed by users with Operator privileges or later, the Compose Audit Trail shows which
user performed the operation, when it was performed, and on which objects.
By default, Compose retains audit files for one week or until they reach a total size of 100 MB (10 files). You
can change these settings through the command line interface (CLI) as described in Exporting Audit Trail files
(page 381) below.
Audit Trail files are located in the following folder:
<Installation_Directory>\data\AuditTrail\audit_service
You can also export an audit trail file for a specific time range, as described in Exporting Audit Trail files (page
381).
Audit trail information
Audit Trail files provide all or some of the following information:
l
Timestamp - The time when the row was inserted into the Audit Trail.
l
User - The user that performed the operation.
l
Node - The IP of the server on which the operation was performed.
l
Requested Action - The API method/function that was called.
l
Required Permission - The minimum role of the user that can perform the operation.
l
Effective Permission - The actual role of the user that performed the operation.
l
Security Result - Whether the user is allowed to perform the operation.
l
Action Result - The completion status of the operation (success of failure).
l
Error Message - The error message if the operation failed.
l
Task - The name of the task where relevant.
l
Notification - The notification defined for the operation (if defined).
l
Payload - A URL. To view payload information, simply copy the link from the Payloadcolumn and
paste it into your browser's address bar.
Payloads for some operations (e.g. RegisterLicense) contain sensitive information and need to be
decoded. For information on decoding payloads, see Decoding an encoded payload (page 382).
l
Project Name - The name of the Compose project.
Audit Trail files are compressed and tamper-protected.
Setup and User Guide - Qlik Compose, May 2022 380
7 Managing Compose
Exporting Audit Trail files
You can export an audit trail file with a record of activity for a specific time range. In Compose, there are two
way of doing this:.
l
Using the management console
l
Using the CLI
You can also export audit trails using the ExportAuditTrail API method. For further information, see
the Qlik Enterprise Manager Help and API Guide.
Exporting an Audit Trail file via the management console
You can use the Compose management console to export the audit trail as a CSV file.
To do this:
1. From the Management drop-down menu, select Audit Trail. The Audit Trail window opens.
2. From the Time Range drop-down list, select the desired time range. If you select Custom, set From
and To values as well.
3. Click Generate.
Depending on your browser settings, you will either be prompted for a download location or the file will be
downloaded automatically to your preferred location.
Exporting an Audit Trail file via the CLI
You can use the Compose CLI to export the audit trail as a JSON file.
Run the following command from the Compose bin directory:
Command syntax
ComposeCli.exe generate_audit_trail --start_timestamp
timestamp
[--end_timestamp
timestamp
] --
outfile
full_path
Parameters
Parameter Description
--start_timestamp The date and time from which you want the audit trail to start, in UTC
format.
--end_timestamp The date and time on which you want the audit trail to end, in UTC
format. When not specified, the file will end at the latest audit trail record.
--outfile The full path to the output file. If the path contains spaces, it should be
enclosed in quotation marks.
Setup and User Guide - Qlik Compose, May 2022 381
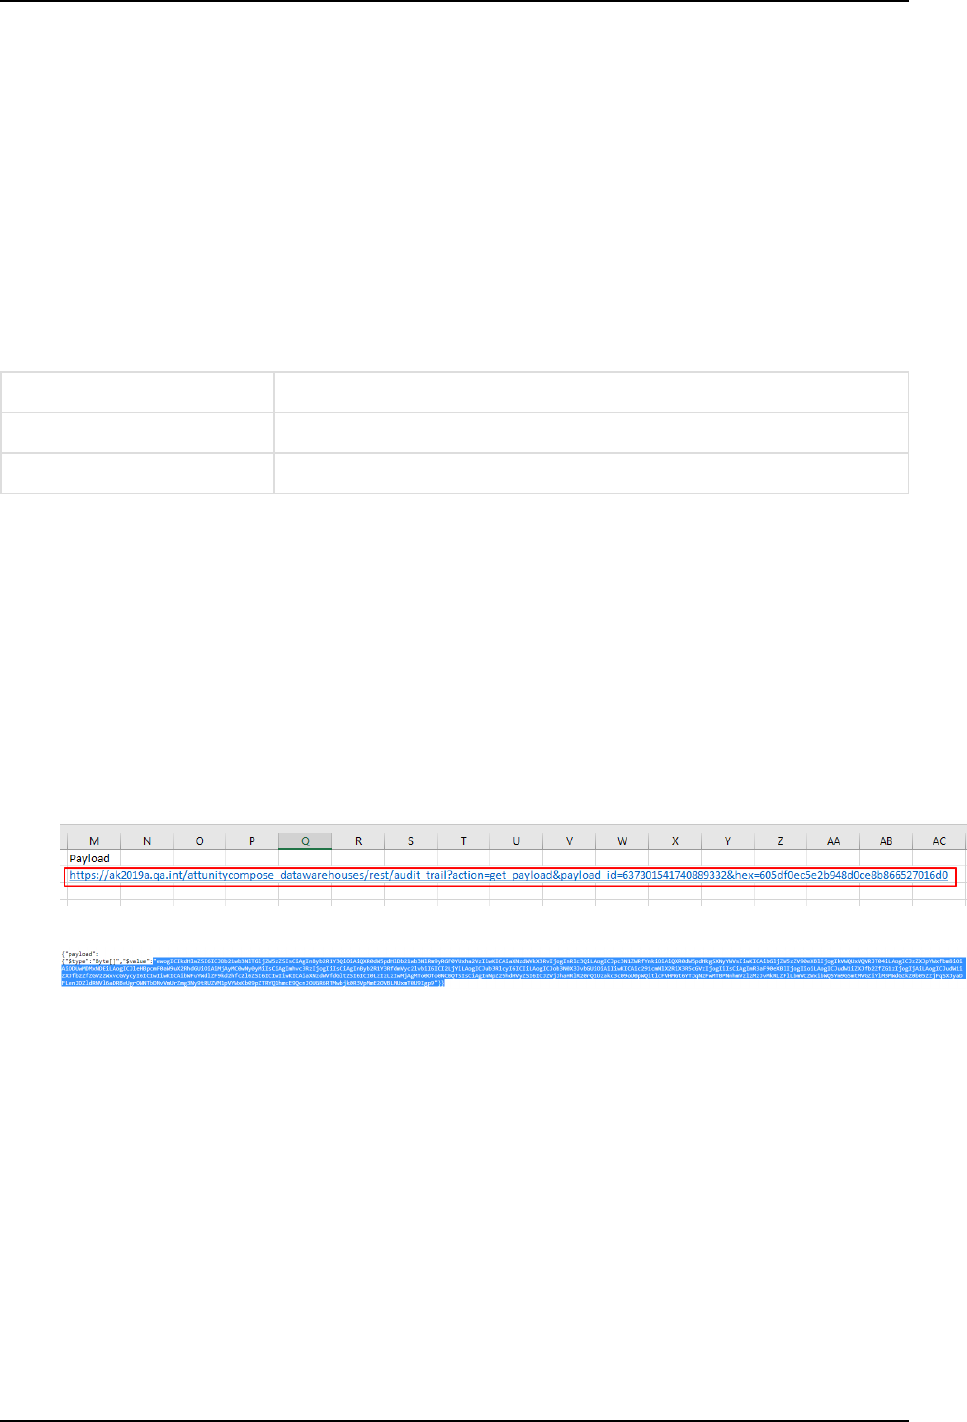
7 Managing Compose
Example
ComposeCli.exe generate_audit_trail --start_timestamp 2020-06-30T16:15:00Z --end_timestamp
2020-07-14T16:15:00Z --outfile "C:\compose audit trails\audit.json"
Configuring Audit Trail size and retention
Run the following command from the Composebin directory:
Command syntax
ComposeCtl.exe audit_trail_control --age
weeks
--size
megabytes
Parameters
Parameter Description
--age The number of weeks to retain the audit trail file (default 1 week).
--size The maximum size of the audit file to retain (default 100 MB).
Example
ComposeCtl.exe audit_trail_control --age 4 --size 1000
Decoding an encoded payload
Some audit records (e.g. RegisterLicenses) may contain an encoded payload. Encoded payloads are displayed
as byte arrays and need to be decoded using Base64.
To decode an encoded stream payload:
1. Locate the payload URL in the audit record.
2. Copy the URL into your browser's address bar and press [Enter]. A byte array will be displayed.
3. Copy the byte array into a Base64 decoder and decode it.
Setup and User Guide - Qlik Compose, May 2022 382
8 Setting up Compose on a Windows HA cluster
8 Setting up Compose on a Windows HA cluster
This section describes how to set up Compose in a Windows Server High Availability Cluster environment. For
instructions on how to set up a Windows clustering environment, refer to the Microsoft Help.
When building failover cluster solutions with Compose using Windows Server Failover Cluster (WSFC)
or a Linux failover cluster software, Qlik recommends using a block device (physical, virtual or iSCSI-
based) for the shared Compose DATA folder. Using NFS or SMB-based storage is not supported due to
the associated latency which could greatly degrade the data transfer performance, as well as due to
reduced reliability and compatibility issues. When building a cloud-based high availability solution
that needs to span different availability zones, it is recommended to use a Storage-as-a-Service
solution that can handle the block-level replication of the storage and that is integrated with the
chosen failover clustering software.
All commands described in this section must be run as administrator.
In this section:
l
Step 1: Installing Compose in the cluster (page 383)
l
Step 2: Adding the Compose service (page 385)
l
Step 3: Defining the service dependencies (page 385)
l
Step 4: Defining the URLfor the cluster (page 386)
l
Upgrading Compose on the cluster (page 386)
8.1 Step 1: Installing Compose in the cluster
This topic describes how to install Compose in a high availability cluster environment.
Preparation
Allocate two shared folders for Compose: one for the Compose server and the other for the Compose agent
The setup instructions below assume that the Compose data folder is F:\Compose-server-data and the
Compose Agent data folder is F:\Compose-agent-data.
Primary node setup
1. Install Compose.
2. Generate a 32 character random master key by running the following command from <PRODUCT_
DIR>\bin:
ComposeCtl.exe utils genpassword
The setup instructions below assume that your key is
WdAHWEwXSvwxDFetcl7TVVFfSXPbMrFx
3. Stop the Compose service.
Setup and User Guide - Qlik Compose, May 2022 383
8 Setting up Compose on a Windows HA cluster
4. Edit the service executable path as follows:
SC CONFIG QlikCompose binPath= "<PRODUCT_DIR>\bin\ComposeCtl.exe -d
F:\server-server-data service run”
Example:
SC CONFIG QlikCompose binPath="\"C:\Program
Files\Qlik\Compose\bin\ComposeCtl.exe\" -d \"F:\Compose-server-data\"
service run"
5. Run the following commands from <PRODUCT_DIR>\bin:
ComposeCtl.exe -d "F:\Compose-server-data" setup install
ComposeCtl.exe -d "F:\Compose-server-data" masterukey set -p
WdAHWEwXSvwxDFetcl7TVVFfSXPbMrFx
6. Edit <PRODUCT_DIR>\java\bin\acjs.bat and immediately below the line with SET JAVA_LIB_PATH,
add the following:
set AT_DATA=-d F:\Compose-agent-data
7. Start the Compose service and then stop it. This will create the java repository.
This step should be performed on the primary node only.
8. Run the following command from <PRODUCT_DIR>\java\bin:
acjs.bat masterukey set WdAHWEwXSvwxDFetcl7TVVFfSXPbMrFx
9. Start the Compose service and then stop it.
10. In the Cluster Manager, move to the secondary node.
Secondary node setup
1. Install Compose.
2. Stop the Compose service.
3. Edit the service executable path as follows:
SC CONFIG QlikCompose binPath= "<PRODUCT_DIR>\bin\ComposeCtl.exe -d
F:\server-server-data service run”
Example:
SC CONFIG QlikCompose binPath="\"C:\Program
Files\Qlik\Compose\bin\ComposeCtl.exe\" -d \"F:\Compose-server-data\"
service run"
4. Run the following commands from <PRODUCT_DIR>\bin:
ComposeCtl.exe -d "F:\Compose-server-data" setup install
ComposeCtl.exe -d "F:\Compose-server-data" masterukey set -p
WdAHWEwXSvwxDFetcl7TVVFfSXPbMrFx
5. Edit <PRODUCT_DIR>\java\bin\acjs.bat and immediately below the line with SET JAVA_LIB_PATH,
add the following:
set AT_DATA=-d F:\Compose-agent-data
6. Run the following command from <PRODUCT_DIR>\java\bin:
acjs.bat masterukey set WdAHWEwXSvwxDFetcl7TVVFfSXPbMrFx
7. Start the Compose service and then stop it.
8. In the Cluster Manager, move to the next nodes if your cluster has more than two nodes.
Setup and User Guide - Qlik Compose, May 2022 384
8 Setting up Compose on a Windows HA cluster
8.2 Step 2: Adding the Compose service
After installing Compose in the cluster, you need to add the Compose service as a resource to the role.
To add the Compose service:
1. In the left pane of the Failover Cluster Manager, select Roles. The available roles will be listed in the
right pane of the console. Right-click the role you are working with and point to Add a resource. Then
select Generic Service.
2. In the Select Service screen of the New Resource wizard, select Qlik Compose from the list.
3. Click Next and follow the instructions in the wizard to create the resource. For information on how to
use this wizard, see the Microsoft online help.
Compose must be installed on the computer where you defined the service in order for the service to
be available in the list.
8.3 Step 3: Defining the service dependencies
You need to define dependencies for the Compose service that will enable the Storage and Network names to
start up before the service. If these resources do not start before the service, Compose will not be able to start
as it will be searching for the data location.
To define the service dependencies:
1. In the left pane of the Failover Cluster Manager console, select Roles.
2. From the list of available roles in the right pane of the console, select the role you are working with.
3. In the bottom right pane, select the Resource tab. From the list of the available roles, select Compose.
4. Right-click the Compose role and select Properties.
5. In the Compose Properties window, select the Dependencies tab.
6. Click Insert. A new line is added to the Resource list.
7. In the Resource column, click the arrow and select the Compose Data storage resource from the list.
8. Click Insert and add the Network Name resource (it should have the same name as the cluster).
9. Start the Service using the Failover Cluster Manager and access the console using the Network name.
10. Register the license. The license should contain all host names of the cluster.
To open the Compose Console, it is recommended to use an address that includes the name
or IP address of the cluster machine (as opposed to the specific node name).
Example:
https://cluster_name_ip/qlikcompose/
Setup and User Guide - Qlik Compose, May 2022 385
8 Setting up Compose on a Windows HA cluster
8.4 Step 4: Defining the URLfor the cluster
By default, the Compose service generates the URL when it starts, according to the host name of the machine
on which Compose is installed.
In a cluster environment, this is not good practice because the URL will change each time the cluster is rolled
over. To resolve this issue, you need to set the cluster name as the Compose URL.
To set the cluster name as the Compose URL:
1. In the left pane of the Failover Cluster Manager, select Nodes.
The right pane of the Console displays a list of cluster nodes.
2. Select a node to see the cluster name. This is the name you want to set (for example: Cluster_
Network_1).
The cluster name must be registered in DNS, before you can set it.
3. Run the following command from the primary node:
<PRODUCT_DIR>\bin>ComposeCtl.exe -d <COMPOSE_SERVER_DATA_FOLDER> configuration set --
address <CLUSTER_NAME>
Example:
ComposeCtl.exe -d "F:\Compose-server-data" configuration set --address QlikCluster
The host configuration will be updated.
4. Restart the Compose service for the changes to take effect.
5. To make sure Compose is now using the correct URL, check F:\Compose-server-data\logs\compose.txt
or use the <COMPOSE_DATA_FOLDER>\service.url shortcut to check the cluster name in the service
Properties.
6. Try to open Compose from a remote browser using <COMPOSE_DATA_FOLDER>\service.url.
8.5 Upgrading Compose on the cluster
To upgrade Compose on a Windows Server High Availability Cluster:
1. Make sure you are on the primary node.
2. In the left pane of the Failover Cluster Manager, select Roles. From the list of available roles in the right
pane, right-click the Compose role you are working with and change it to offline.
3. Run the standard upgrade procedure.
Make sure the Compose role is offline, as the upgrade should bring the services online.
4. As the upgrade process overrides the acjs.bat file, when the upgrade completes, add the following row
to the <PRODUCT_DIR>\java\bin\acjs.bat file:
SET AT_DATA=-d <agent data path>
Setup and User Guide - Qlik Compose, May 2022 386

8 Setting up Compose on a Windows HA cluster
If the above string already exists in acjs.bat, you can skip this step.
5. Bring the Compose role back online and make sure there are no connection errors.
6. Upgrade the projects by running the following command on the primary node only:
ComposeCtl.exe -d <server data path> setup postupdate
7. Repeat steps 2-5 on the secondary node.
Setup and User Guide - Qlik Compose, May 2022 387

A Impact of DST change on Qlik Compose
A Impact of DST change on Qlik Compose
This topic describes how Qlik Compose is affected by Daylight Saving Time (DST) and provides guidelines for
handling changes brought about by DST.
There are two types of DST changes:
l
DST On - Occurs approximately when Summer starts (actual date is country specific). Its impact on
local time is that local time is moved one hour forward (so, for example, 01:00AM becomes 02:00AM).
This DST change does not impact Qlik Compose as it does not result in time overlap.
l
DST Off - Occurs approximately when Winter starts (actual date is country specific). Its impact on local
time is that local time is moved back one hour (so, for example, 02:00AM becomes 01:00AM). This DST
change results in time overlap where local time travels over the same hour twice in a row.
The comments below assume that the customer has not changed the time but rather the timezone or the DST
setting. Changing the actual time (not for minor time adjustments) is a sensitive operation and is best done
when Qlik Compose is stopped.
There are two places where DST may have an effect:
l
Timestamps in logs and audit messages are in local time. As a result, when Winter time starts, the logs
will show the time going back an hour; conversely, when Summer time starts, the logs may appear to
be missing one hour.
l
Statistics shown on the console are also sensitive to local time, and thus may also show
confusing/inaccurate data in the overlap period (going in to Winter time) or for the skipped period
(going into Summer time).
In general, it is recommended to avoid non-critical task design changes during the first overlap period (going
in to Winter time) so as to prevent confusion about when the changes took place.
In addition to Qlik Compose, other components are also affected including:
l
The source endpoint system
l
The target endpoint system
l
The local operating system
l
The task design (specifically using timestamp based variables)
The Scheduler is not adjusted to take into account daylight saving time (DST). For example, a daily
job which was scheduled to run at 11 PM should be rescheduled to run at 11 PM after DST comes into
effect.
Given the complexity of the topic and the involvement of many independent components and settings, Qlik
generally recommends that customers first verify the impact of DST changes in their test environment.
Setup and User Guide - Qlik Compose, May 2022 388
B Support matrix
B Support matrix
In addition to listing the platforms on which Qlik Compose can be installed, this topic also specifies which
source and target database versions can be used in a Qlik Compose task.
B.1 Supported Windows platforms
Qlik Compose can be installed on any of the following Windows platforms:
l
Windows Server 2012 (64-bit)
l
Windows Server 2012 R2 (64-bit)
l
Windows Server 2016 (64-bit)
l
Windows Server 2019 (64-bit)
l
Windows Server 2022 (64-bit)
Windows Server 2022 support is available from Compose May 2022 SR 01
B.2 Supported browsers
The Qlik Compose Web UI supports the following browsers:
l
Microsoft Edge (with automatic updates turned on)
l
Mozilla Firefox (with automatic updates turned on)
l
Google Chrome (with automatic updates turned on)
B.3 Supported Qlik Replicate and Enterprise Manager
versions
Qlik Replicate is required for landing data into the data warehouse or storage while Qlik Enterprise Manager
allows you to monitor and control Compose tasks running on different servers. This section lists the supported
versions for each of these products.
Compose May 2022 Initial Release
Compose May 2022 Initial Release is compatible with the following Replicate and Enterprise Manager versions:
l
Qlik Replicate - Qlik Compose is compatible with Replicate November 2021 latest service release, Qlik
Replicate May 2022, and Qlik Replicate May 2023 including its service packs.
l
Enterprise Manager - Qlik Compose is compatible with Enterprise Manager May 2022.
Compose May 2022 Service Release 1
Compose May 2022 Service Release 01 is compatible with the following Replicate and Enterprise Manager
versions:
Setup and User Guide - Qlik Compose, May 2022 389

B Support matrix
l
Qlik Replicate: Qlik Compose is compatible with Qlik Replicate May 2022, Qlik Replicate November
2022, and Qlik Replicate May 2023 including its service packs.
l
Enterprise Manager: Qlik Compose is compatible with Enterprise Manager November 2022.
Compose May 2022 Service Release 2
Compose May 2022 Service Release 2 is compatible with the following Replicate and Enterprise Manager
versions:
l
Qlik Replicate: Qlik Compose is compatible with Qlik Replicate May 2022, Qlik Replicate November
2022 including its service packs, and Qlik Replicate May 2023 including its service packs.
l
Enterprise Manager: Qlik Compose is compatible with Enterprise Manager November 2022 SR1.
B.4 Supported Databases for Data Warehouse Projects
Supported data sources
Any data source supported by Qlik Replicate can be used as a data source in Qlik Compose. When using a Qlik
Replicate data source, discovery needs to be performed on the landing zone. Replicate data sources
(endpoints) that can be discovered directly from Qlik Compose are described in the table below.
For more information on discovering data sources, see Discovering the Source Database or Landing Zone (page
156).
Data Source (Endpoint) Version
Microsoft SQL Server 2014, 2016, 2017, 2019
MySQL 5.x and 8.x
Oracle
Note: All Oracle editions are supported.
11.x, 12.x, 18.x, and 19.x
IBM DB2 for LUW 9.x, 10.x, and 11.x
Supported data sources and versions
Supported data warehouses
The table below lists the data warehouse versions supported in a Data Warehouse project.
Data Warehouse Version
Microsoft SQL Server 2014, 2016, 2017, 2019
Microsoft Azure SQL Database (via the Microsoft SQL Server database
connection settings)
Same as Microsoft SQL
Server.
Microsoft Azure SQL Managed Instance (via the Microsoft SQL Server database
connection settings)
Same as Microsoft SQL
Server.
Supported data warehouses and versions
Setup and User Guide - Qlik Compose, May 2022 390

B Support matrix
Data Warehouse Version
Oracle
All Oracle editions are supported.
11.x, 12.x, 18.x, and 19.x
Amazon Redshift N/A
Microsoft Azure Synapse Analytics (formerly known as Microsoft Azure SQL
Server Data Warehouse)
N/A
Snowflake N/A
Google Cloud BigQuery N/A
Setup and User Guide - Qlik Compose, May 2022 391
B Support matrix
B.5 Supported hive distributions for Data Lake projects
The table below lists the supported hive distributions for Data Lake projects.
l
For all hive distributions, fully binary compatible versions are also supported.
l
All major versions and selected minor versions are certified for use with Compose.
l
For information about supported drivers, see Prerequisites (page 277).
Hive Distribution Version
Amazon EMR 6.x
Cloudera 7.x
Microsoft Azure HDInsight 4.x
Google Dataproc (non
ACID)
2.0
Databricks on AWS 7.3 and 9.1 (LTS)
From Compose May 2022 Service Release 01, only the following
versions will be supported: 9.1 LTS and 10.4 LTS
Databricks on Azure 7.3 and 9.1 (LTS)
From Compose May 2022 Service Release 01, only the following
versions will be supported: 9.1 LTS and 10.4 LTS
Databricks on Google
Cloud
7.3 and 9.1 (LTS)
From Compose May 2022 Service Release 01, only the following
versions will be supported: 9.1 LTS and 10.4 LTS
Supported databases for Data Lake projects
Setup and User Guide - Qlik Compose, May 2022 392
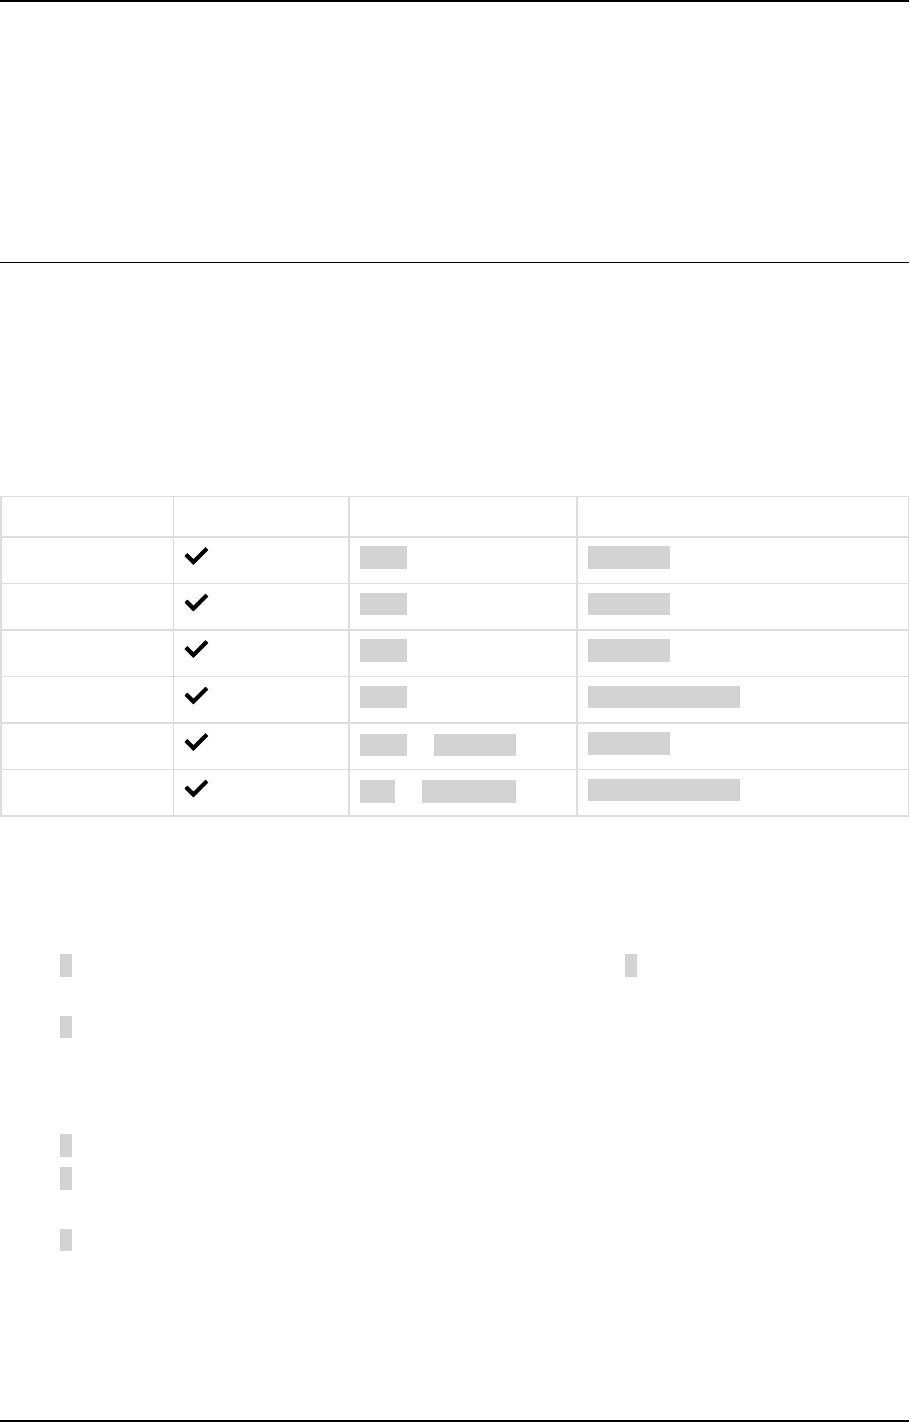
C Cron format and examples
C Cron format and examples
Cron expressions can be used to schedule a Compose task. This appendix describes the Cron format used in
Compose (Quartz), provides a description of the special characters that can be used in an expression and ends
with some examples of Cron usage.
In this appendix:
C.1 Cron format
A cron expression is a string comprised of five fields separated by a white space. Fields can contain any of the
allowed values, along with various combinations of the allowed special characters for that field. The fields are
described in the table below.
Field Name Mandatory Allowed Values Allowed Special Characters
Seconds
0-59 , - * /
Minutes
0-59 , - * /
Hours
0-23 , - * /
Day of month
1-31 , - * ? / L W
Month 1-12 or JAN-DEC
, - * /
Days of week 1-7 or SUN-SAT
, - * ? / L #
Cron expression field values
C.2 Special characters
The following special characters are supported:
l
* ("all values") Used to select all values within a field. For example, "*" in the minute field means
"every minute".
l
? ("no specific value") Useful when you need to specify something in one of the two fields in which the
character is allowed, but not the other. For example, if I want my task to run on a particular day of the
month (say, the 10th), but don't care what day of the week that happens to be, I would put "10" in the
day-of-month field, and "?" in the day-of-week field. See the examples below for clarification.
l
- Used to specify ranges. For example, "10-12" in the hour field means "the hours 10, 11 and 12".
l
, Used to specify additional values. For example, "MON,WED,FRI" in the day-of-week field means "the
days Monday, Wednesday, and Friday".
l
/ Used to specify increments. For example, "0/15" in the seconds field means "the seconds 0, 15, 30,
and 45". And "5/15" in the seconds field means "the seconds 5, 20, 35, and 50". You can also specify '/'
after the '' character - in this case '' is equivalent to having '0' before the '/'. '1/3' in the day-of-month
field means "run every 3 days starting on the first day of the month".
Setup and User Guide - Qlik Compose, May 2022 393
C Cron format and examples
l
L ("last") Has a different meaning in each of the two fields in which it is allowed. For example, the
value "L" in the day-of-month field means "the last day of the month" - day 31 for January, day 28 for
February on non-leap years. If used in the day-of-week field by itself, it simply means "7" or "SAT". But
if used in the day-of-week field after another value, it means "the last xxx day of the month" - for
example "6L" means "the last friday of the month". You can also specify an offset from the last day of
the month, such as "L-3" which would mean the third-to-last day of the calendar month. When using
the 'L' option, it is important not to specify lists, or ranges of values, as you'll get
confusing/unexpected results.
l
W ("weekday") Used to specify the weekday (Monday-Friday) nearest the given day. As an example, if
you were to specify "15W" as the value for the day-of-month field, the meaning is: "the nearest
weekday to the 15th of the month". So if the 15th is a Saturday, the trigger will run on Friday the 14th.
If the 15th is a Sunday, the trigger will run on Monday the 16th. If the 15th is a Tuesday, then it will run
on Tuesday the 15th. However if you specify "1W" as the value for day-of-month, and the 1st is a
Saturday, the trigger will run on Monday the 3rd, as it will not 'jump' over the boundary of a month's
days. The 'W' character can only be specified when the day-of-month is a single day, not a range or list
of days. ** The 'L' and 'W' characters can also be combined in the day-of-month field to yield 'LW',
which translates to "last weekday of the month".
l
# Used to specify "the nth" XXX day of the month. For example, the value of "6#3" in the day-of-week
field means "the third Friday of the month" (day 6 = Friday and "#3" = the 3rd one in the month). Other
examples: "2#1" = the first Monday of the month and "4#5" = the fifth Wednesday of the month. Note
that if you specify "#5" and there is not 5 of the given day-of-week in the month, then no firing will
occur that month. ** The legal characters and the names of months and days of the week are not case
sensitive. MON is the same as mon.
C.3 Usage examples
Here are some examples of cron expressions and their effect.
Cron
expression
example
Trigger frequency
0 0 12 * * ? 12 pm (noon) every day
0 15 10 ? * * 10:15am every day
0 15 10 * * ? 10:15am every day
0 15 10 * * ? * 10:15am every day
0 15 10 * * ?
2005
10:15am every day during the year 2005
0 * 14 * * ? Every minute starting at 2pm and ending at 2:59pm every day
0 0/5 14 * * ? Every 5 minutes starting at 2pm and ending at 2:55pm every day
Cron expression usage examples
Setup and User Guide - Qlik Compose, May 2022 394

C Cron format and examples
Cron
expression
example
Trigger frequency
0 0/5 14,18 * * ? Every 5 minutes starting at 2pm and ending at 2:55pm every day, ANDevery 5 minutes
starting at 6pm and ending at 6:55pm every day
0 0-5 14 * * ? Every minute starting at 2pm and ending at 2:05pm every day
0 10,44 14 ? 3
WED
At 2:10pm and at 2:44pm every Wednesday, in the month of March
0 15 10 ? * MON-
FRI
At 10:15am every day from Monday - Friday
0 15 10 15 * ? 10:15am on the 15th day of every month
0 15 10 L * ? 10:15am on the last day of every month
0 15 10 ? * 6L 10:15am on the last Friday of every month
0 15 10 ? * 6L
2002-2005
10:15am on the last Friday of every month, during the years 2002-2005
0 15 10 ? * 6#3 10:15am on the third Friday of every month
0 0 12 1/5 * ? 12pm (noon) every 5 days every month, starting on the first day of the month
0 11 11 11 11 ? 11:11am on every November 11th
Setup and User Guide - Qlik Compose, May 2022 395

D Supported characters
D Supported characters
To prevent character validation errors, Compose best practice is to only use alphanumeric characters,
underscores and hyphens in table and column names. This is because object naming rules are always
determined by the database type, of which there may be several in a single Compose project.
Setup and User Guide - Qlik Compose, May 2022 396

E Glossary
E Glossary
A
Attribute
In the Compose model, an attribute is a logical representation of a physical
column in a source database (or Landing Zone) table.
Attributes Domain
A list of all the attributes available in the Compose model. You can add, edit and
delete attributes according to your data warehousing needs. The Attributes
Domain also shows you which entities each attribute is used in, as a single
attribute may be used in several entities.
C
Change Tables
Change Tables are created in the Landing Zone when the Replicate task is defined
as Full Load and Store Changes or Store Changes only. When the Store Changes
replication option is enabled in the Replicate task, any changes to the source
tables will be replicated to the Change Tables in the Landing Zone. The Change
Table name format comprises the original table name appended with a "__ct".
E
Entity
In the Compose model, an entity is a logical representation of a physical source
database/Landing Zone table or view.
ETL Task
In a project, the following ETL tasks can be run: - An ETL task that extracts data
from the Landing Zone, performs user-defined transformations on the data, and
loads it into the data warehouse tables. - An ETL task that extracts data from the
data warehouse, performs user-defined transformations on the data, and loads it
into the data mart tables. Depending on the ETL task type and specific settings
within Compose, only changes to the existing data will be populated or all of the
data (regardless of whether any changes were made to the source).
Setup and User Guide - Qlik Compose, May 2022 397

E Glossary
F
Full Load
A Full Load replication task is a Replicate task that replicates all of the selected
source tables to the Landing Zone and populates them with data from the source
database. When you duplicate an existing data warehouse ETL, you can set the
ETL type to Full Load and Change Tables (i.e. initially extract all the data from the
Landing Zone tables and then only the changes), Full Load Only (i.e. extract all
the data from the Landing Zone tables) or Change Tables Only (i.e. extract only
the changes to the Landing Zone tables).
H
History
Model attributes (and their corresponding data warehouse columns) can either be
defined as history Type 1 or history Type 2. When an attribute is defined as history
type 1, no history of the data is kept since old data will always be overwritten
with new data. When an attribute is defined as history Type 2, a new record is
added each time the record is updated. This is especially useful for Slowly
Changing Dimensions (SCDs). For example, defining the Address attribute in the
Customers table as Type 2 would enable you to retrieve data based on the
customer’s location during a certain time period. Attributes defined as history
Type 1 will always exist in hub tables whereas attributes defined as history Type 2
will always exist in satellite tables.
Hub
A table in the data warehouse containing history Type 1 columns. When a column
is defined as history type 1, no history of the data is kept since old data is
overwritten with new data.
I
Incremental loading
The activity of loading only new or updated records from the data warehouse into
the data mart(s), using Full Load formatted data. The input data may include all
of the records (full) or only added and updated records (partial). As opposed to
CDC, incremental loading does not indicate wether the change is an UPDATE,
INSERT, or DELETE.
Setup and User Guide - Qlik Compose, May 2022 398

E Glossary
L
Landing Zone
The area in the data warehouse to which the source tables are replicated. This is
also the target endpoint in a Replicate task.
Lineage
A visual representation of the data flow of a particular table or column from its
source to its current location. Before editing an entity or attribute, you may want
to see which other entities/attributes or tables/columns will be impacted by the
change. For example, removing the "Discount" attribute from a table will affect
the "Total Price". Additionally, a single attribute may have multiple names
depending on its location.
M
Model
The business information model of an enterprise. Usually an ERD (Entity-
Relationship Diagram), the model should contain all of the information needed to
create the data warehouse. Models can be imported from ERwin or generated
automatically by discovering (otherwise known as reverse engineering) the source
database or Landing Zone.
R
Relationship
Similar to a foreign key, a relationship "attribute" is a special type of attribute
that points to another entity in the same model.
S
Satellite
A table in the data warehouse containing history Type 2 columns. When a column
is defined as history type 1, a new record is added whenever a record is updated
(instead the existing record being overwritten). Satellite tables also contain two
additional columns: FD (From Date) and TD (To Date). For old records, these
columns show the dates between which a particular record was current (i.e.
before a new record rendered it obsolete). The TD column will only contain a date
Setup and User Guide - Qlik Compose, May 2022 399

E Glossary
if the record has been succeeded by a newer record. In Compose, you can set a
satellite number (1 and above) for attributes in the model. This is a good way of
ensuring that similar attributes (or columns in the data warehouse) appear in the
same satellite table. For example, setting the same satellite number for the
"Total" and "Discount" attributes ensures that both attributes will be included in
the same satellite table.
Setup and User Guide - Qlik Compose, May 2022 400
